Aviatrix UserVPN Design for Multi-Accounts and Multi-VPC/VNets
This reference design helps you build an end-to-end secure cloud network, from users accessing the network (AWS VPC, Azure VNet, or GCP VPC) to routing packets among the VPC/VNets, such that once a user is connected via VPN, they can access any private resources in the cloud no matter where that resource is.
There are three use cases covered, from simple to more complex. You can decide which one suits you or combine parts from different ones to create a network that meet your requirements. You can easily build a full-mesh network.
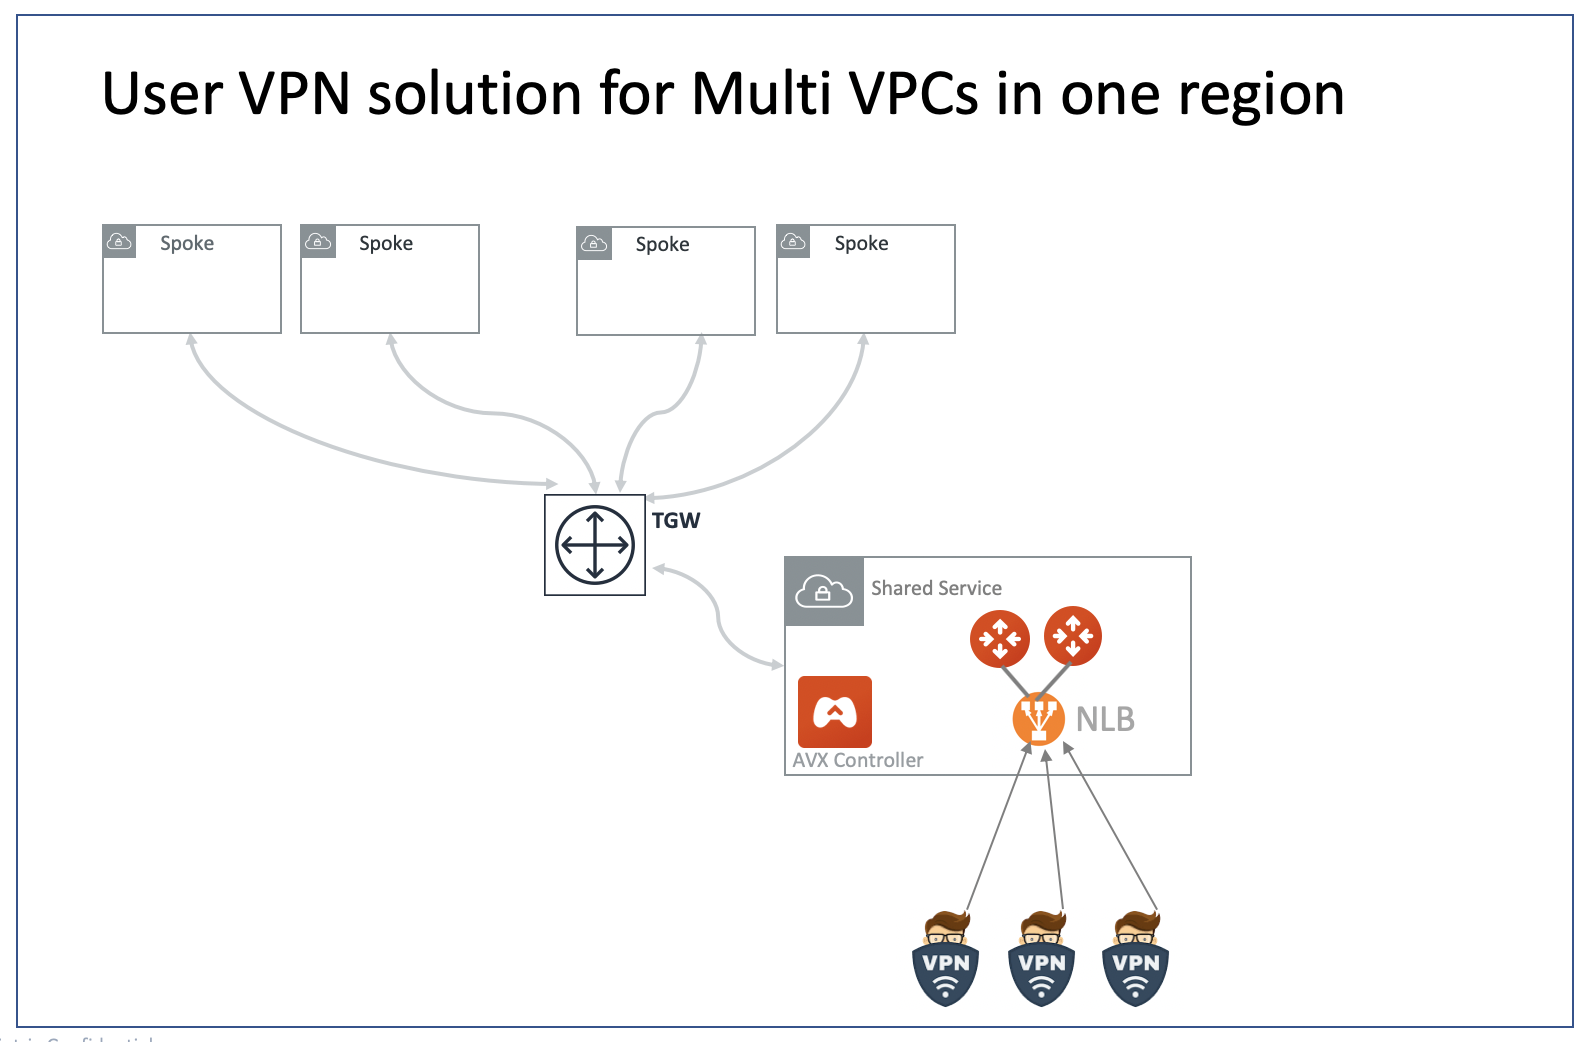
Multiple VPC/VNets in One Region
The network shown below has all VPC/VNets in the same region. The Aviatrix Platform instance can be in the same VPC/VNet or a different VPC/VNet.
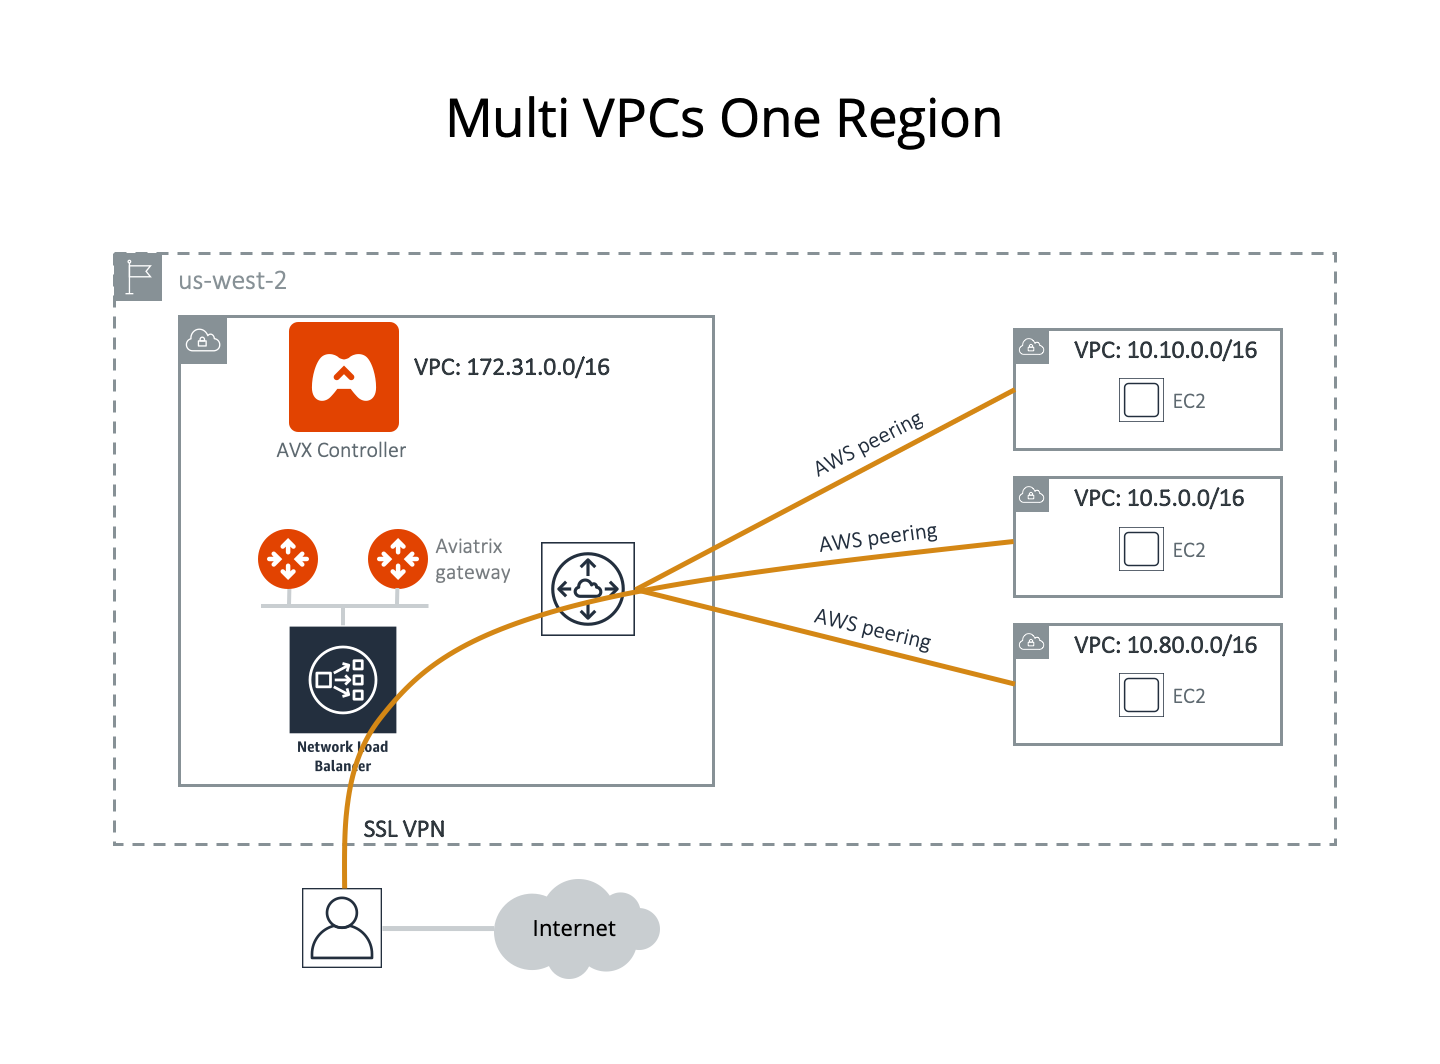
This example assumes that you have created four VPC/VNets in the same region (us-west-2 in this case). You would like to use the VPC/VNet with CIDR 172.31.0.0/16 to host gateways where users connect to. After a user connects to this VPC/VNet via SSL VPN, they should be able to access any instances in the other VPC/VNets as long as their profile allows, without having to connect to each VPC/VNet with SSL VPN.
Another requirement is split tunnel mode. That is, only traffic destined to the cloud goes through the SSL tunnel. If a user does general browsing on the Internet or watches movies, traffic should be routed via Wi-Fi > ISP > Internet so that you do not have to pay the additional cost.
Configuration Workflow
| Hover your cursor over the fields to see their definitions. Do a software upgrade if an upgrade alert message appears on your dashboard page. |
The description in the steps below provides critical fields you need to select; it may not include all fields. Make sure you have the correct VPC/VNet ID and its region for the VPC/VNet ID field and region in each step.
-
Create a VPN Gateway in VPC 172.31.0.0/16.
-
Repeat Step 1 to create more gateways with VPN enabled. Note that each gateway must have a different VPN CIDR Block and name. You may select different AZs for the Public Subnet field.
-
In CoPilot go to Networking > Connectivity > Native Peering.
-
Click + Native Peering.
-
For VPC/VNet 1, select the Account Name, Region, and VPC ID of one of the gateways created.
-
Do the same for VPC/VNet 2.
-
Click Save.
-
Repeat the above steps as many times as necessary for the gateways you created.
-
-
Add Users and Profiles.
-
Go to Cloud Fabric > UserVPN > select the Profiles tab to create as many profiles as needed. The target field can be FQDN (DNS names or fully qualified domain name).
-
Go to Cloud Fabric > UserVPN > select the Users tab to add more users. Associate each user with a profile. Note that if no profile is associated, the user has full access to all resources. When a user is added to the database, an email with a .ovpn file or .onc (for Chromebooks) will be sent to the user with detailed instructions.
-
-
Launch VPN connections from remote users to VPC/VNet1 (172.31.0.0/16). Once the SSL VPN connection is established, this VPN user should be able to reach all instances (in all VPC/VNets) to which they have access permission.
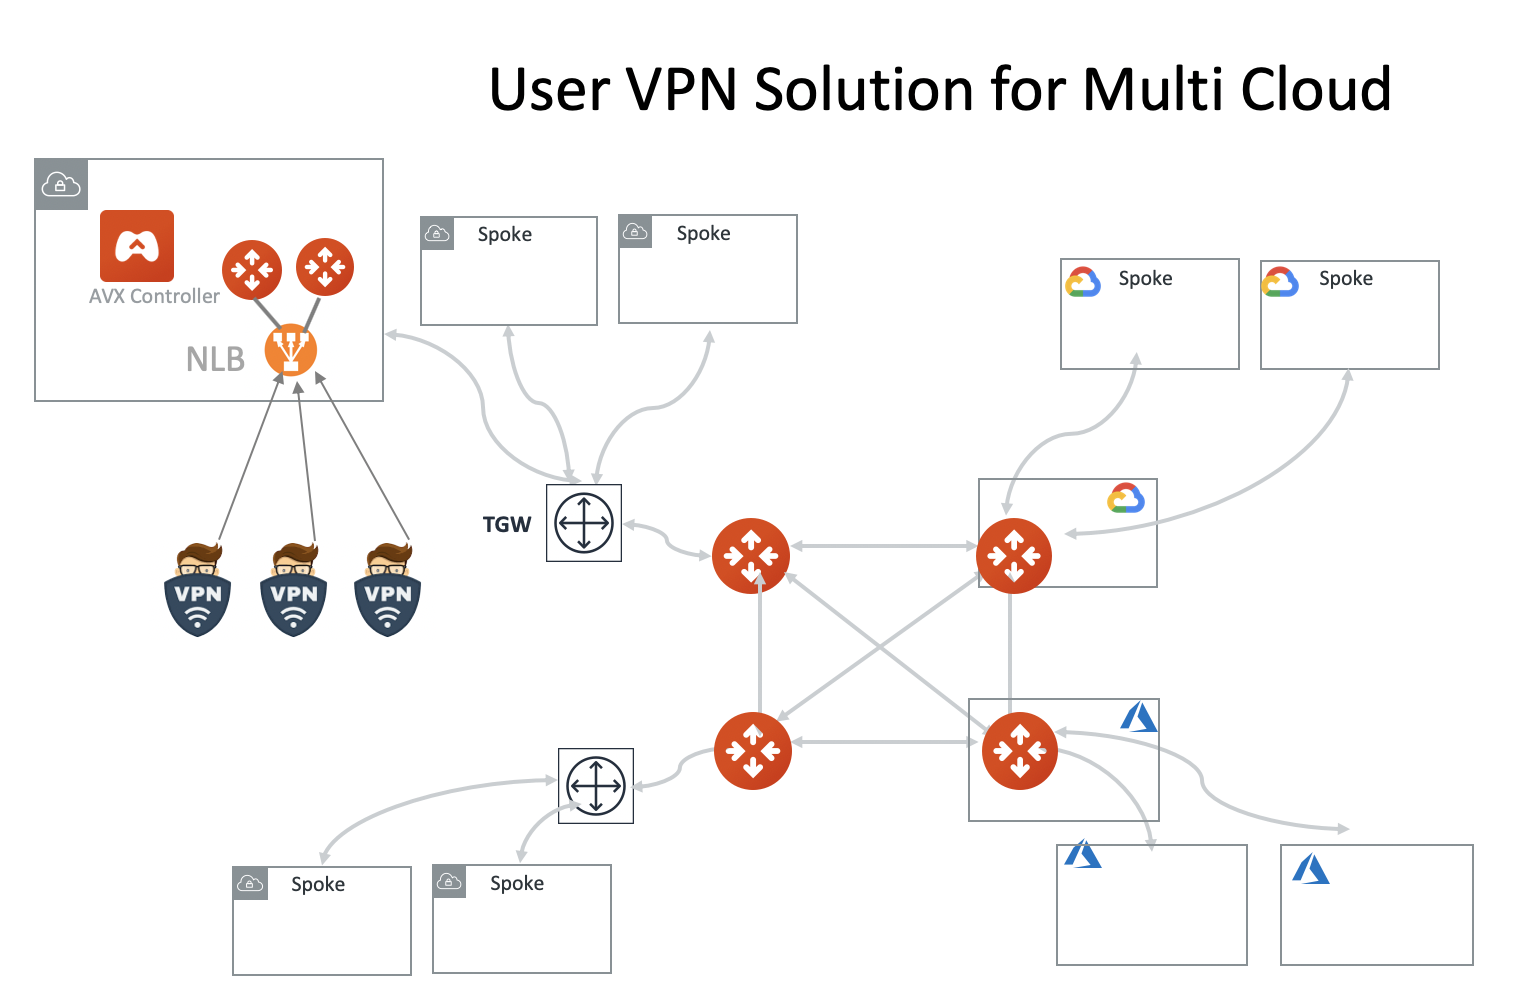
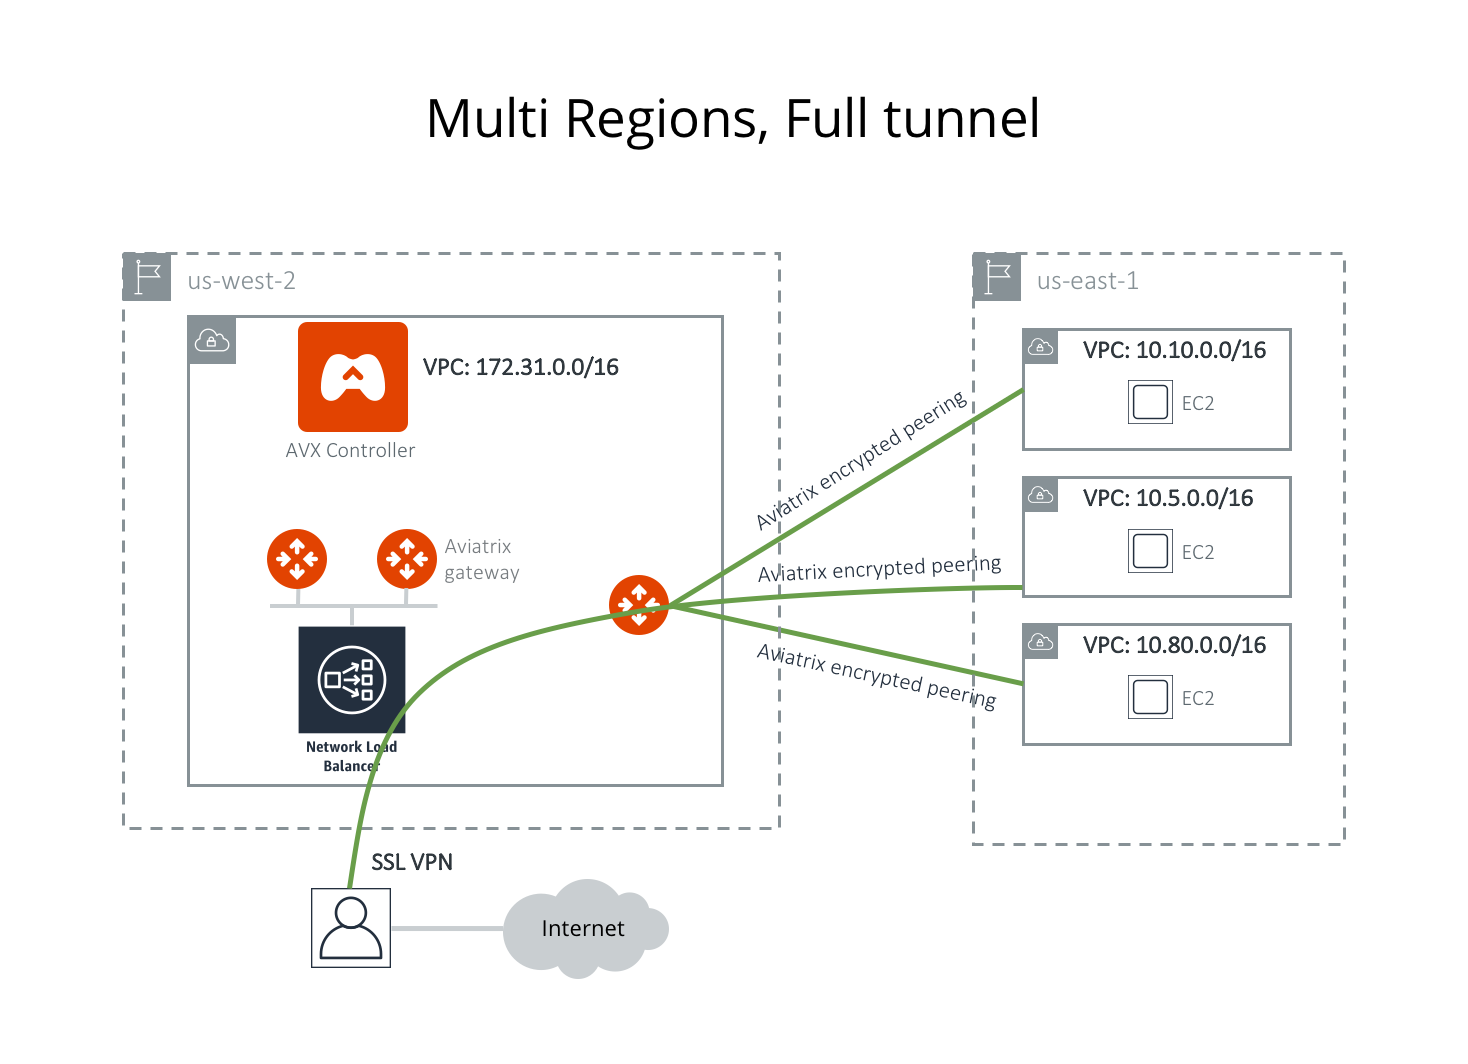
Multiple VPC/VNets in Multi-Regions, Split Tunnel
The network shown below has VPC/VNets in different regions. The Aviatrix Platform instance can be in the same or a different VPC/VNet.

In this example, Aviatrix encrypted peering is used for connecting to remote VPCs. You can also use AWS peering/Azure peering to accomplish the task.
Assume you have created four VPC/VNets. You would like to use the VPC/VNet with CIDR 172.31.0.0/16 in us-west-2 to host gateways where users connect to. After a user connects to this VPC/VNet via SSL VPN, they should be able to access any instances in the other VPC/VNets as long as their profile allows, without having to connect to each VPC/VNet with SSL VPN.
Another requirement is split tunnel mode. That is, only traffic originating from the user and destined to resources in VPC/VNets is routed through the SSL VPN tunnel. The traffic to the Internet will be routed through ISP instead of SSL VPN tunnel.
Configuration Workflow
| Hover your cursor over the fields to see their definitions. The description in each step does not include all fields. Make sure you have the correct VPC/VNet ID and its region for the VPC ID field and region in each step. |
-
Create a VPN Gateway in VPC 172.31.0.0/16, keeping in mind the following:
-
Select Split Tunnel mode.
-
For the Additional CIDRs field under Split Tunnel, enter any other VPC/VNet or any network CIDRs you want to reach beyond the VPC/VNet you are connecting to.
In the example shown, you should enter 10.10.0.0/16,10.5.0.0/16, 10.80.0.0/16. It is a good idea to do some planning to include future VPC/VNets or network address ranges.
In a case where you never have to worry about connecting to your corporate VPN, you may consider entering the entire private network address range in the Additional CIDRs range field, separated by commas: 172.16.0.0/12,10.0.0.0/8,192.168.0.0/16. Doing so means you do not have to reconfigure the gateway if you need to add more VPC/VNets for networking with different CIDR ranges in the future. -
(Optional) If you want to use a private DNS name to access the instance, you can use the Nameservers and Search Domain fields under Split Tunnel. Enter your private DNS name and search domain.
If you use AWS Route 53 private hosted zone and records for your host names, make sure the Nameserver is the DNS server of the VPC/VNet. In this case, you should enter "172.31.0.2".
-
Select ELB in the Load Balancer field.
-
-
Repeat Step 1 to create more VPN gateways. You may select different AZs for the Attach to Subnet field.
-
Build encrypted routing networks to reach other VPC/VNets.
-
Launch a gateway without VPN capability in VPC/VNet 172.31.0.0/16. This is the routing gateway. Make sure NAT is NOT enabled (since step 1 has enabled NAT function for this VPC/VNet).
-
-
Repeat step 3 for VPC/VNet 10.10.0.0/16, 10.5.0.0/16 and 10.80.0.0/16. Enable NAT for these gateways if you want instances in these 3 VPC/VNets to be able to reach the Internet directly.
-
Connect the VPC/VNets using Spoke-Spoke peering. Note that each VPC/VNet is represented by one or more gateways. Make sure you peer between gateways that do not have VPN capability.
-
(Optional) Set up Stateful Firewall Rules at the VPC/VNet level.
-
Select the gateway you just created to edit Security Policies to add any policies for each VPC/VNet.
These steps complete the network infrastructure setup.
-
Add Users and Profiles.
-
Go to Cloud Fabric > UserVPN > select the Profiles tab to create as many profiles as needed. The target field can be FQDN (DNS names or fully qualified domain name).
-
Go to Cloud Fabric > UserVPN > select the Users tab to add as many users as needed. Associate each user with a profile. Note that if no profile is associated, the user has full access to all resources. When a user is added to the database, an email with an .ovpn file or .onc (for Chromebooks) will be sent to the user with detailed instructions.
-
Multiple VPC/VNets in Multi Regions / Full Tunnel / Your Own Firewall
The network shown below has VPC/VNets are in different regions. The Aviatrix Platform instance can be in the same or a different VPC/VNet.
Assume the following:
-
Four VPC/VNets have been created.
-
You would like to use the VPC/VNet with CIDR 172.31.0.0/16 in us-west-2 to host gateways where users connect to.
-
Full tunnel mode: that is, all traffic originated from the user is routed through SSL VPN. Your organization is required to run its own firewall function for any Internet-bound traffic.
After a user connects to this VPC/VNet via SSL VPN, they should be able to access any instances in the other VPC/VNets as long as their profile allows, without having to connect to each VPC/VNet with SSL VPN.
Configuration Workflow
| Hover your cursor over the fields to see their definitions. The description in each step does not include all fields. Make sure you have the correct VPC/VNet ID and its region for the VPC/VNet ID field and region in each step. |
-
Create a VPN Gateway in VPC/VNet 172.31.0.0/16.
-
The VPN CIDR must be a subnet that is outside your current VPC/VNet CIDR range and your laptop or device subnet range. In the example above, you may enter 192.168.2.0/24.
-
Turn Off Split Tunnel.
-
Select ELB from the Load Balancer field.
-
Enable Policy-Based Routing (PBR).
-
The PBR Subnet must be a subnet that is in the same AZ as the primary subnet (Public Subnet where the gateway is launched). Enter the AWS subnet default gateway for PBR Default Gateway field. For example, if PBR Subnet is 172.31.48.0/20, the default Gateway field is 172.31.48.1.
-
(optionally) you can enable NAT Translation Logging to log every user’s activity to every server and site. This is useful for auditing and compliance.
-
-
-
Repeat Step 1 to create more gateways with VPN enabled. You may select different AZs for the Public Subnet field.
-
(Optional) If you have your own routing network to route between the VPCs and one of your own backbone routers can route traffic to your own firewall for Internet-bound traffic, you can skip this step and the next two steps (step 4 and 5).
-
Launch a gateway (not a VPN gateway) in VPC 172.31.0.0/16. Since this is the routing gateway, make sure that NAT is not enabled for this gateway.
-
(Optional) Repeat step 3 for VPC 10.10.0.0/16, 10.5.0.0/16 and 10.80.0.0/16. Select Enable NAT if you wish the instances in these VPCs to be able to reach Internet directly.
-
(Optional) Connect the VPC/VNets using Spoke-Spoke peering. Note that each VPC/VNet is represented by one or more gateways. Make sure you peer between gateways that do not have VPN capability.
The steps above complete the network infrastructure setup.
-
Add Users and Profiles.
-
Go to Cloud Fabric > UserVPN > select the Profiles tab to create as many profiles as needed. The target field can be FQDN (DNS names or fully qualified domain name).
-
Go to Cloud Fabric > UserVPN > select the Users tab to add as many users as needed. Associate each user with a profile. If no profile is associated, the user has full access to all resources. When a user is added to the database, an email with a .ovpn file or .onc (for Chromebooks) will be sent to the user with detailed instructions.
Alternatively, you can download the .ovpn file directly.
-