Overview of AWS Transit Gateway Orchestrator Features
The Aviatrix CoPilot > Networking > Connectivity > AWS TGW tab provides a list of AWS Transit Gateways. Select any AWS TGW on this page to review and create Attachments, Network Domains, Connection Policies, TGW Routes, or Approvals for any AWS TGW.
For background information, refer to the TGW Orchestrator FAQ.
On this page, you can:
-
Create an AWS TGW.
-
Edit audit settings.
-
Create AWS TGW attachments, including attachments to Transit Gateways, VPCs, VPNs, Direct Connects, AWS TGW Peerings, and TGW Connections.
-
Create TGW-based Network Domains.
-
Review connection policies.
-
Review TGW Routes.
-
Review TGW Approvals.
Creating an AWS TGW
To use the AWS TGW (Transit Gateway) feature, you must first create an AWS Transit Gateway.
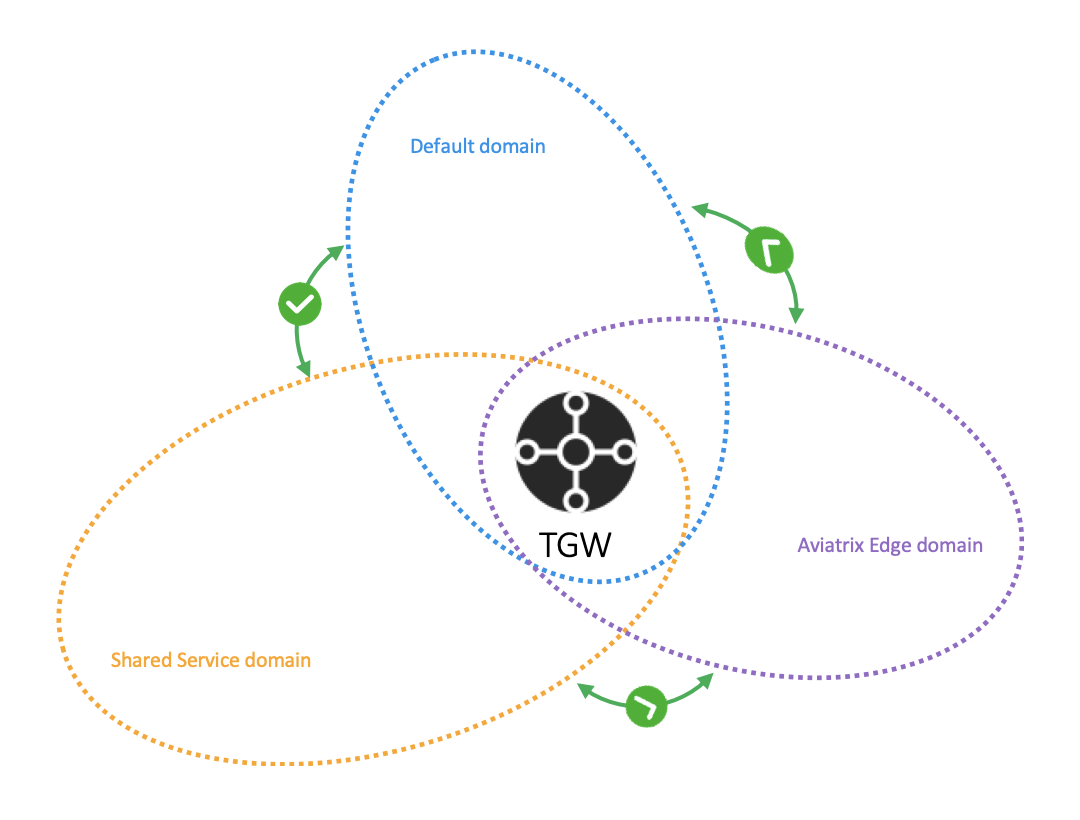
This step creates an AWS Transit Gateway in a specified region with a specified AWS account. Aviatrix CoPilot also automatically creates the Default_Domain, the Shared_Service_Domain and the Aviatrix_Edge_Domain and the corresponding AWS Transit Gateway route tables.
The three domains are connected. If you attach a VPC to the Default Domain or Shared Service Domain, the VPCs can communicate with each other and can access on-prem environments through the Aviatrix Edge Domain.
The three domains are connected, implying that if you attach a VPC to the Default Domain or Shared Service Domain, the VPCs can communicate with each other and can access on-prem through the Aviatrix Edge Domain.
To create an AWS Transit Gateway:
-
Go to Aviatrix CoPilot > Networking > Connectivity > select the AWS TGW tab.
-
Click + AWS TGW.
| Setting | Value |
|---|---|
Account Name |
An Aviatrix account that corresponds to an IAM role or account in AWS. |
Region |
One of the AWS regions. |
TGW Name |
The name of the AWS Transit Gateway. |
AWS Side AS Number |
TGW ASN number. The default AS number is 64512. |
Advanced Settings |
|
FireNet Inspection Mode |
Select either mode:
|
TGW CIDR(s) |
Enter the TGW CIDR ranges. |
Click Save.
The AWS TGW is created. If for some reason it was not created, you can go to Monitor > Notifications > Tasks and check what errors occurred during creation.
Audit Settings
To edit audit settings:
-
Go to Aviatrix CoPilot > Networking > Connectivity > AWS TGW tab.
-
Click Audit Settings.
-
Turn the Auto Edit (Every Night) setting on to set up an audit every night.
This setting is Off by default. When it is Off, only manual auditing occurs.
-
Click Save.
Your edits are saved.
Attachments tab
The Attachments tab lists the TGW attachments. To review attachments:
-
Go to Aviatrix CoPilot > Networking > Connectivity > select the AWS TGW tab > select an existing AWS TGW.
-
Select the Attachments tab.
Use the tabs under Attachments to review and create attachments to:
Network Domains tab
The Network Domains tab displays the TGW route table entries. You can also add an AWS TGW network domain here.
Creating an AWS TGW Network Domain
To create network domains in an AWS TGW:
-
Go to Networking > Connectivity > AWS TGW.
-
Click on an existing AWS TGW and go to the Network Domains tab.
-
Click + Network Domain.
-
Enter a name for the network domain.
-
Select the network domain type:
-
User Domain
-
Aviatrix Firewall Domain: Select if this domain will be used in a Transit FireNet configuration. You can then select a previously created AWS TGW FireNet (optional).
If you select an AWS TGW FireNet, it must be in the same region as the AWS TGW (for example, us-east-1). -
Native Firewall Domain: Select if this domain will be used for non-Aviatrix Transit FireNet based firewall traffic inspection (only supports an active-standby firewall deployment).
-
Native Egress Domain: Select if this domain will be used for non-Aviatrix Transit FireNet based Internet-bound traffic (only supports an active-standby firewall deployment).
-
-
Click Save.
If you associate one of the above AWS TGW network domains to the network domain, now any resources (regardless of whether they are AWS TGW or Aviatrix Transit) that share the network domain can communicate with each other. The following is now also possible:
-
AWS TGW native Edge connections can route to Spokes attached to an Aviatrix Transit network.
-
Can peer an AVX Transit to an AWS TGW that is connected to on-prem. The network domains in both of these domains will work across Transit gateway peering and vice versa (but not AWS TGW peering).
-
Any two Aviatrix network domains that are connected are able to route to TGW Shared Services (for example, if Transit domain 1 is connected to Transit domain 2, and TGW domain A is associated with Transit domain 1, then TGW domain A can communicate with Spoke gateways in Transit domain 2).
-
TGW domains associated with any two connected Aviatrix network domains can communicate with each other (as long as they are not in the same TGW).
VPCs in the same AWS TGW but in different domains cannot communicate with each other unless you configure a connection policy.
For a VPC attached to the TGW domains that are connected to an Edge domain, its VPC CIDR is propagated to the main route table of the Transit gateway and its connected Transit/Spoke gateways.
Enabling Intra Domain Inspection
Intra domain inspection allows traffic between AWS TGW VPC/VNets in the same Network Domain to be redirected to a Firewall Domain for inspection before reaching the destination.
By default, traffic between VPCs in the same Network Domain does not get inspected by firewalls in the FireNet deployment.
| You can only enable Intra Domain Inspection if the selected AWS TGW has one of its Firewall Domains selected in an AWS TGW FireNet. |
To enable intra domain inspection:
-
Go to Aviatrix CoPilot > Networking > Connectivity > select the AWS TGW tab > select the AWS TGW > select the Network Domains tab.
-
Find the Shared_Service_Domain in the table and click on the three dots icon in its row. Select Enable Intra Domain Inspection.
-
In the dialog, select a Firewall Domain.
-
Click Enable.
Enabling Egress Inspection
This option applies to connection-based inspection mode. When connection-based inspection is enabled, use this option to enable Egress inspection for a specific domain.
To enable intra domain inspection:
-
Go to Aviatrix CoPilot > Networking > Connectivity > select the AWS TGW tab > select the AWS TGW > select the Network Domains tab.
-
Find the Network Domain in the table and click on the three dots icon in its row. Select Enable Egress Domain Inspection.
Connection Policies tab
To view Connection Policies:
-
Go to Aviatrix CoPilot > Networking > Connectivity > select the AWS TGW tab > select an existing AWS TGW.
-
Select the Connection Policies tab.
-
Use the Network Domain dropdown menu to view all gateways in that domain that are available for connection to this AWS TGW.
Inspecting Inter Region Traffic
The Network Domain associated with each TGW Peering attachment is available for user. The Network Domain has the name peering_<TGW NAME>. For example, for the TGW with name tgw-1, the peering Network Domain is peering_tgw-1.
You can specify a FireNet inspection policy on this Network Domain. When you do so, it implies that any cross-region traffic is inspected.
To connect the peering domain with FireNet Domain:
-
Go to Aviatrix CoPilot > Networking > Connectivity > select the AWS TGW tab > select an existing AWS TGW.
-
Select the Connection Policies tab.
-
Find the Network Domain in the table. In the Connection Policy column, click the toggle switch to enable the connection.
-
Click Commit.
| To avoid double inspections by two FireNet gateways associated with each TGW, configure the connection policy between peering domain and FireNet domain on only one TGW. |
TGW Routes tab
The TGW Routes tab displays the routes in each network domain. To review TGW Routes:
-
Go to Aviatrix CoPilot > Networking > Connectivity > select the AWS TGW tab > select an existing AWS TGW.
-
Select the TGW Routes tab.
-
Click on the Network Domains dropdown menu to select a different domain to review.
Approval tab
TGW Approval
TGW VPN and TGW Direct Connect Gateway (TGW DXGW) dynamically learns BGP routes from remote peer. Aviatrix CoPilot periodically pulls the TGW route table and propagate these routes to Spoke VPCs route table that have connection policy to the VPN.
There are scenarios where you require an approval process before these learned CIDRs propagation take place. For example, a specific TGW VPN may be connected to a partner network and you need to make sure undesirable routes, such as the default route (0.0.0.0/0) are not propagated into your own network and accidentally bring down the network.
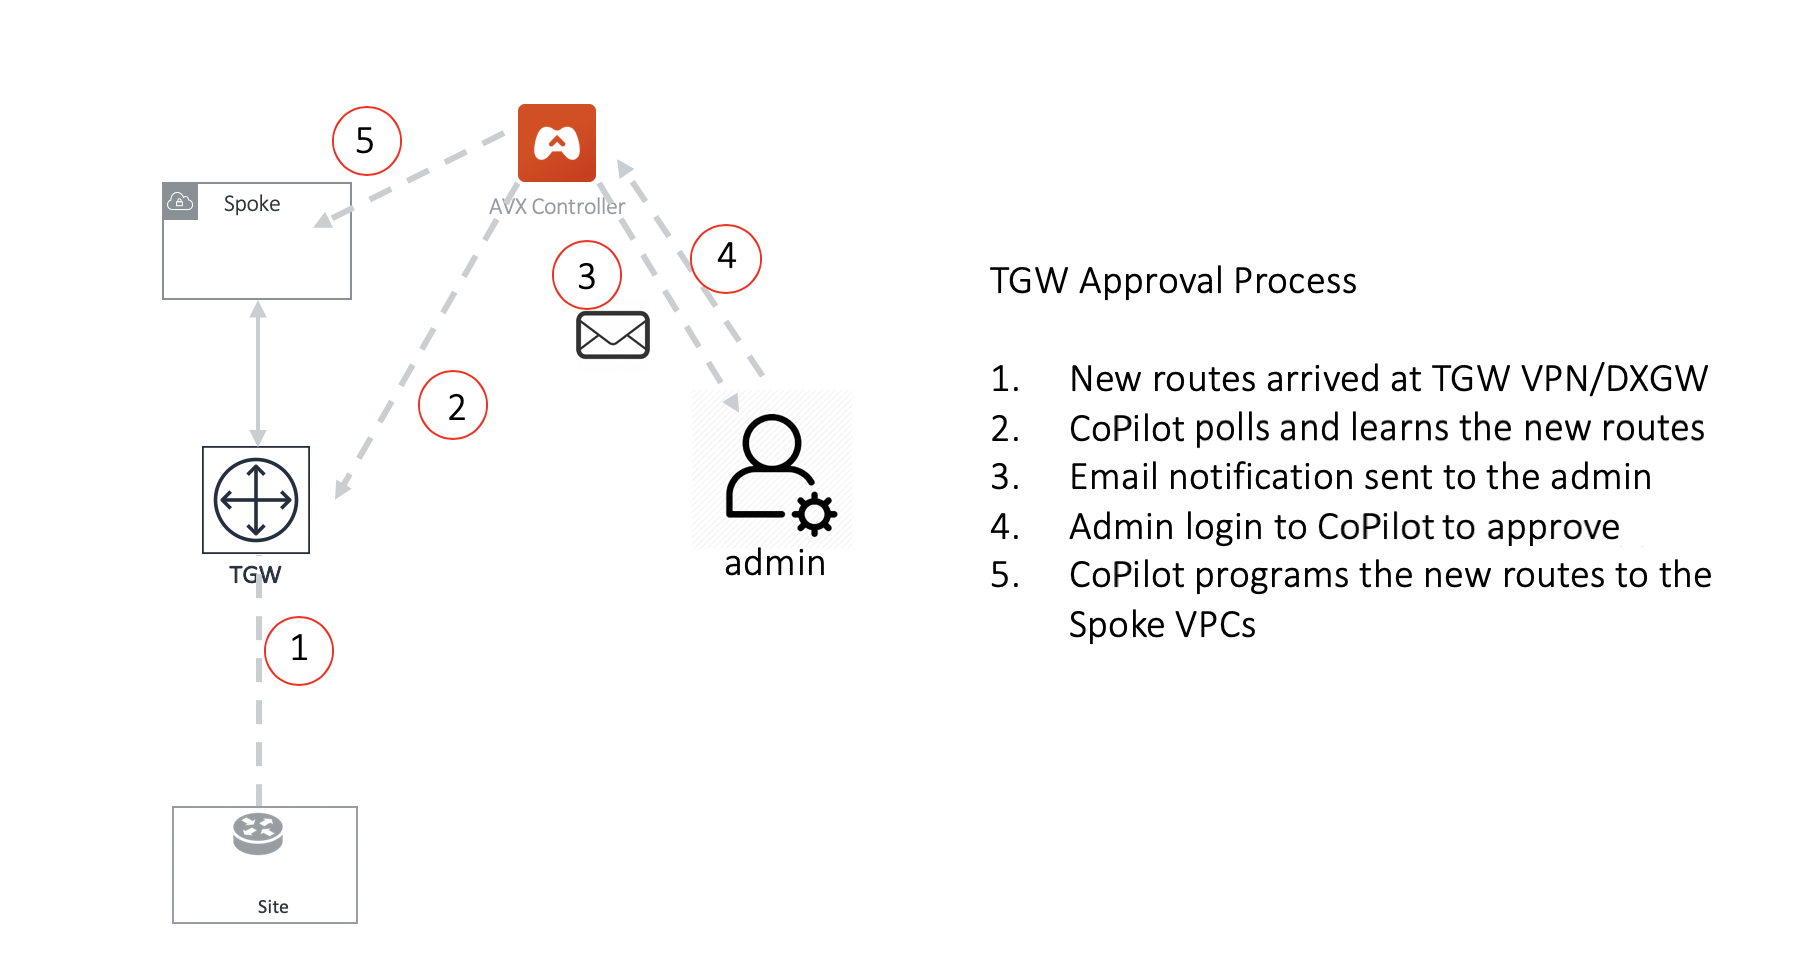
Approval is enabled on per TGW VPN and TGW DXGW bases. When Approval is enabled on a TGW VPN, dynamically learned routes trigger an email to the CoPilot admin.
To review Approvals:
-
Go to Networking > Connectivity > select the AWS TGW tab > select the AWS TGW > select the Approval tab.
-
Click on the AWS TGW Attachment dropdown to select the attachment to review.
-
Make sure Learned CIDR Approval is enabled.
-
All routes appear, both unapproved and already approved.
-
To approve an unapproved route, click Approve in its row. Now, the route can be propagated.
-
To disapprove an approved route, click Remove in its row.
-
How the Approval Feature Works
When Learned CIDR Approval is enabled, TGW route table route propagation to the connected Network Domain is turned off. That is, the TGW VPN/DXGW learned routes are statically programmed into the TGW route table of connected Network Domains after the routes are approved.
This is illustrated in the following two examples.
Example 1: Two TGW VPN/DXGW in the same domain
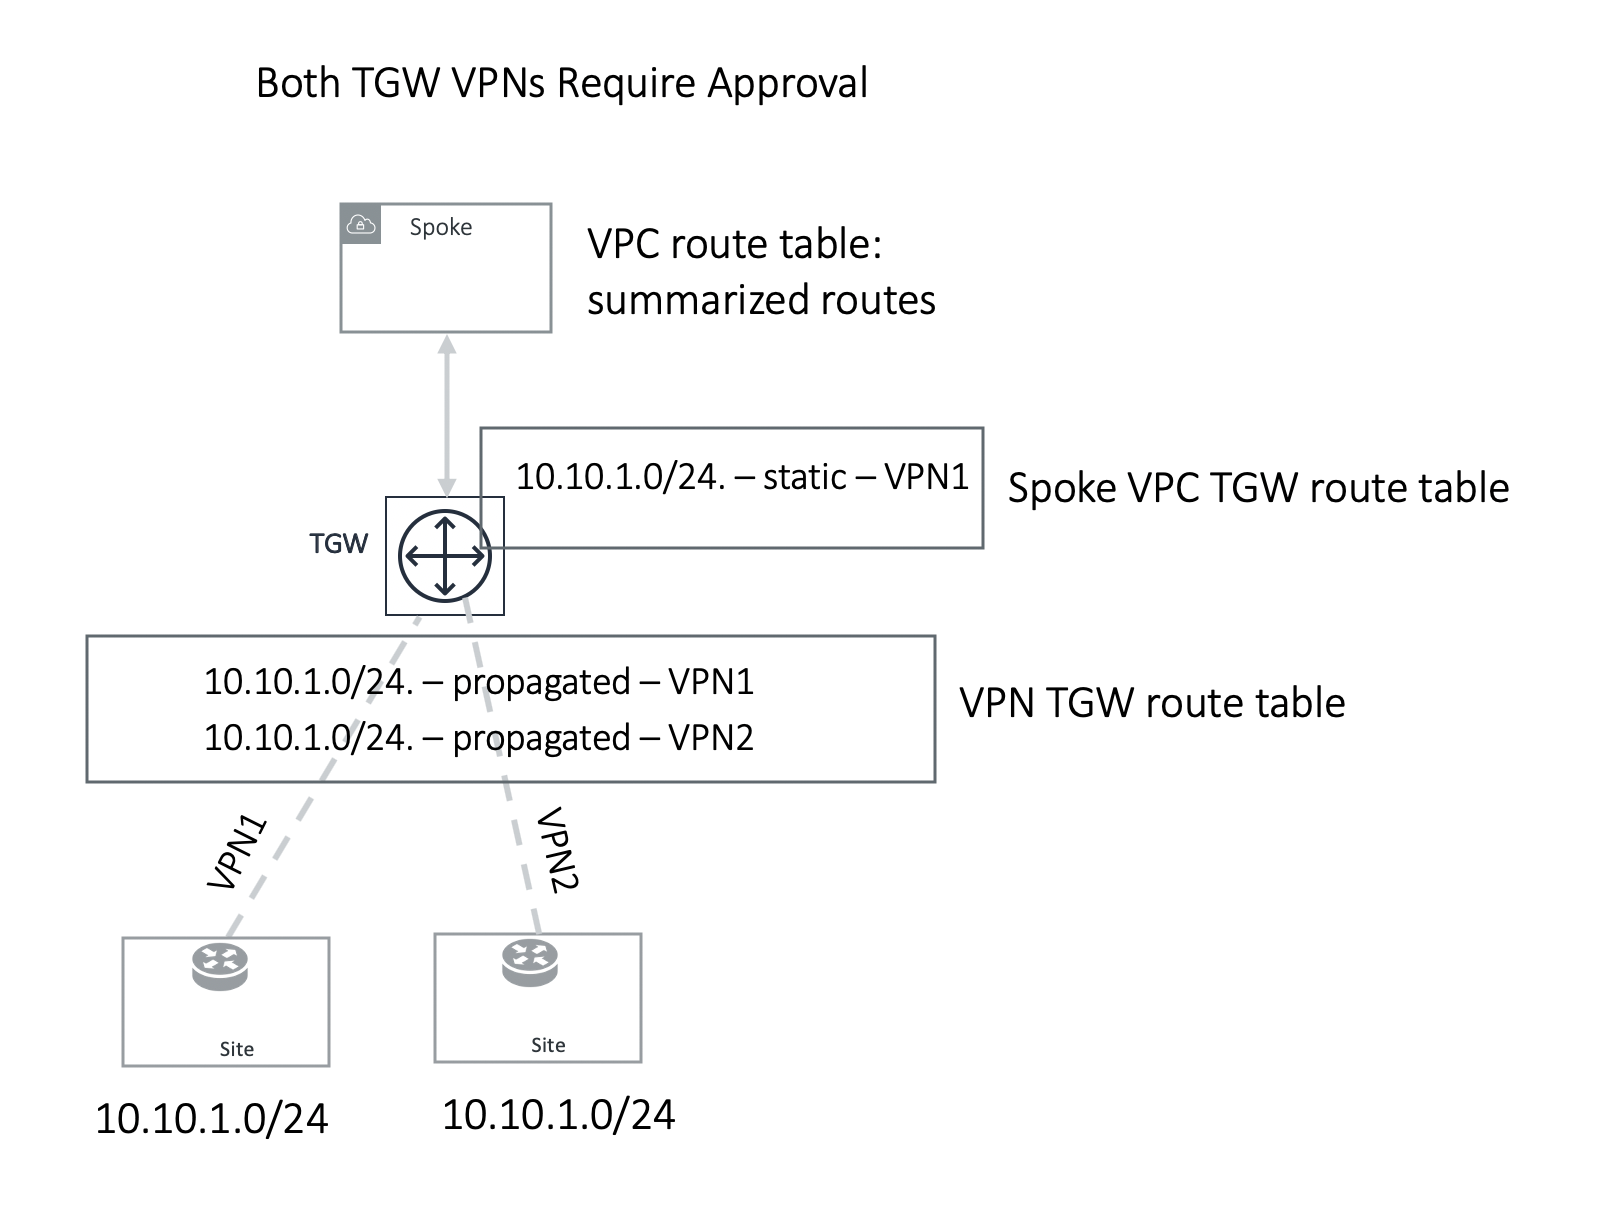
In the example above, two identical VPN CIDRs 10.10.1.0/24 are advertised to two TGW VPNs but are in the same domain. Both have Approval enabled. Whichever VPN attachment learns the CIDR first and is approved, its attachment is programmed into Spoke associated TGW route table, in this case, VPN1 attachment is approved first and is programmed into the Spoke associated TGW route table. VPN2 CIDR should continue to remain in pending list. If VPN1 withdraw route 10.10.1.0/24, you can initiate approval by moving the VPN2 pending CIDR to the approved panel, and this time it should be programmed.
Example 2: One TGW VPN requires approval and another one does not
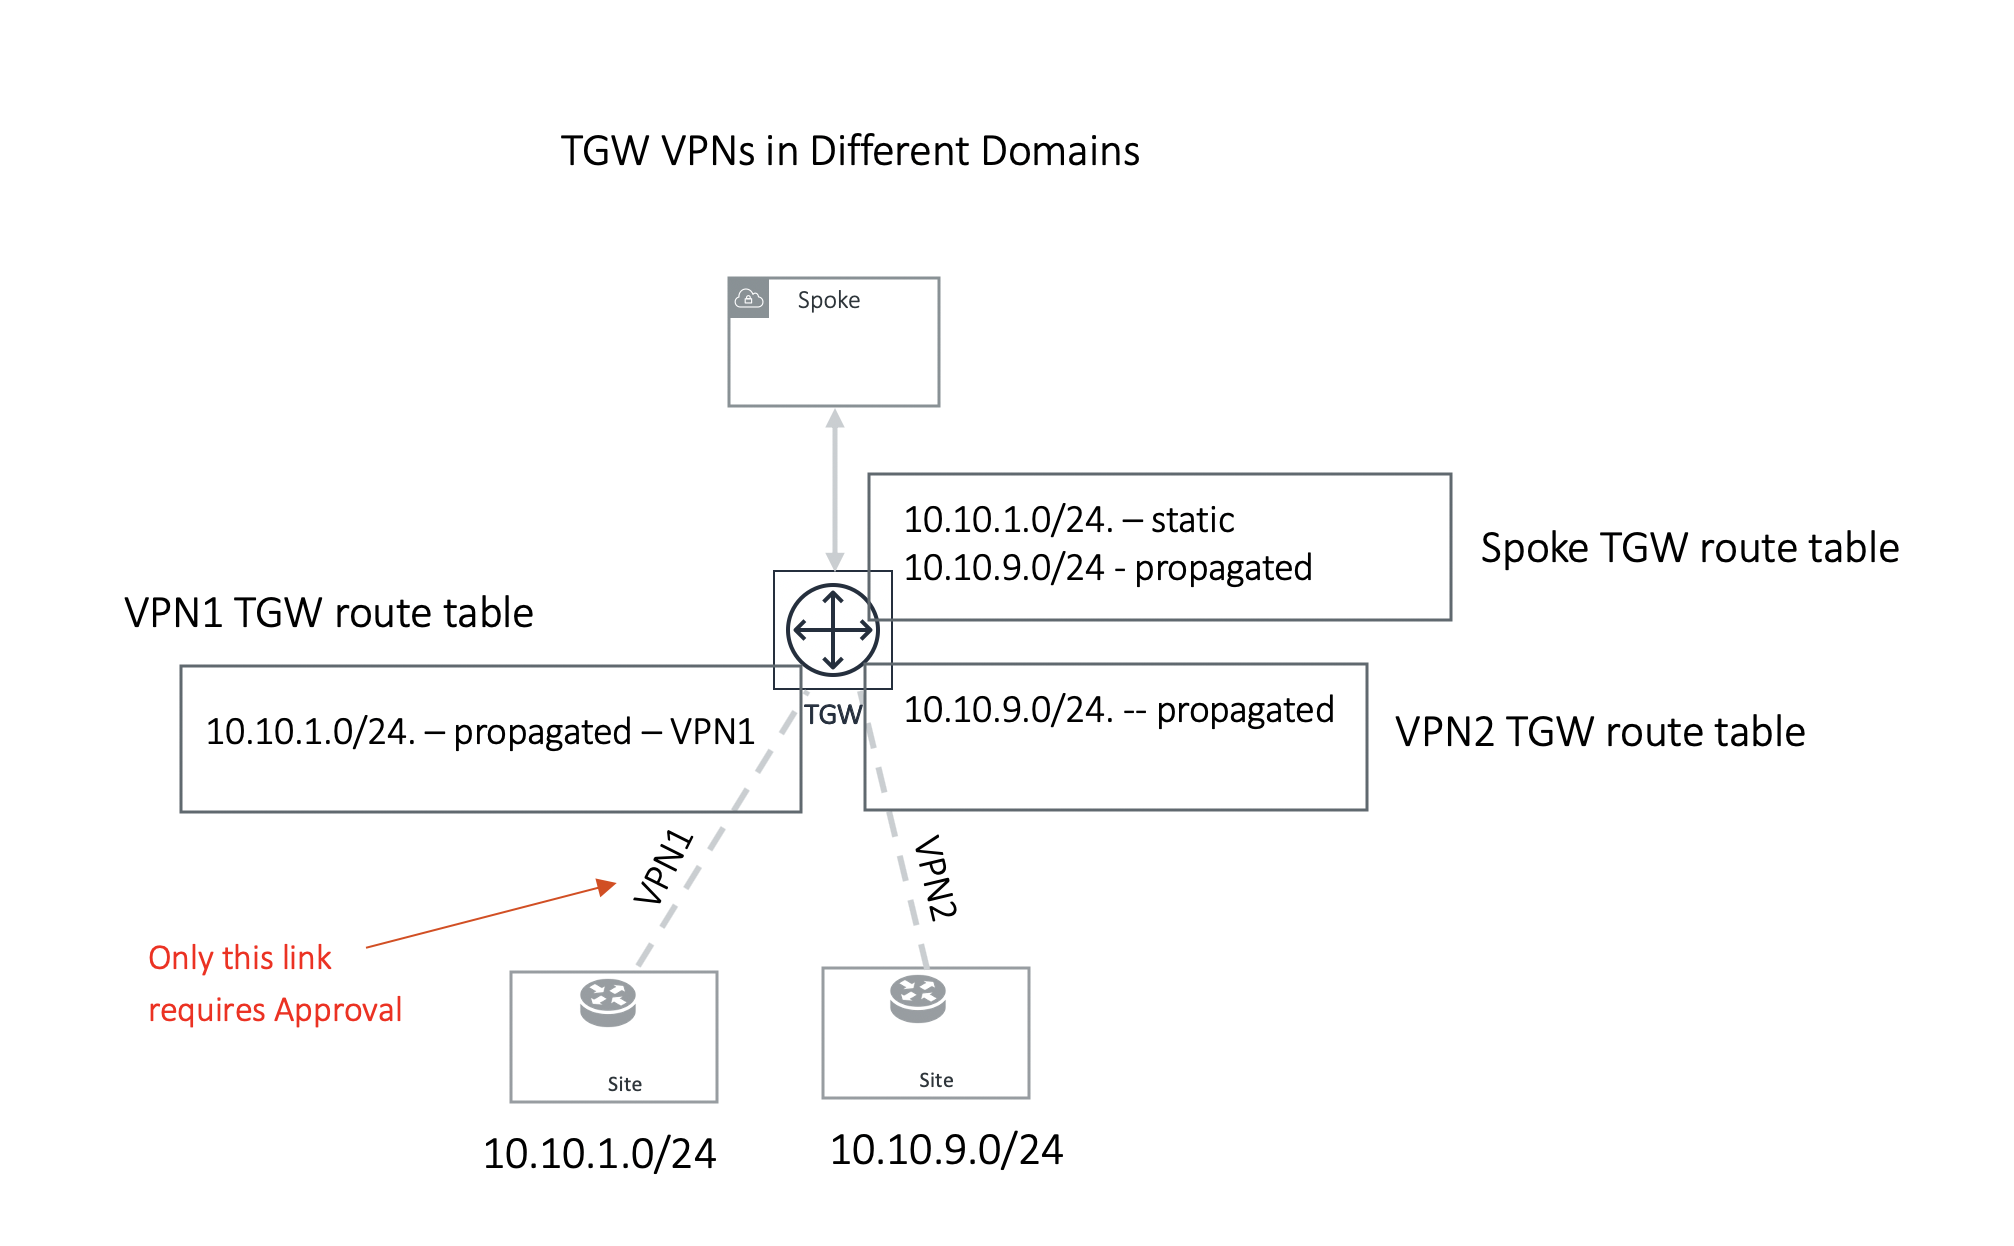
In the second example, TGW VPN2 link 10.10.9.0/24 is in a different domain and does not require approval. Its route is propagated to the Spoke TGW route table, while TGW VPN1 link 10.10.1.0/24 is statically programmed to Spoke TGW route table after approval is initiated by the customer.
Note in the second example, if TGW VPN2 link advertises the same network CIDR 10.10.1.0/24, this CIDR will be propagated first and TGW VPN1 approval request will be rejected and the CIDR 10.10.1.0/24 from TGW VPN1 remains in the approval pending list.