SAML Authentication
Overview
This guide provides an example on how to configure the Aviatrix Controller to authenticate to an IdP. When SAML is used for Controller access authentication, your Aviatrix controller acts as the Identity Service Provider (ISP) that redirects browser traffic from client to IdP (e.g., Okta) for authentication.
The Aviatrix controller SAML login supports multiple SAML endpoints with varying access and utilizing different IdP’s.
For different IdP’s, there will be links to each individual IdP integration.
SAML Configuration Checklist
Before configuring SAML integration between Aviatrix and IdP, make sure the following is completed:
-
The Aviatrix Controller up and running.
-
You have a valid IdP account with admin access.
An IdP refers to an identity provider for SAML. This could be any provider that supports a SAML end point like Okta, OneLogin, and Azure AD. You will require administrator access to create IdP endpoints for SAML. Check IdP-specific SAML Integration to see a list of guides for supported IdP’s.
Configuring SAML Authentication
Follow these steps to configure Aviatrix to authenticate against IdP:
-
Create a temporary Aviatrix SP Endpoint for the Aviatrix controller.
-
Create a SAML IdP App with a specific IdP.
-
Retrieve the IdP Metadata from IdP.
-
Update the Aviatrix SP Endpoint with IdP metadata.
-
Test the Integration set-up.
Create a Temporary Aviatrix SP Endpoint
|
This step is usually completed by the Aviatrix admin. This endpoint will be updated later on in the guide. At this step, we will be using placeholder values. |
Choose an endpoint name for your Aviatrix SAML endpoint which will be
used throughout the guide. This guide will use
aviatrix_saml_controller as an example for the endpoint name.
-
Log in to the Aviatrix Controller.
-
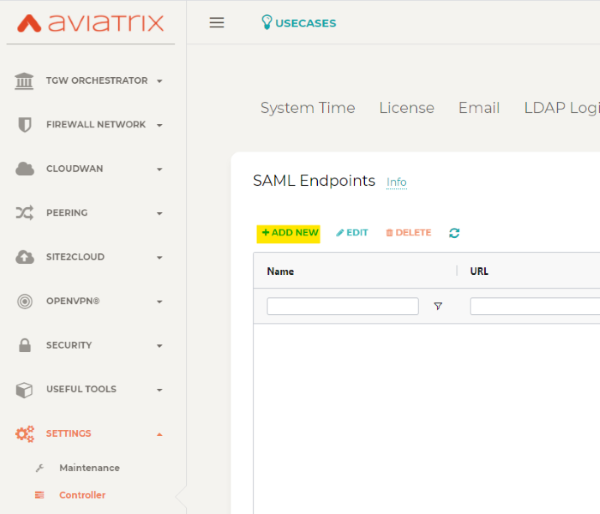
Click Settings in the left navigation menu.
-
Select Controller.
-
Click on the SAML Login tab.
-
Click the +ADD NEW button.
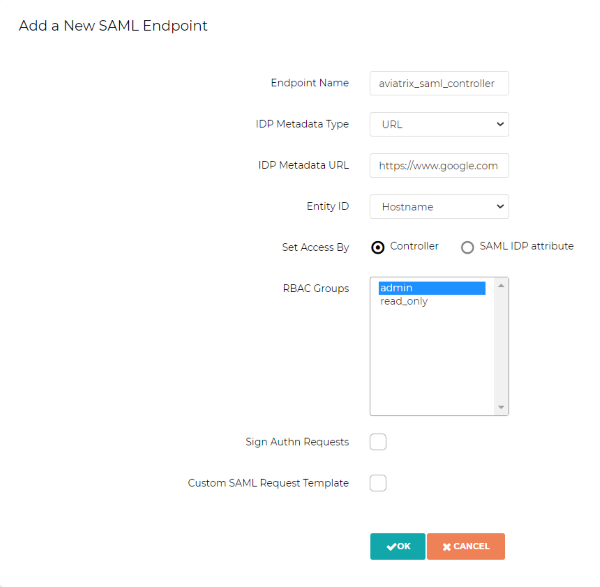
Field Value Endpoint Name
Enter a unique identifier for the service provider
IPD Metadata Type
Text or URL (depending on what was provided by the SAML provider) For now, choose URL
IdP Metadata Text/URL
IdP metadata URL/Text copied from the SAML provider configuration For now, put in a placeholder URL, such as "https://www.google.com"
Entity ID
Select Hostname for now
Access
Select admin or read-only access
Custom SAML Request Template
For now leave blank, depending on your specific IdP, you may have to check this option
|
Each endpoint only supports one type of access. If you need admin and read-only access, create two separate SAML apps. |
-
Click OK.
-
Depending on your IdP provider, you may need to upload SP metadata. After temporary SAML endpoint is created:
-
Click DOWNLOAD SP METADATA button next to the SAML endpoint and save file to your local machine
-
Click SP METADATA button, and copy the SP metadata as text
-
Create a SAML App for Aviatrix with the IdP
|
This step is usually done by the IdP administrator. This section shows only a generalized process for creating a SAML application. |
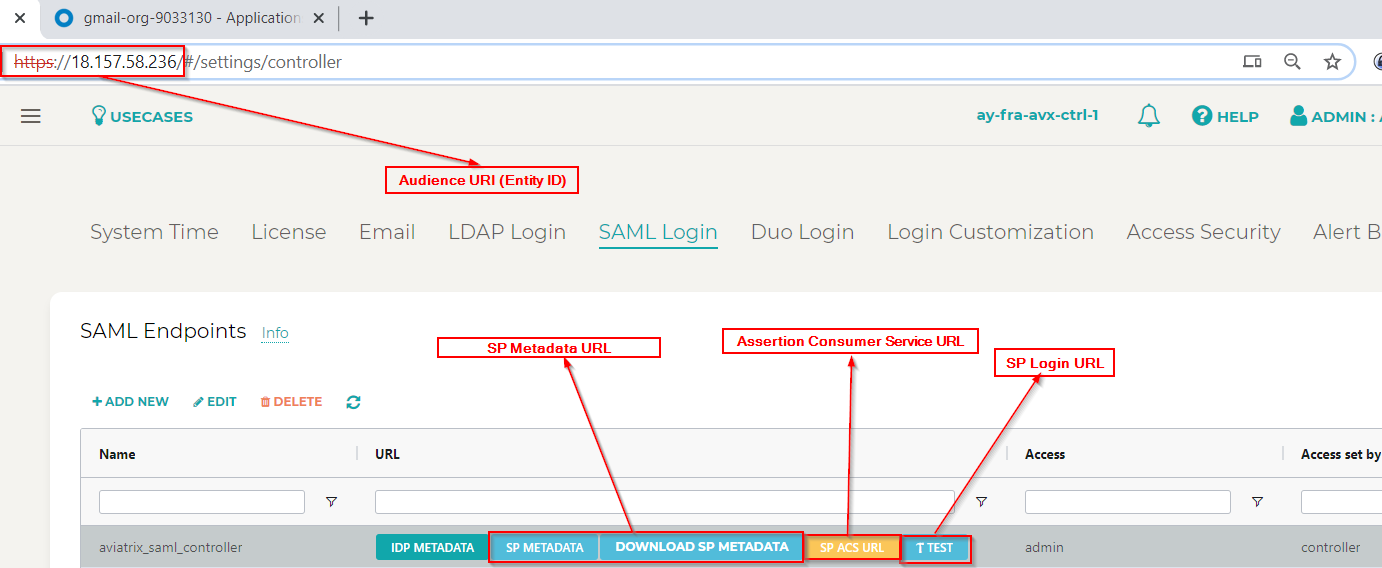
Create a SAML 2.0 app with the IdP Provider with the following values.
-
Assertion Consumer Service URL
-
Audience URI(Entity ID)
-
SP Metadata URL
-
SP Login URL
-
Default RelayState = <empty>
|
You can find these values in the controller under the Settings navigation item. Then, select Controller and go to the SAML Login tab. Click on the button for the respective value, and copy the URL on the new page. RelayState is currently not used by the Aviatrix SP |
The following SAML attributes are expected:
-
FirstName
-
LastName
-
Email (unique identifier for SAML)
|
These values are case-sensitive. |
IdP-specific SAML App Integration
|
You will require administrator access to create IdP endpoints for SAML. |
See the UserVPN Overview to review specific IdPs that were tested to work with Aviatrix SAML integration.
Other tested IdP’s include: VmWare VIDM, ForgeRock’s OpenAM.
Retrieve IdP metadata
After creating the IdP, you need to retrieve IdP Metadata either in URL or text from the IdP application created in the previous step.
-
Azure AD - provides IdP metadata URL and needs a custom SAML request template metadata text from Aviatrix
-
Okta - provides IdP metadata URL
-
OneLogin - provides IdP metadata URL
Update Aviatrix SP Endpoint
|
This step is usually completed by the Aviatrix admin. Take note of the IdP Metadata type along with Text/URL your IdP provides, and if you need a custom SAML request template in the previous section. |
-
Log in to the Aviatrix Controller.
-
Click Settings in the left navigation menu.
-
Select Controller.
-
Click on the SAML Login tab.
-
Select an endpoint and click the Edit button.
Field Value Endpoint Name
Unique name that you chose in the "Create a Temporary Aviatrix SP Endpoint" section above.
IPD Metadata Type
Text or URL (depending on what was provided by the SAML provider)
IdP Metadata Text/URL
IdP metadata URL/Text copied from the SAML provider configuration
Entity ID
Select Hostname or Custom
Custom Entity ID
Only visible if Entity ID is Custom
Access
Select admin or read-only access
Custom SAML Request Template
Depending on your specific IdP, you may have to check this option.
|
Hostname is the default for Entity ID, but if you have other apps using the same hostname, use a custom Entity ID. |
-
Click OK.
Test the Integration
-
Click Settings in the left navigation menu.
-
Select Controller.
-
Click on the SAML Login tab.
-
Click the Test button next to your SAML endpoint name.

-
You should be redirected to IdP. Login with your test user credentials.
|
If everything is configured correctly, after you have authenticated, another window will open with the test user’s access. |
Validate the Integration
-
Log out of the Aviatrix Controller.
-
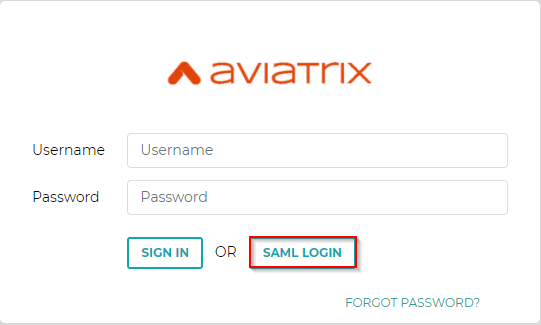
Choose your SAML endpoint name from the dropdown box.
-
Log in to the Aviatrix Controller by clicking the SAML Login button.
-
You should be redirected to IdP. Log in with your test user credentials.
|
If everything is configured correctly, after you have authenticated, you will be redirected to the Controller dashboard. |