Aviatrix Secure Edge on Customer Managed VMware ESXi and KVM Deployment Workflow
This document provides instructions for deploying an Aviatrix Edge Gateway on customer managed VMware ESXi or an open-source Kernal-based Virtual Machine (KVM).
For an overview of Aviatrix Secure Edge, see Aviatrix Secure Edge Overview.
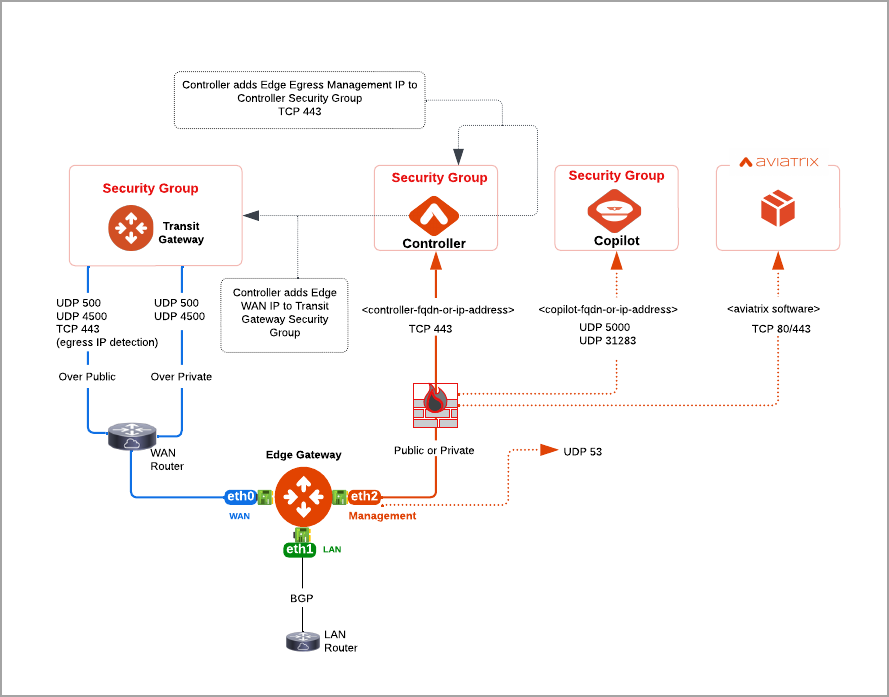
Aviatrix Secure Edge Network Connectivity
The following diagram shows an example of network connectivity for Aviatrix Edge Gateway to Transit Gateway in AWS.
Prerequisites
Before you deploy an Aviatrix Edge Gateway on VMware ESXi or KVM, ensure the prerequisite requirements are complete, see Prerequisites for Aviatrix Secure Edge Deployment on VMware ESXi and KVM.
Aviatrix Secure Edge Deployment Workflow
The diagram below provides a high-level view of the four-step process for deploying Aviatrix Secure Edge in Aviatrix Controller. You have the option to use either VMware ESXi or an open-source Kernel-based Virtual Machine (KVM) to deploy the Aviatrix Secure Edge VM and attach the ISO file. The ISO file is the equivalent of the Zero-Touch Provisioning (ZTP) token. ZTP allows network engineers to remotely deploy and provision network devices at remote locations.
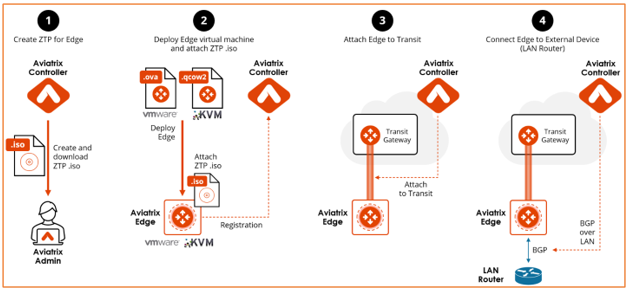
This workflow provides steps to create a primary and secondary Edge Gateway in VMware ESXi and KVM, attach the Edge Gateways to a Transit Gateway, and connect the Edge Gateways to an external device.
Creating the ZTP ISO for the Edge Gateway (Self-Managed Platform)
|
You must have port 443 open to the IP address of the Aviatrix Controller. For the required port access for Edge Gateway deployment, refer to Aviatrix Edge Gateway Ports and Protocols. |
In Aviatrix CoPilot:
-
Go to Cloud Fabric > Edge > Gateways tab.
-
Click + Edge Gateway.
Provide the following information.
Parameter
Description
Name
Name for the Edge Gateway.
Platform
Select edge_admin.
Site
Select an existing name or enter a new name to identify the edge location.
Site names cannot contain spaces.
ZTP File Type
Select the ZTP file type.
-
For VMware ESXi, select iso.
-
For KVM, select iso or cloud-init.
High Availability
High Availability is set to Off for the primary Edge Gateway.
For the secondary (HA) Edge Gateways, select Active-Active or Active-Standby mode.
Deploying multiple Edge Gateways for the same site is supported. A maximum of 8 Edge Gateways are supported.
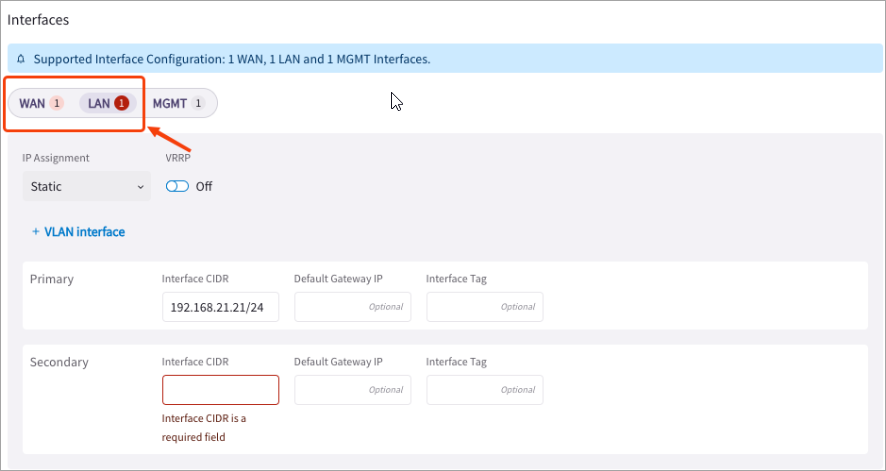
In the Interfaces section, configure the WAN, LAN, and Management interfaces for the Edge Gateway.
WAN Interface
Click WAN, then provide the following information.
For IP and DNS settings, enter using the applicable format. For example, if the Edge Gateway’s WAN IP is 10.1.1.151, enter 10.1.1.151/24 or what your netmask is. Parameter Description IP Assignment
The default is Static for static IP assignment.
DHCP for dynamic IP address assignment is not supported.
Interface Labels
(optional) A name to identify the WAN interface.
Interface CIDR
The CIDR for the WAN interface.
Default Gateway IP
The Default Gateway IP address for the WAN interface.
Public IP
(optional) The Public IP address of the WAN interface.
To change or update the Edge Gateway WAN connectivity to Transit Gateway, you will need to first detach the Edge-to-Transit gateway attachment, if there is an attachment. LAN Interface
Click LAN, then provide the following information.
Parameter Description IP Assignment
The default is Static for static IP assignment.
DHCP for dynamic IP address assignment is not supported.
VRRP
If you have Virtual Router Redundancy Protocol (VRRP) configured for the LAN router redundancy, set this switch to On.
Interface CIDR
The CIDR for the LAN interface.
VRRP Gateway IP
The Virtual IP (VIP) address, when VRRP is enabled.
Default Gateway IP
(optional) The Default Gateway IP for the LAN interface.
Interface Labels
(optional) A name to identify the LAN interface.
VLAN Interface
If your LAN is segmented into virtual LANs (VLANs), click + VLAN Interface to add one or more VLAN sub-interfaces, then provide the following information for each VLAN sub-interface.
You cannot edit the VLAN ID after the Edge Gateway is created. To edit the VLAN sub-interface attributes, it is highly recommended to delete and recreate the VLAN sub-interface configuration. Parameter Description Interface CIDR
The native VLAN interface IP address.
This is the interface where the untagged packets are sent.
VRRP Gateway IP
The Virtual IP for the VRRP Gateway, when VRRP is enabled.
Default Gateway IP
The Default Gateway IP address for the native VLAN interface.
Interface Labels
(optional) A name to identify this native VLAN interface.
VLAN Sub-Interfaces
VLAN ID
The VLAN ID.
VLAN ID must be a number between 2 and 4092.
VLAN Interface CIDR
The VLAN sub-interface IP address.
VRRP Gateway IP
The Virtual IP for the VRRP Gateway, when VRRP is enabled.
Default Gateway IP
The Default Gateway IP address for this VLAN sub-interface.
Sub-Interface Tag
(optional) A name to identify this VLAN sub-interface.
Management Interface
Click MGMT, then provide the following information.
Parameter Description IP Assignment
Select DHCP or Static, depending on your environment.
This setting cannot be changed after the gateway is created.
Private Network
If the Management interface connection to the Aviatrix Controller is over a private network, set this switch to On.
Leave the setting to Off, if the connection is over the public internet.
Parameter
Description
Egress CIDR (Optional)
The CIDR range for the egress flow for the Management interface.
If a required field is missing, the interface tab is highlighted to indicate there is an error.
CoPilot creates the ISO file and downloads the file to your downloads folder.
Next, log in to your VMware ESXi or KVM host and upload the ISO or cloud-init file to a datastore or storage device. Then, deploy the Edge Gateway VM instance and attach the ISO or cloud-init image file to complete the Edge Gateway creation and authentication with the Aviatrix Controller.
The ISO file expires after 24 hours. You cannot download it again and will have to repeat the above steps. You must mount the ISO file to an Edge VM to complete the Edge Gateway registration within the 24-hour timeframe.
-
Creating a Highly Available Edge Gateway (Self-Managed Platform)
|
To create a highly available secondary (HA) Edge Gateway, follow these steps.
-
In Aviatrix CoPilot, go to Cloud Fabric > Edge > Gateways tab.
-
In the table, locate the primary Edge Gateway for which you want to create the HA gateway and click its Edit icon.
-
In the Edit Edge Gateway dialog box, from the High Availability dropdown menu, select Active-Active or Active-Standby mode.
-
In the Interfaces section, configure the WAN, LAN, and Management interfaces for the secondary (HA) Edge Gateway.
WAN Interface
Click WAN, then provide the following information.
For IP and DNS settings, enter using the applicable format. For example, if the Edge Gateway’s WAN IP is 10.1.1.151, enter 10.1.1.151/24 or what your netmask is. Parameter Description IP Assignment
The default is Static for static IP assignment.
DHCP for dynamic IP address assignment is not supported.
Interface Labels
(optional) A name to identify the WAN interface.
Interface CIDR
The CIDR for the WAN interface.
Default Gateway IP
The Default Gateway IP address for the WAN interface.
Public IP
(optional) The Public IP address of the WAN interface.
LAN Interface
Click LAN, then provide the following information.
Parameter Description IP Assignment
The default is Static for static IP assignment.
DHCP for dynamic IP address assignment is not supported.
VRRP
If you have Virtual Router Redundancy Protocol (VRRP) configured for the LAN router redundancy, set this switch to On.
Interface CIDR
The CIDR for the LAN interface.
VRRP Gateway IP
The Virtual IP (VIP) address, when VRRP is enabled.
Default Gateway IP
(optional) The Default Gateway IP for the LAN interface.
Interface Labels
(optional) A name to identify the LAN interface.
VLAN Interface
Provide the following information for each VLAN sub-interface.
Parameter Description Interface CIDR
The native VLAN interface IP address.
This is the interface where the untagged packets are sent.
Default Gateway IP
The Default Gateway IP address for the native VLAN interface.
Interface Labels
(optional) A name to identify this native VLAN interface.
VLAN Sub-Interfaces
VLAN Interface CIDR
The VLAN sub-interface IP address.
Default Gateway IP
The Default Gateway IP address for this VLAN sub-interface.
VLAN configurations are added to the primary Edge Gateway. On the secondary Edge Gateway, some fields are disabled and non-editable, the field value appears when it is selected. CoPilot creates the ISO file and downloads the file to your downloads folder.
Next, log in to your VMware ESXi or KVM host and upload the ISO or cloud-init file to a datastore or storage device. Then, deploy the Edge Gateway VM instance and attach the ISO or cloud-init image file to complete the Edge Gateway creation and authentication with the Aviatrix Controller.
The ISO file expires after 24 hours. You cannot download it again and will have to repeat the above steps. You must mount the ISO file to an Edge VM to complete the Edge Gateway registration within the 24-hour timeframe.
Deploying the Edge Gateway Virtual Machine Instance and Attaching the ZTP ISO
See:
Deploying the Edge Gateway Virtual Machine in VMware ESXi
To deploy the Edge Gateway virtual machine, follow these steps.
-
If you have not downloaded the ESXi OVA file, download the file by using the link provided to you by Aviatrix Support. See Download the Aviatrix Secure Edge Image File.
-
Log in to VMware vSphere Web client to access the ESXi host.
You can use vSphere Web client to manage ESXi host, launch a VM, mount ISO files, and start and stop the Aviatrix Edge Gateway.
-
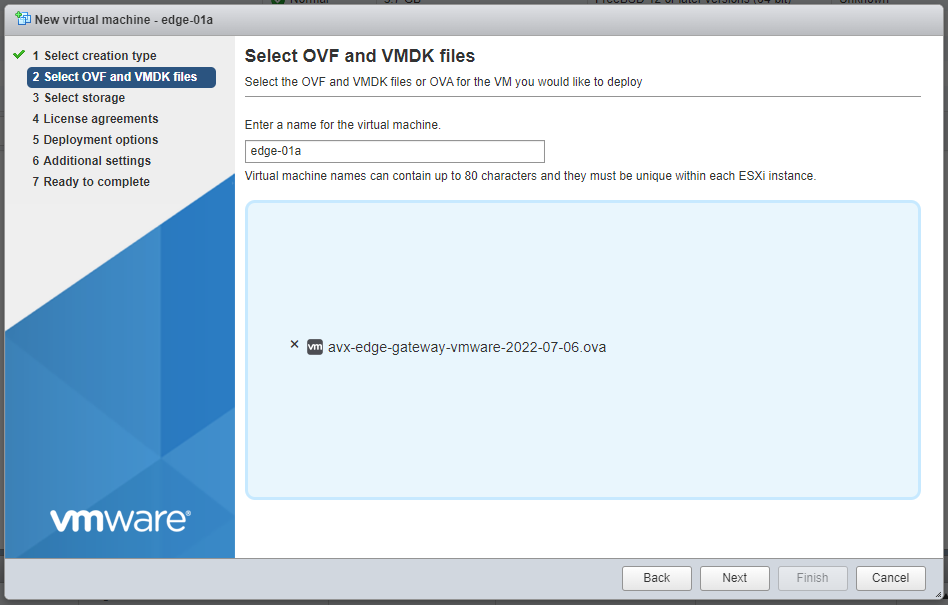
Load the OVA file into the ESXi using vSphere, go to ESXi > Virtual Machines > Create/Register VM.
-
Select Deploy a virtual machine from an OVF or OVA file and click Next.
-
Enter a name for the Aviatrix Secure Edge VM and drag the OVA file into the blue pane, then click Next.
-
In the Select storage page, select the storage device where to create the VM instance (the OVA is installed in this instance) and click Next.
-
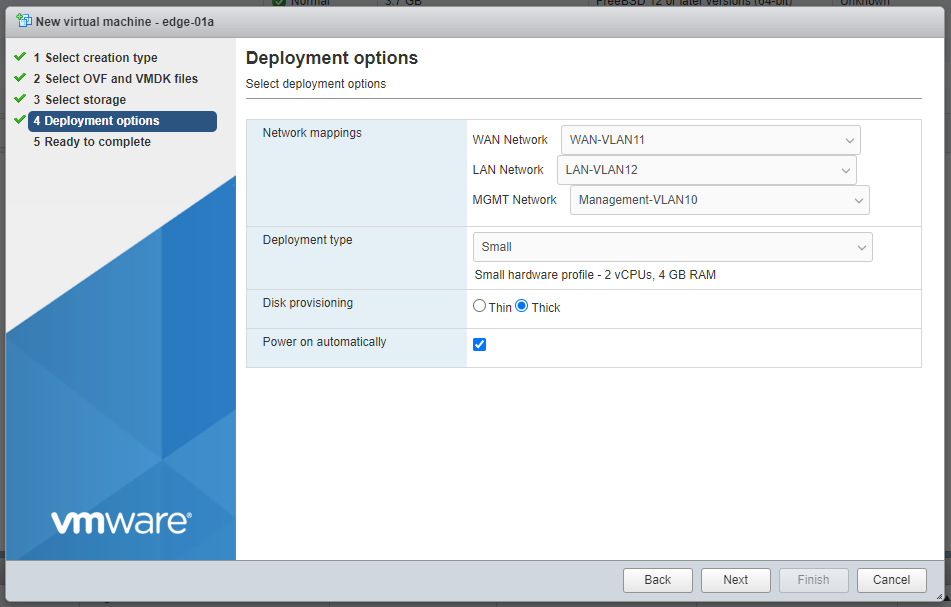
In the Deployment options window, enter the Network mappings for WAN, LAN, and MGMT network interfaces and select the Deployment type. (Refer to the pull-down menu or see Virtual Machine CPU and Memory Configurations.)
If necessary, you can change the network interface mappings after deployment.
-
Click Next.
-
In the Ready to complete page, click Finish.
Next, attach the ISO file to Edge Gateway VM, which will auto-mount the media with the configuration file to be provision the Edge Gateway.
Attaching the ISO File to the Edge Gateway Virtual Machine in VMware ESXi
|
-
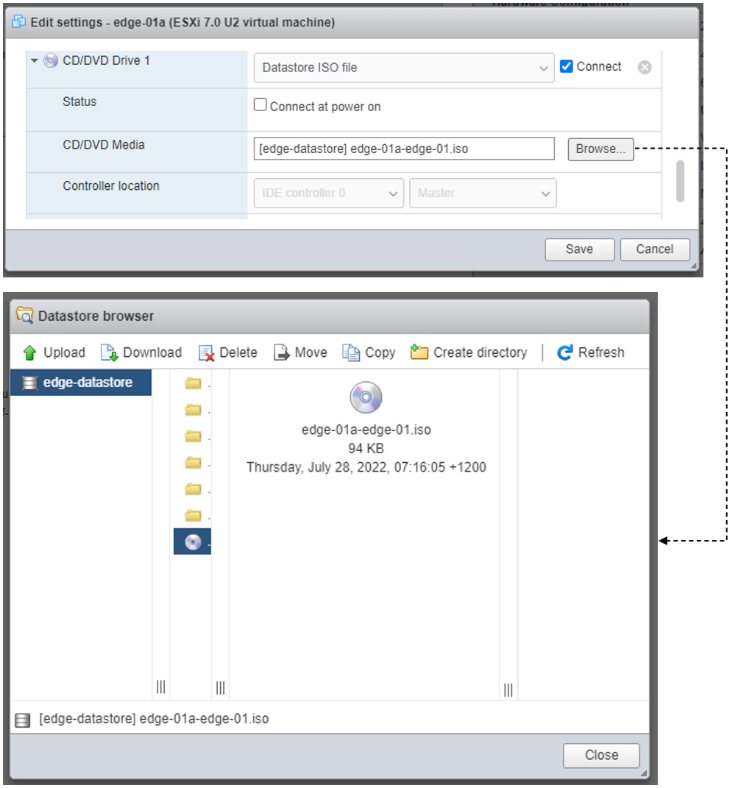
Upload the ISO file downloaded from Aviatrix CoPilot to your VMware datastore.
-
In vSphere, select the Aviatrix Secure Edge VM you created and click Edit settings.
-
Select the Virtual Hardware tab.
-
Next to CD/DVD Drive 1, click the dropdown menu and select Datastore ISO file.
-
Next to CD/DVD Drive 1, ensure the Connect box is checked and click Save.
Connect at power on is required when you attach the ISO image to the VM for the first time. If the VM is powered on at the time you attach the ISO image, select the ISO file and save the configuration to make the ISO available to ZTP.
-
Next to the CD/DVD Media, click Browse, locate the datastore and select the ISO file you uploaded.
-
Click Save. ZTP auto-mounts the ISO file and deploys the Edge Gateway on the VM.
-
Verify the Edge Gateway is Up (see Verifying the Edge Gateway Creation).
Deploying the Edge Gateway Virtual Machine in KVM
Before you begin, on the KVM Linux host ensure the LAN, WAN, and MGMT network bridges are associated with the physical ethernet interfaces on the KVM sever. Refer to KVM product documentation.
|
KVM Hypervisor does not support configuration of RX/TX queue size during runtime. RX/TX queue size should be configured during Edge Gateway VM bootup. See Enabling Multiqueue virtio-net on KVM. |
-
If you have not downloaded the KVM QCOW2 file, download the file by using the link provided to you by Aviatrix Support. See Download the Aviatrix Secure Edge Image File.
-
Launch Virtual Machine Manager UI to access the KVM host.
-
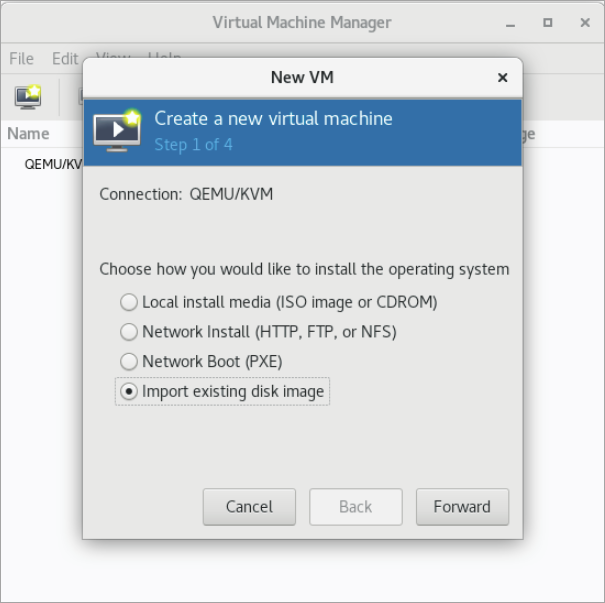
Create a new virtual machine from an existing disk image.
-
From the File menu, select New virtual machine.
-
Select the option Import existing disk image.
-
Click Forward.
-
-
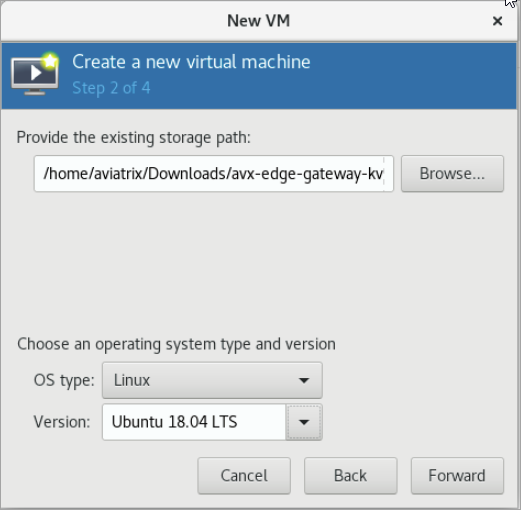
Provide the path to the KVM QCOW2 file and specify the operating system type and version.
-
Enter the path or use the Browse button to locate the KVM QCOW2 file you previously downloaded.
-
For OS type, select Linux.
-
For Version, select Ubuntu 18.04 LTS.
-
Click Forward.
-
-
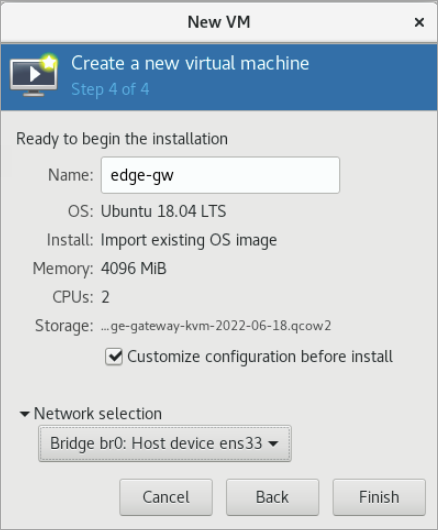
Enter the memory and CPU settings for the Edge Gateway VM and click Forward.

-
Enter a name for the Edge Gateway VM and check the Customize configuration before install checkbox, then click Finish.
-
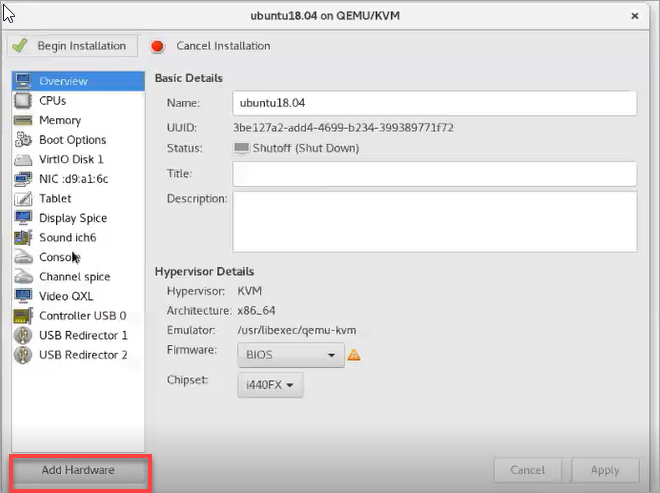
Add the LAN and MGMT virtual bridge interfaces.
-
Click Add Hardware.
-
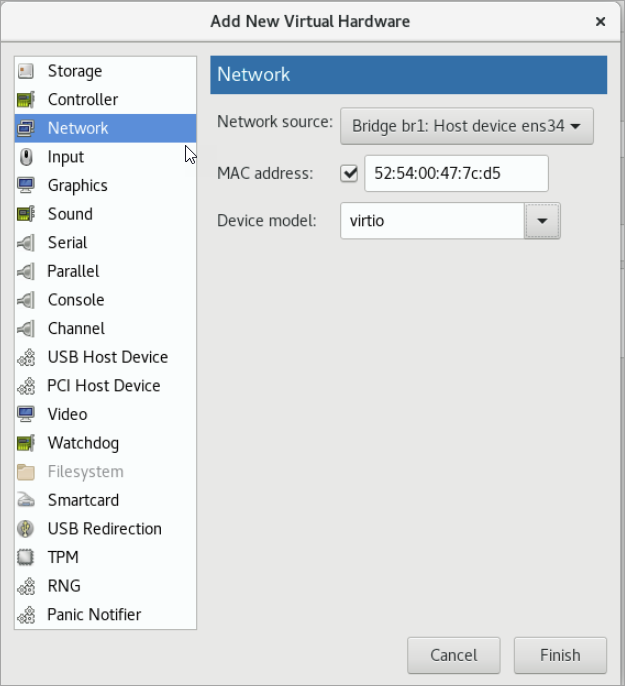
In Add New Virtual Hardware, select Network from the left pane and add two additional network interfaces for the LAN and MGMT virtual bridges. The virtual bridge for the WAN interface is automatically added as part of the VM image creation.
-
For Network source, select the name of the virtual bridge for the LAN interface.
-
For Device model, select virtio.
-
Repeat steps a and b and add the virtual bridge for the MGMT interface.
-
-
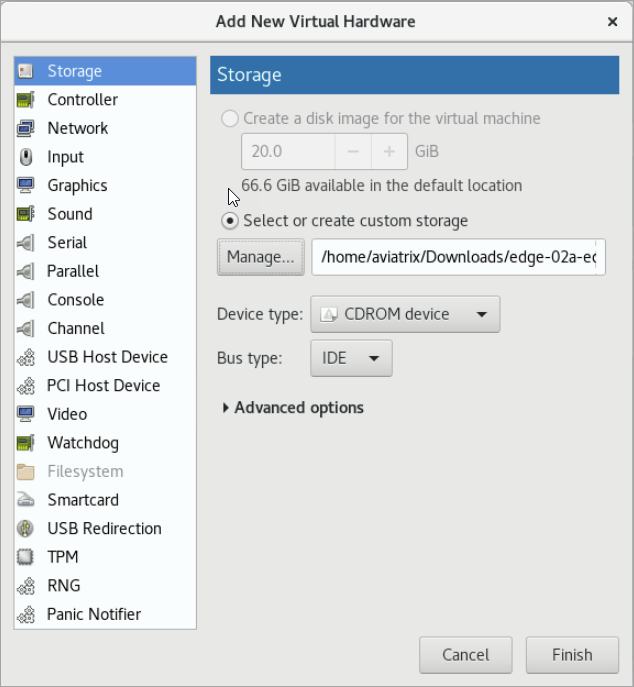
Choose the storage device and attach the ISO file to the VM.
-
In Add New Virtual Hardware, select Storage from the left pane.
-
Select the option Select or create custom storage.
-
Click Manage.
-
Locate and select the KVM iso file which you previously uploaded.
-
Click Choose Volume.
-
Click Finish.
-
-
Click Begin Installation to create the Edge Gateway VM on the KVM host.
After the VM is created, ZTP auto-mounts the ISO file and deploys the Edge Gateway on the VM.
-
Verify the Edge Gateway is Up (see Verifying the Edge Gateway Creation).
Attaching the Edge Gateway to the Transit Gateway
Prerequisites
Before you attach the Edge Gateway to the Transit Gateway, perform these prerequisite steps.
-
Ensure Local ASN Number is configured on Edge and Transit Gateway.
-
If the Edge to Transit Gateway attachment is over public network, you need to update the WAN Public IP on the Edge Gateway.
-
Go to Cloud Fabric > Edge > Gateways tab.
-
Locate the Edge Gateway, and click its Edit icon on the right.
-
In Edit Edge Gateway, scroll to the Interfaces section and click WAN.
-
In Public IP, click Discover.
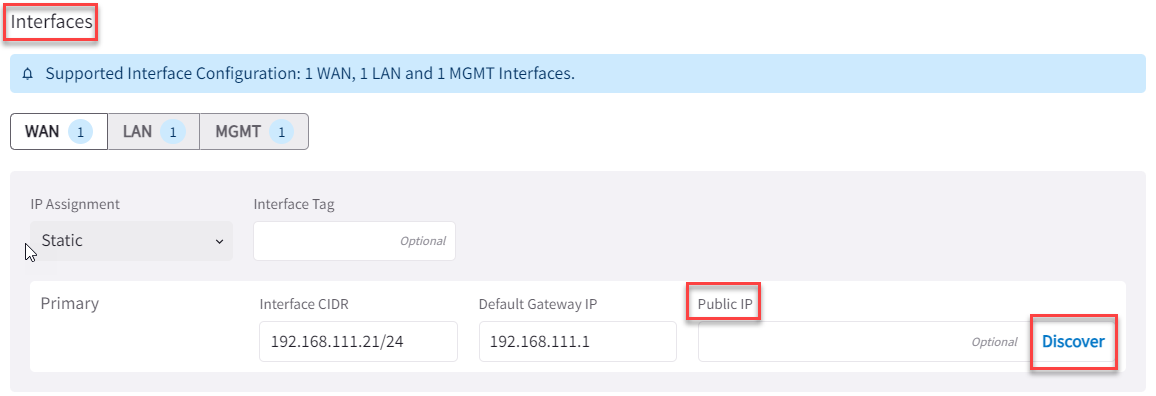
-
Verify the WAN Public IP and click Save.
-
Attach Edge Gateway to Transit Gateway
You can attach an Edge Gateway to multiple Transit Gateways. Each attachment can be configured with different parameters, such as connecting interfaces, connection over private or public network, high-performance encryption, and Jumbo Frame.
|
In Aviatrix CoPilot:
-
Go to Cloud Fabric > Edge > Gateways tab.
-
Locate the Edge Gateway, click the three-dot vertical menu on the right, and select Manage Transit Gateway Attachment.

Click + Transit Gateway Attachment, then provide the following information.
Parameter Description Transit Gateway
From the dropdown menu, select the Transit Gateway to attach to the Edge Gateway.
Connecting Edge Interfaces
From the dropdown menu, select the WAN interface connection to the Transit Gateway.
In the Advanced section, set the advanced gateway settings that apply.
Parameter Description Attach over Private Network
If the Edge WAN connection to the Transit Gateway is over a private network, set this toggle to On.
Leave it Off if the connection is over the public internet.
Jumbo Frame
If you want to use Jumbo Frames for the Transit-to-Edge Gateway connection, set this toggle to On.
High Performance Encryption
If you want to enable high-performance encryption for the Transit-to-Edge Gateway connection, set this toggle to On.
In Number of Tunnels, enter the number of HPE tunnels to create.
-
For HPE over private network, setting the number of tunnels count to 0 creates maximum tunnels based on the peering gateway size.
-
For HPE over public network, the number of tunnels count supported range is between 2 and 20.
To attach the Edge Gateway to another Transit Gateway, click + Transit Gateway Attachment again and provide the required information.
-
-
Click Save.
Connecting the Edge Gateway to an External Device (BGP over LAN)
To connect the Edge Gateway to the LAN router using BGP over LAN, follow these steps.
-
Navigate to Networking > Connectivity > External Connections (S2C) tab.
-
Click + External Connection, then provide the following information.
Parameter Description Name
Name to identify the connection to the LAN router.
Connect Local Gateway To
Select External Device radio button, then from the dropdown menu, select BGP over LAN.
Local Gateway
The Edge Gateway to connect to the LAN router.
Local ASN
The Local AS number the Edge Gateway will use to exchange routes with the LAN router.
This is automatically populated if the Edge Gateway is assigned an ASN already. Remote ASN
The BGP AS number configured on the LAN router.
-
Click + Connection and provide the following information.
Parameter Description Remote LAN IP
The IP address for the LAN router.
Local LAN IP
This is automatically populated with the Edge Gateway LAN interface IP address.
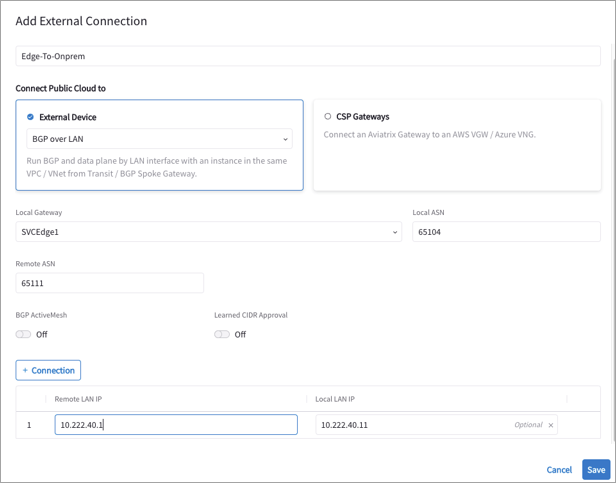
-
Click Save.
Enabling Multiqueue virtio-net on KVM
Multiqueue virtio-net allows network performance to scale with the number of vCPUs, by allowing packet processing (packet sending and receiving) through multiple TX and RX queues.
To enable Multiqueue virtio-net support on KVM, when launching the Edge Gateway VM using virt-install, add the driver_queues parameter to the network interface details.
--network bridge=<bridge-name>, model=virtio,driver_queues=N
where N is the number of vCPUs.