Aviatrix SAML Authentication on Azure AD IdP
This guide provides an example on how to configure Aviatrix to authenticate against Azure AD IdP. When SAML client is used, your Aviatrix CoPilot acts as the Identity Service Provider (IdP) that redirects browser traffic from client to IdP (e.g., Azure AD) for authentication.
Pre-Deployment Checklist
Before configuring SAML integration between Aviatrix and Azure AD, make sure the following is completed:
-
The Aviatrix Controller is deployed.
-
You have an Azure account.
-
You have downloaded and installed the Aviatrix SAML VPN client.
Azure Account
Configure Azure AD on your Azure account before continuing with the configuration.
Aviatrix VPN Client
All users must use the Aviatrix VPN client to connect to the system. Download the client for your OS here.
Configuration Steps
Follow these steps to configure Aviatrix to authenticate against your Azure AD IDP:
-
Create an Azure AD SAML Application for Aviatrix in the AWS Console.
-
Create a SAML Endpoint in Aviatrix CoPilot.
Azure AD Custom SAML Application
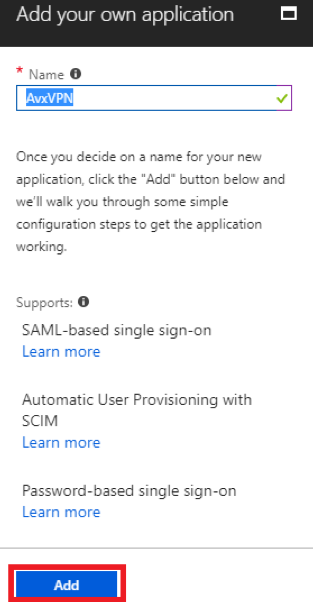
Before you start, pick a short name to be used for the SAML application name. In the notes below we will refer to this as aviatrix_azuread, but, it can be any string.
We will use the string you select for the SAML application name to generate a URL for Azure AD to connect with Aviatrix. This URL is defined below as SP_ACS_URL. This URL should be constructed as:
"https://<[your CoPilot IP or host name]>/flask/saml/sso/<[aviatrix_azuread]>"
|
Replace <[your CoPilot IP or host name]> with the actual host name or IP address of your CoPilot and <[aviatrix_azuread]> with the string you chose to refer to the SAML application. |
Connect to Azure
Log in to your Azure portal.
Create Custom SAML Application
-
Go to the Azure Active Directory service.
-
Select Enterprise Applications under the Manage navigation menu item.
-
Click + New application.
You must be an administrator to add new Enterprise Applications.
-
Click Non-gallery application.
-
Enter a Display Name.
Custom applications require an Azure AD Premium subscription.
-
Click Add.
Assign Users to this Application
-
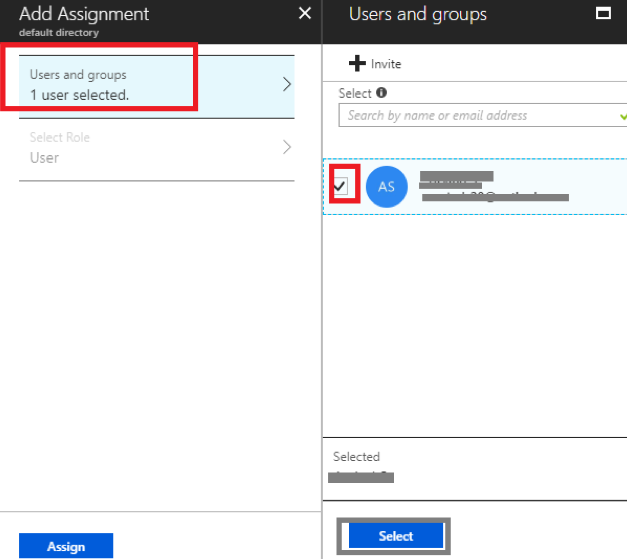
Click Users and groups below Manage.
-
Click + Add user.
-
Select a User and Role.
-
Click Assign.
Single Sign-on Configuration
Click Single sign-on below Manage.
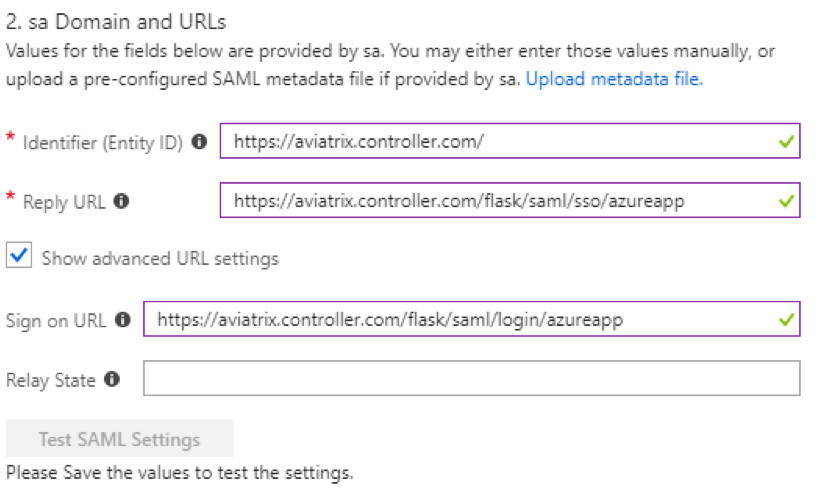
Application Domain and URLs
-
Select SAML-based Sign-on from the Single Sign-on Mode dropdown menu.
-
Fill out the fields below.
Field Value Identifier (Entity ID)
https://<<<your copilot">[your" class="bare">https://<<<your copilot]>Reply URL
SP_ACS_URL
Show Advanced URL settings
checked
Sign on URL
SP_ACS_URL
Relay State
(leave blank)
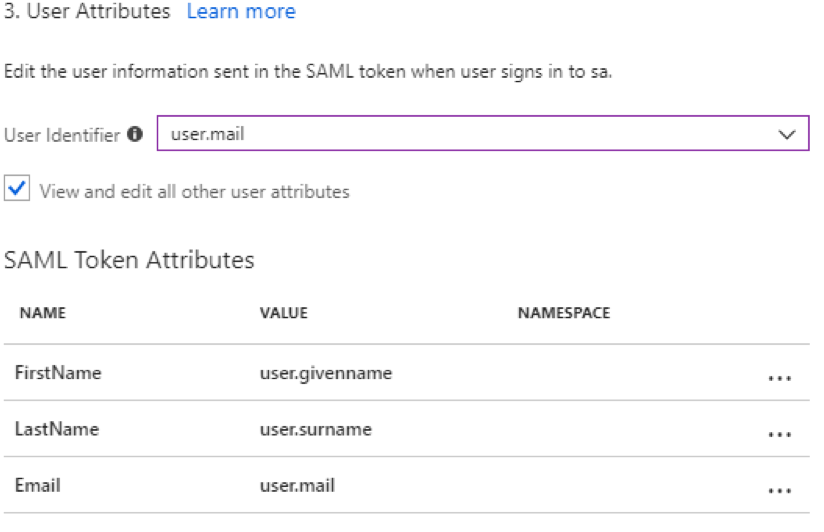
User Attributes
-
Enter user.mail for User Identifier.
-
Click View and edit all other user attributes.
-
Add the following SAML Token Attributes (please find the right values from your Azure user details to match firstname, lastname and email). You can also add "Profile" and send the profile name of a VPN profile - at this time,we only support attaching one profile per user via SAML.
NAME VALUE NAMESPACE FirstName
user.givenname
(blank)
LastName
user.surname
(blank)
Email
user.mail
(blank)
| Recently, Azure changed to a New UI "attributes & claims". The following picture is the new reference setting example. |

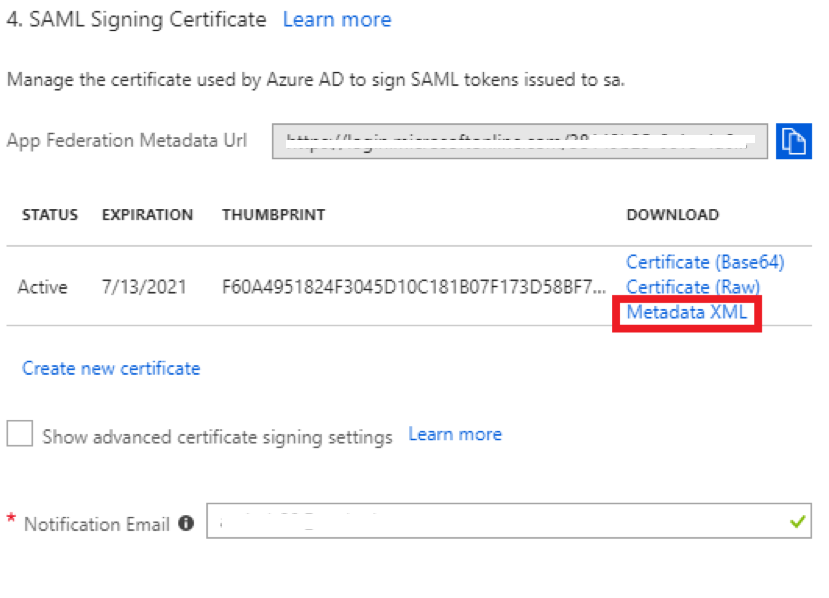
SAML Signing Certificate
-
Find the Metadata XML link.
-
Click the link to download the file.
Save Application
Click Save.
Aviatrix CoPilot SAML Endpoint
-
Go to Aviatrix CoPilot > Cloud Fabric > UserVPN > select the Settings tab.
-
Under SAML, click + SAML Endpoint.
-
Enter the following information:
Field Description Name
Pick
IPD Metadata Type
Select Text.
IDP Metadata Text/URL
Paste in the metadata XML file contents downloaded earlier.
Entity ID
Select Hostname
Custom SAML Request Template
Turn this setting on.
-
Copy the following into the Custom SAML Request Template field:
<?xml version="1.0" encoding="UTF-8"?>
<samlp:AuthnRequest xmlns:samlp="urn:oasis:names:tc:SAML:2.0:protocol" ID="$ID" Version="2.0" IssueInstant="$Time" Destination="$Dest" ForceAuthn="false" IsPassive="false" ProtocolBinding="urn:oasis:names:tc:SAML:2.0:bindings:HTTP-POST" AssertionConsumerServiceURL="$ACS">
<saml:Issuer xmlns:saml="urn:oasis:names:tc:SAML:2.0:assertion">$Issuer</saml:Issuer>
</samlp:AuthnRequest>
This is required to connect with Azure AD. If you don’t do this, you will receive an error message when testing.
-
Click OK.
Validating
|
Be sure to assign users to the new application in Azure AD prior to validating. If you do not assign your test user to the Aviatrix UserVPN application, you will receive an error. |
You can quickly validate that the configuration is complete by clicking the link in the Test column for the SAML endpoint.