Transit FireNet Workflow for Azure
Aviatrix Transit FireNet allows you to deploy firewall functions for the Aviatrix Multicloud Transit architecture. With the Transit FireNet feature, the Firewall Network (FireNet) function is integrated into the Aviatrix Transit gateway.
Aviatrix Transit FireNet supports different hashing algorithms available in Azure cloud to load balance the traffic across different firewalls which includes Hash-based distribution mode (five-tuple hash) and Source IP affinity mode (three-tuple or two-tuple hash).
To deploy firewall networks in other CSPs:
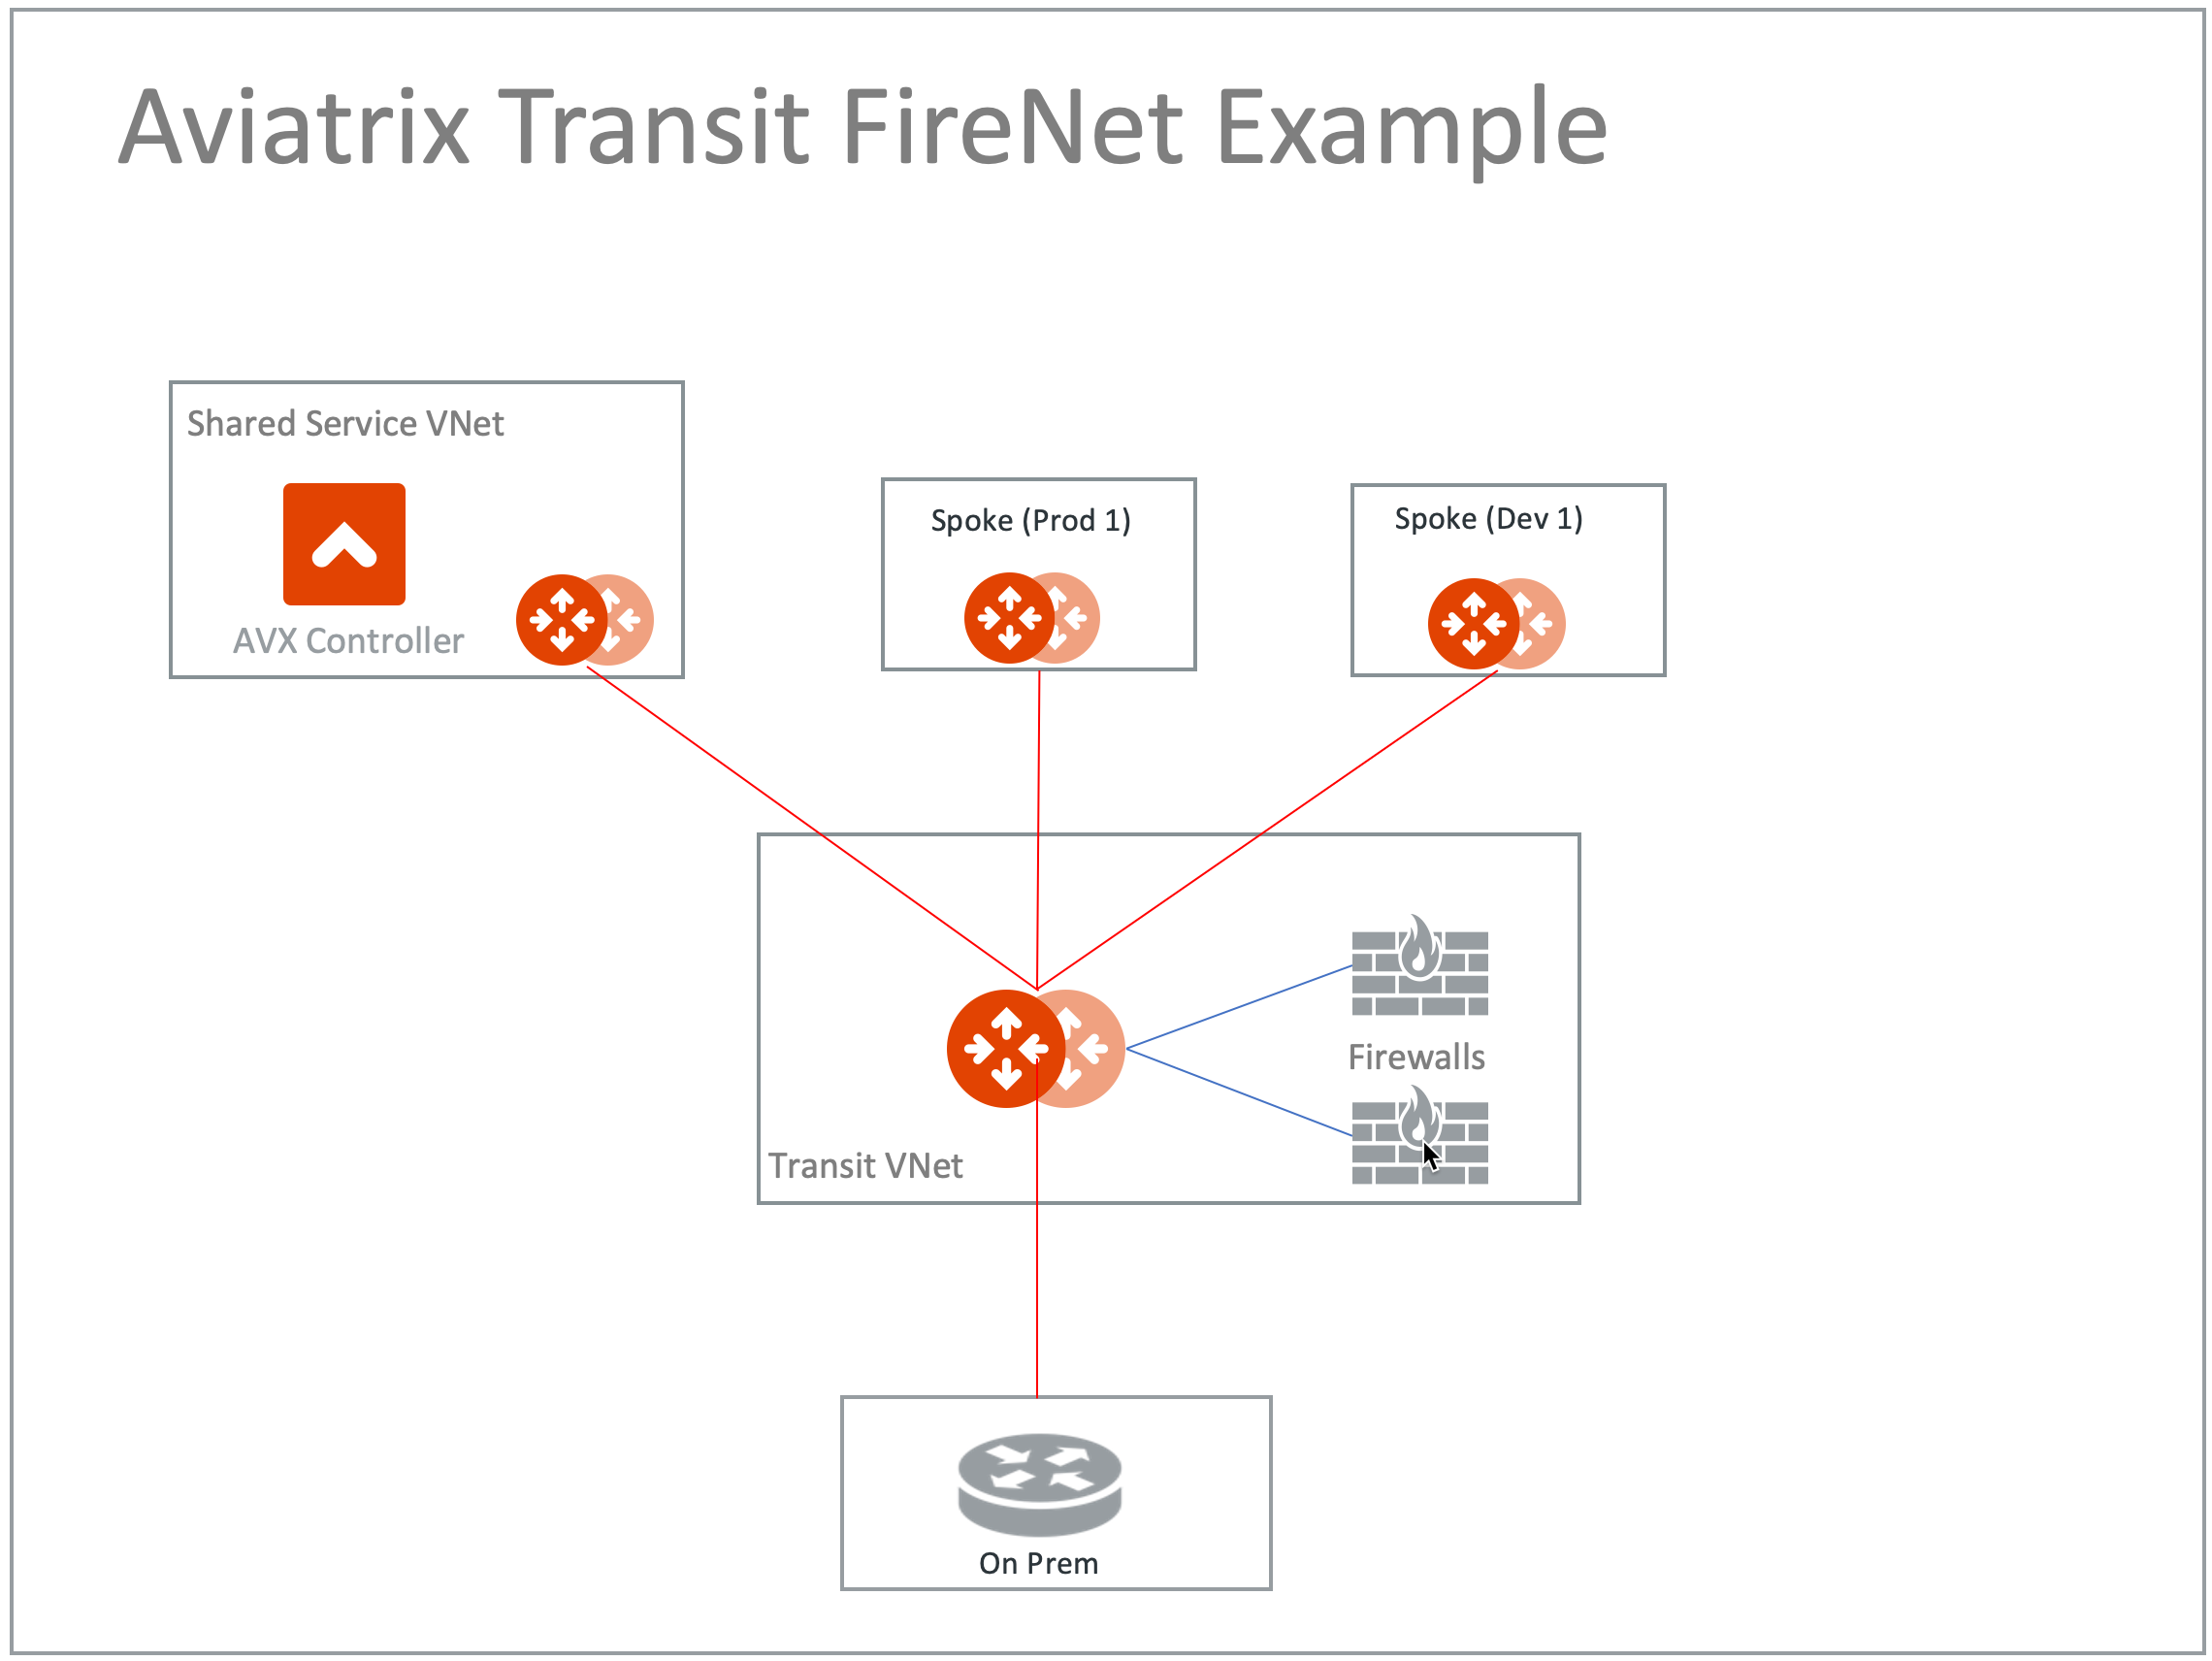
In this example, Transit VNet with Aviatrix Gateways is deployed, and two Spoke Gateways (DEV and PROD) are attached to it.
The transit VNET will then have a firewall of supported vendors (Check Point, Palo Alto Networks and Fortinet etc.) deployed in it. Please see the diagram below for more details.
Once the infrastructure is in place you create a policy to inspect the east-west and north-south traffic.
Create Transit VNet
VNets can be created manually on Azure or directly from Aviatrix Controller.
VNets are created in the Controller under Useful Tools > Create a VPC.
-
Log in to the Aviatrix Controller with a username and password.
-
Navigate to Useful Tools > Create A VPC.
-
Select Azure as the Cloud Type.
-
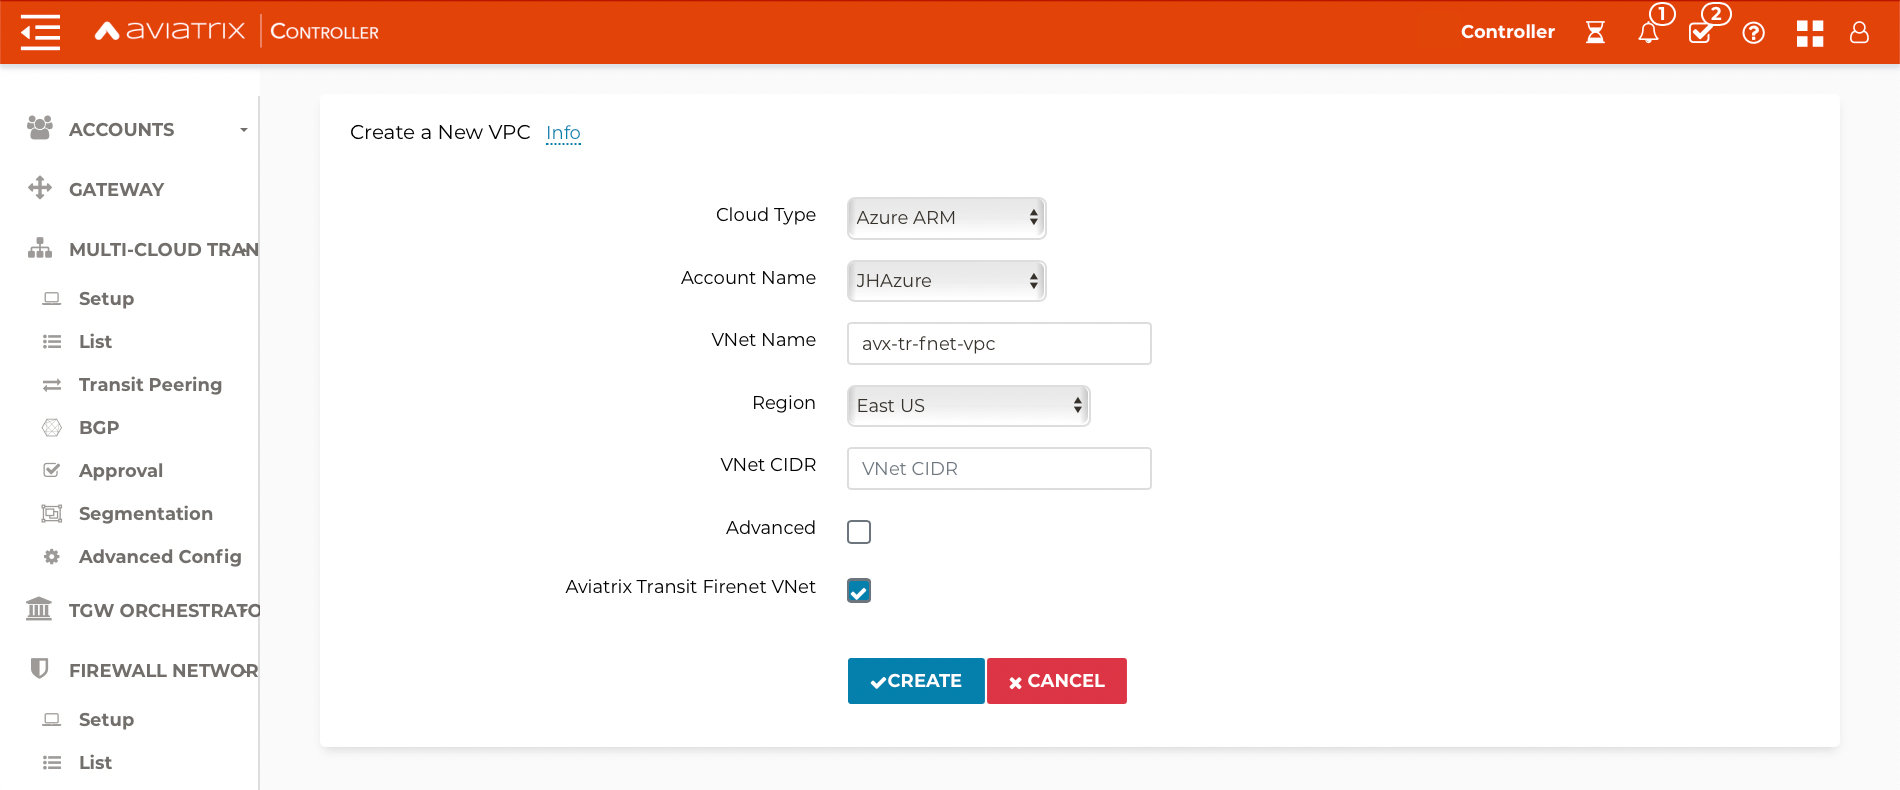
Add one VNet for Transit FireNet Gateway and select the Aviatrix Transit Firenet VNet option as shown below.
-
Create two more VNets with no option/checkbox selected for Spoke Gateways.
Deploy the Aviatrix Transit Gateway
Transit Aviatrix Gateway can be deployed using the Transit Gateway Workflow.
Prerequisites for Azure
Transit FireNet builds on the Aviatrix Transit Network solution where Aviatrix gateways are deployed in the Transit VNet and/or in the Spoke VNet in Azure. ActiveMesh is enabled by default.
Make sure the deployment meets the following specifications:
-
Aviatrix Transit Network must be in Connected mode. Go to Multi-Cloud Transit > Advanced Config → Connected Transit. Toggle to Enabled.
-
The minimum size of the Aviatrix Transit Gateway instance size is Standard_B2ms.
|
In Controller version 6.0 and prior, the minimum size of the Aviatrix Transit Gateway virtual machine is Standard_B2ms. Starting in 6.1, the minimum Transit Gateway instance size requirement is removed. |
Procedure
-
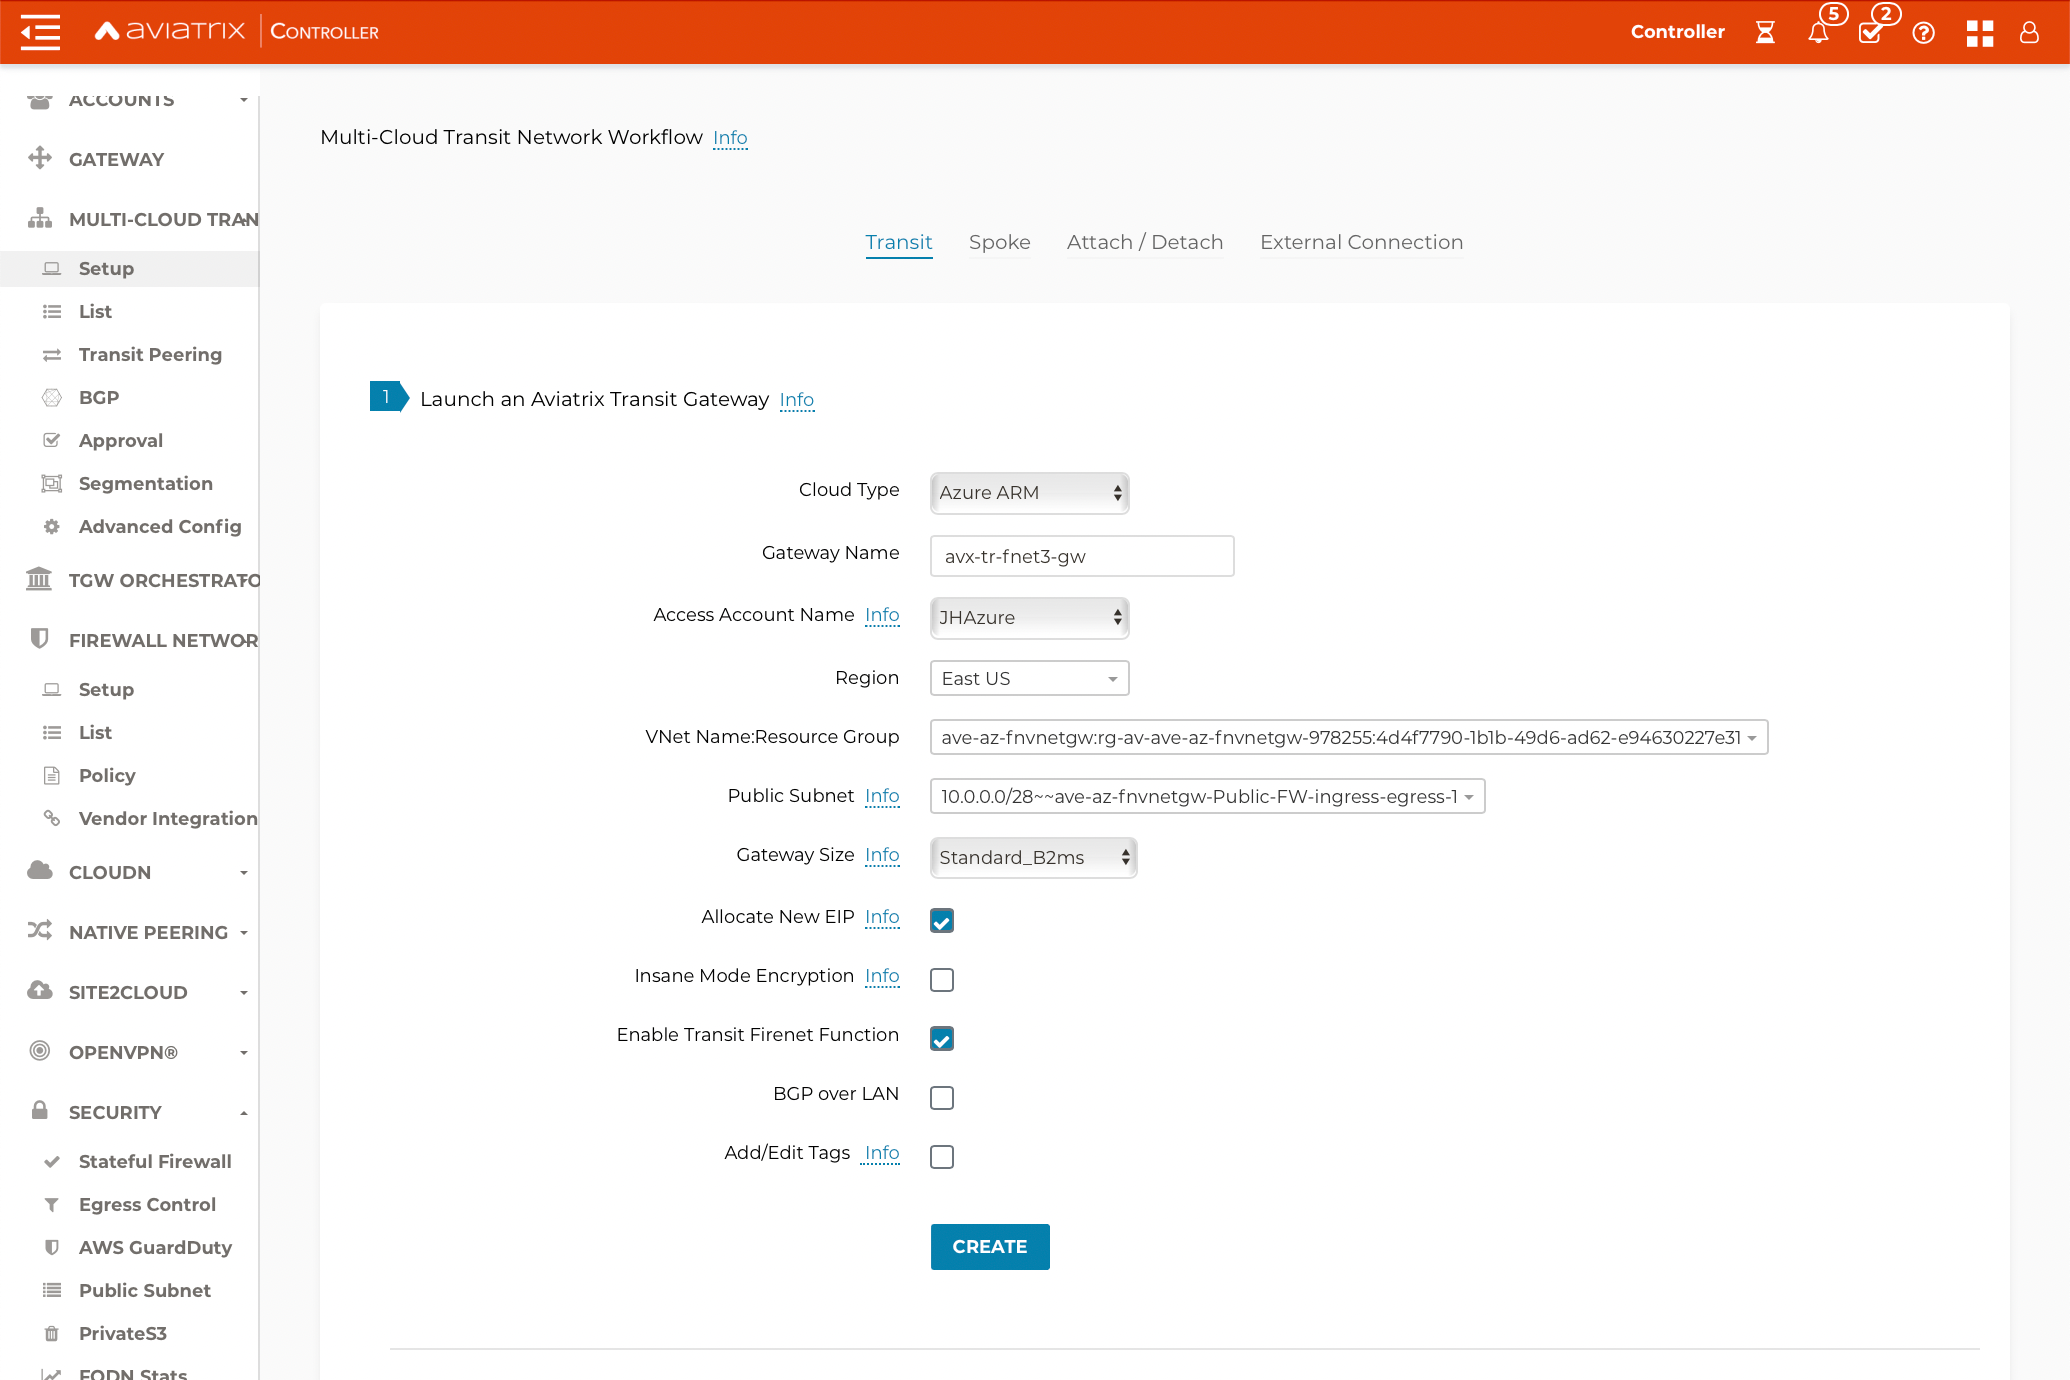
Navigate to Multi-Cloud Transit > Setup > #1 Launch an Aviatrix Transit Gateway.
-
Ensure that Azure is the selected Cloud Type.
-
Enter a Gateway Name.
-
Select the Azure Access Account Name.
-
Select a region.
-
Select the VNet Name.
-
Select a Public Subnet.
-
Select a gateway size (default is Standard_B2ms).
-
Enable High Performance Mode Encryption for higher throughputs (optional).
-
Select the Enable the Transit Firenet Function check box.
-
Click Create.
-
Enable Transit Gateway HA by navigating to Multi-Cloud Transit > Setup > #2 (Optional) Enable HA to an Aviatrix Transit Gateway.
Please see an example below for Transit FireNet GW:
|
High Performance Mode Encryption for higher throughput requires a virtual machine size. See link. for details. |
Deploy Spoke Gateways
Now that we have Aviatrix Transit Gateway, we can deploy Aviatrix Spoke Gateways in the spoke VNET using Aviatrix Spoke Gateway Workflow.
-
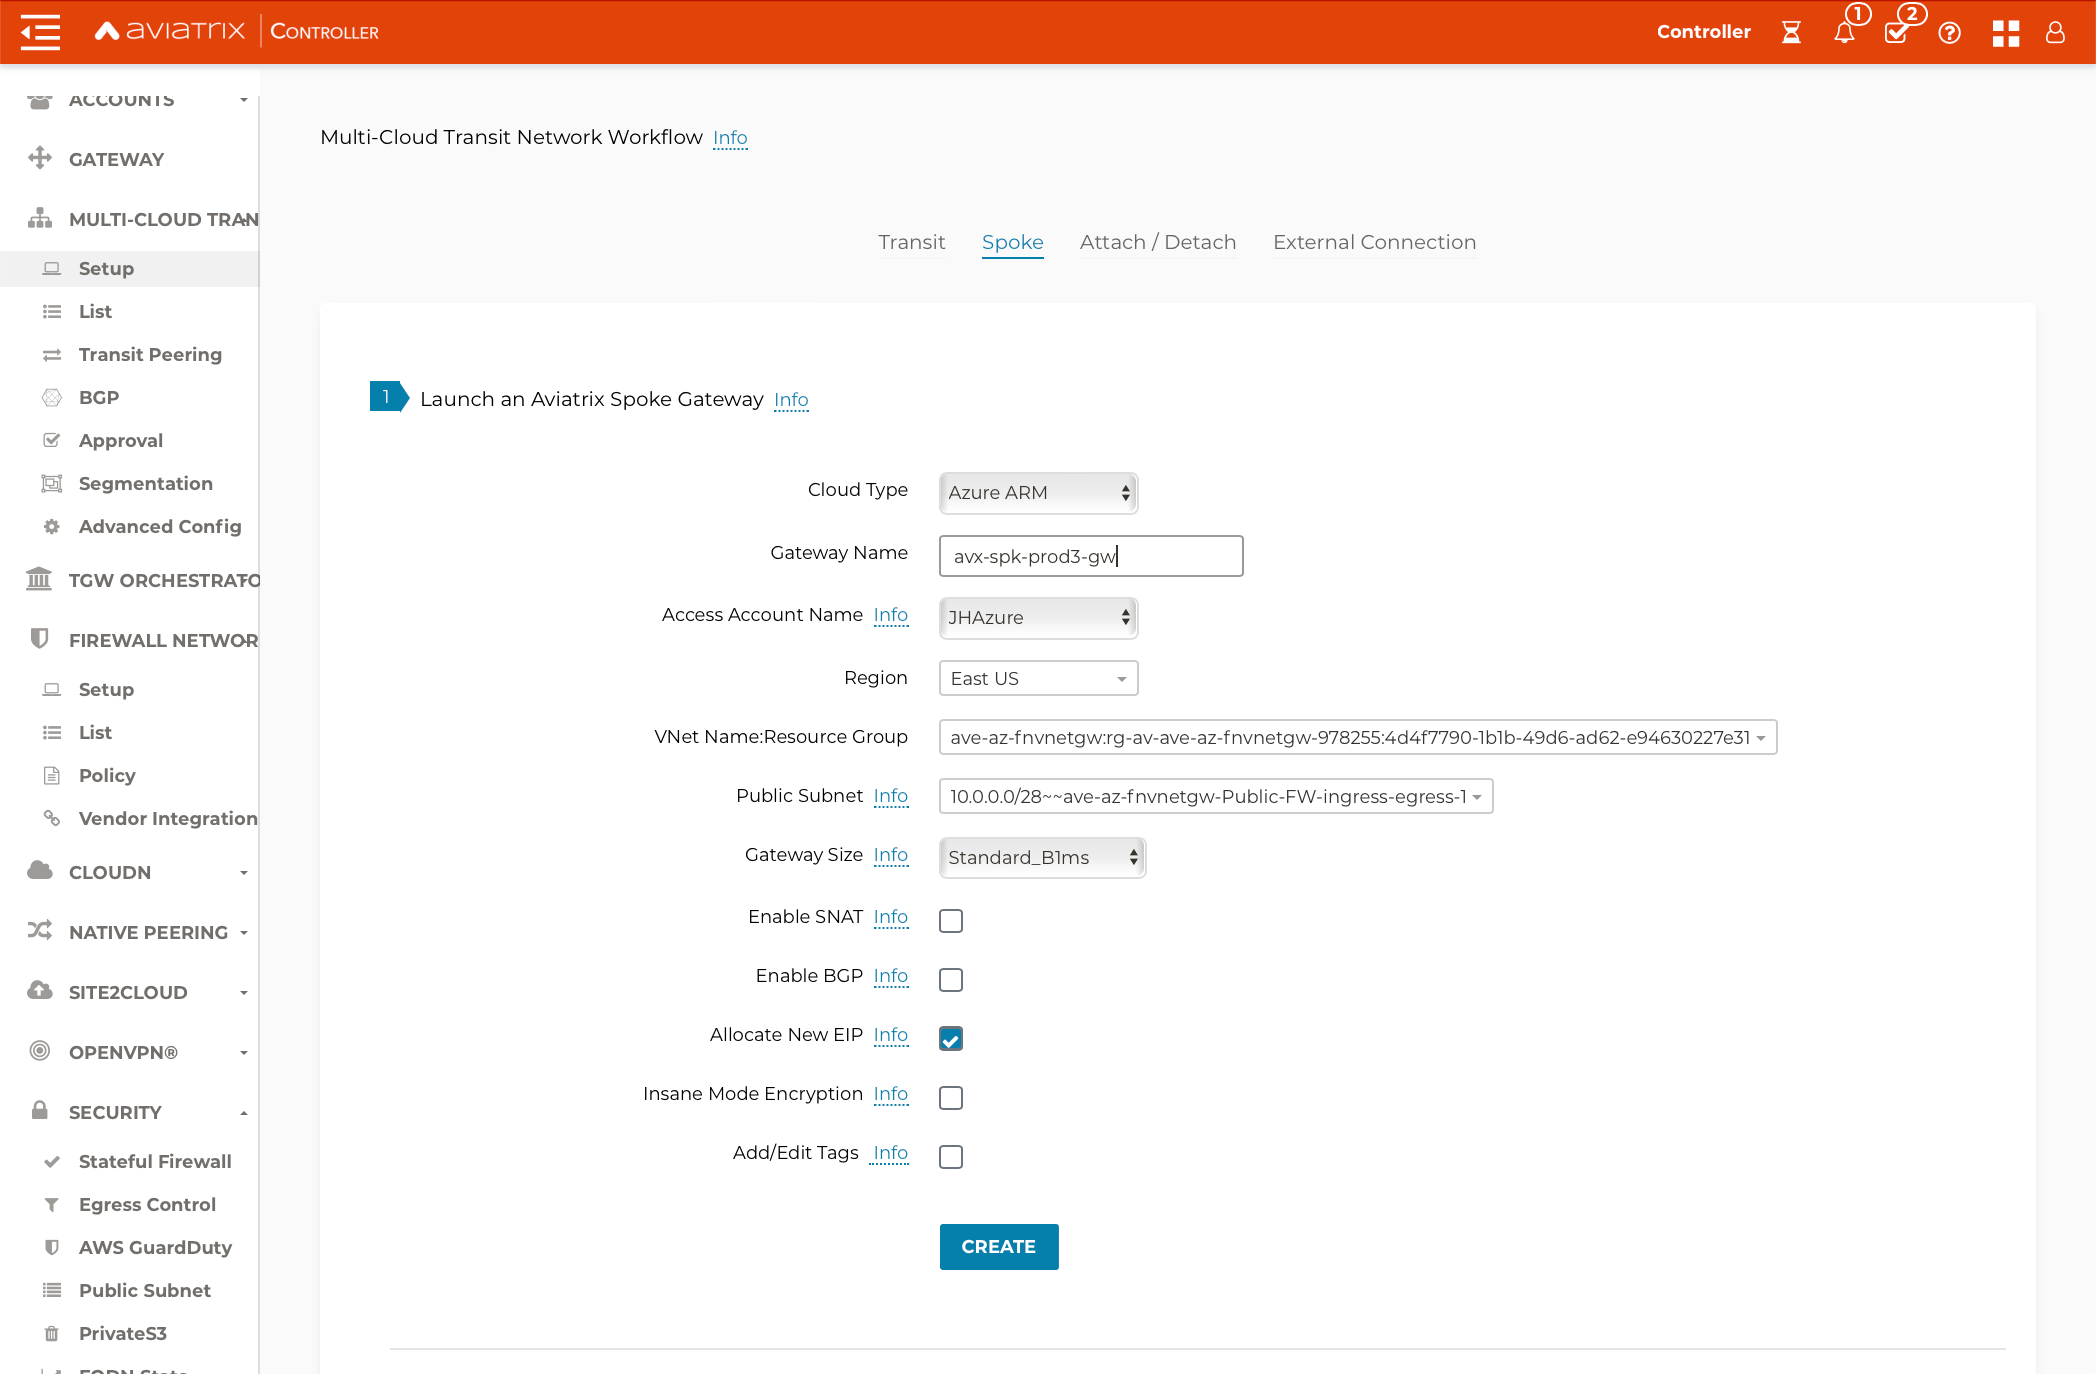
Navigate to Multi-Cloud Transit > Setup > Spoke > #1 Launch an Aviatrix Spoke Gateway.
-
Deploy a Spoke Gateway (GW) in each of the spoke VNETs using the defaults; choose the appropriate Account and VNET information.
-
Choose the Public Subnet.
-
Enable Spoke Gateway HA by navigating to Multi-Cloud Transit > Setup > Spoke > #2 (Optional) Enable/Disable HA to an Aviatrix Spoke Gateway.
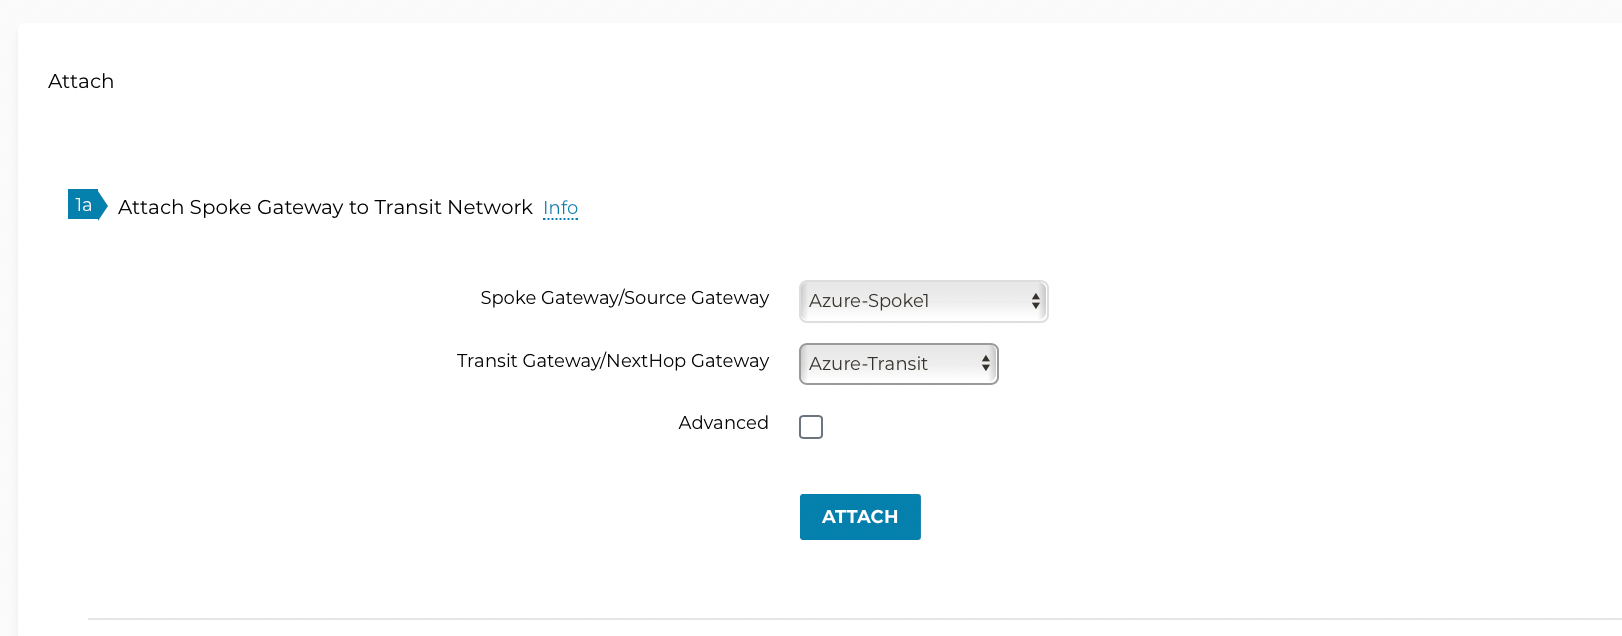
Attach Spoke Gateways to Transit Network
Now that the Transit and Spoke gateways are deployed, you must connect them. If you want to connect native Spoke VNets, see the following section.
-
Navigate to Multi-Cloud Transit > Setup > Attach/Detach > #1 Attach Spoke Gateway to Transit Network.
-
Select one spoke at a time and attach to the Transit Gateway.
|
The Transit Gateway is now attached to Spoke Gateways, but by default, the Transit Gateway will not route traffic between Spoke Gateways. |
Attach Native Spoke VNets
If attaching native Spoke VNets that already exist in your Azure portal, navigate to Multi-Cloud Transit > Setup > Attach/Detach > 1b Attach Azure ARM Spoke through Native Peering.
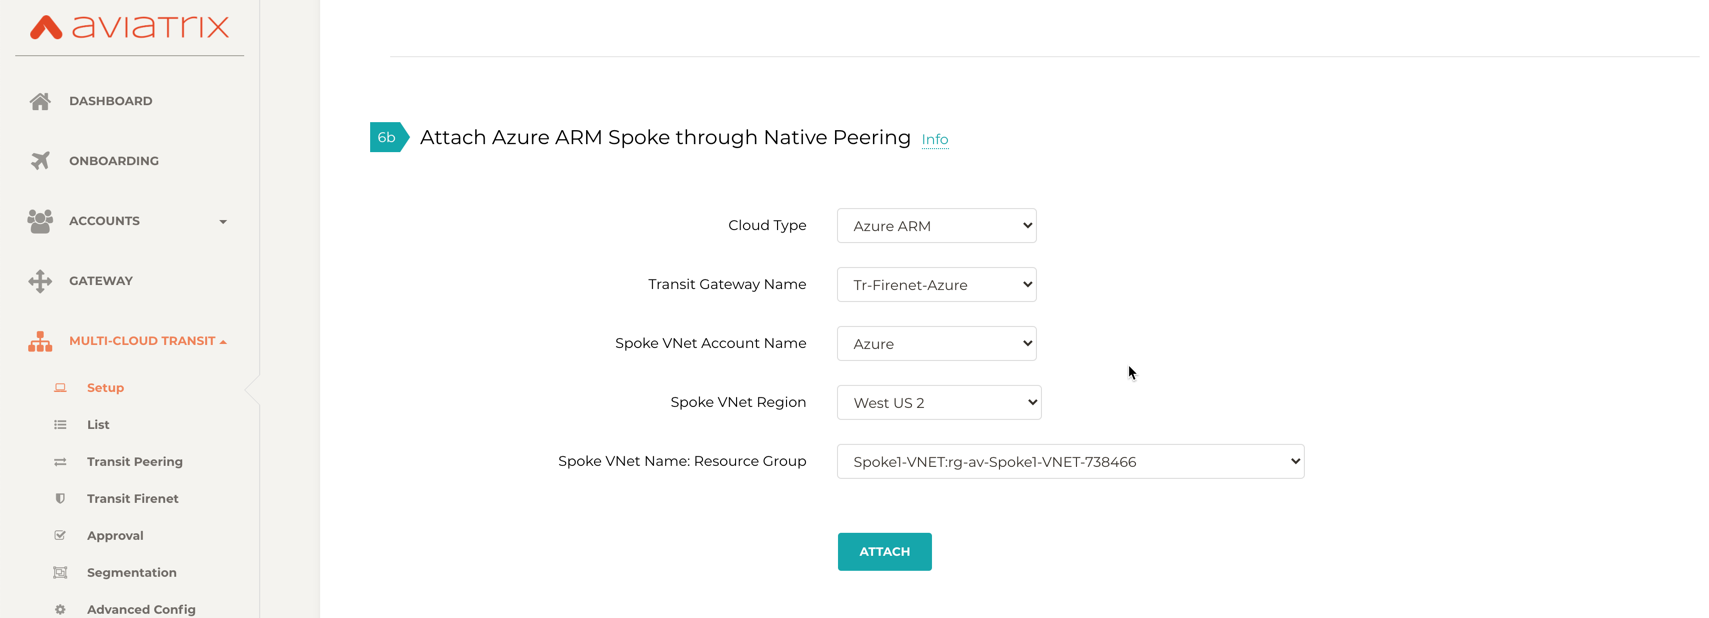
Select one VNet at a time and attach to the Transit gateway.
| The Transit gateway is attached to the Azure native Spokes, but by default the Transit gateway will not route traffic between the native Spokes. |
Enable Connected Transit
By default, Spoke VNETs are in isolated mode where the Transit will not route traffic between them. To allow the Spoke VNETs to communicate with each other, you must enable Connected Transit by navigating to Multi-Cloud Transit > Advanced Config. Under Edit Transit, select the Transit Gateway and toggle Connected Transit to Enabled.

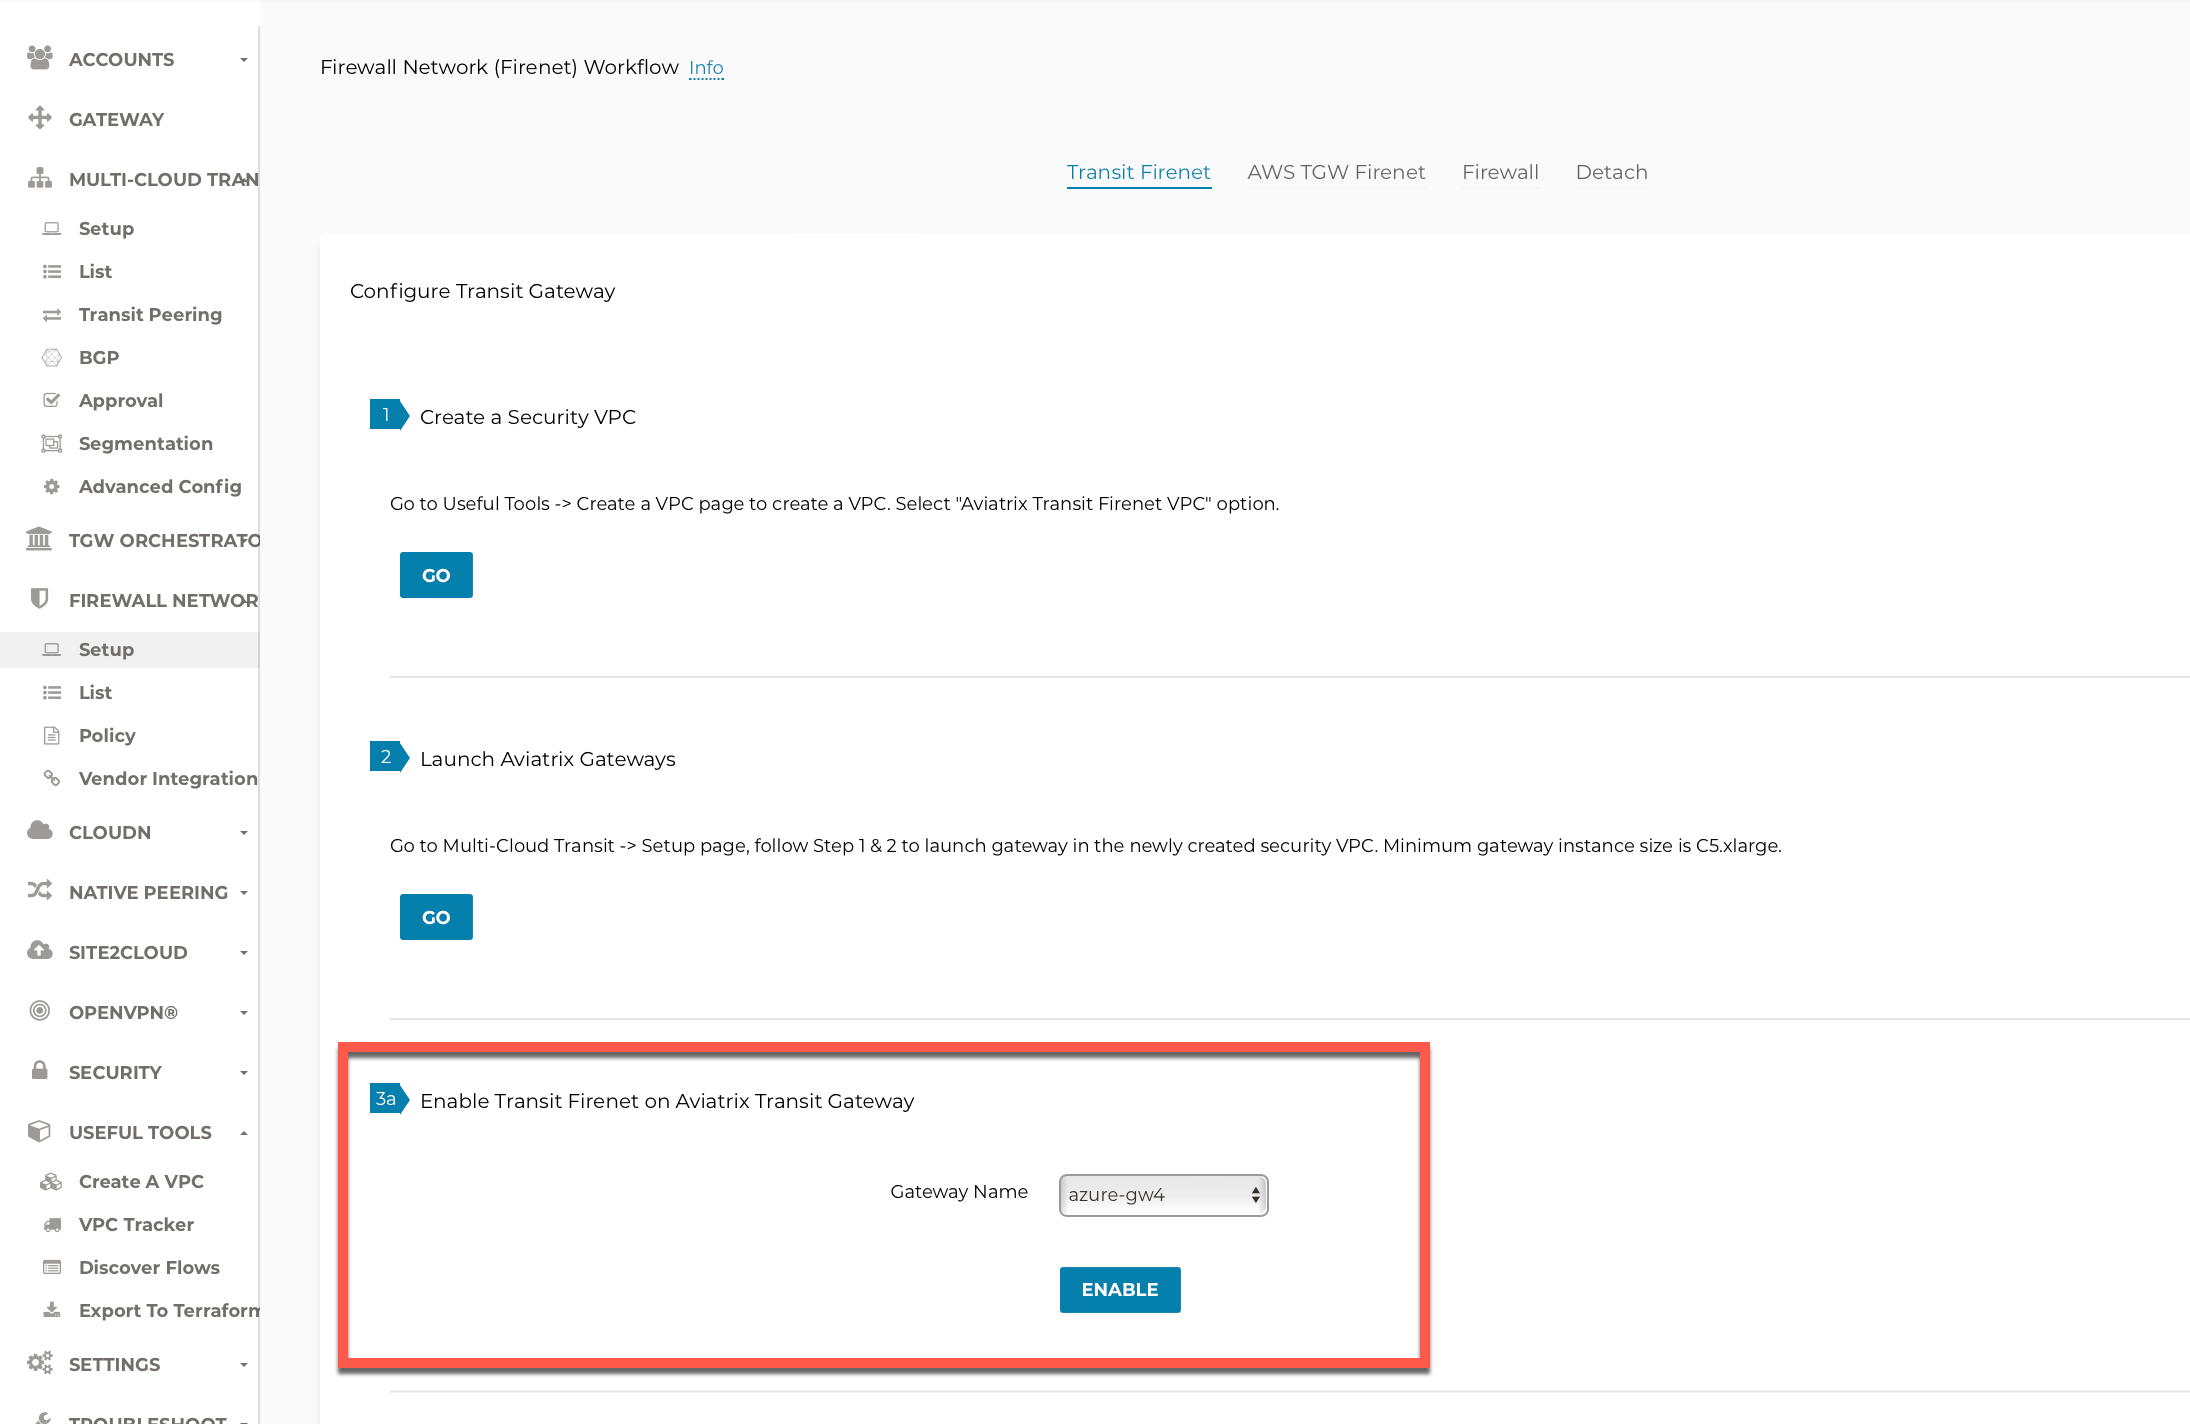
Configure Transit Firewall Network
Now that the Transit and Spoke Gateways have been deployed, you must deploy and enable the Firewall for traffic inspection.
-
Navigate to Firewall Network > Transit FireNet > #3a Enable Transit FireNet on Aviatrix Transit Gateway.
-
Choose the Aviatrix Transit Gateway and click Enable.
-
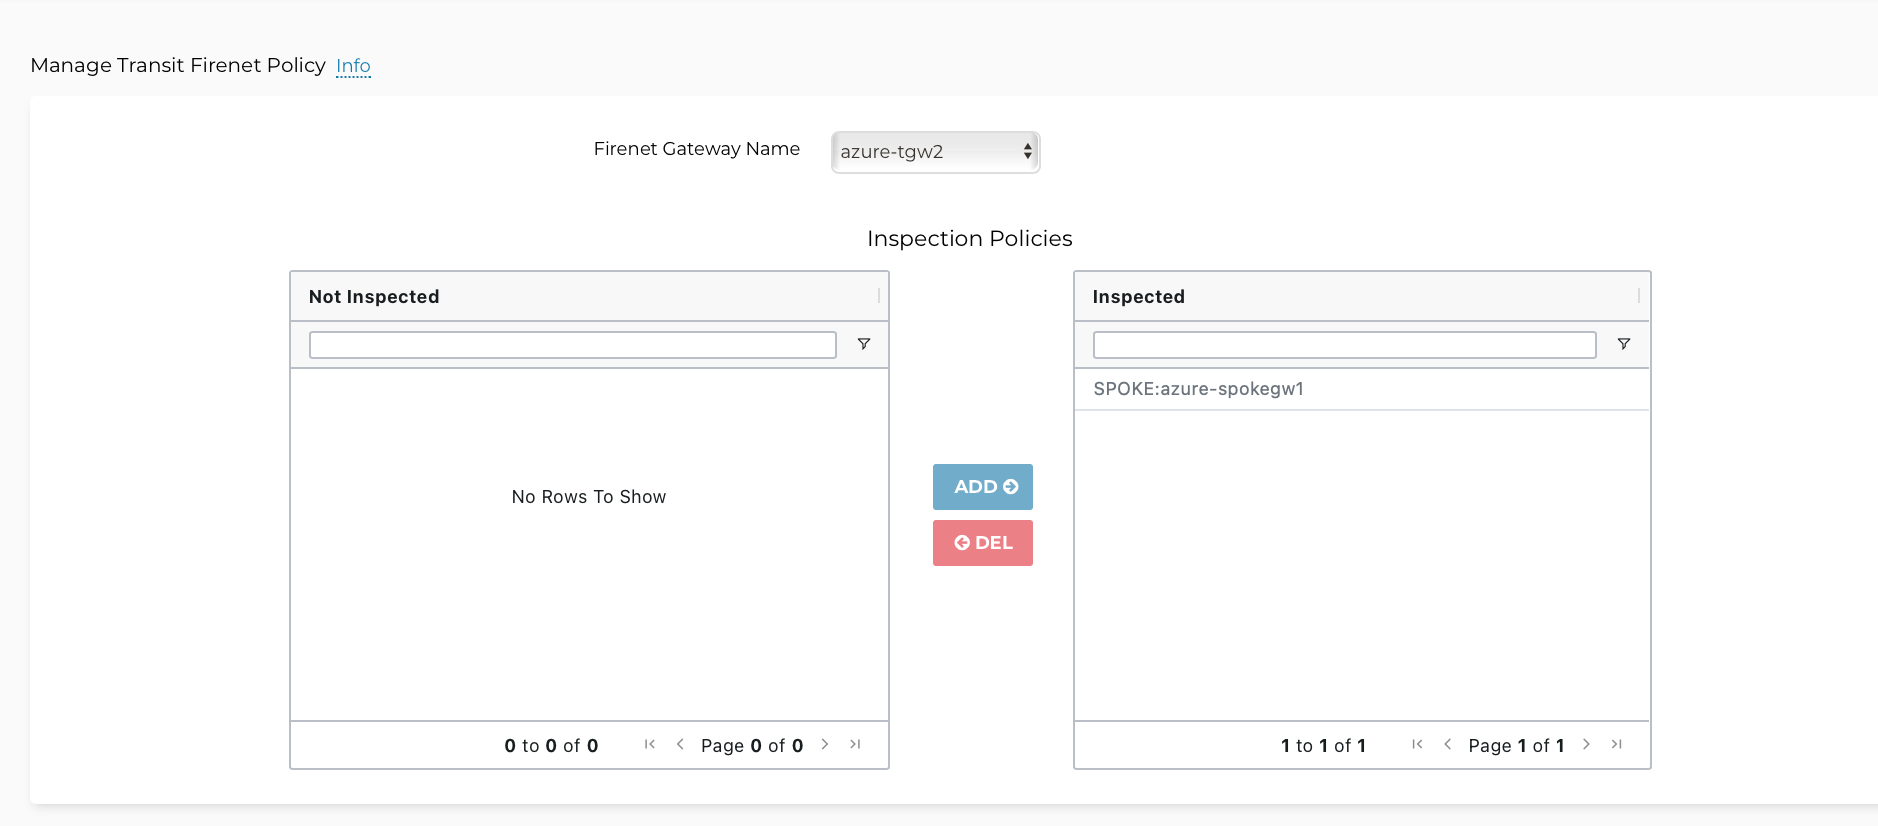
Navigate to Firewall Network > Policy > Manage Transit FireNet Policy.
-
Add spokes to the Inspected box for traffic inspection.
|
By default, FireNet inspects ingress (INET to VNET) and east-west traffic (VNET to VNET) only. |
Launch and Associate Firewall Instance
This approach is recommended if this is the first firewall instance to be attached to the gateway.
This step launches a firewall instance and associates it with one of the FireNet gateways.
|
The Firewall instance and the associated Aviatrix FireNet gateway above must be in the same AZ, and the Management Interface Subnet and Egress (untrust dataplane) Interface Subnet should not be in the same subnet. |
|
By default, Aviatrix Transit FireNet uses a 5-tuple hashing algorithm but can be changed if required. |
Launch and Attach
In the Aviatrix Controller navigate to Firewall Network > Setup > Step 2a. Provide all the required input as shown in a table and click Launch.
|
The vendor’s firewall may take some time after launch to be available. |
| Setting | Value |
|---|---|
VPC ID |
The Security VNET created in Step 1. |
Gateway Name |
The primary FireNet gateway. |
Firewall Instance Name |
The name that will be displayed on Azure Console. |
Firewall Image |
The Azure AMI that you have subscribed. |
Firewall Image Version |
Firewall supported software versions. |
Firewall Instance Size |
Firewall virtual machine size. |
Management Interface Subnet. |
Select the subnet whose name contains "gateway and firewall management" |
Egress Interface Subnet |
Select the subnet whose name contains "FW-ingress-egress". |
Username |
Applicable to Azure deployment only. "admin" as a username is not accepted. |
Authentication Method |
Password or SSH Public Key |
Password |
Applicable to Azure deployment only. |
Key Pair Name (Optional) |
The .pem file name for SSH access to the firewall instance. |
Attach (Optional) |
By selecting this option, the firewall instance is inserted in the data path to receive packet. If this is the second firewall instance for the same gateway and you have an operational FireNet deployment, you should not select this option as the firewall is not configured yet. You can attach the firewall instance later at Firewall Network → Advanced page. |
Advanced (Optional) |
Click this selection to allow Palo Alto firewall bootstrap files to be specified. |
Check Point Specifications
Check Point Security Gateway has two interfaces as described below.
| Check Point VM interfaces | Description | Inbound Security Group Rule |
|---|---|---|
eth0 (on subnet -Public-FW-ingress-egress) |
Egress or Untrusted interface |
Allow ALL |
eth1 (on subnet -dmz-firewall) |
LAN or Trusted interface |
Allow ALL (Do not change) |
Note that security gateway eth1 is on the same subnet as the FireNet gateway eth2 interface.
The Check Point Security Gateway launch from the Aviatrix Controller automatically initiates the onboarding process, configures security gateway interfaces and programs RFC 1918 routes. After completing this step, you can log in to the Check Point Gaia console with username admin and the password provided during launch.
|
Repeat the Launch and Attach procedure to launch the second security gateway to associate with the HA FireNet gateway. Or repeat this step to launch more security gateways to associate with the same Firenet gateway. |
Follow Check Point AWS Example to see how to launch the Check Point Security Gateway in Azure, and for more details.
Palo Alto VM-Series Specifications
Palo instance has three interfaces as described below.
| Palo Alto VM interfaces | Description | Inbound Security Group Rule |
|---|---|---|
eth0 (on subnet -Public-gateway-and-firewall-mgmt) |
Management interface |
Allow SSH, HTTPS, ICMP, TCP 3978 |
eth1 (on subnet -Public-FW-ingress-egress) |
Egress or Untrusted interface |
Allow ALL |
eth2 (on subnet -dmz-firewall) |
LAN or Trusted interface |
Allow ALL (Do not change) |
Note that firewall instance eth2 is on the same subnet as FireNet gateway eth2 interface.
Launch VM Series from Aviatrix Controller automatically set it up the Palo Alto Network VM-Series firewall. User should be able to login to the VM-Series console with given username and password during launch.
|
For Panorama managed firewalls, you need to prepare Panorama first and then launch a firewall. When a VM-Series instance is launched and connected with Panorama, you need to apply a one time "commit and push" from the Panorama console to sync the firewall instance and Panorama. |
|
If VM-Series are individually managed and integrated with the Controller, you can still use Bootstrap to save initial configuration time. Export the first firewall’s configuration to bootstrap.xml, create an IAM role and Bootstrap bucket structure as indicated above, then launch additional firewalls with IAM role and the S3 bucket name to save the time of the firewall manual initial configuration. |
Fortinet Specifications
FortiGate Next Generation Firewall instance has two interfaces as described below.
| FortiGate VM interfaces | Description | Inbound Security Group Rule |
|---|---|---|
eth0 (on subnet -Public-FW-ingress-egress) |
Egress or Untrusted interface |
Allow ALL |
eth1 (on subnet -dmz-firewall) |
LAN or Trusted interface |
Allow ALL (Do not change) |
|
FortiGate bootstrap configuration in Azure is supported. |
Please refer to FortiGate Azure Configuration Example for more detail on configuring FortiGate in Azure.
Associate an Existing Firewall Instance
This step is the alternative step to Launch and Attach. If you already launched the firewall (Check Point, Palo Alto Network or Fortinet) instance from Azure Console, you can still associate it with the FireNet gateway.
In the Aviatrix Controller navigate to Firewall Network > Setup → Firewall > Step 2b and associate a firewall with the correct FireNet Gateway.
(Optional) Vendor Firewall Integration
Vendor integration dynamically updates firewall route tables. The use case is for networks with RFC 1918 and non-RFC 1918 routes that require specific route table programming on the firewall appliance
-
In the Aviatrix Controller, navigate to Firewall Network > Vendor Integration > Firewall.
-
Select the Firewall Vendor Type and fill in the Firewall details of your Firewall instance.
-
Click Save.
-
You can click Show or Sync to show the integration details or sync the configuration with the firewall.
|
Aviatrix Controller automatically programs RFC 1918 in Check Point Security Gateway at a time of launch. This step can be skipped for Check Point if non-RFC 1918 routes programming is not required in Security Gateway. |
|
Vendor integration is not supported for FortiGate. User needs to configure RFC 1918 static routes manually in FortiGate firewall. |
Enable Health Check Policy in Firewall
Aviatrix Controller uses HTTPS (TCP 443) to check the health of firewall every 5 seconds. User needs to enable this port in firewall as per given instruction.
Palo Alto Network (PAN)
By default, the VM-Series does not allow HTTPS or TCP 443 port. Please follow the given steps to enable it:
-
Login to VM-Series with username and password.
-
Go to Network > Interface Mgmt under Network Profiles and click "Add".
-
Give any name in "Interface Management Profile", check HTTPS checkbox under Administrative Management Service and click OK.
-
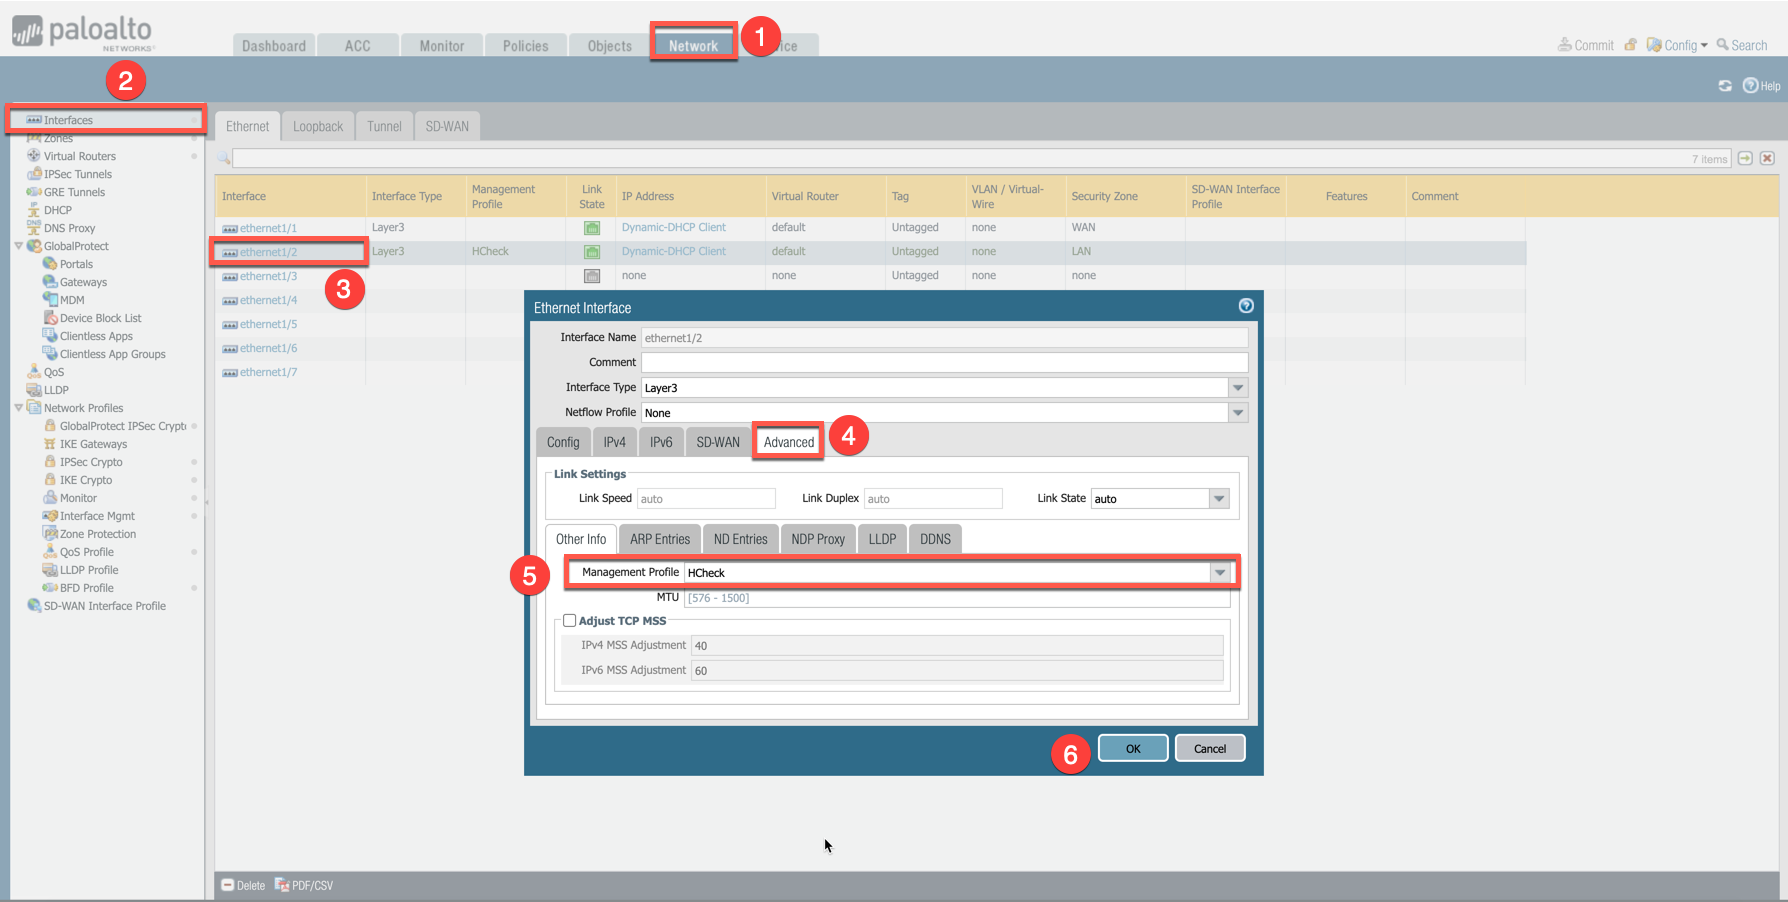
Attach Profile with LAN interface. Network > Interfaces > Select LAN Ethernet Interface > Advanced > Management Profile > Select appropriate profile.
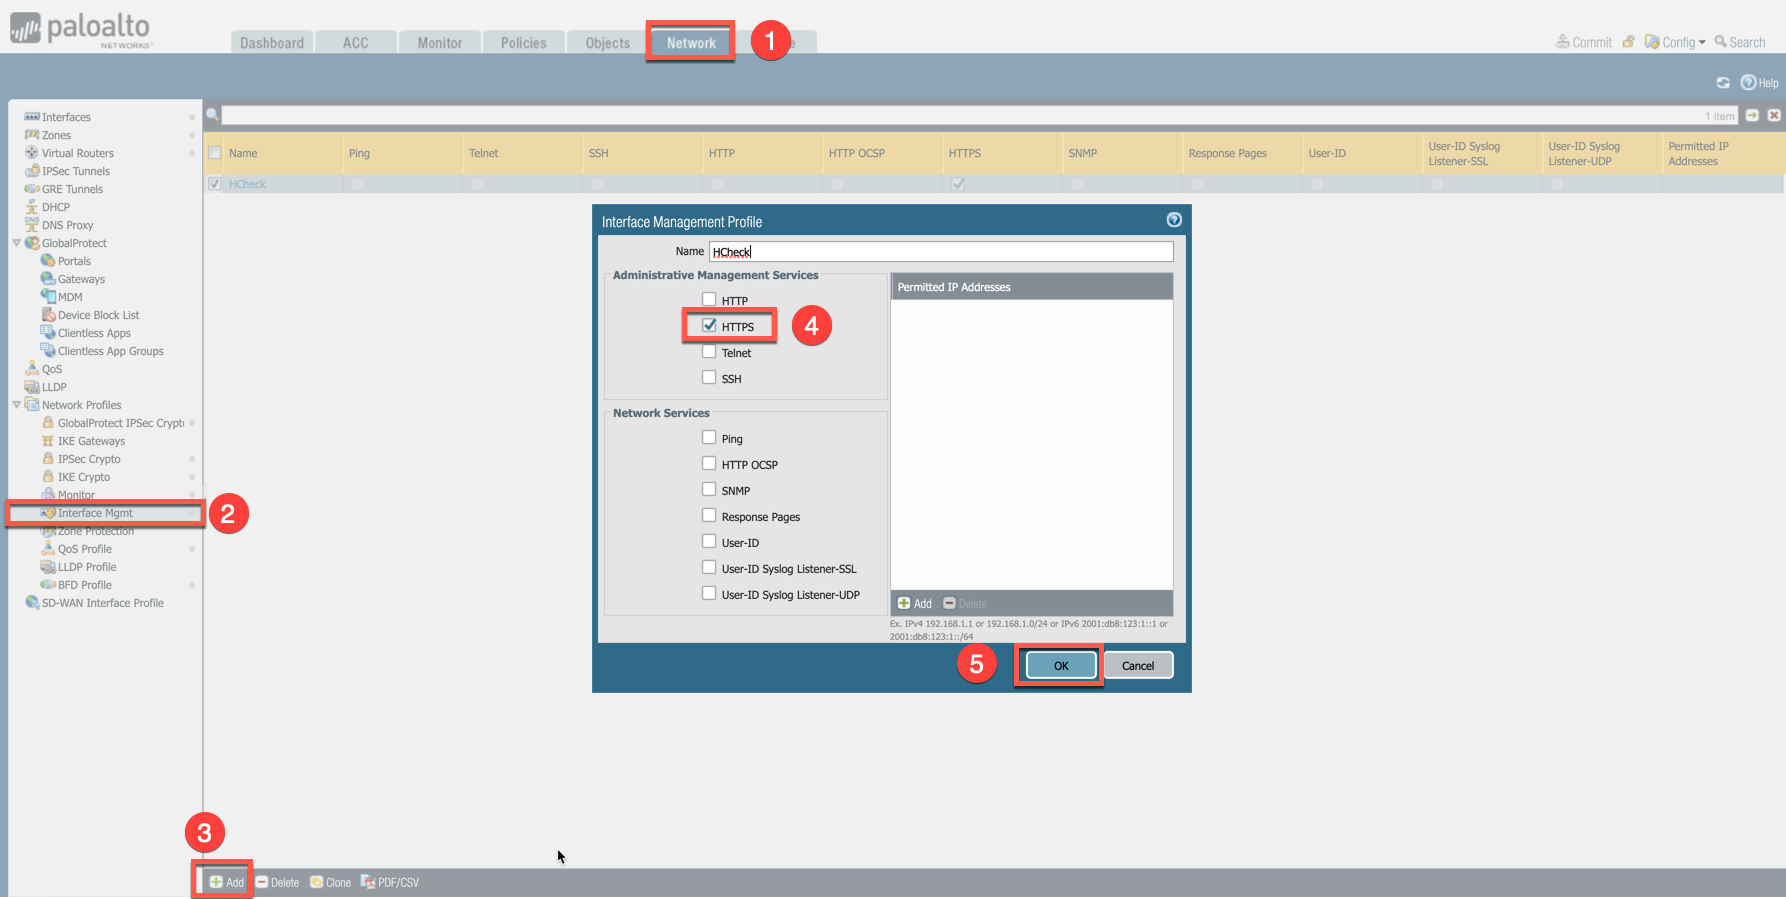
See an example screenshot below how to attach profile to an interface.
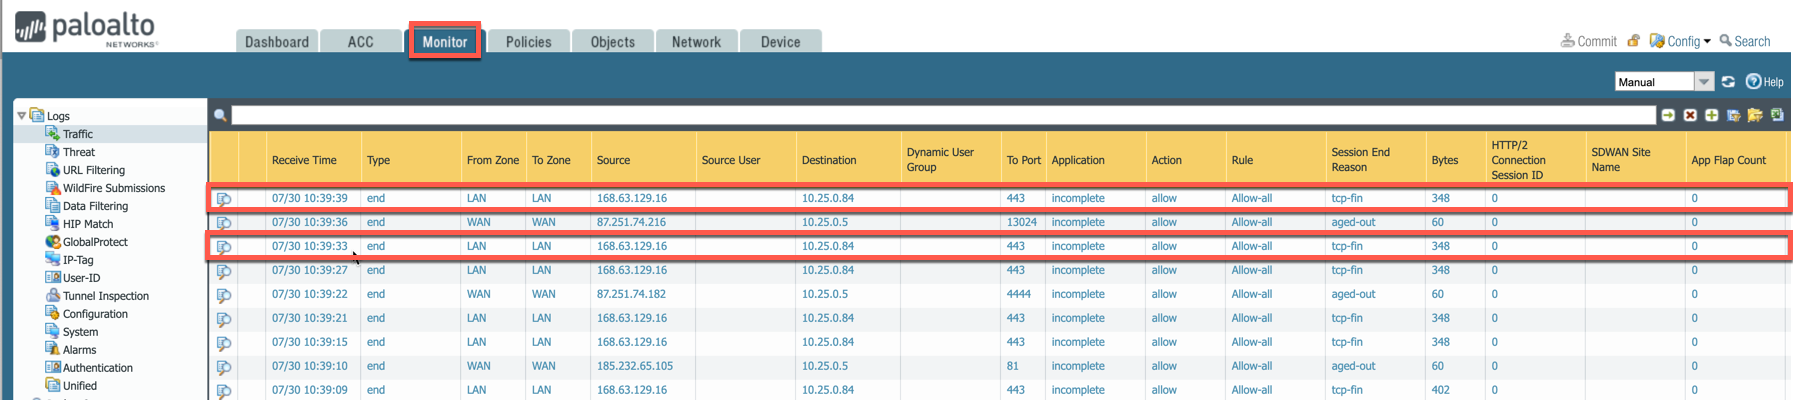
Firewall health check probes can be verified in Monitor > Traffic.
Fortinet
User needs to allow HTTPS or TCP 443 port in FortiGate firewall to monitor the health of firewall. Please follow the steps to allow HTTPS in FortiGate:
-
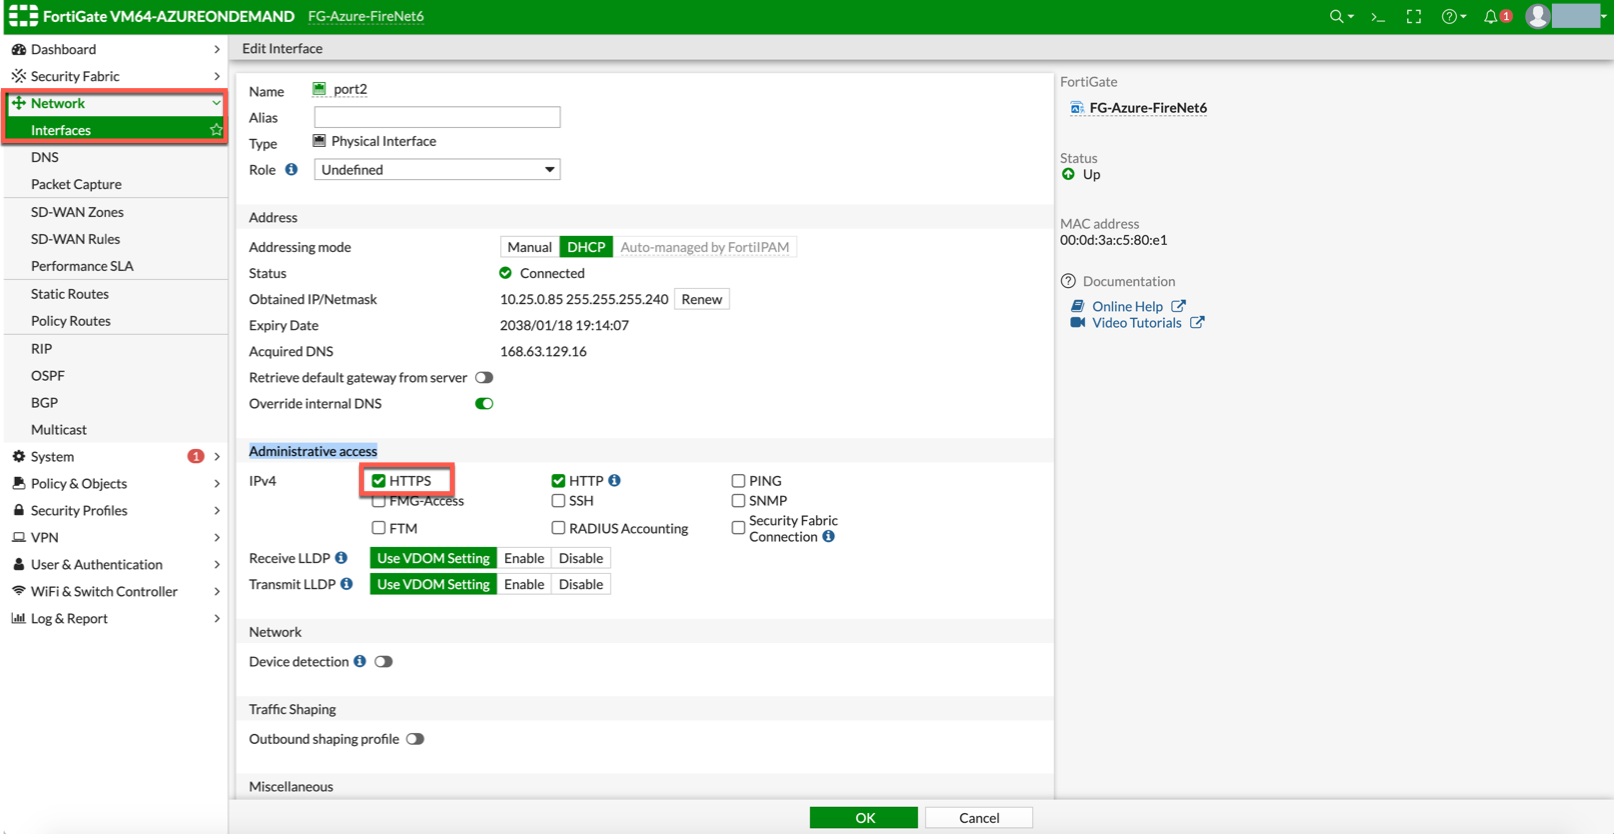
Login to FortiGate’s console using username and password
-
Go to Network > Interfaces, select port 2 and click "Edit".
-
Check HTTPS checkbox under Administrative access > IPv4 and click "OK".
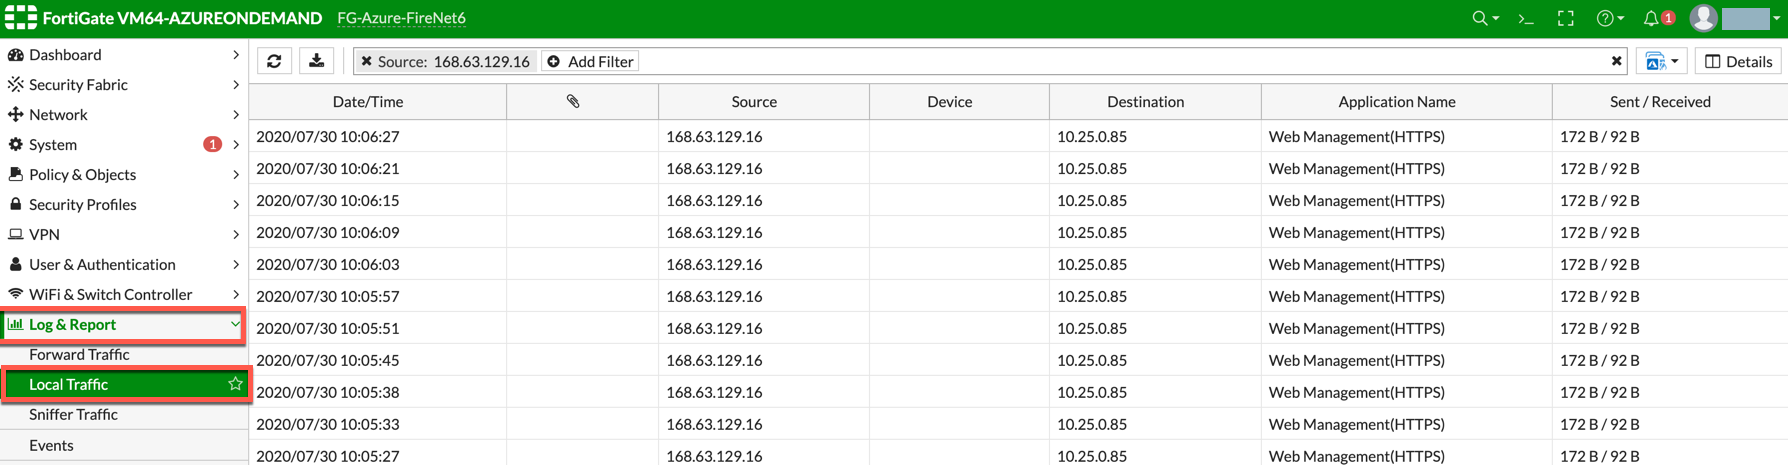
The health check probes can be verified in FortiGate by navigating to Log & Report > Local Traffic.
Step 10: Example Setup for "Allow All" Policy
After a firewall instance is launched, wait for 5 to 15 minutes for it to come up. Time varies for each firewall vendor. In addition, please follow example configuration guides as below to build a simple policy on the firewall instance for a test validation that traffic is indeed being routed to firewall instance.
Palo Alto Network (PAN)
For basic configuration, please refer to example Palo Alto Network configuration guide.
FortiGate (Fortinet)
For basic policy configuration, please refer to example Fortinet configuration guide.
Check Point
For basic policy configuration, please refer to example Check Point configuration guide.
Verification
There are multiple ways to verify if Transit FireNet is configured properly:
-
Aviatrix Flightpath - Control-plane Test
-
Ping/Traceroute Test between Spoke VNETs (East-West) - Data-plane Test
Flight Path Test for FireNet Control-Plane Verification
Flight Path is a very powerful troubleshooting Aviatrix tool which allows users to validate the control-plane and gives visibility of end to end packet flow.
-
Navigate to Troubleshoot→ Flight Path
-
Provide the Source and Destination Region and VNET information
-
Select ICMP and Private subnet, and Run the test
|
VM instance will be required in Azure, and ICMP should be allowed in security group. |
Ping/Traceroute Test for FireNet Data-Plane Verification
Once control-plane is established and no problem found in security and routing polices. Data-plane validation needs to be verified to make sure traffic is flowing and not blocking anywhere.
There are multiple ways to check the data-plane:
-
SSH to Spoke EC2 instance (e.g. DEV1-VM) and ping the other Spoke EC2 to instance (e.g PROD1-VM) to make sure there is no traffic loss in the path.
-
Ping/traceroute capture can also be performed from Aviatrix Controller. Navigate to Troubleshoot → Diagnostics and perform the test.