Configuring Palo Alto in Azure
Example Config for Palo Alto Networks VM-Series in Azure
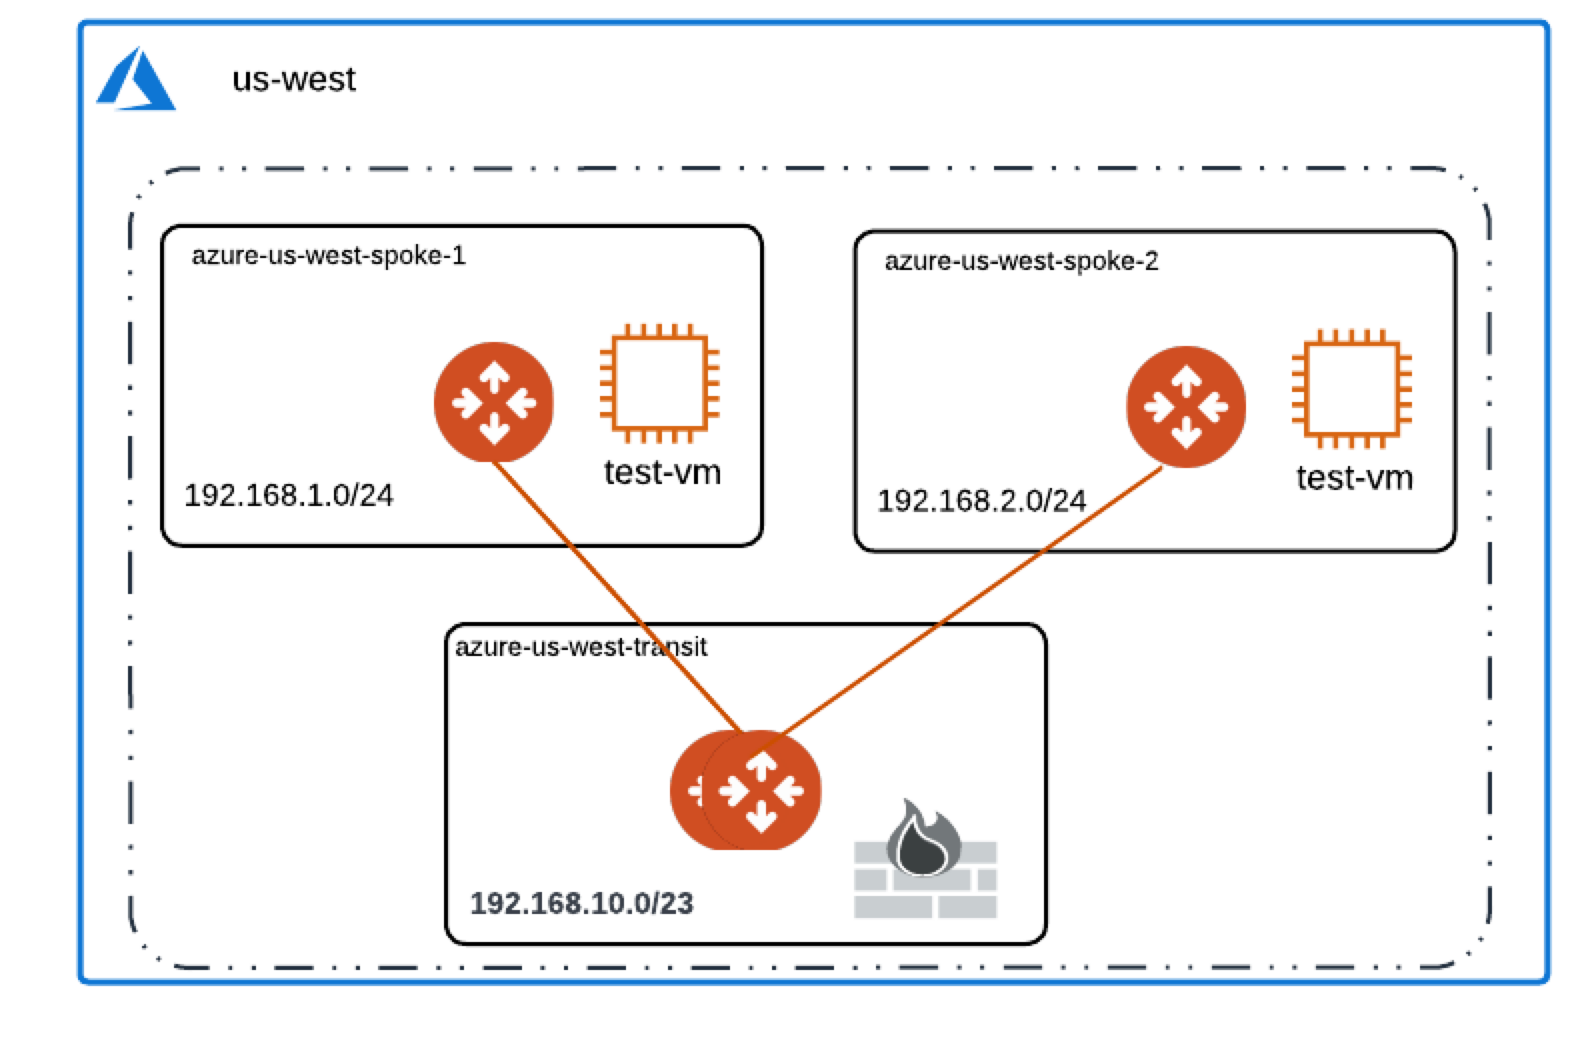
The example on this page walks through how to deploy the Palo Alto Networks (PAN) VM-Series firewalls in the Transit VNet, and how to inspect traffic between the two Spoke VNETs using firewall policies.
Aviatrix FireNet deploys and manages firewall instances in the cloud. It greatly simplifies virtual firewall deployment and allows the firewall to inspect East-West and/or North-South traffic.
FireNet allows you to scale firewall deployment to multiple Availability Zones and multiple instances/VMs in a maximum throughput Active/Active state without SNAT.
For more information on using a bootstrap configuration to set up your Palo Alto firewall in Azure, click here.
For Palo Alto example configurations in other CSPs, see:
Launching Palo Alto Networks Firewall from Aviatrix Controller
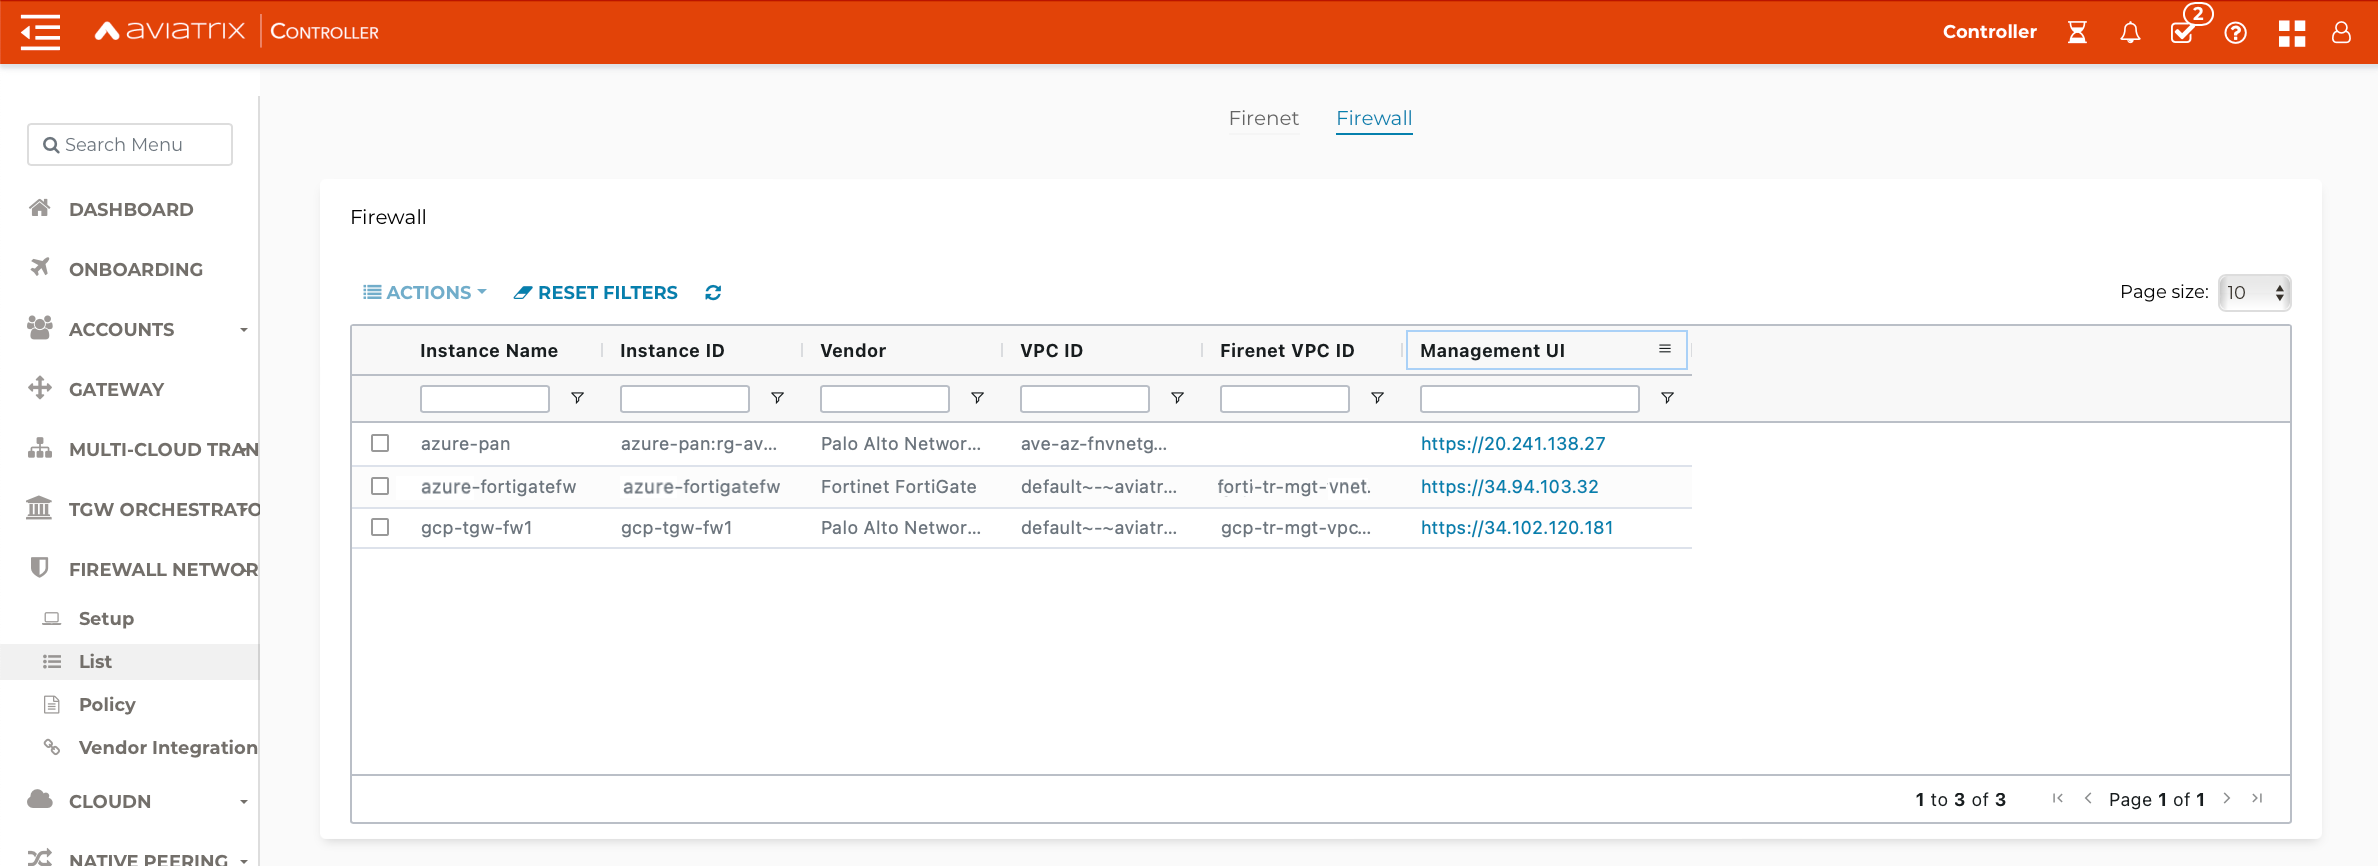
The Aviatrix Firewall Network (FireNet) workflow launches a VM-Series at this step in the workflow. After the launch is complete, the console displays the VM-Series instance with its public IP address of management interface.
Go to your Aviatrix Controller > Firewall Network > Setup > Firewall > Step 2a. Here is the VM-Series information in this example for your reference. Please adjust it depending on your requirements.
| Example setting | Example value |
|---|---|
VPC ID |
Select VPC (e.g. TR-Firenet-VNET) |
Gateway Name |
Select correct Transit FireNet Gateway |
Firewall Instance Name |
Give any Good Name (e.g. PAN-Azure-Firenet) |
Firewall Image |
Palo Alto Networks VM-Series Next-Generation Firewall Bundle 1 |
Firewall Image Version |
9.1.0 |
Firewall Instance Size |
Standard_D3_v2 |
Management Interface Subnet |
Select the subnet whose name contains "Public-gateway-and-firewall-mgmt". |
Egress Interface Subnet |
Select the subnet whose name contains "Public-FW-ingress-egress". |
Username |
Any Good Name (e.g. panadmin). Note that 'admin' is not allowed. Please refer to https://docs.microsoft.com/en-us/azure/virtual-machines/linux/faq for the requirements for setting this name |
Authentication Method |
Password or SSH Public Key |
Password |
Input a good password of your choice |
Attach |
Mark this checkbox |
Advanced |
Unmark this checkbox |
Palo Alto Networks VM-Series instance has three interfaces as described below.
| Palo Alto VM interfaces | Description | Inbound Security Group Rule |
|---|---|---|
eth0 (on subnet -Public-gateway-and-firewall-mgmt) |
Management interface |
Allow SSH, HTTPS, ICMP, TCP 3978 |
eth1 (on subnet -Public-FW-ingress-egress) |
Egress or Untrusted interface |
Allow ALL |
eth2 (on subnet -dmz-firewall_lan) |
LAN or Trusted interface |
Allow ALL (Do not change) |
Note that firewall instance eth2 is on the same subnet as FireNet gateway eth2 interface.
Logging in to VM-Series
-
Go back to your Aviatrix Controller.
-
Go to Firewall Network workflow, Step 2a. Click on the Management UI link. This takes you to the VM-Series you just launched.
-
Log in with Username "panadmin". The password is the one you set in the previous step.
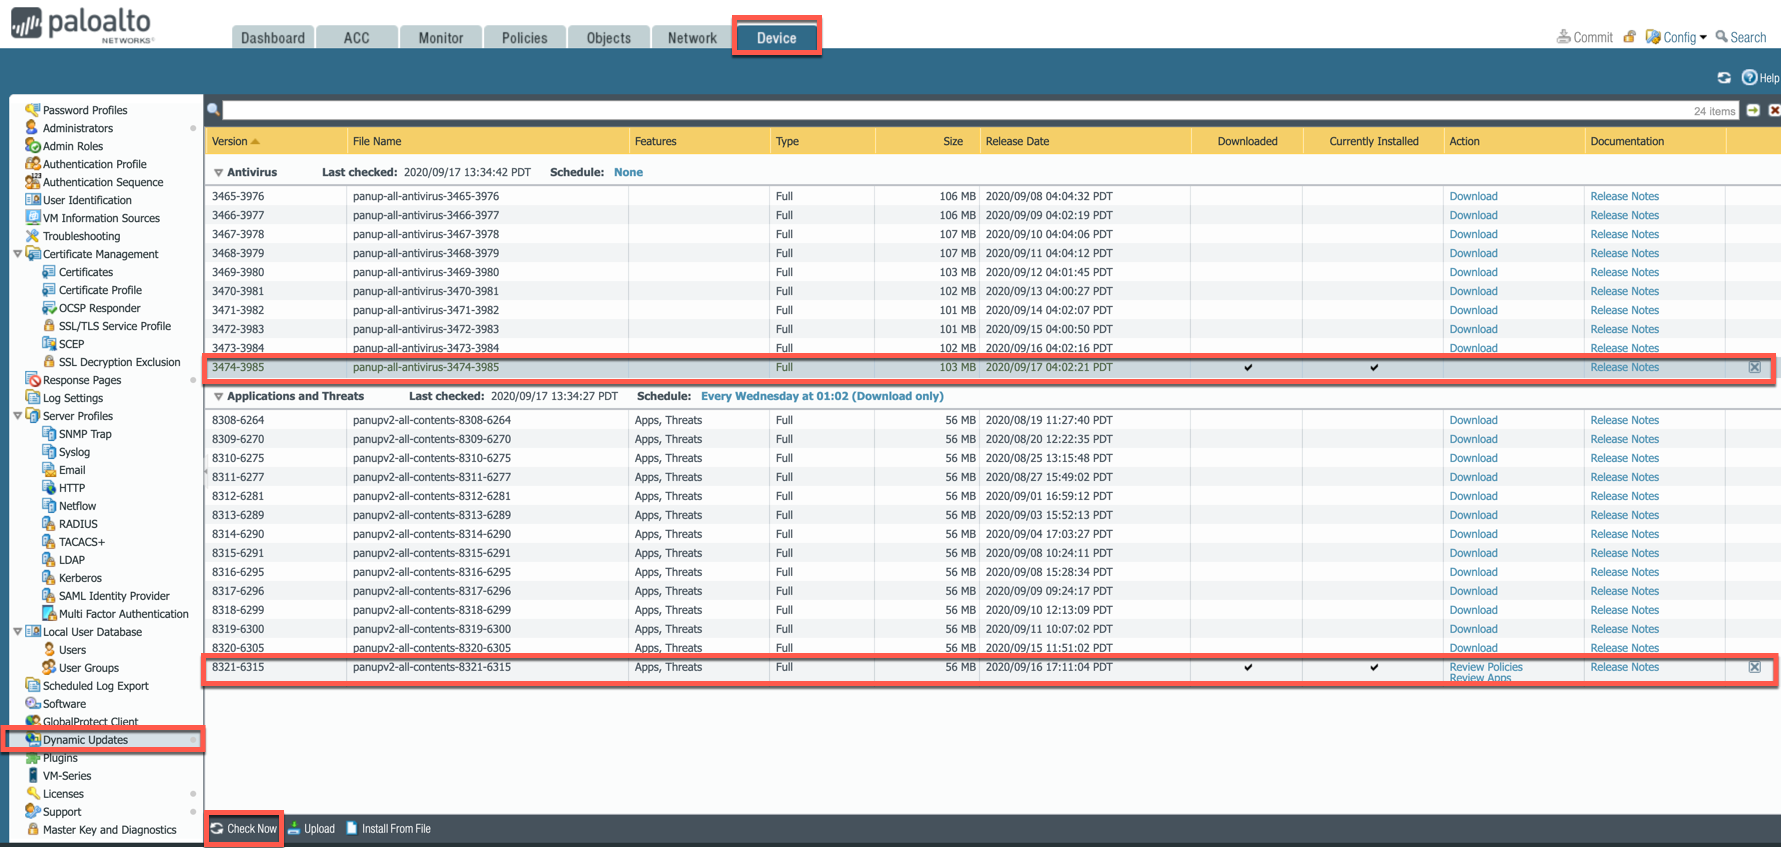
Dynamic Updates
-
Go to Device > Dynamic Updates > Click on Check Now.
-
Download and Install the latest versions of Applications and Threats.
-
Wildfire updates > Click on "Check Now" again and download and then install the latest version of Antivirus.
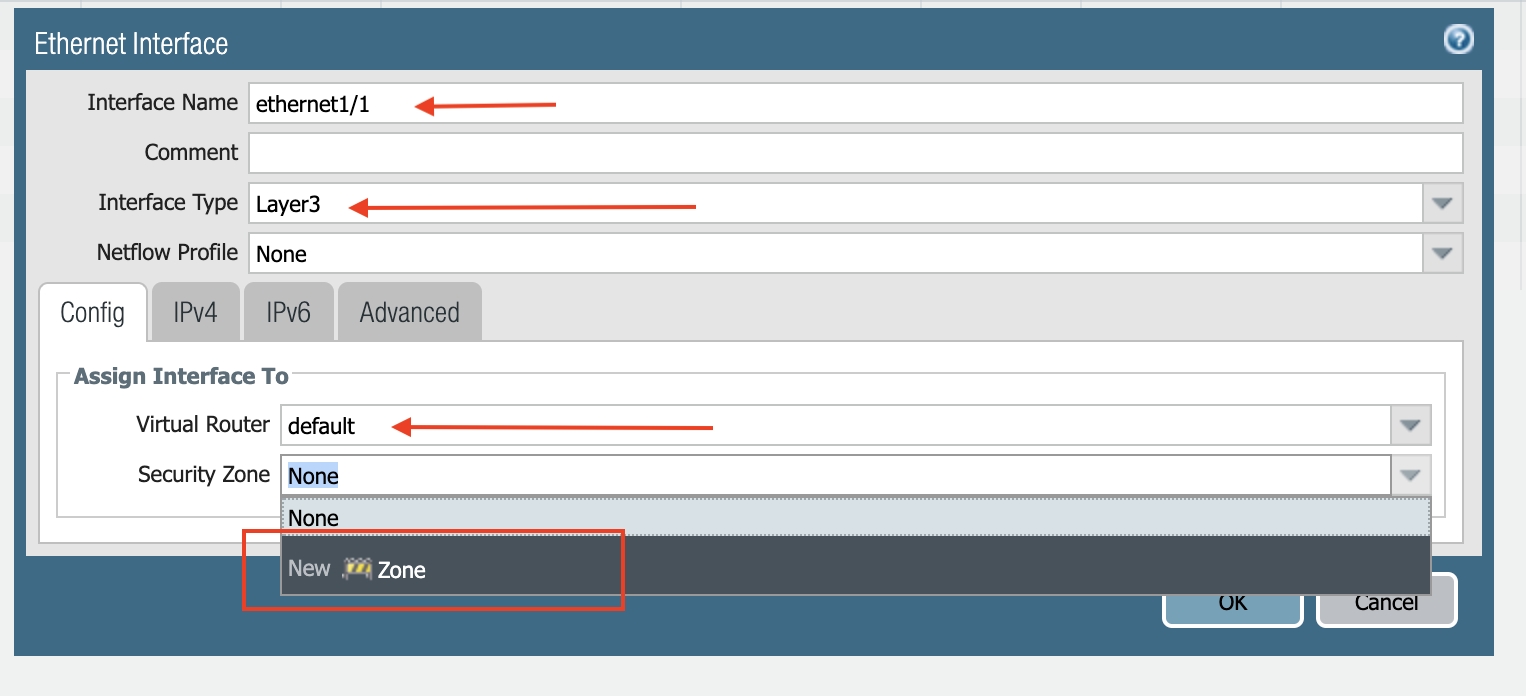
Configuring VM-Series ethernet1/1 with WAN Zone
After logging in, select the Network tab to see a list of ethernet interfaces. Click ethernet1/1 and configure as per the following screenshot.
-
Select the Network tab.
-
Click ethernet1/1.
-
Select layer3 for Interface Type
-
Click Config tab in the popup Ethernet Interface window.
-
Select default for Virtual Router at Config tab.
-
Click New Zone for Security Zone to create a WAN zone.
-
At the next popup window, name the new zone "WAN" and click OK.
-
Select IPV4 tab in the popup Ethernet Interface window.
-
Select DHCP Client.
-
Unmark the Automatically create default route pointing to default gateway provided by server checkbox as shown below.
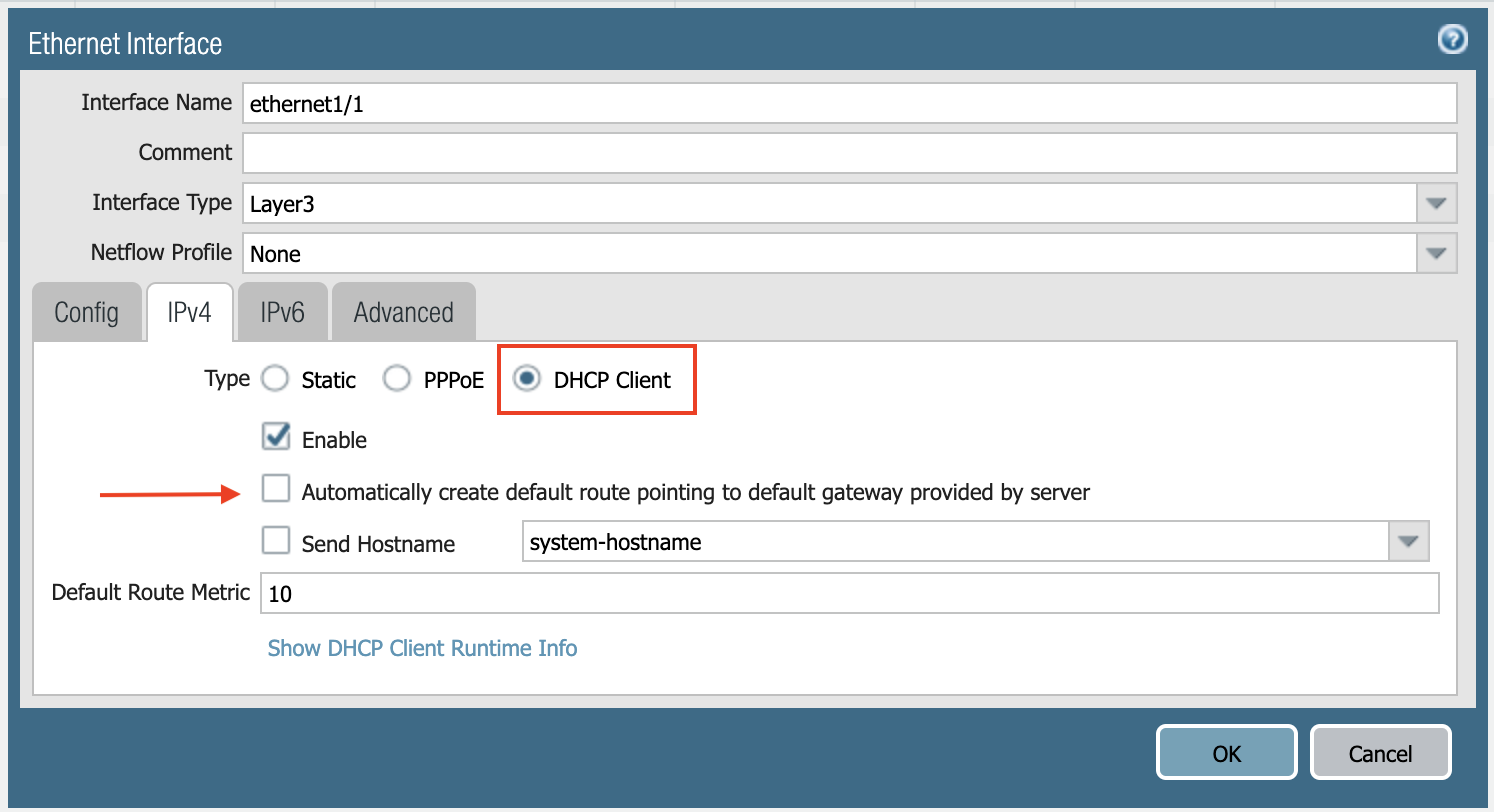
-
Click Commit. Once Commit is complete, you should see the Link State turn green at the Network page for ethernet1/1.
Configuring VM-Series ethernet1/2 with LAN Zone
Repeat the steps from the Configuring VM-Series ethernet1/1 with WAN Zone section above for ethernet1/2. Name the new zone LAN.
Click Commit. Once Commit is complete, you should see the Link State turn green at the Network page for ethernet1/2.
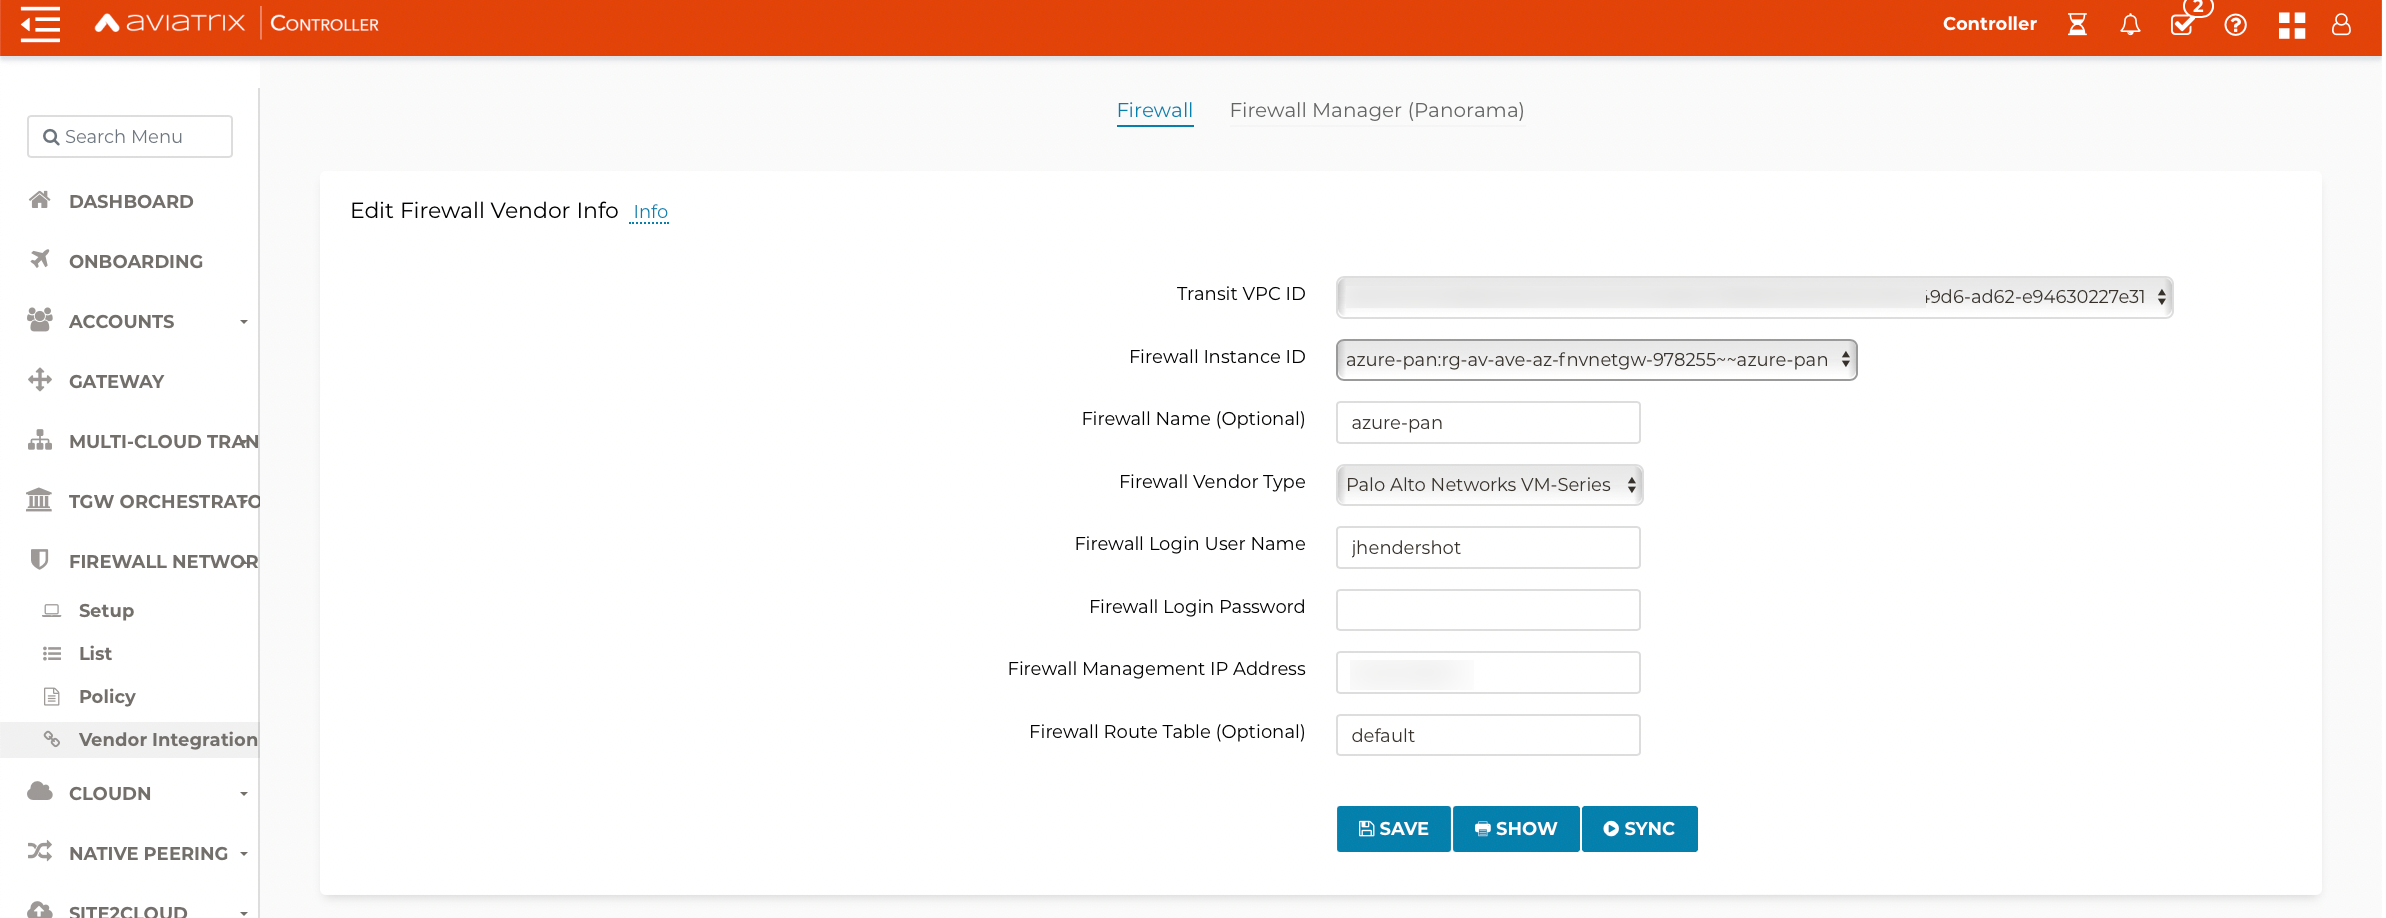
Vendor Firewall Integration
This step automatically configures the RFC 1918 and non-RFC 1918 routes between the Aviatrix Gateway and the Vendor’s firewall instance (in this case Palo Alto Networks VM-Series). This can also be done manually through the CSP and/or Vendor’s Management tool.
-
Go to Firewall Network > Vendor Integration > Firewall.
-
Fill in the details of your Firewall instance.
-
Click Save, Show and Sync.
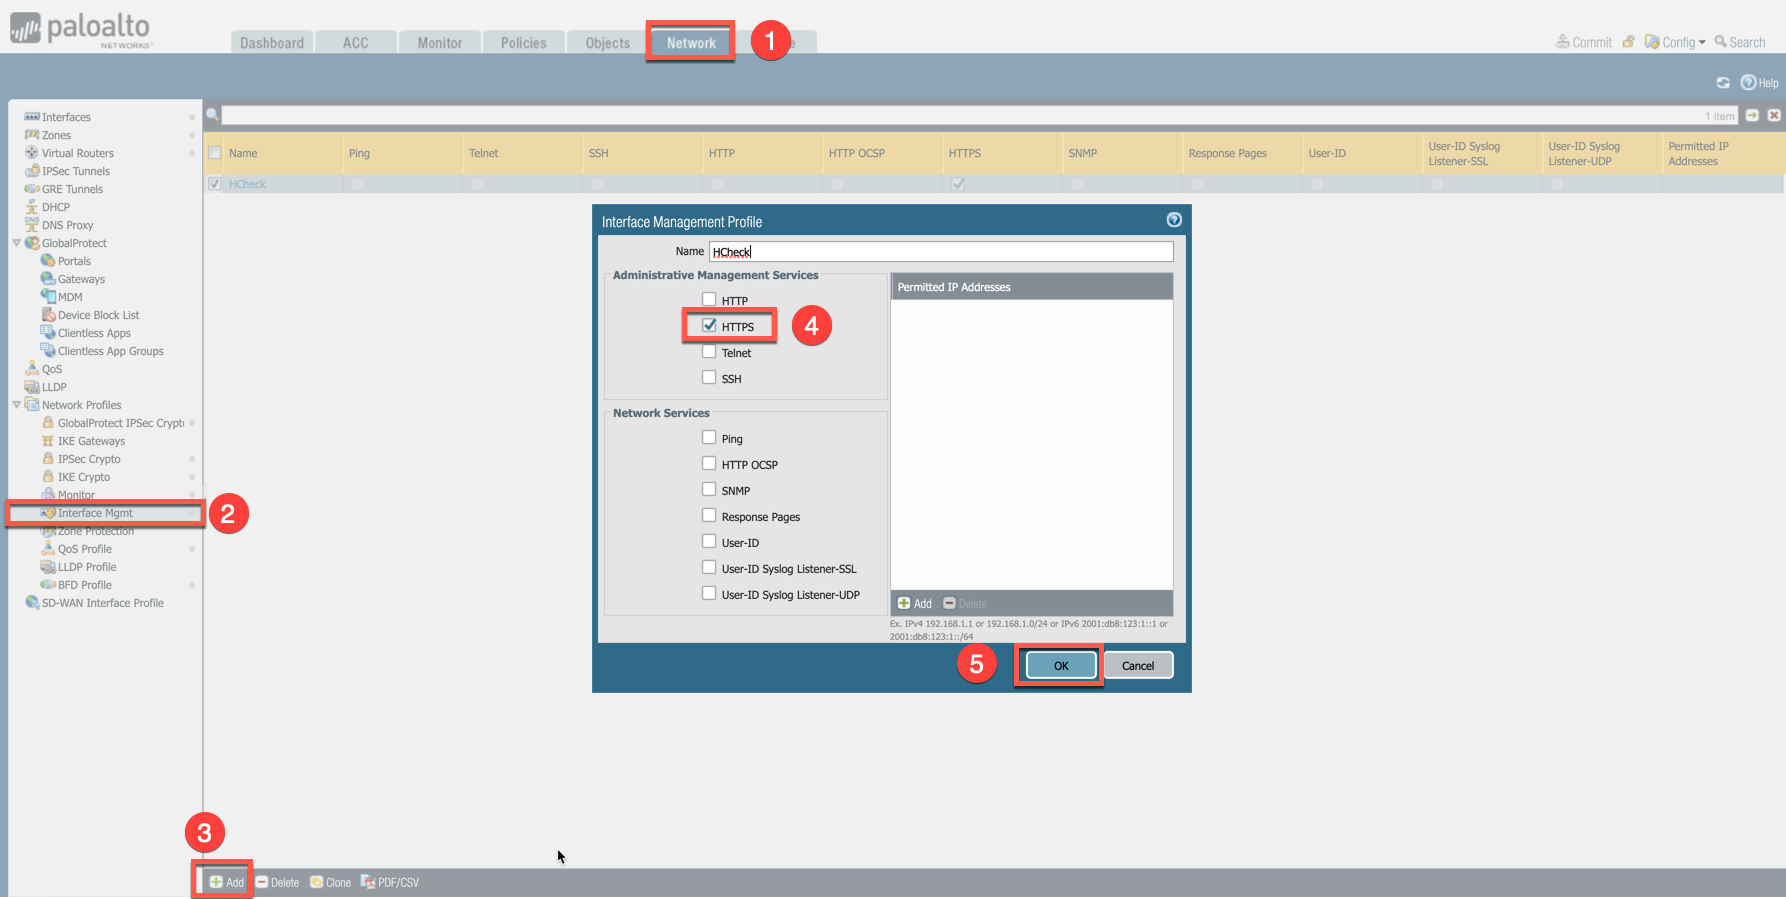
Enabling VM-Series Health Check Policy
By default, VM-Series does not allow the HTTPS or TCP 443 port. Please use the following steps to enable it:
-
Go to Network > Interface Mgmt under Network Profiles and click Add.
-
Enter a name in the Interface Management Profile, mark the HTTPS checkbox under Administrative Management Service, and click OK.
-
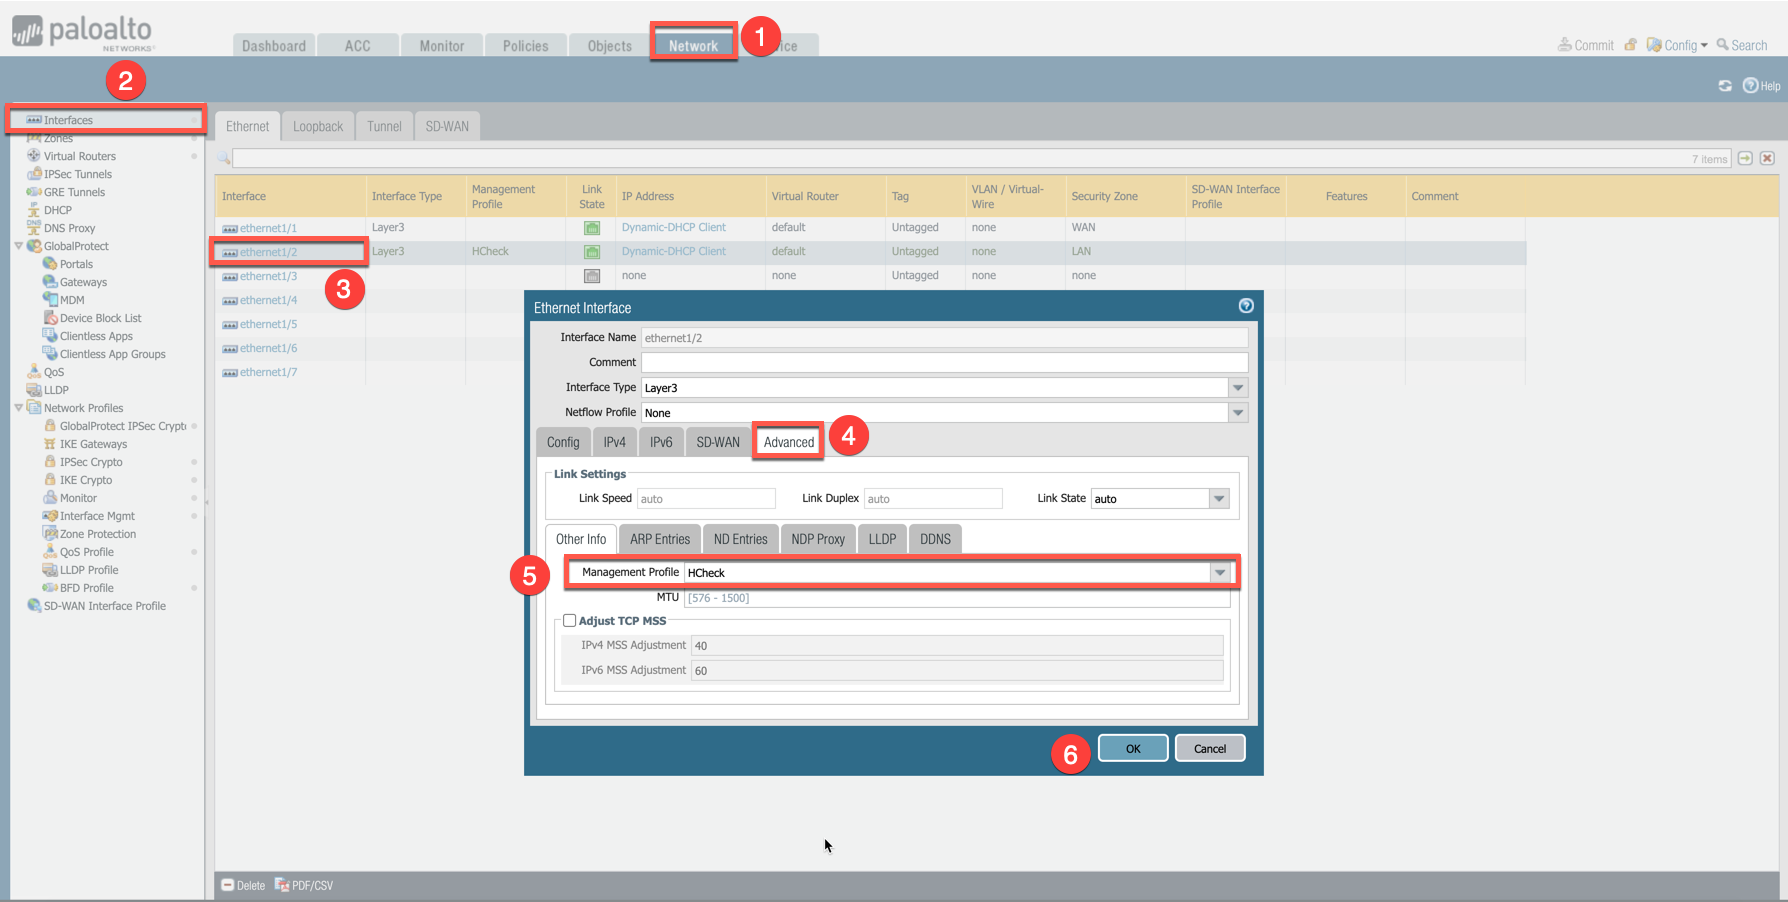
Attach Profile with LAN interface: Network > Interfaces > Select LAN Ethernet Interface > Advanced > Management Profile > Select appropriate profile.
This example shows how to attach a profile to an interface.
Firewall health check probes can be verified in Monitor > Traffic.
Configuring Basic Traffic Policy to Allow Traffic VNet to VNet
In this step, we will configure a basic traffic security policy that allows traffic to pass through the VM-Series firewall.
-
Select the Policies tab.
-
Click +Add in the bottom left corner to create a new policy.
-
Select the General tab. Name the policy "Allow-all."
-
Select the Source tab. Select Any for both panels.
-
Select the Destination tab. Select Any for both panels.
-
Select the Application tab. Select Any.
-
Click OK.
-
Click Commit to commit the Allow-all policy.
(Optional) Configuring Basic Traffic Policy to Allow Traffic VNet to Internet
If you would also like to enable NAT to test egress, follow these steps.
-
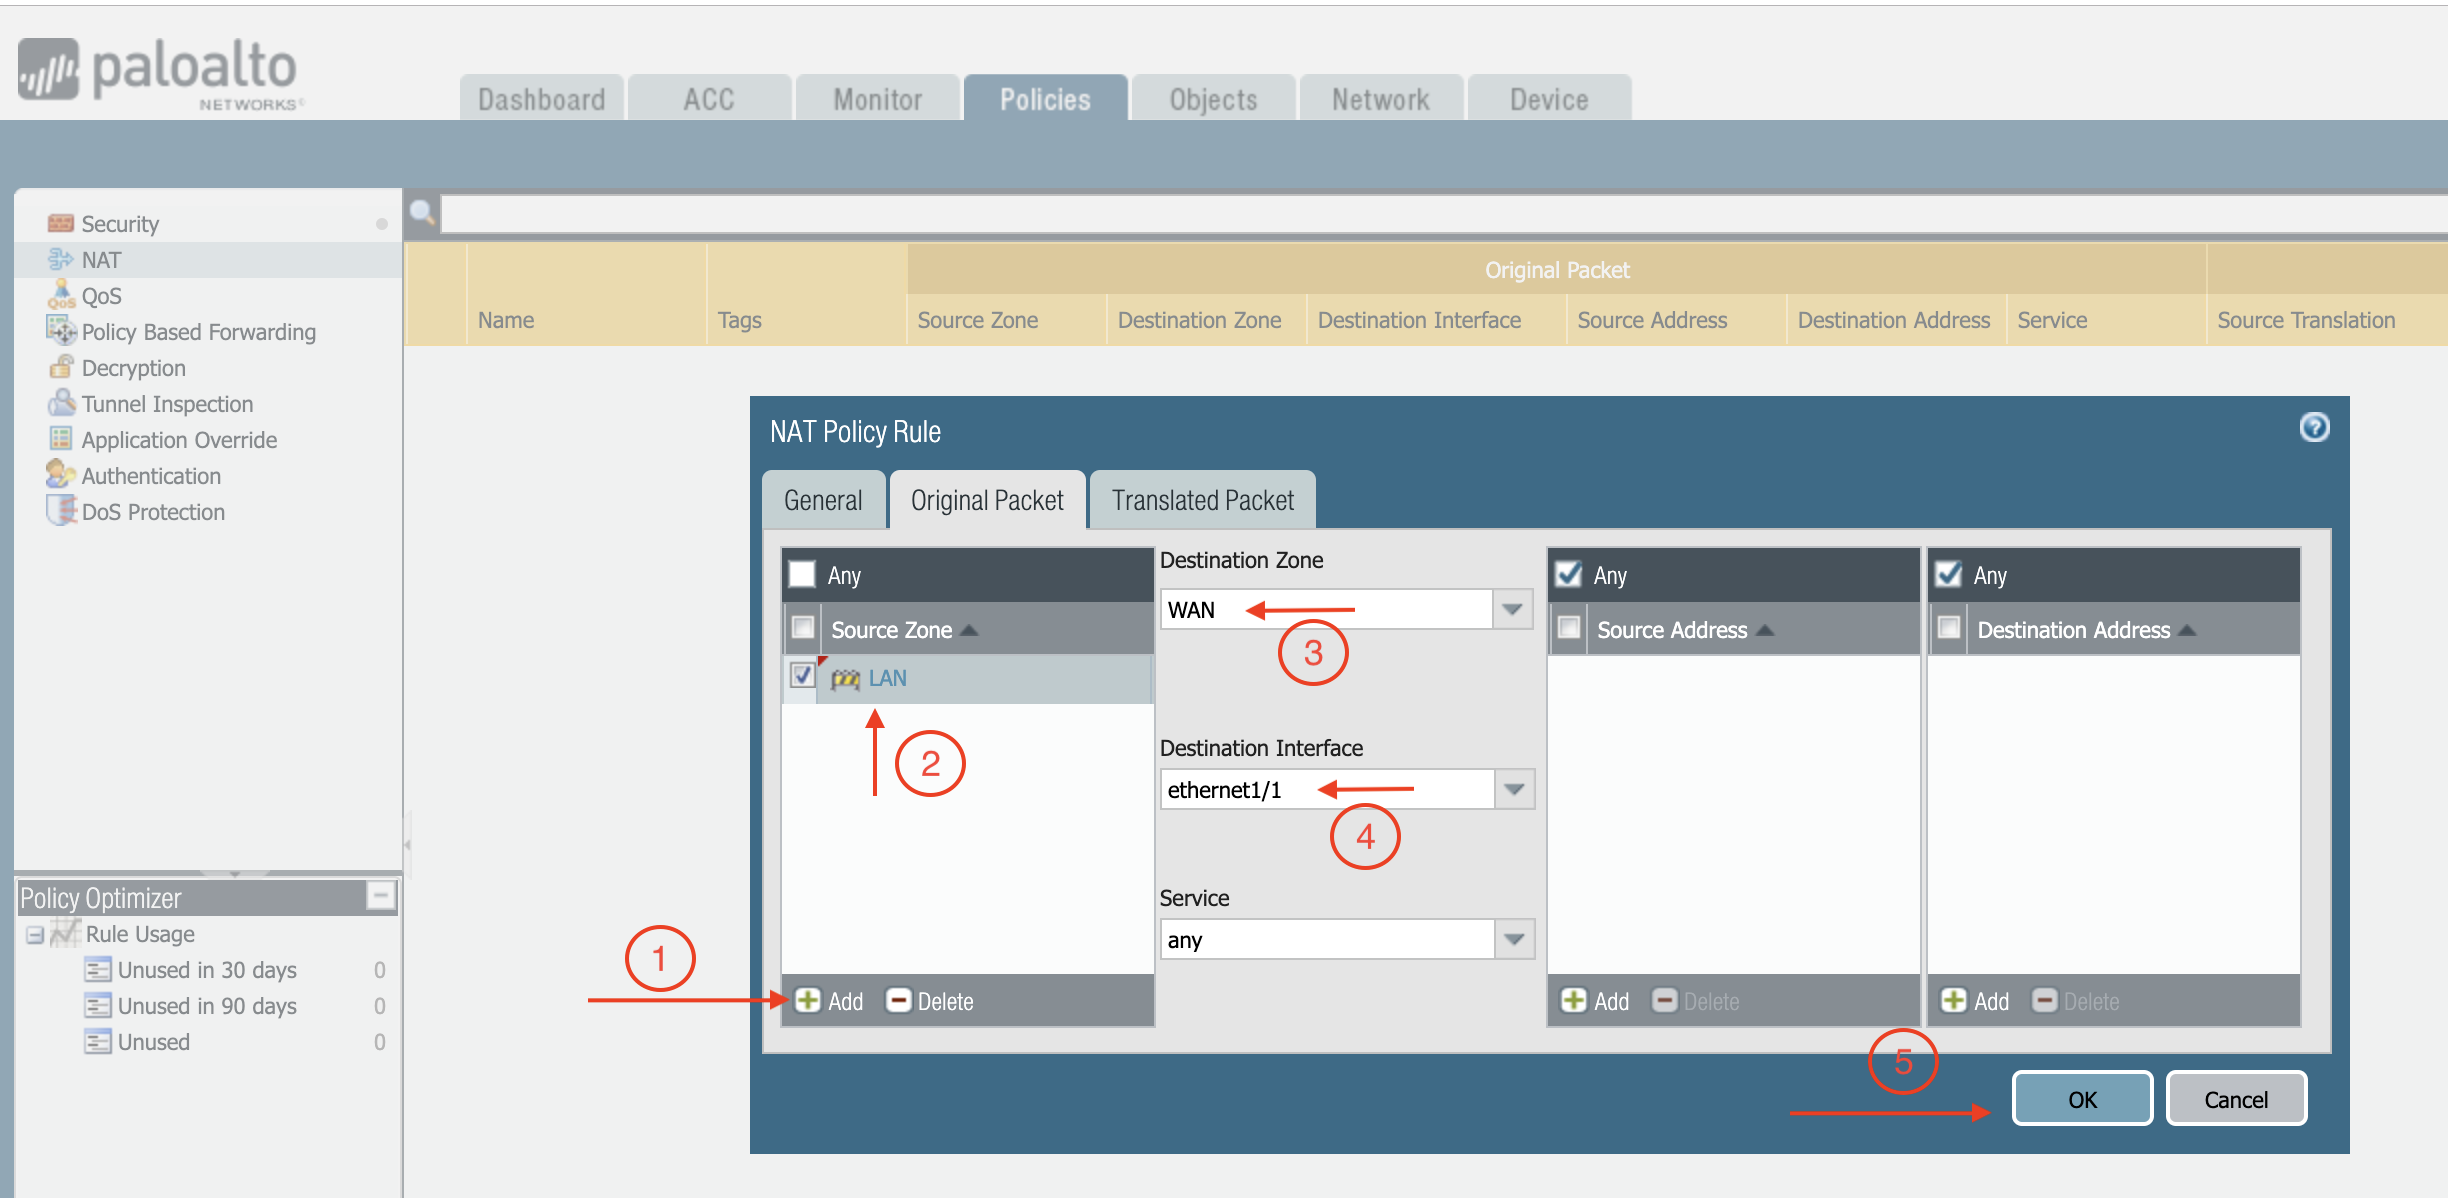
Policies > NAT > click Add.
-
Select the General tab, give it a name > click Original Packet.
-
At Source Zone, click Add, and select LAN.
-
At Destination Zone, select WAN. At Destination Interface, select Ethernet1/1, as shown below.
-
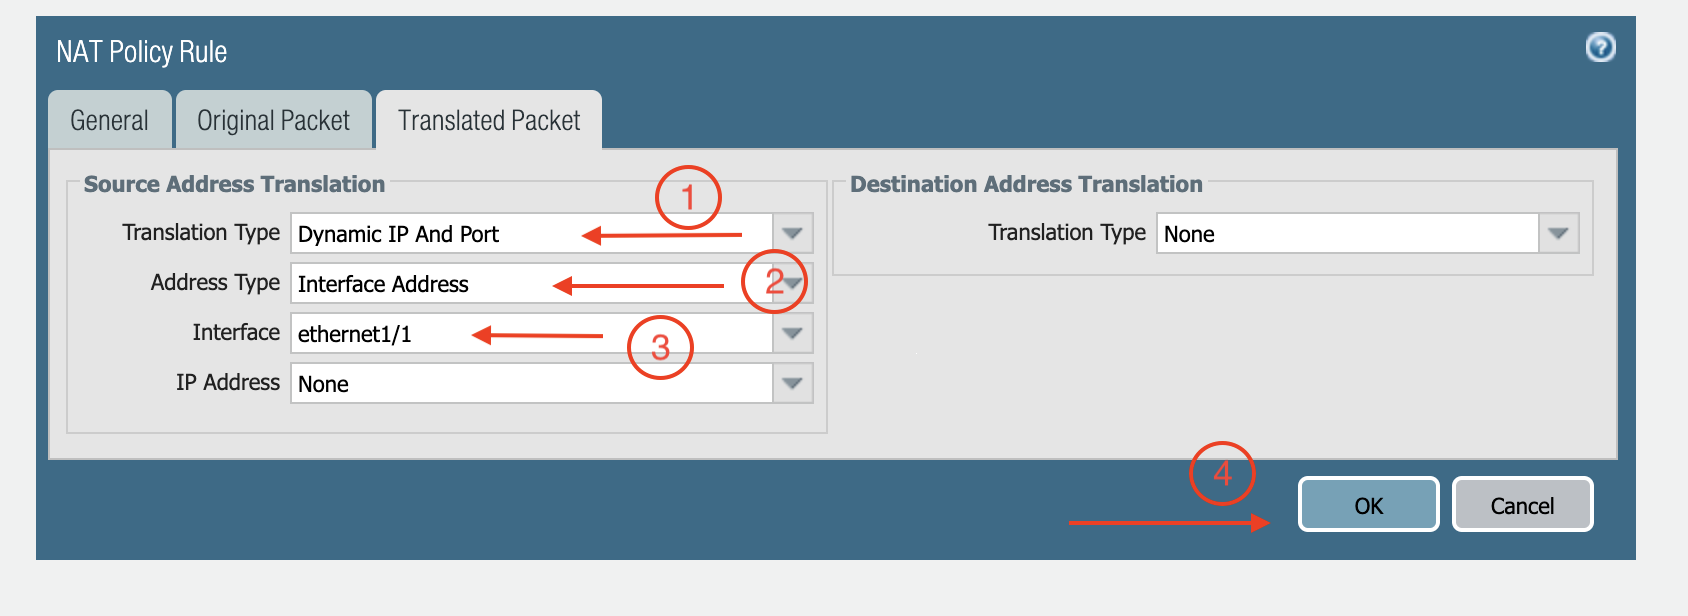
Click Translated Packet. At Translation Type, select Dynamic IP And Port.
-
At Address Type, select Interface Address.
-
At Interface, select ethernet1/1, as shown below.
Ready to Go
Now your firewall instance is ready to receive packets. The next step is to validate your configurations and polices using FlightPath and Diagnostic Tools (ping, traceroute etc.).
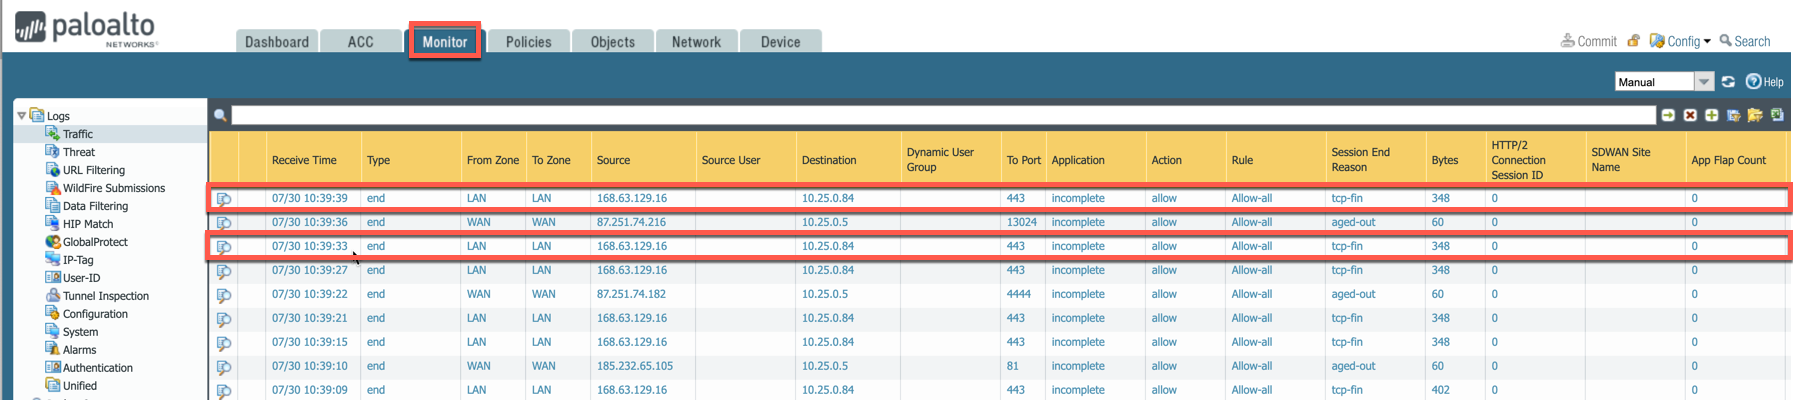
Viewing Traffic Log
You can view if traffic is forwarded to the firewall instance by logging in to the VM-Series console. Go to Monitor > Traffic.
VNet to VNet Traffic
Launch one instance in Spoke VNet-1 and one in Spoke VNet-2. Start ping packets from a instance in Spoke VNet-1 to the private IP of another instance in Spoke VNet-2. The ICMP traffic should go through the firewall and can be inspected in firewall.

[Optional] For VNet to Internet Traffic
Similarly, VNet to internet traffic can be also inspected by launching a private instance in the Spoke VNet and start ping packets from the private instance towards Internet (e.g 8.8.8.8) to verify the egress function.
|
The Egress Inspection is only applicable to VNets that deploy non-public facing applications. If you have any Spoke VNet that has public facing web services, you should not enable Egress Inspection. This is because Egress Inspection inserts a default route (0.0.0.0/0) towards Transit GW to send the Internet traffic towards firewall to get inspected. Azure’s System Default Route pointing towards Internet will be overwritten by User-defined default route inserted by the Controller. |