Transit FireNet Workflow for AWS TGW
Aviatrix Transit FireNet allows you to deploy firewall functions for the Aviatrix Multicloud Transit architecture. With the Transit FireNet feature, the Firewall Network is integrated into the Aviatrix Transit gateway.
To deploy firewall networks in other CSPs:
Creating a Security VPC/VNet
We recommend that you use the Aviatrix Useful Tools to create a VPC/VNet for a FireNet deployment.
Select the Aviatrix FireNet VPC option when creating a security VPC/VNet.
| Aviatrix FireNet VPC Public Subnet | Description |
|---|---|
-Public-gateway-and-firewall-mgmt-AZ-a |
A /28 subnet (public in AWS/GCP/OCI) in AZ a for FireNet Gateway and firewall instance management interface. |
-Public-gateway-and-firewall-mgmt-AZ-b |
A /28 subnet (public in AWS/GCP/OCI) in AZ b for FireNet HA Gateway and firewall instance management interface. |
-Public-FW-ingress-egress-AZ-a |
A /28 subnet (public in AWS/GCP/OCI) in AZ a for firewall instance’s egress interface. |
-Public-FW-ingress-egress-AZ-b |
A /28 subnet (public in AWS/GCP/OCI) in AZ b for firewall instance’s egress interface. |
Subscribing to a Firewall Instance (AWS Only)
Before setting up Aviatrix FireNet, AWS customers need to subscribe to a firewall instance from a specific vendor on the AWS Marketplace.
|
This document section applies to AWS customers only. Azure, GCP, and OCI customers can launch firewall instances directly from the Aviatrix Controller without subscriptions. |
To subscribe to a firewall instance from AWS, use the following steps.
-
In your AWS account, search for AWS Marketplace Subscriptions.
-
On the AWS Marketplace Subscriptions page, select Discover products.
-
In the search bar, enter the type of firewall instance you wish to subscribe to:
-
Enter “VM-series” to search for a Palo Alto firewall instance.
-
Enter “CloudGuard” to search for a Check Point firewall instance.
-
Enter “Fortigate” to search for a Fortinet firewall instance.
-
-
From the results, select a bundle and/or license option for the firewall instance you wish to subscribe to. There are different bundle/license options for each instance type that represent different costs and performance offerings.
-
On the next page, click Continue to subscribe to subscribe to the instance.
-
On the next page, click Accept terms to accept the license terms. After you subscribe to the firewall instance, wait for the Effective date column to change from “Pending” to today’s date. Then, return to the Aviatrix Controller to launch the firewall instance from there.
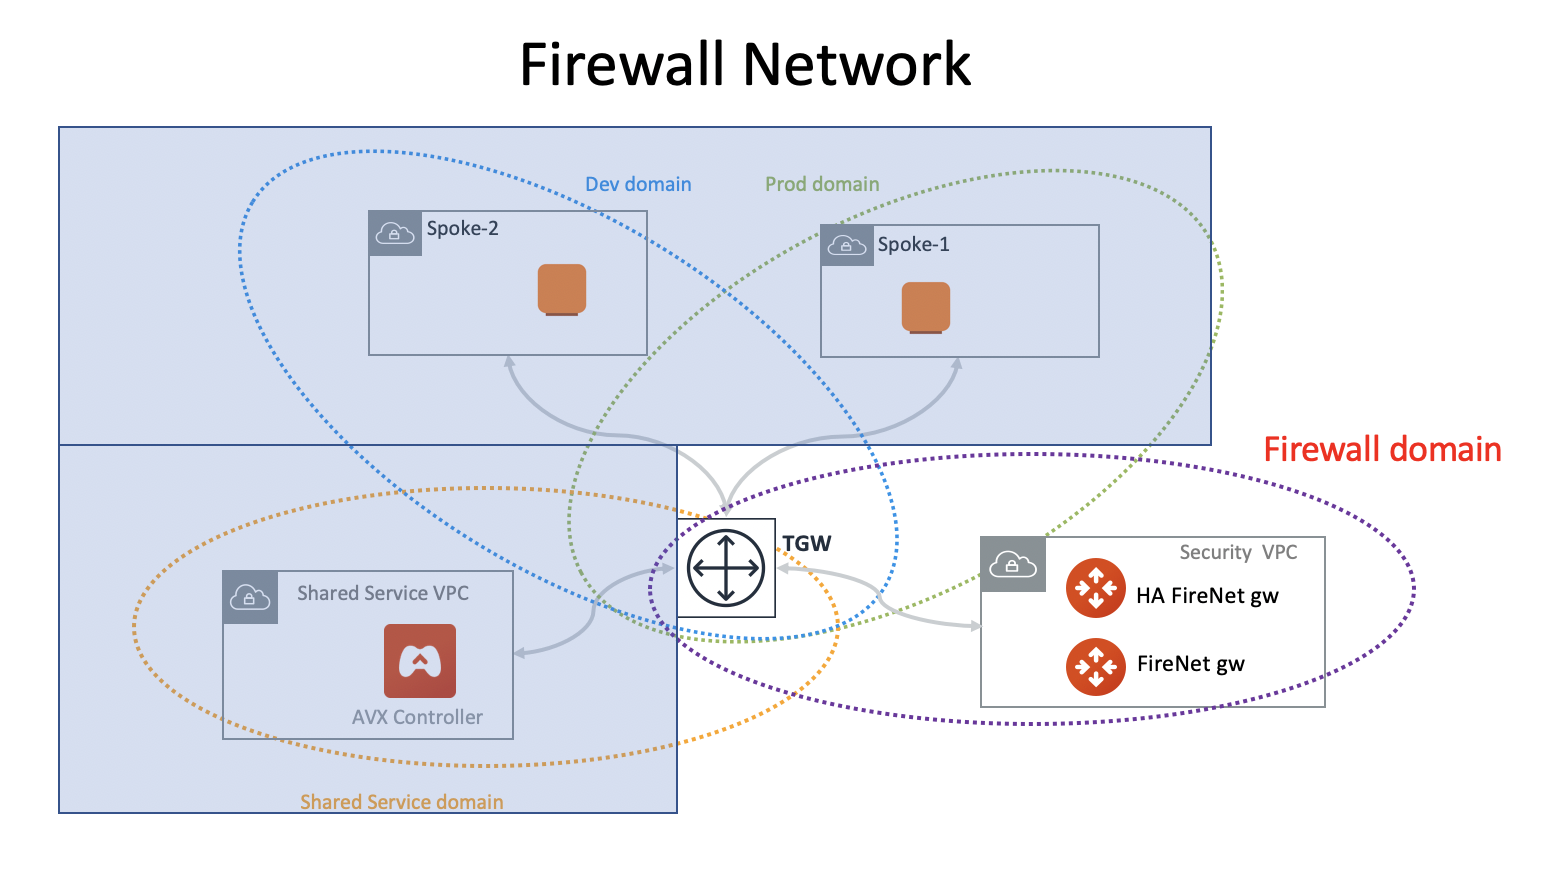
Creating a Firewall Domain
This step creates a Security Domain with a Firewall Domain option.
In your Aviatrix Controller, go to TGW Orchestrator > Plan > Create an AWS Transit Gateway and then a Security Domain by selecting Aviatrix Firewall Domain. For more information, refer to Create a New Network Domain.
Launching Aviatrix FireNet Gateway
This step leverages the Transit Network workflow to launch one Aviatrix Gateway for FireNet deployment. C5x.large is the minimum Aviatrix gateway instance size for FireNet deployment as it requires four interfaces.
If your deployment requires 2-AZ HA, go through Transit Network > Setup to launch one Aviatrix gateway and enable HA which effectively launches a HA gateway (the second gateway) in a different AZ. If you select public subnet "-Public-gateway-and-firewall-mgmt-AZ-a" for the primary FireNet Gateway, you should select public subnet "-Public-gateway-and-firewall-mgmt-AZ-b" for the second AZ FireNet Gateway.
Do not mark the High Performance Mode Encryption checkbox.
Enabling Aviatrix FireNet Gateway
This step configures the gateway launched in the "Launching an Aviatrix FireNet Gateway" section above or FireNet function. If you have HA enabled, it automatically sets up the HA gateway for FireNet deployment.
| If you do not see any gateways in the dropdown menu, refresh the browser. |
In this step, the Aviatrix Controller creates 3 more Ethernet interfaces with associated subnets on the FireNet Gateways.
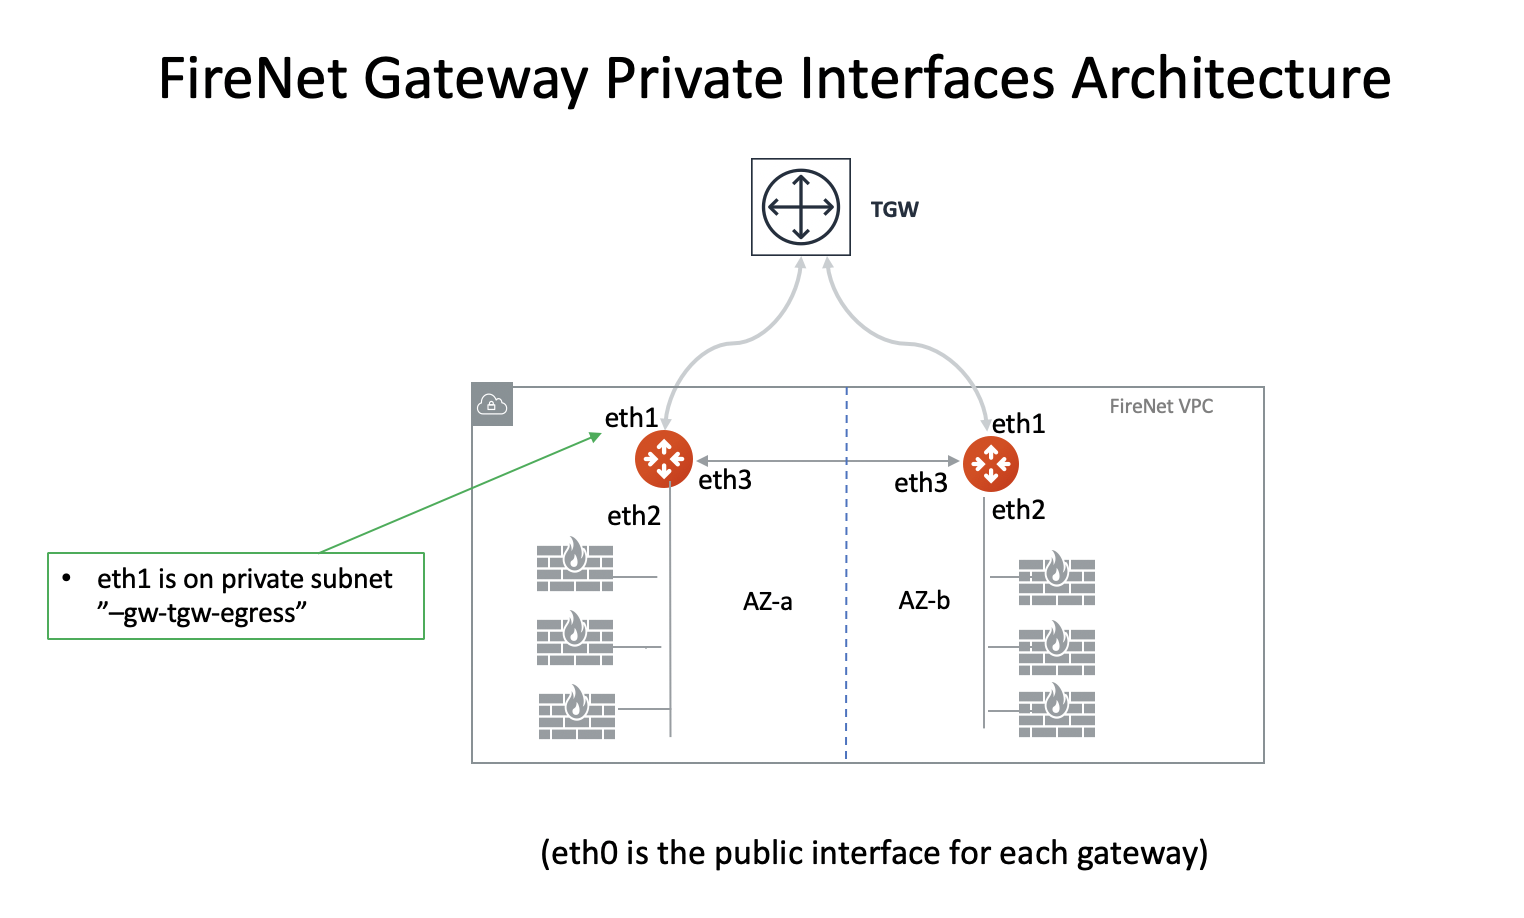
| FireNet Gateway instance interfaces | Inbound Security Group Rule | Description |
|---|---|---|
eth0 |
Allow SSH and HTTPS from Aviatrix Controller |
Public interface for communication with Controller |
eth1 |
Allow ALL (Do not change) |
Private interface for traffic to/from TGW |
eth2 |
Allow ALL (Do not change) |
Private interface for traffic to firewall instances |
eth3 |
Allow ALL (Do not change) |
Private interface for traffic to FireNet HA gateway |
|
Please do not change the security group inbound and outbound rules on eth1, eth2, and eth3 of a FireNet Gateway. |
If FireNet Gateway HA is enabled, the HA gateway shares the same route table as the primary for its eth1 interface.
The new subnets created by the Controller at these steps are listed below.
| Aviatrix FireNet VPC/VNet Private Subnet | Description |
|---|---|
-tgw-egress |
for FireNet Gateway eth1 to TGW |
-hagw-tgw-egress |
for FireNet HA Gateway eth1 to TGW |
-tgw-ingress |
for TGW to the ENI of eth1 of FireNet Gateway |
-hagw-tgw-ingress |
for TGW to the ENI of eth1 of the FireNet HA Gateway |
-dmz-firewall |
for FireNet Gateway eth2 |
-hagw-dmz-firewall |
for FireNet HA Gateway eth2 |
-dmz-exchange |
for FireNet Gateway eth3 |
-hagw-dmz-exchange |
for FireNet HA Gateway eth3 |
Enabling Native AWS GWLB for FireNet Function
This step integrates the AWS Transit Gateway (TGW) with AWS Gateway Load Balancer (GWLB) for native FireNet solution.
In the dropdown menu, select the right AWS Account and region, provide the right security VPC/VNet and click Enable.
The Aviatrix Controller will automatically create the new subnets, GWLB and GWLBe.
The new subnets created by the Controller at these steps are listed below.
| Aviatrix FireNet VPC/VNet Private Subnet | Description |
|---|---|
-tgw-ingress |
for TGW ENI to the GWLBe |
-hagw-tgw-ingress |
for TGW ENI to the GWLBe in different AZ |
-dmz-firewall |
for GWLBe |
-hagw-dmz-firewall |
for GWLBe in different AZ |
-gwlb-pool |
for GWLB and Firewalls |
-gwlb-pool-ha |
for GWLB and Firewalls in different AZ |
-gwlb-egress |
for NATGW gateway (if egress inspection is enabled) |
-gwlb-egress-ha |
for NATGW HA gateway (if egress inspection is enabled) |
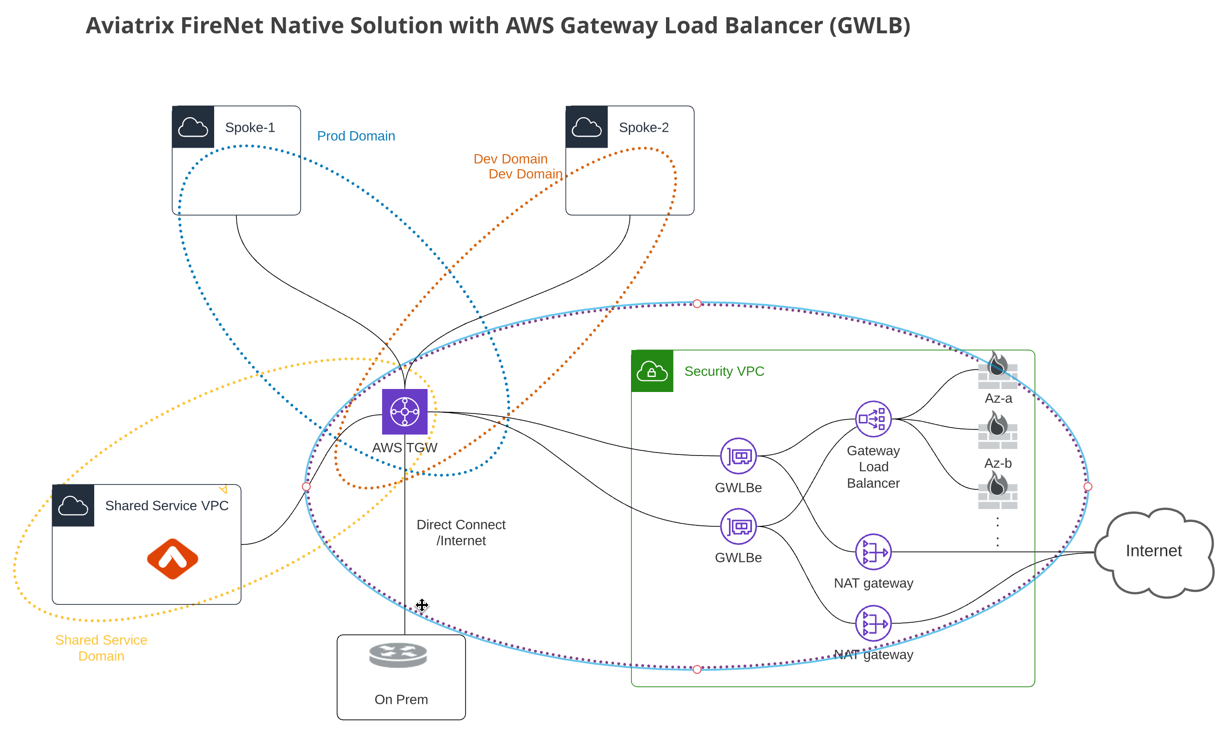
|
HTTPS needs to be opened on firewall appliance for health check. Check Firewall Health Check for more information. |
Attaching Aviatrix FireNet Gateway to TGW Firewall Domain
This step requires you have already created a Network Domain with Firewall attribute enabled.
When this step is completed, you have built the network infrastructure for FireNet deployment. This step may take a few minutes.
This step programs the relative route tables, described as below.
| Aviatrix FireNet VPC/VNet route table | key route entry | Description |
|---|---|---|
-tgw-egress |
0.0.0.0/0 → tgw |
for FireNet Gateway eth1 to TGW |
-hagw-tgw-egress |
0.0.0.0/0 → tgw |
for FireNet HA gateway eth1 to TGW |
-tgw-ingress |
0.0.0.0/0 → eth1 |
for TGW to eth1 of FireNet Gateway |
-hagw-tgw-ingress |
0.0.0.0/0 → eth1. |
for TGW to eth1 of FireNet HA gateway |
-dmz-firewall |
0.0.0.0/0 → tgw |
for firewall instance LAN interface to TGW |
-hagw-dmz-firewall |
0.0.0.0/0 → tgw |
for firewall instance LAN interface to TGW |
-dmz-exchange |
0.0.0.0/0 → eth3 |
for eth3 of FireNet Gateway to eth3 of HA gateway |
-hagw-dmz-exchange |
0.0.0.0/0 → eth3 |
for eth3 of FireNet HA gateway to eth3 of primary gateway |
Launching and Associating Firewall Instance
This approach is recommended if this is the first Firewall instance to be attached to the gateway.
This step launches a Firewall instance and associates it with one of the FireNet Gateways.
| The Firewall instance and the associated Aviatrix FireNet Gateway above must be in the same AZ, and, we recommend that the Management Interface Subnet and Egress (untrust dataplane) Interface Subnet should not be in the same subnet. |
Launching and Attaching
| Setting | Value |
|---|---|
VPC ID |
The Security VPC/VNet created above. |
Gateway Name |
The primary FireNet Gateway. |
Firewall Instance Name |
The name that will be displayed on the AWS Console. |
Firewall Image |
The AWS AMI that subscribed to above. |
Firewall Image Version |
Firewall instance current supported software versions. |
Firewall Instance Size |
Firewall instance type. |
Management Interface Subnet. |
Select the subnet whose name contains "gateway and firewall management" |
Egress Interface Subnet |
Select the subnet whose name contains "FW-ingress-egress". |
Username |
Applicable to Azure deployment only. "admin" as a username is not accepted. |
Password |
Applicable to Azure deployment only. |
Key Pair Name (Optional) |
The .pem file name for SSH access to the firewall instance. |
Attach (Optional) |
By selecting this option, the firewall instance is inserted in the data path to receive packet. If this is the second firewall instance for the same gateway and you have an operational FireNet deployment, you should not select this option as the firewall is not configured yet. You can attach the firewall instance later at Firewall Network > Advanced page. |
Advanced (Optional) |
Click this selection to allow Palo Alto firewall bootstrap files to be specified. |
IAM Role |
In advanced mode, create an IAM Role on the AWS account that launched the FireNet Gateway. Create a policy to attach to the role. The policy is to allow access to "Bootstrap Bucket". This option is not supported on Check Point. |
Bootstrap Bucket Name |
In advanced mode, specify a bootstrap bucket name where the initial configuration and policy file is stored. This option is not supported on Check Point. |
User Data |
In advanced mode and applicable to Check Point and FortiGate. For FortiGate in Azure, refer to FortiGate User Data in Azure. For Check Point in Azure, refer to Check Point User Data in Azure. |
Palo Alto VM-Series Specifications
Palo instance has three interfaces as described below.
| Palo Alto VM instance interfaces | Description | Inbound Security Group Rule |
|---|---|---|
eth0 (on subnet -Public-FW-ingress-egress-AZ-a) |
Egress or Untrusted interface |
Allow ALL |
eth1 (on subnet -Public-gateway-and-firewall-mgmt-AZ-a) |
Management interface |
Allow SSH, HTTPS, ICMP, TCP 3978 |
eth2 (on subnet -dmz-firewall) |
LAN or Trusted interface |
Allow ALL (Do not change) |
Note that firewall instance eth2 is on the same subnet as FireNet Gateway eth2 interface.
|
For Panorama managed firewalls, you need to prepare Panorama first and then launch a firewall. When a VM-Series instance is launched and connected with Panorama, you need to apply a one time "commit and push" from the Panorama console to sync the firewall instance and Panorama. |
|
If VM-Series are individually managed and integrated with the Controller, you can still use Bootstrap to save initial configuration time. Export the first firewall’s configuration to bootstrap.xml, create an IAM role and Bootstrap bucket structure as indicated above, then launch additional firewalls with IAM role and the S3 bucket name to save the time of the firewall manual initial configuration. |
FortiGate Specifications
FortiGate Next Generation Firewall instance has two interfaces as described below.
| Fortigate VM instance interfaces | Description | Inbound Security Group Rule |
|---|---|---|
eth0 (on subnet -Public-FW-ingress-egress-AZ-a) |
Egress or Untrusted interface |
Allow ALL |
eth1 (on subnet -dmz-firewall) |
LAN or Trusted interface |
Allow ALL (Do not change) |
Note that firewall instance eth1 is on the same subnet as FireNet Gateway eth2 interface.
FortiGate bootstrap configuration is supported on AWS and Azure.
Check Point Specification
CheckPoint Firewall instance has two interfaces as described below.
| CheckPoint VM instance interfaces | Description | Inbound Security Group Rule |
|---|---|---|
eth0 (on subnet -Public-FW-ingress-egress-AZ-a) |
Egress or Untrusted interface |
Allow ALL |
eth1 (on subnet -dmz-firewall) |
LAN or Trusted interface |
Allow ALL (Do not change) |
Note that firewall instance eth1 is on the same subnet as FireNet Gateway eth2 interface.
|
Launching Check Point firewall instances from the Aviatrix Controller automatically initiates its onboarding process. For initial login information, go to Credentials for Checkpoint Initial Login. You must be registered to access the Aviatrix Customer Support website. If you are not already registered, you can sign up at https://support.aviatrix.com. |
Repeat the previous step to launch the second firewall instance to associate with the HA FireNet gateway. Or, repeat this step to launch more firewall instances to associate with the same FireNet gateway.
Example Setup for "Allow All" Policy
After a firewall instance is launched, wait 15 minutes for it to come up. In addition, please follow the example configuration guides as below to build a simple policy on the firewall instance to validate that traffic is indeed being routed to the firewall instance.
Palo Alto
For basic configuration, refer to this Palo Alto AWS configuration guide.
For implementation details on using Bootstrap to launch and initiate VM-Series, refer to this Bootstrap Palo Alto AWS Configuration Example.
FortiGate
For basic configuration, refer to this FortiGate AWS example configuration guide.
Check Point
For basic configuration, refer to this Check Point AWS example configuration guide.
Migrating from FireNet to FireNet with AWS GWLB
Transit FireNet supports the AWS Gateway Load Balancer (GWLB). The key advantage of this integration is to allow firewalls to be scaled up and down without affecting established sessions (except sessions associated with the failed firewalls).
-
Save the firewall configuration.
-
Disassociate the firewall instance: Go to Aviatrix Controller > Firewall Network > Setup > Detach.
-
Delete the firewall instance: Go to Aviatrix Controller > Firewall Network > List > Firewall, select a firewall instance in the list and select Actions > Delete.
-
Disable FireNet function: Go to Aviatrix Controller > Firewall Network > Setup > Detach.
-
Enable Transit FireNet function: Go to Aviatrix Controller > Firewall Network > Setup > Transit Firenet. Mark the Use AWS GWLB checkbox if migrating from Aviatrix FireNet to FireNet with AWS GWLB.
-
Launch and associate firewall: Go to Aviatrix Controller > Firewall Network > Setup > Firewall.
-
Restore the firewall configuration.