Ingress Protection via Aviatrix Transit FireNet with FortiGate
This document illustrates a widely deployed architecture for an Ingress traffic inspection/protection firewall that leverages AWS Load Balancers, Transit FireNet for AWS and FortiGate VM in AWS.
Ingress traffic from the Internet forwards to firewall instances first in the Aviatrix Transit FireNet VPC and then reaches application servers as shown in the diagram below. In this design pattern, each firewall instance must perform:
-
Source NAT (SNAT) on its LAN interface that connects to the Aviatrix FireNet gateway
-
Destination NAT (DNAT) to the IP of application server or application load balancer
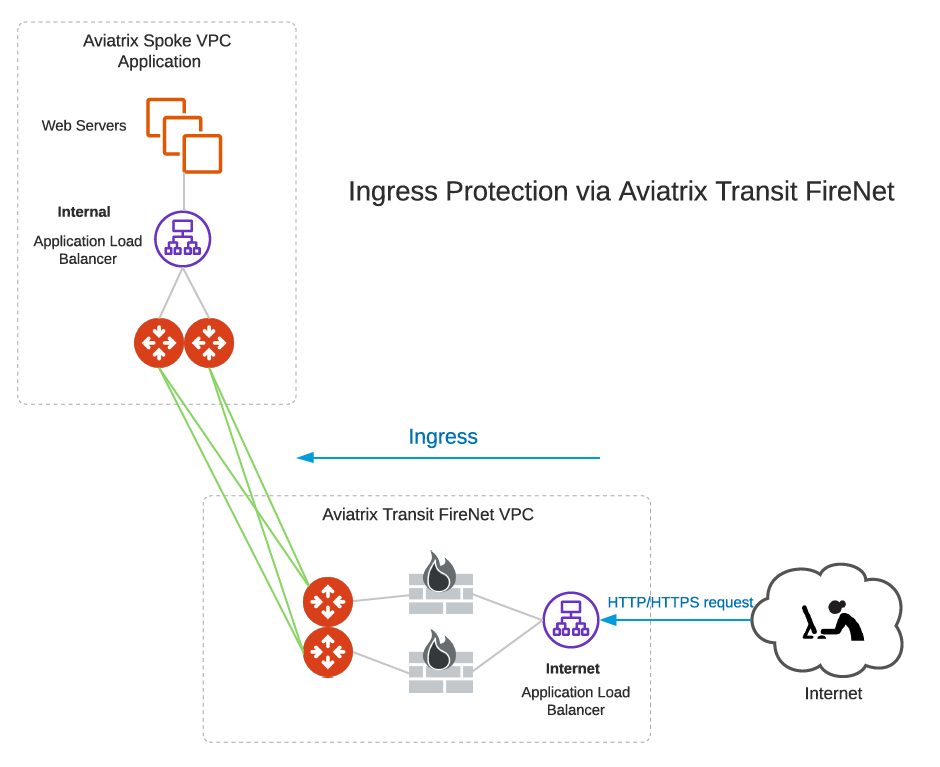
| This design pattern also supports multiple firewalls (scale out fashion) for each Aviatrix Transit FireNet gateway. |
This document describes step-by-step Ingress Protection via Aviatrix Transit FireNet with a FortiGate deployment workflow:
For more information about Transit FireNet, see the following documents:
Prerequisites
Upgrade Aviatrix Controller to at least version 6.1. In this example, we are going to deploy the below VPCs in AWS:
-
Aviatrix Transit FireNet VPC (i.e. 10.70.0.0/16)
-
Aviatrix Spoke VPC for Application (i.e. 10.3.0.0/16)
Workflow on Transit FireNet for AWS
Refer to Creating a VPC using CoPilot for steps on how to:
-
Deploy a Transit VPC
-
Deploy a Spoke VPC for Application (can also be done in the AWS portal). You can also use an existing VPC.
Adjust the topology depending on your requirements.
-
Deploy the Transit Aviatrix Gateway to launch the Aviatrix Transit gateway and enable HA in the Transit FireNet VPC.
-
(optional) Deploy Spoke Gateways to launch an Aviatrix Spoke gateway and enable HA in Spoke VPC for Applications.
-
Follow Attach Spoke Gateways to Transit Network to attach Spoke Gateways to Transit Gateways.
Launch and Associate Firewall Instance
-
Subscribe to Firewall Vendor in AWS Marketplace for FortiGate Next Generation Firewall.
-
Launch a FortiGate Firewall instance for each Aviatrix Transit FireNet gateway.
Example setting Example value Firewall Image
Fortinet FortiGate Next-Generation Firewall
Firewall Image Version
6.4.2
Firewall Instance Size
c5.xlarge
Egress Interface Subnet
Select the subnet whose name contains "FW-ingress-egress".
Key Pair Name (Optional)
The .pem file name for SSH access to the firewall instance.
Attach
Check
-
Wait for a couple of minutes for the FortiGate Firewall instances to change to Running Instance state.
A later section will describe how to set up basic configuration for FortiGate (Fortinet) in Workflow on Firewall Instances - FortiGate.
Workflow on AWS Application Load Balancer
This workflow example describes how to:
-
Place an internet-facing AWS Load Balancer to load balance traffic to firewall instances in Transit FireNet.
-
Place an internal AWS Load Balancer to load balance traffic to a private application server in Application Spoke.
-
Set up the related network components and private application web server with HTTP and port 8080.
Please adjust the settings depending on your requirements.
Create an AWS Application Load Balancer with Internet-Facing Scheme
In your AWS Management Console, in the Transit FireNet VPC, create an internet-facing AWS Application Load Balancer by following the steps below:
-
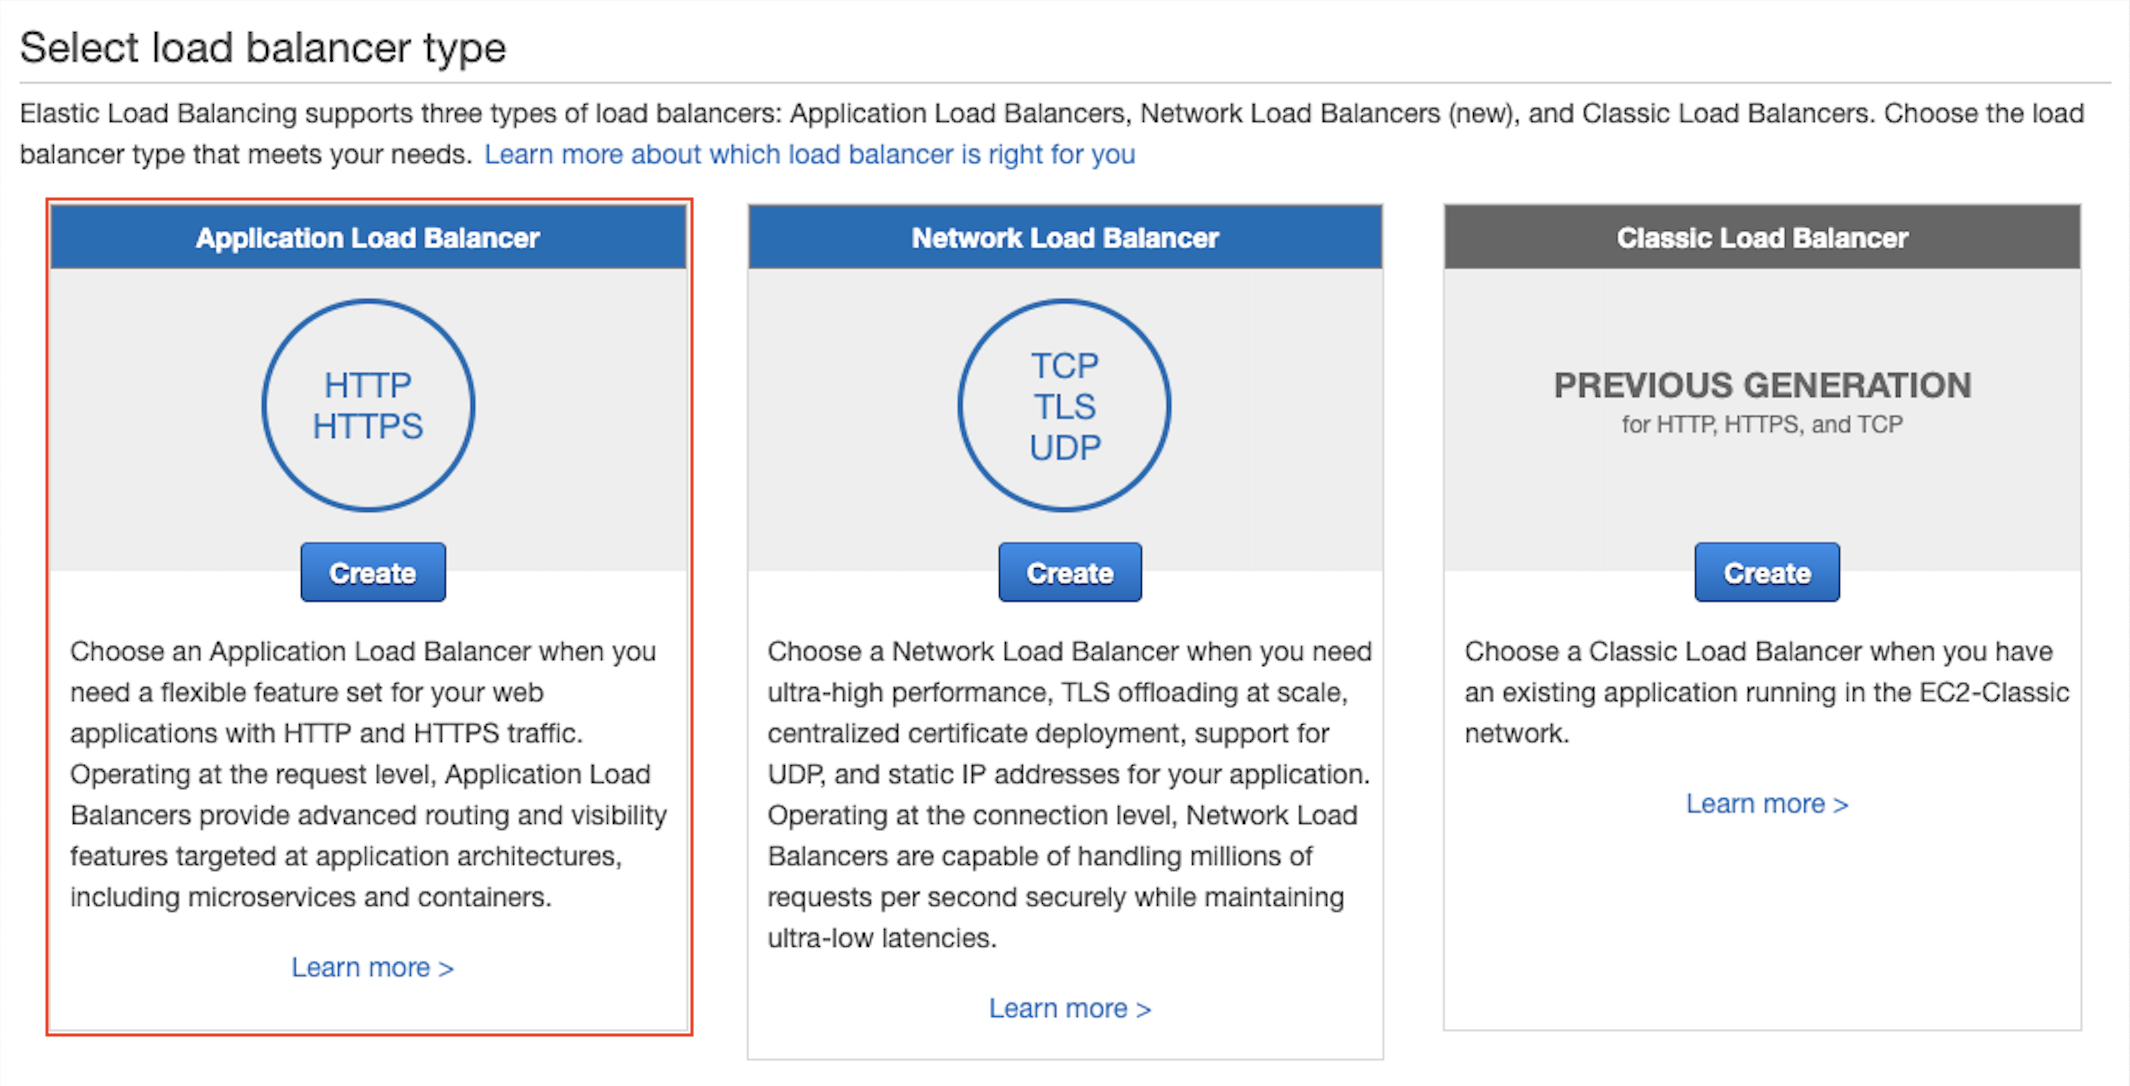
Select Application Load Balancer HTTP/HTTPS.
-
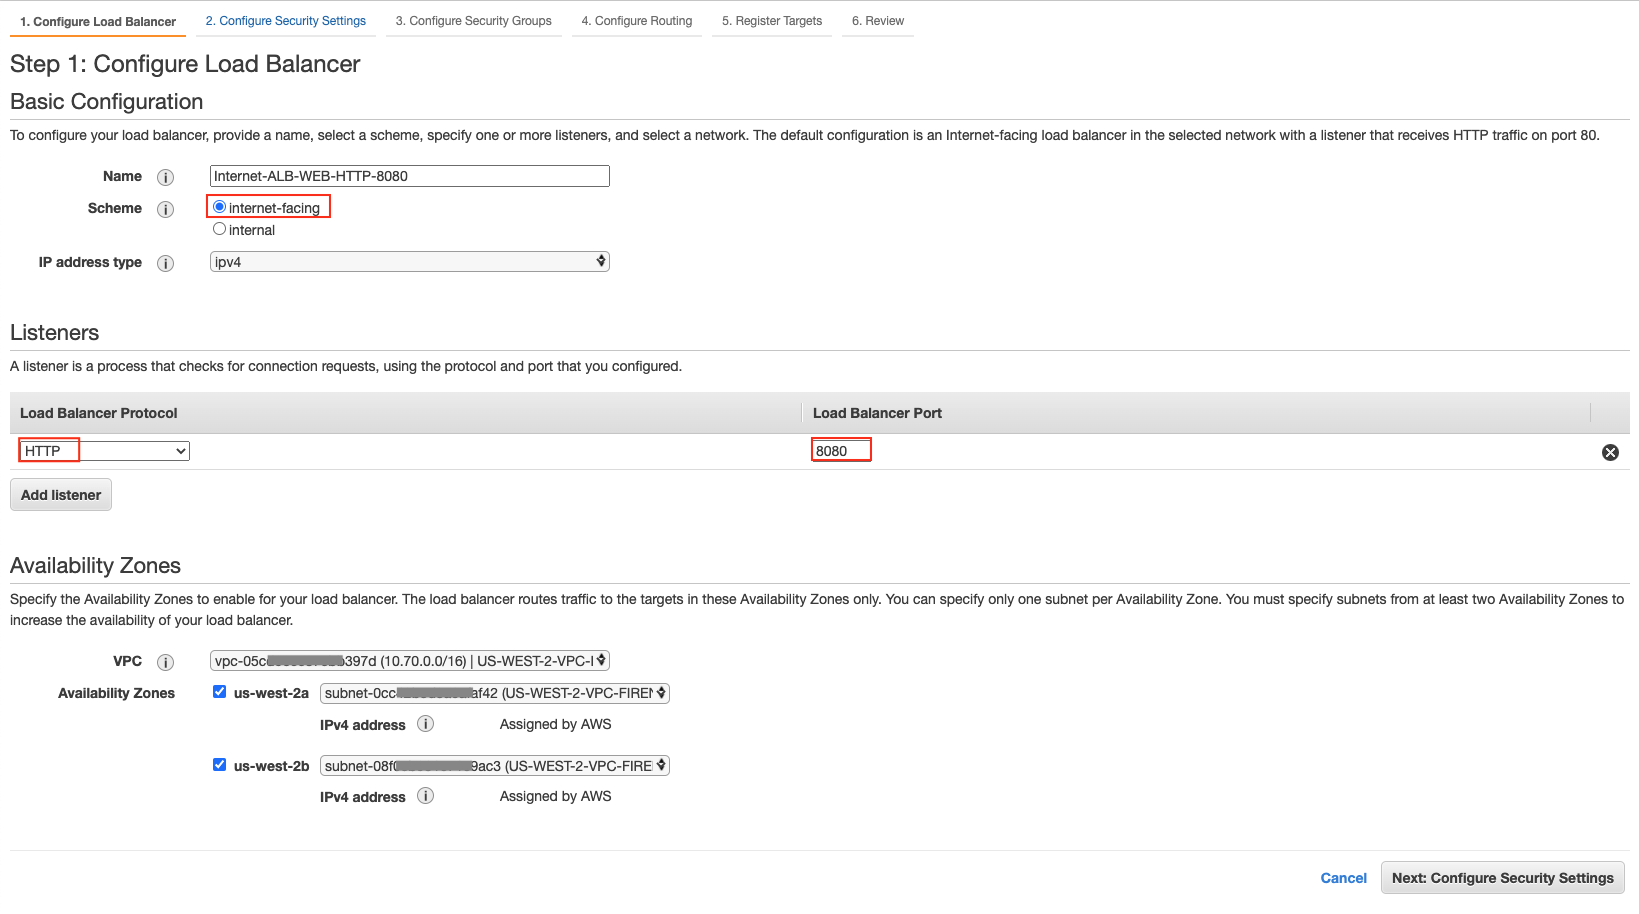
Select items as follows:
Section Field Value Basic Configuration
Scheme
internet-facing
IP address type
ipv4
Listeners
Load Balancer Protocol
HTTP
Load Balancer Port
8080
Availability Zones
VPC
Aviatrix Transit FireNet VPC
Availability Zones
select the subnet with -Public-FW-ingress-egress-AZ- in each AZ
-
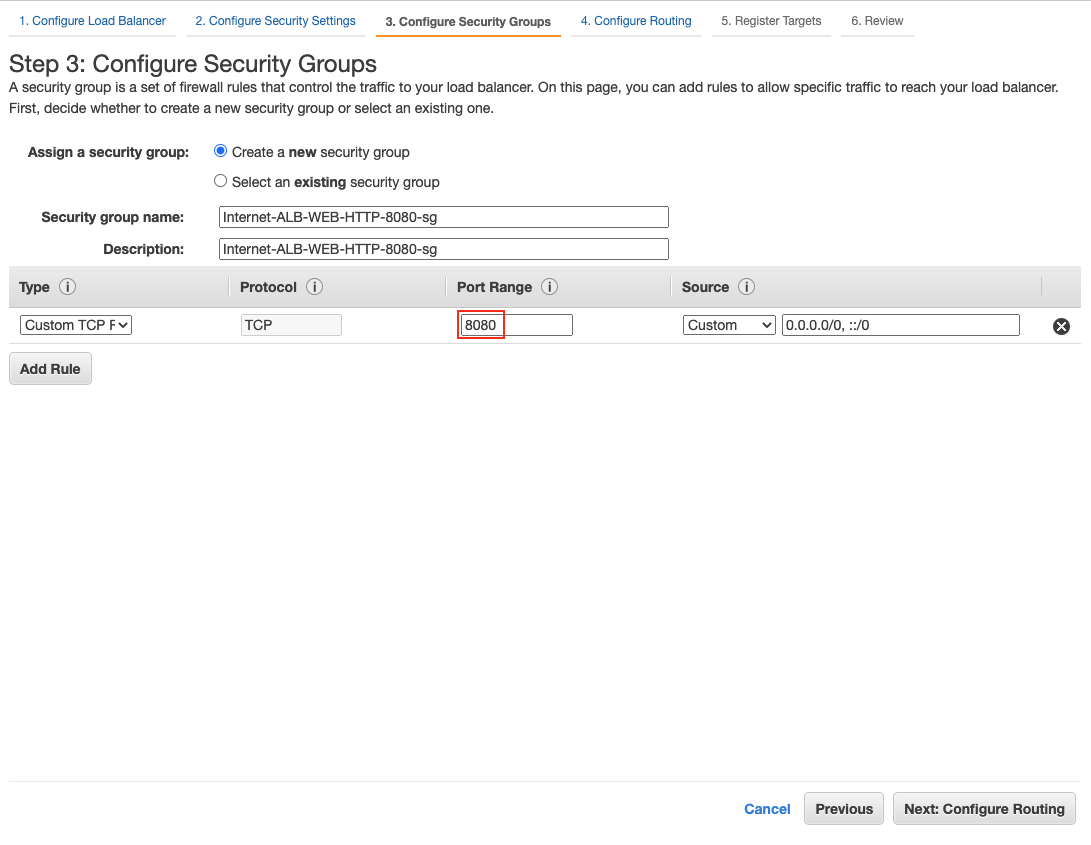
Create a security group with Protocol TCP and Port 8080.
-
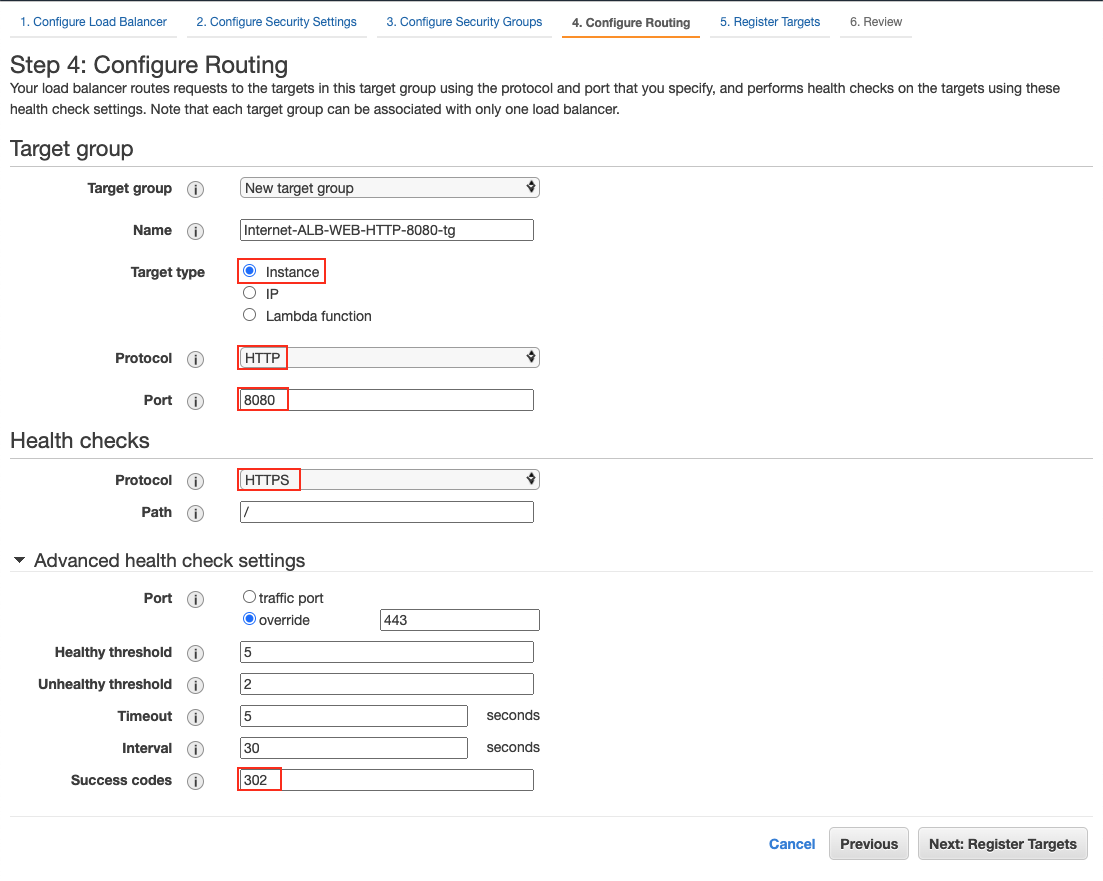
Select items as follows:
Section
Field
Value
Target group
Target group
New target group
Target type
Instance
Protocol
HTTP
Port
8080
Health checks
Protocol
HTTPS
Path
/
Advanced health check settings
Port
override with 443
Success codes
302
-
Select firewall instances and click the button "Add to registered" in Step 5: Register Targets.
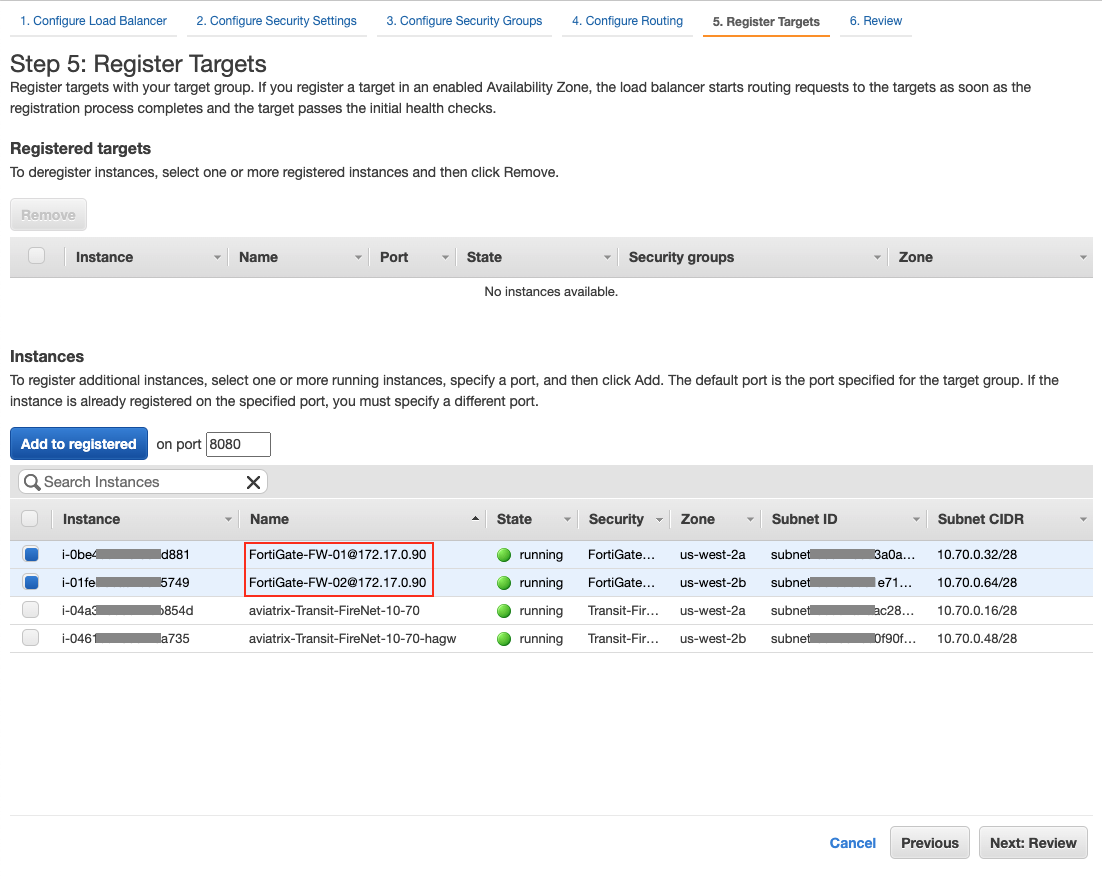
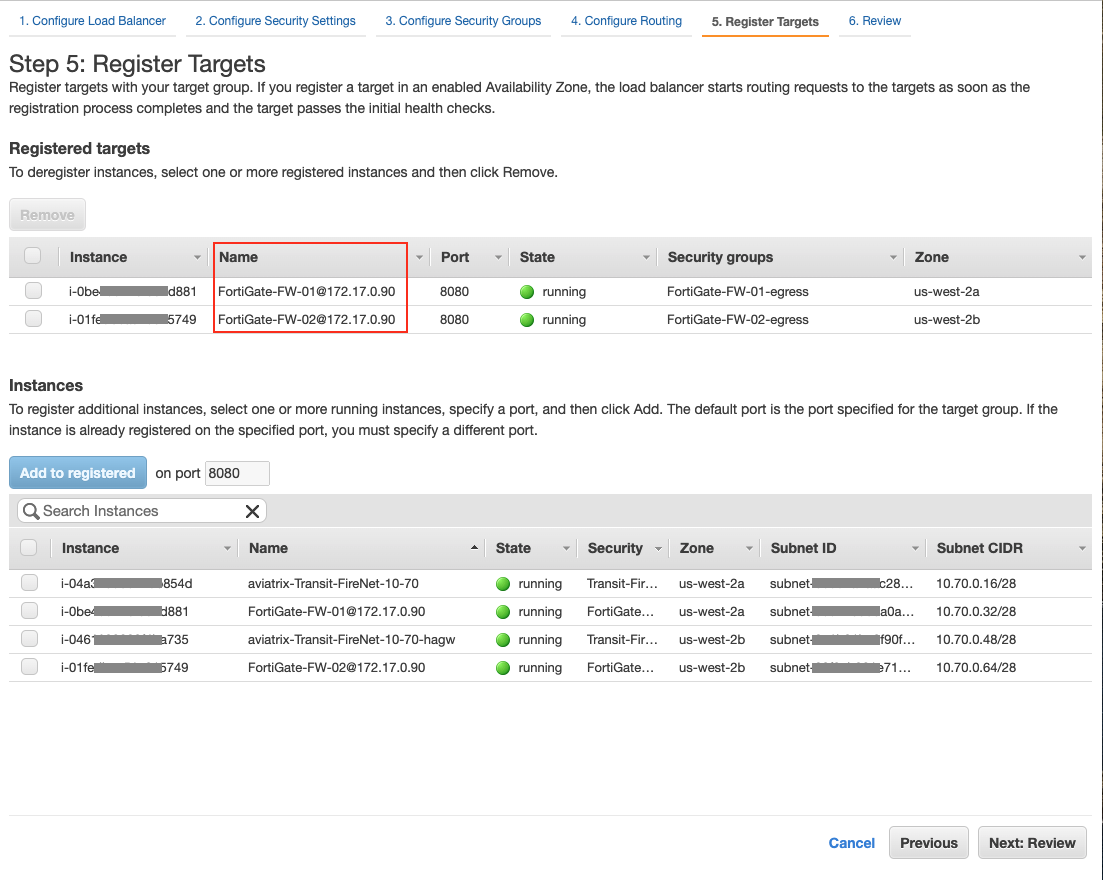
-
Confirm the selected firewall instances are placed under the section "Registered targets".
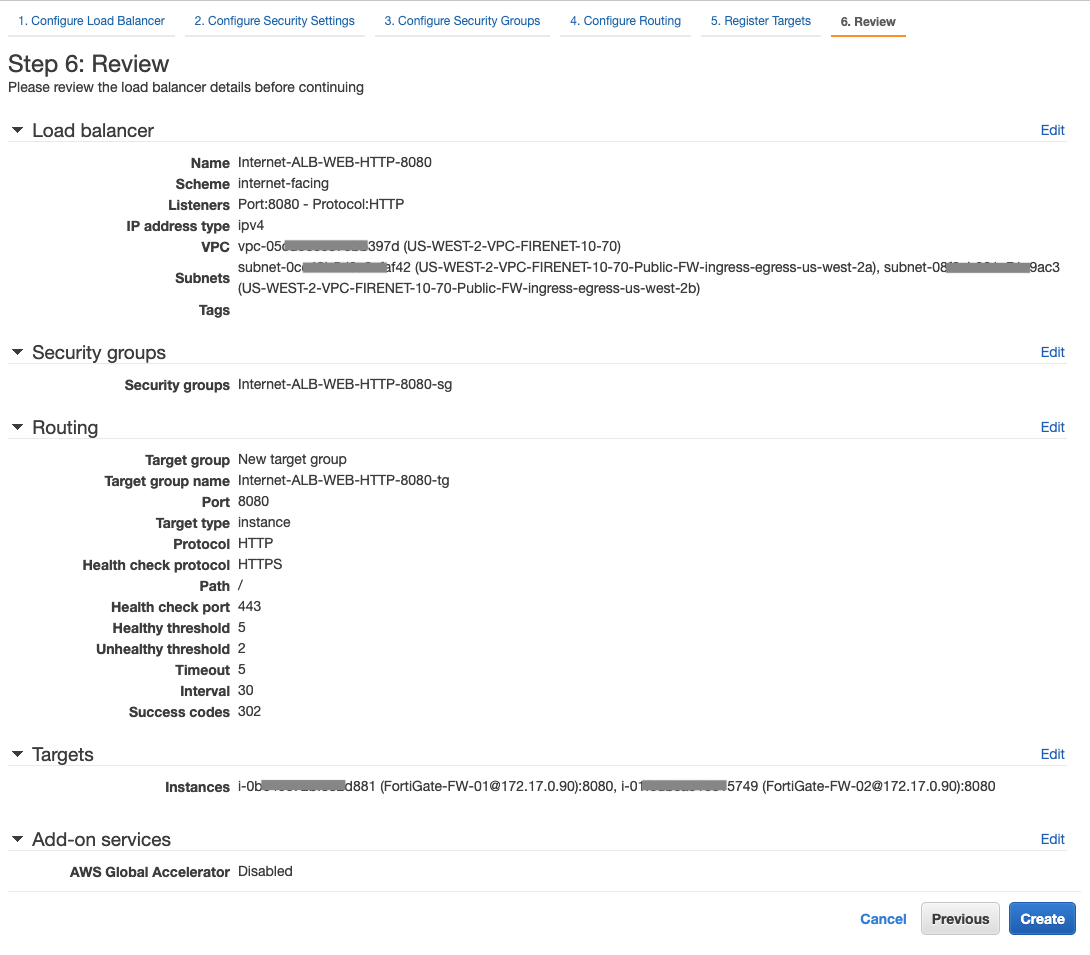
-
Review the configuration from the previous step.
-
Wait for a couple of minutes and check firewall instances' healthy Status behind AWS Application Load Balancer.
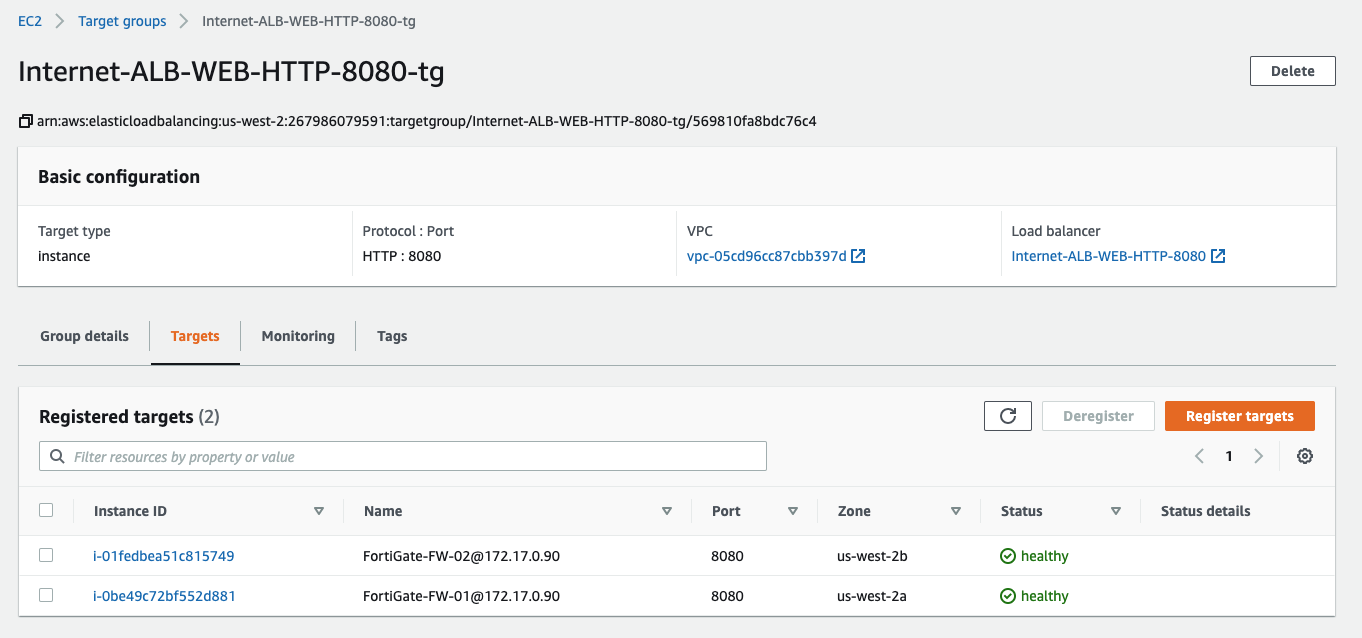
|
Healthy status targets behind the AWS load balancer can be found on the page in the AWS Console. |
Launch an Apache2 Web server in Application Spoke
In the Application Spoke, create a virtual machine and install Apache2 HTTP Server with custom port 8080 as a web application server.
Example setting |
Example value |
Protocol |
HTTP |
Port |
8080 |
|
Refer to Install The Latest Apache2 HTTP Server ( 2.4.34 ) On other opensource OS Servers to install Apache2 HTTP Server. Refer to How To Change Apache Default Port To A Custom Port to use custom port 8080. |
Create an AWS Application Load Balancer with Internal Scheme
In the AWS Management Console in the Application Spoke VPC, create an internal AWS Application Load Balancer:
-
Select Application Load Balancer HTTP/HTTPS.
-
Select items as follows in Step 1: Configure Load Balancer.
Section Field Value Basic Configuration
Scheme
internal
IP address type
ipv4
Listeners
Load Balancer Protocol
HTTP
Load Balancer Port
8080
Availability Zones
VPC
Aviatrix Spoke VPC for application
Availability Zones
select the subnet where private application servers locate
-
Create a security group with Protocol TCP and Port 8080 in Step 3: Configure Security Groups.
-
Select items as follows in Step 4: Configure Routing.
Section
Field
Value
Target group
Target group
New target group
Target type
Instance
Protocol
HTTP
Port
8080
Health checks
Protocol
HTTP
Path
/
Advanced health check settings
Port
traffic port
Success codes
200
-
Select private application server and click the button "Add to registered" in Step 5: Register Targets
-
Review the configuration in Step 6: Review.
Workflow on Firewall Instances - FortiGate
This is just a simple example to set up a firewall for Ingress traffic. Please adjust the security settings depending on your requirements.
Set up Basic Configuration for FortiGate (Fortinet)
-
Refer to FortiGate Example to launch FortiGate in AWS and for more details.
Configure Destination NAT (DNAT) to the FQDN/IP of Internal Application Load Balancer
-
Log in to the FortiGate GUI.
-
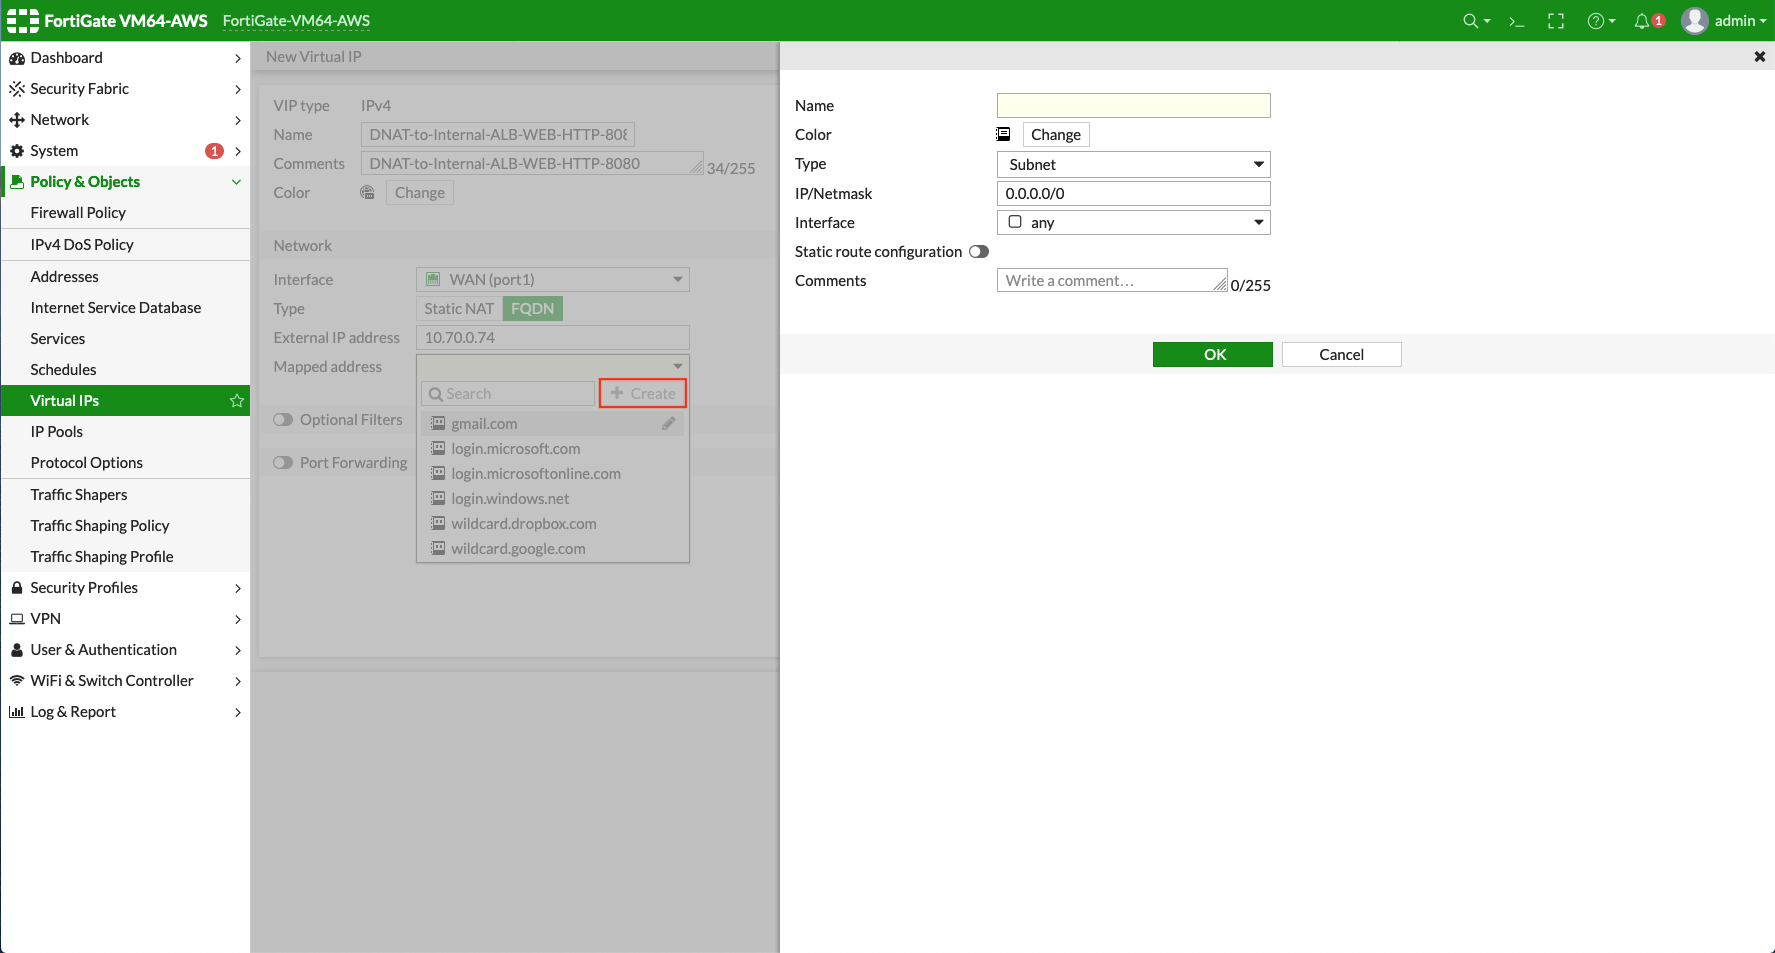
Navigate to the page Policy & Objects > Virtual IPs.
-
Click Create New.
-
Enter fields for Name, Comments, Interface, Type, External IP address, Mapped address, and Port Forwarding as follows:
Section
Example setting
Example value
Edit Virtual IP
VIP type
IPv4
Name
DNAT-to-Internal-ALB-WEB-HTTP-8080
Comments
DNAT-to-Internal-ALB-WEB-HTTP-8080
Network
Interface
WAN (port1)
Type
FQDN
External IP address
Private IP of interface WAN (port1)
Mapped address
Create a new tag 'Internal-ALB-WEB-HTTP-8080'
Port Forwarding
Status
enable
Protocol
TCP
External service port
8080
Map to port
8080

-
Create a tag for Mapped address by clicking + Create.
-
Enter fields for Name, Type, FQDN, and Interface for Mapped address as follows:
Example setting Example value Name
Internal-ALB-WEB-HTTP-8080
Type
FQDN
FQDN
DNS name of the internal AWS Application Load Balancer which is created in the previous step
Interface
any
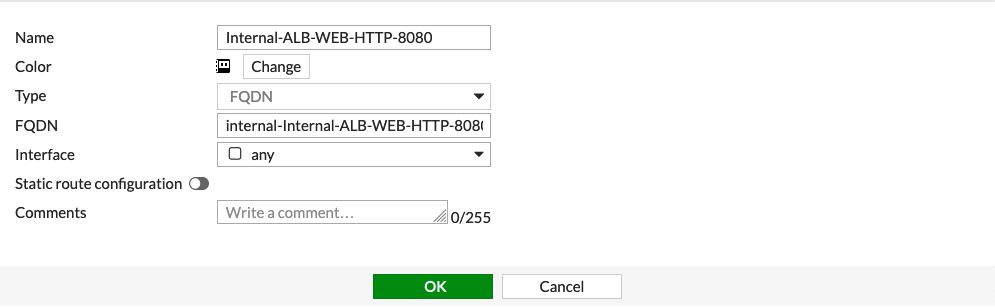
| FQDN is the DNS name of the 'internal' AWS Application Load Balancer not the 'internet-facing' AWS ALB. |
| DNS name of the AWS Application Load Balancer can be found on the page |
Apply Destination NAT (DNAT) and configure Source NAT (SNAT) on firewall’s LAN interface in Firewall Policy to allow Ingress traffic
-
Navigate to the page .
-
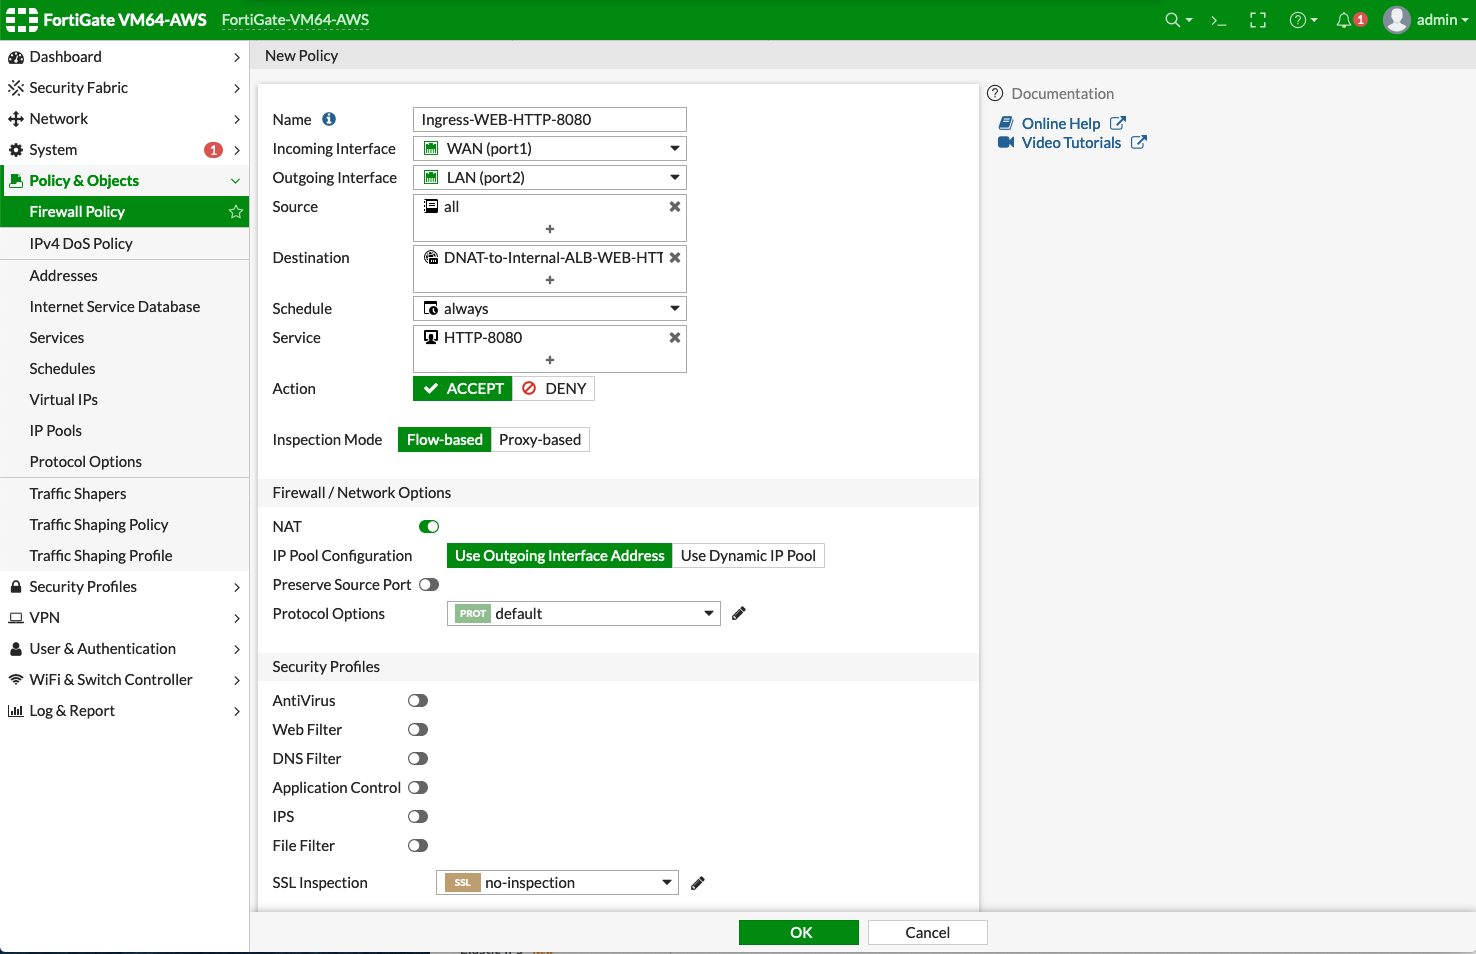
Click +Create New.
-
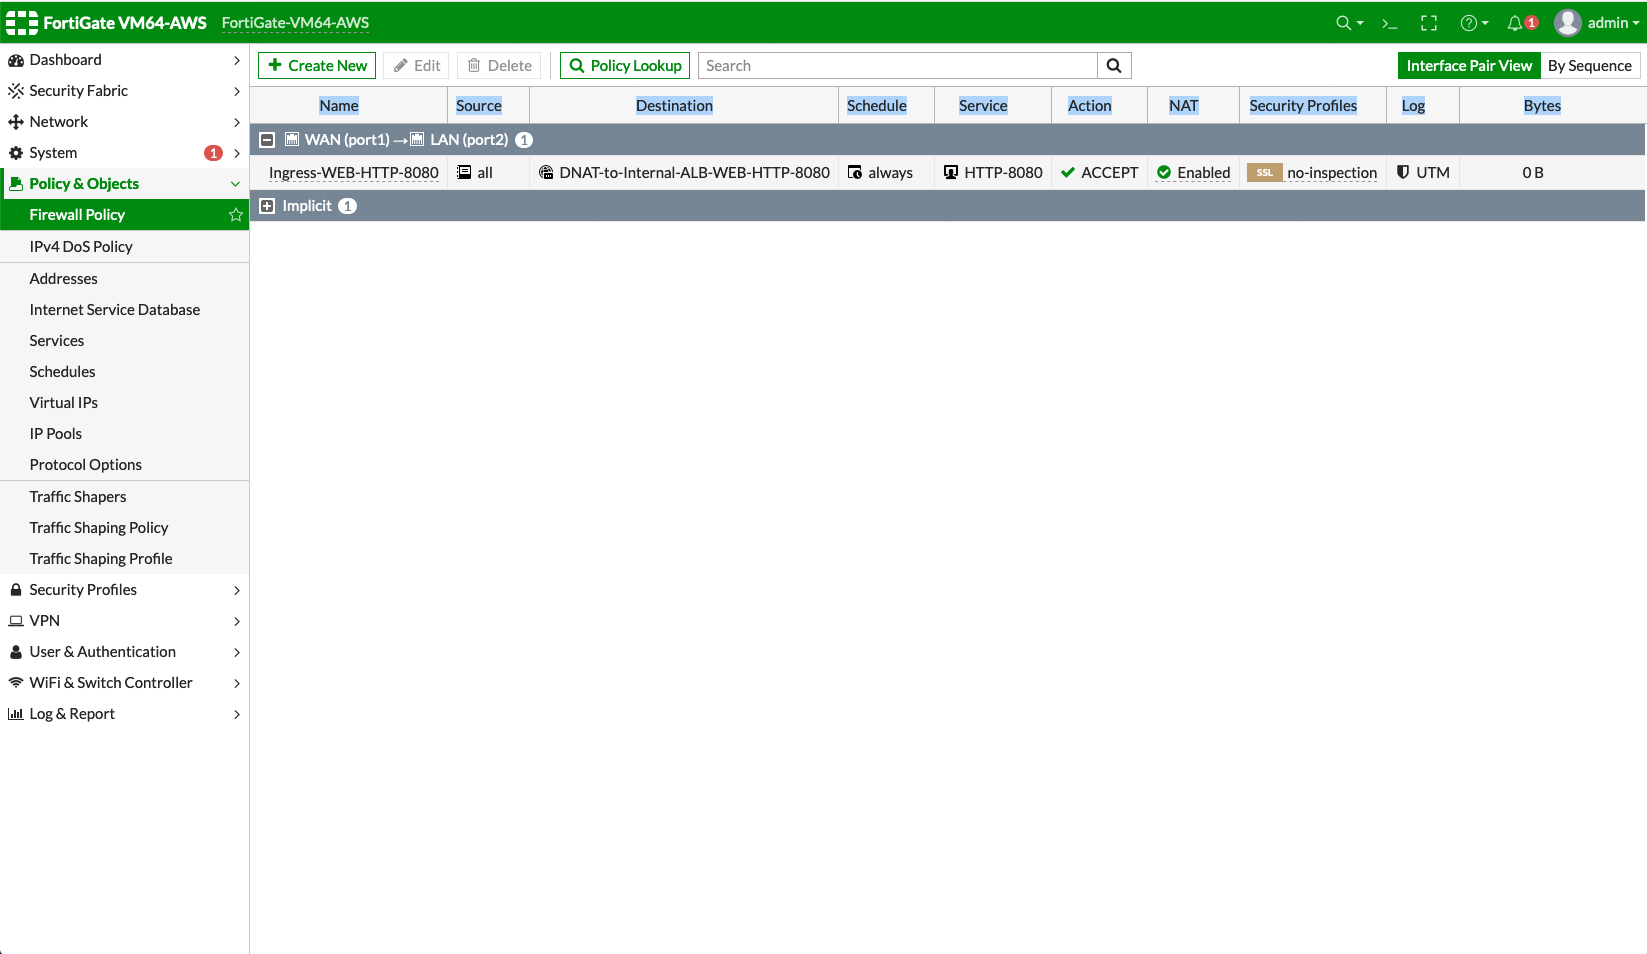
Enter fields for Name, Incoming Interface, Outgoing Interface, Source, Destination, Service, Action, NAT, IP Pool Configuration as follows:
Section Example setting Example value Edit Policy
Name
Ingress-WEB-HTTP-8080
Incoming Interface
WAN (port1)
Outgoing Interface
LAN (port2)
Source
all
Destination
Select the Virtual IPs 'DNAT-to-Internal-ALB-WEB-HTTP-8080' which is created in the previous step
Service
Create a new service for HTTP-8080
Action
ACCEPT
Firewall / Network Options
NAT
Enable
IP Pool Configuration
Use Outgoing Interface Address
|
To enable DNAT function, you must select 'Virtual IPs' for Destination under Edit Policy. To enable SNAT function, you must enable NAT with IP Pool Configuration under Firewall / Network Options. |
-
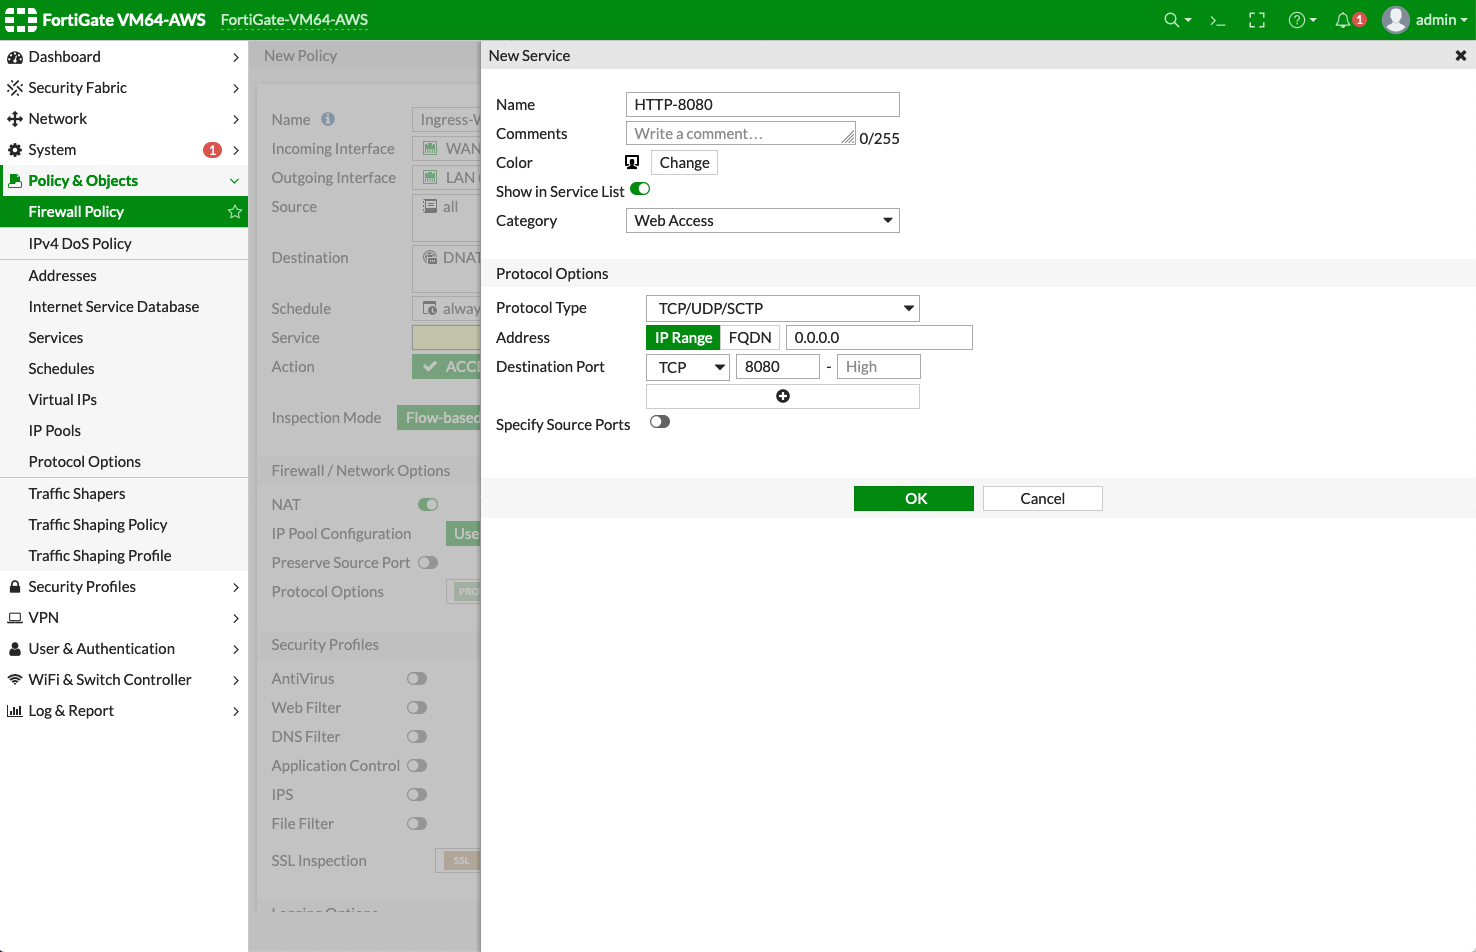
Create a new service for HTTP-8080 by clicking +Create.
Section
Example setting
Example value
New Service
Name
HTTP-8080
Category
Web Access
Protocol Options
Protocol Type
TCP/UDP/SCTP
Address
IP Range with 0.0.0.0
Destination Port
TCP with port 8080
-
Review the Firewall Policy.
-
Repeat the above steps for all your firewall instances.
Reference Material
-
Inbound application traffic with firewall resiliency in Amazon Web Services (AWS) Reference Architecture.
-
INBOUND APPLICATION TRAFFIC WITH FIREWALL RESILIENCY in wp-aws-transit-gateway-cloud-services.pdf.
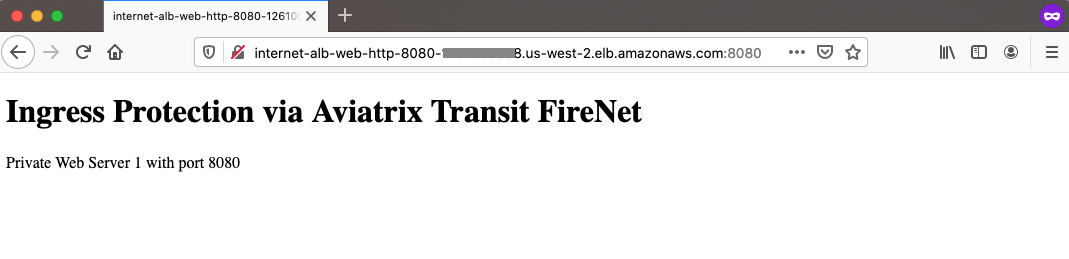
Ready to go
Now firewall instances and private application server are ready to receive Ingress traffic.
Open your browser and access the DNS of AWS Internet Application Load Balancer with HTTP and port 8080.
Ingress Protection via Aviatrix Transit Firenet for Multiple Applications
If you have a use case where you want to inspect traffic for multiple applications using the same FW, you need to add more NAT rules on the firewall.
-
Create an additional subnet in the security VPC (/24) for the LB.
-
Create additional ALB/NLB based on the number of application.
-
Add a SNAT/DNAT same as above for each application mapping it for the specific LB.