Example Config for FortiGate VM in Azure
In this document, we provide an example to set up the FortiGate Next Generation Firewall instance for you to validate that packets are sent to the FortiGate Next Generation Firewall for VNet-to-VNet and from VNet-to-Internet traffic inspection.
|
You must first create a Transit FireNet in Azure, and deploy a Fortinet FortiGate firewall in that Transit FireNet. If you do not use Aviatrix vendor integration, you can manually configure Fortinet route table entries. In Azure, the RFC 1918 routes should point to the firewall LAN interface subnet cloud provider’s default gateways. |
After you launch a FortiGate Next Generation Firewall instance, the FireNet > Firewall tab displays the public IP address of the firewall’s management/egress interface. You click this to access the firewall UI.
Here is the Firewall information in this example used during launch (Aviatrix CoPilot > FireNet > Firewall tab > + Firewall), for your reference. Adjust it depending on your requirements.
| Example setting | Example value |
|---|---|
Firewall Image |
Fortinet FortiGate Next-Generation Firewall |
Firewall Image Version |
6.4.1 |
Firewall Instance Size |
Standard_D3_v2 |
Egress Interface Subnet |
Select the subnet whose name contains "FW-ingress-egress." |
Username |
Any username except admin, sys and root |
Authentication Method |
Select Password. Input a good password of your choice |
Attach |
Mark this checkbox |
|
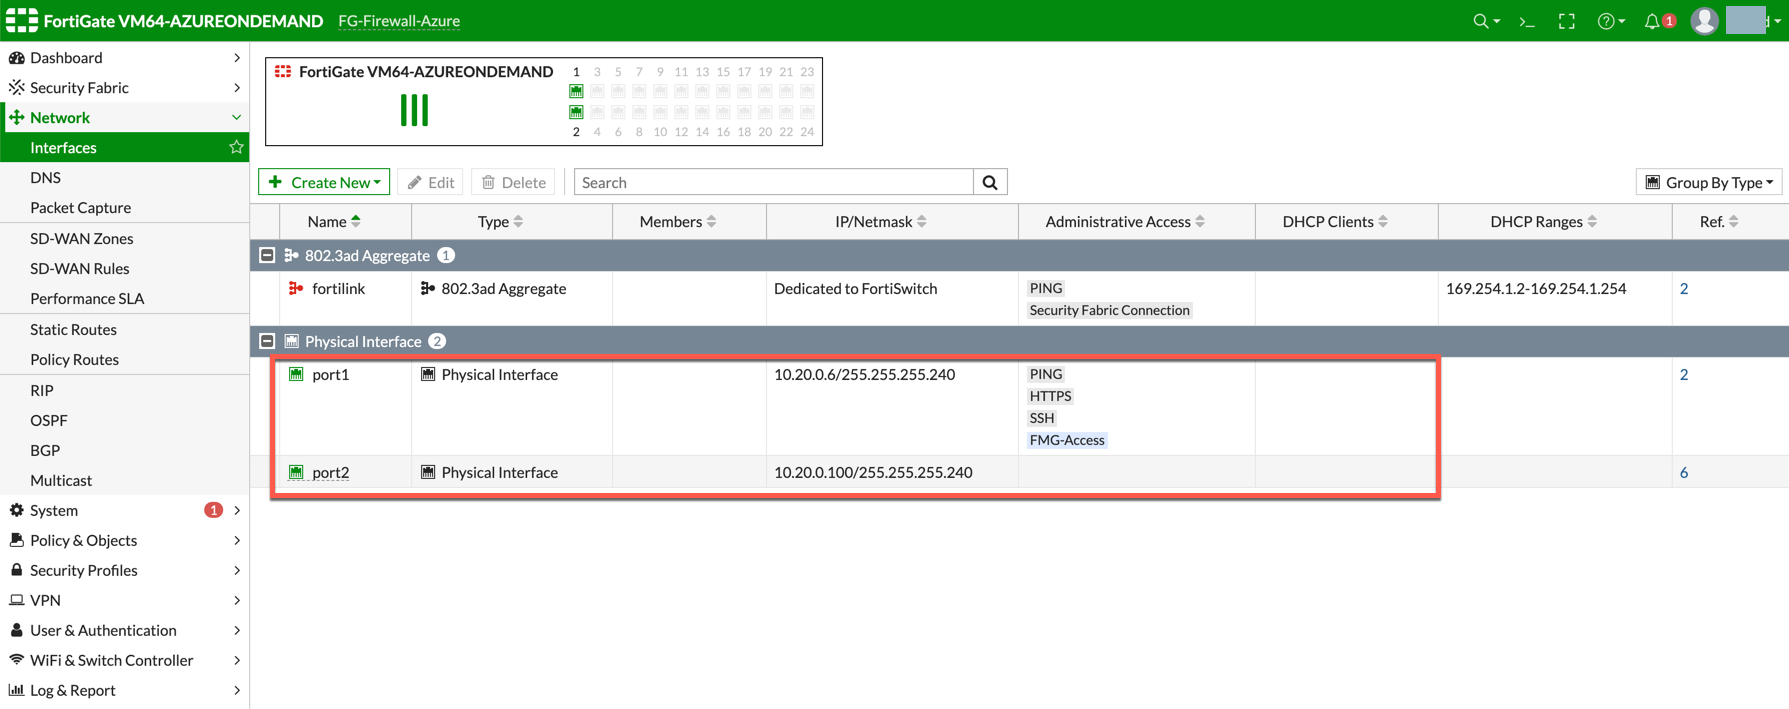
The FortiGate Next Generation Firewall instance has two interfaces as described below. Additionally, firewall instance eth1 is on the same subnet as FireNet gateway eth2 interface. |
| Fortigate VM instance interfaces | Description | Inbound Security Group Rule |
|---|---|---|
eth0 (on subnet -Public-FW-ingress-egress) |
Egress or Untrusted interface |
Allow ALL |
eth1 (on subnet -dmz-firewall-lan) |
LAN or Trusted interface |
Allow ALL (Do not change) |
Fortigate Next Generation Firewall Initial Setup
Once logged in with username and password provided during launch, it will ask you to do an initial setup as shown below:
Go to Network > Interfaces and review the interface configuration before move forward. This interface configuration is done by Aviatrix Controller during the launch.
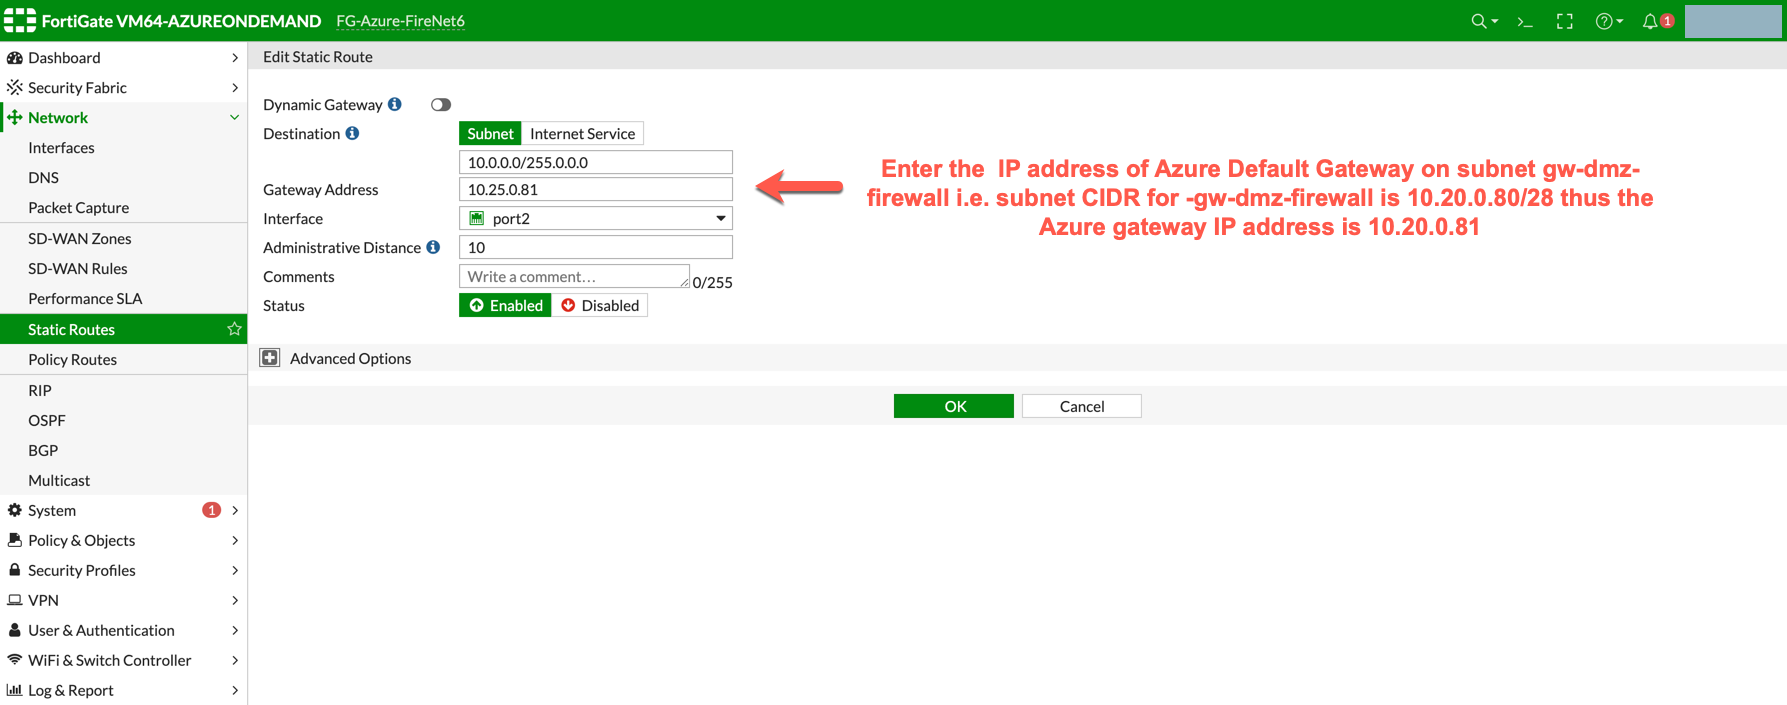
Create Static Routes for Routing of Traffic VNet to VNet
For simplicity, in this example we configure the firewall to send all RFC 1918 packets to LAN port.
Go to Network > State Routes to create a Static Route as the following screenshot.
-
Click Create New.
-
Enter the destination route in the Destination box.
-
In the Gateway Address box, enter the Azure default gateway IP on subnet -dmz-firewall-lan (i.e. subnet CIDR for -dmz-firewall-lan is 10.20.0.80/28, thus the Azure default gateway IP on this subnet is 10.20.0.81).
|
dmz-firewall-lan subnet can be found in the Aviatrix Controller. Go to Aviatrix Controller > Gateway > Select Gateway and click Edit > click More details to check all subnets. |
-
The interface will be the LAN (port2).
-
Configure an appropriate admin distance if you expect overlapping routes that need to be prioritized.
-
Enter comments as necessary.
-
Repeat the above steps for RFC 1918 routes.
|
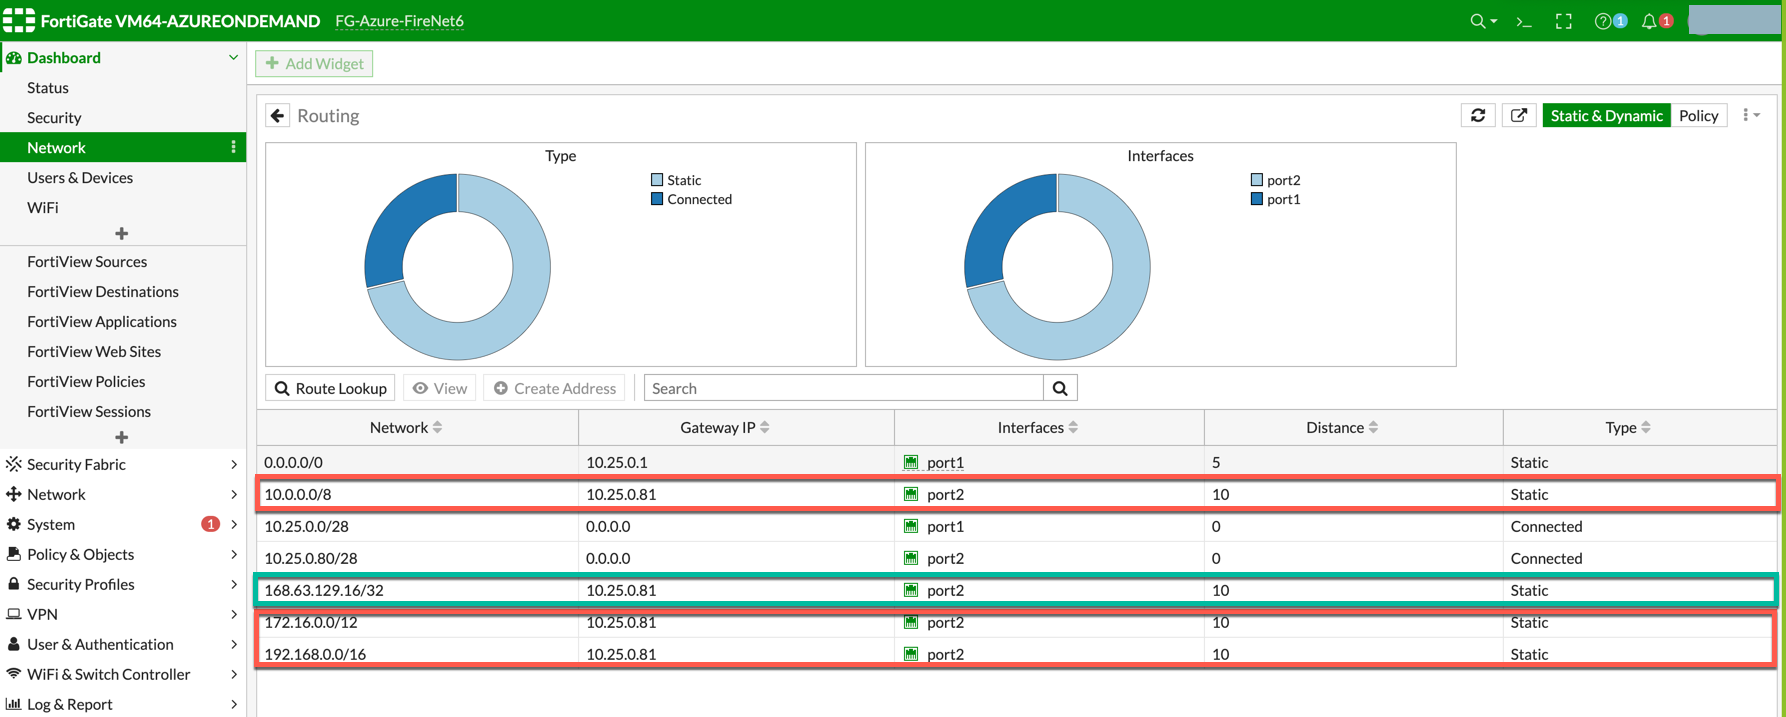
The Load Balancer static route 168.63.129.16/32 needs to be added manually pointing to the lan interface (port 2). 168.63.129.16/32 is the health probe source address. |
-
Those static routes could also be reviewed on the page Dashboard > Network > Routing.
RFC 1918 routes are highlighted in red whereas the load balancer static route is highlighted in green.
Vendor Integration
Click here for information on vendor integration.
Enabling Health Check Policy in Firewall
Aviatrix CoPilot uses HTTPS (TCP 443 port) to check the health of the firewall every five seconds. You must enable this port in the firewall as per given instructions.
Please follow the steps to allow HTTPS in FortiGate:
-
Login to FortiGate using your username and password.
-
Go to Network > Interfaces, select port 2, and click Edit.
-
Mark the HTTPS checkbox under Administrative access > IPv4 and click OK.
Configuring Basic Traffic Policy to Allow Traffic VNet to VNet
In this step, you will configure a basic traffic security policy that allows traffic to pass through the firewall. Given that Aviatrix gateways will only forward traffic from the TGW to the LAN port of the Firewall, you can set your policy condition to match any packet that is going in/out of LAN interface.
In the FortiGate UI, navigate to Policy & Objects > Firewall Policy > Create New / Edit to configure policy as the following screenshot.
| Field | Value |
|---|---|
Name |
Configure any name for this policy |
Incoming Interface |
LAN (port2) |
Outgoing Interface |
LAN (port2) |
Source |
Click on the + sign and add all |
Destination |
Click on the + sign and add all |
Schedule |
always |
Service |
ALL |
Action |
ACCEPT |
NAT |
Disabled |
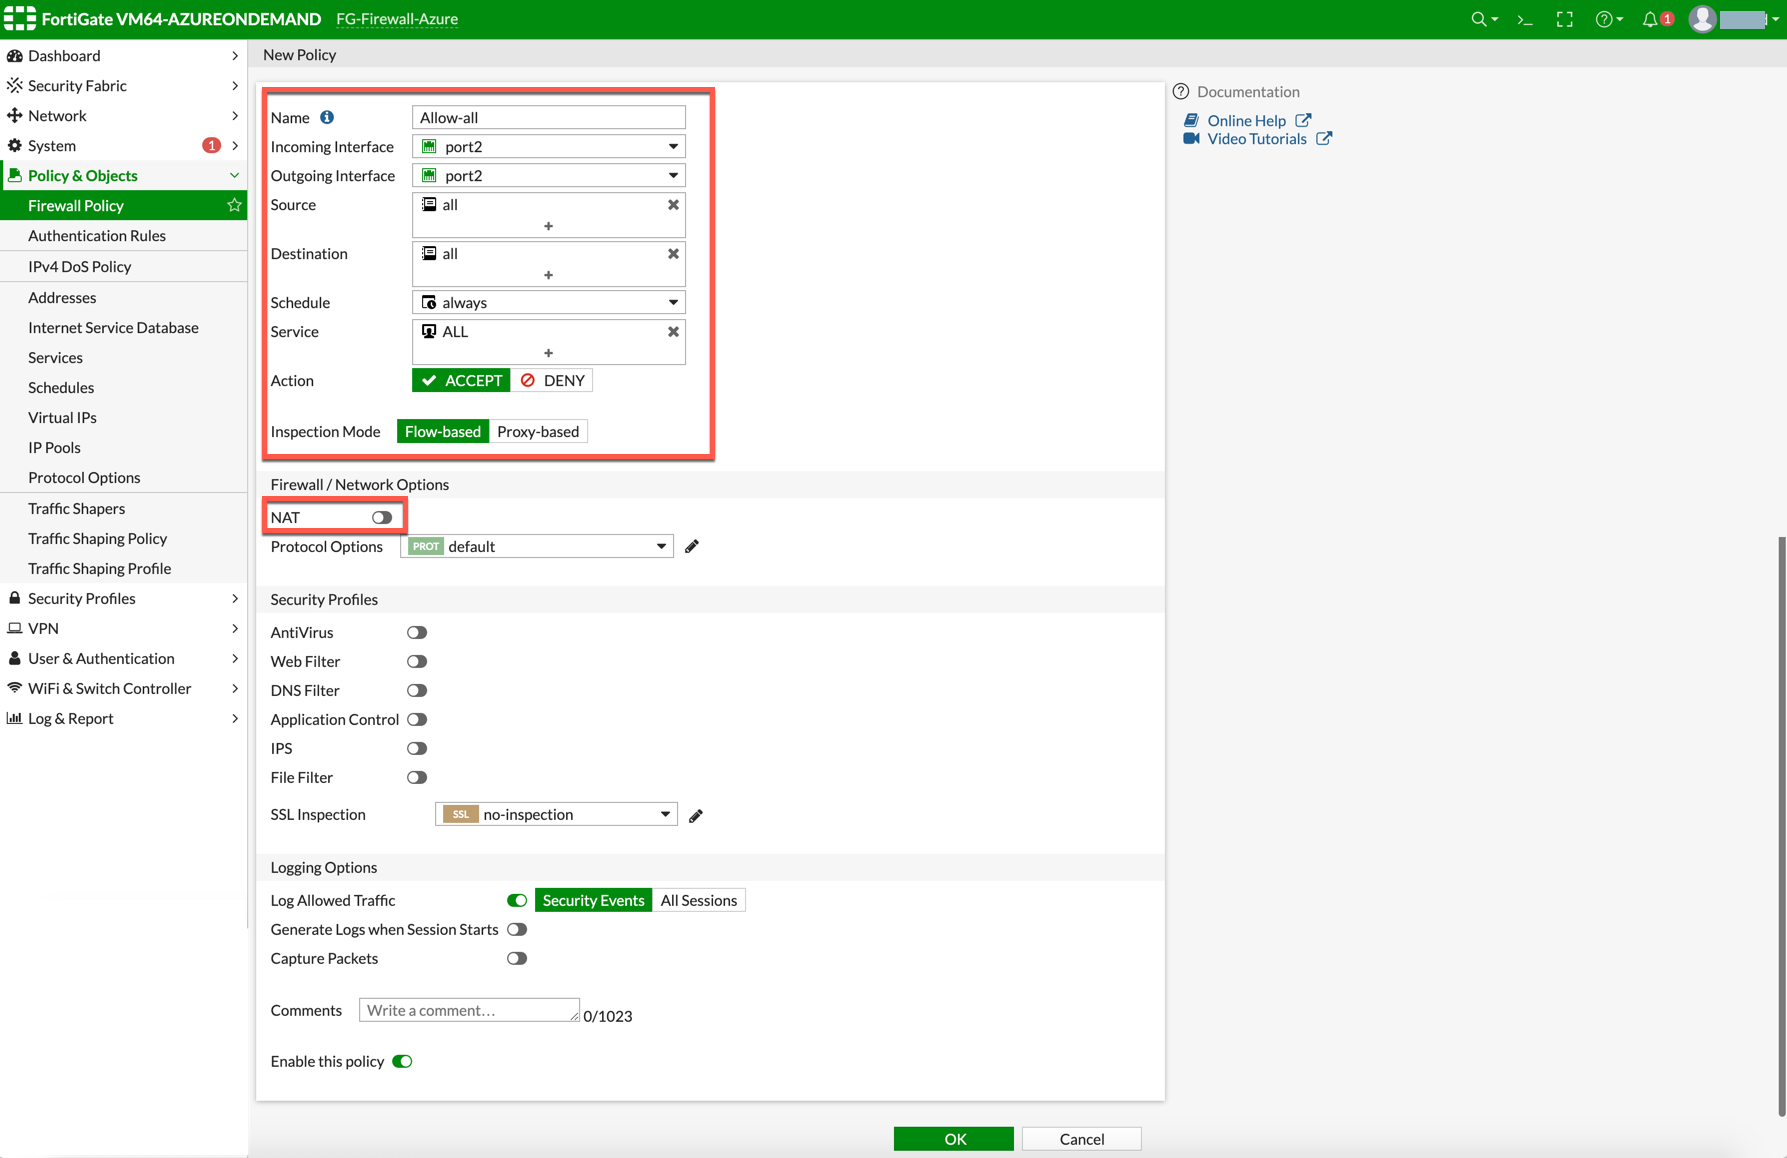
After validating that your traffic is being routed through your firewall instances, you can customize the security policy to tailor to your requirements.
(Optional) Configuring Basic Traffic Policy to Allow Traffic VNet to Internet
In this step, you will configure a basic traffic security policy that allows internet traffic to pass through the firewall. Given that Aviatrix Gateways will only forward traffic to the LAN port of the Firewall, set your policy condition to match any packet that is going into LAN interface and out of the WAN interface.
First you enable egress inspection:
-
In CoPilot, select FireNet on the left.
-
Select a Transit FireNet in the list and click the Edit icon.
-
In the Edit FireNet dialog, under FireNet Configuration, toggle the Egress slider to On.
-
Verify the Egress status on the Firewall Network > List > Firenet page in the Egress column for this firewall.
In the FortiGate Next Generation Firewall console, create the new policy:
-
Navigate to Policy & Objects > IPv4 Policy > Create New / Edit to configure policy as per the following table.
| Field | Value |
|---|---|
Name |
Configure any name for this policy |
Incoming Interface |
LAN (port2) |
Outgoing Interface |
WAN (port1) |
Source |
Click on the + sign and add all |
Destination |
Click on the + sign and add all |
Schedule |
always |
Service |
ALL |
Action |
ACCEPT |
NAT |
Enable |
|
NAT function needs to be enabled on this VNET to Internet policy. |
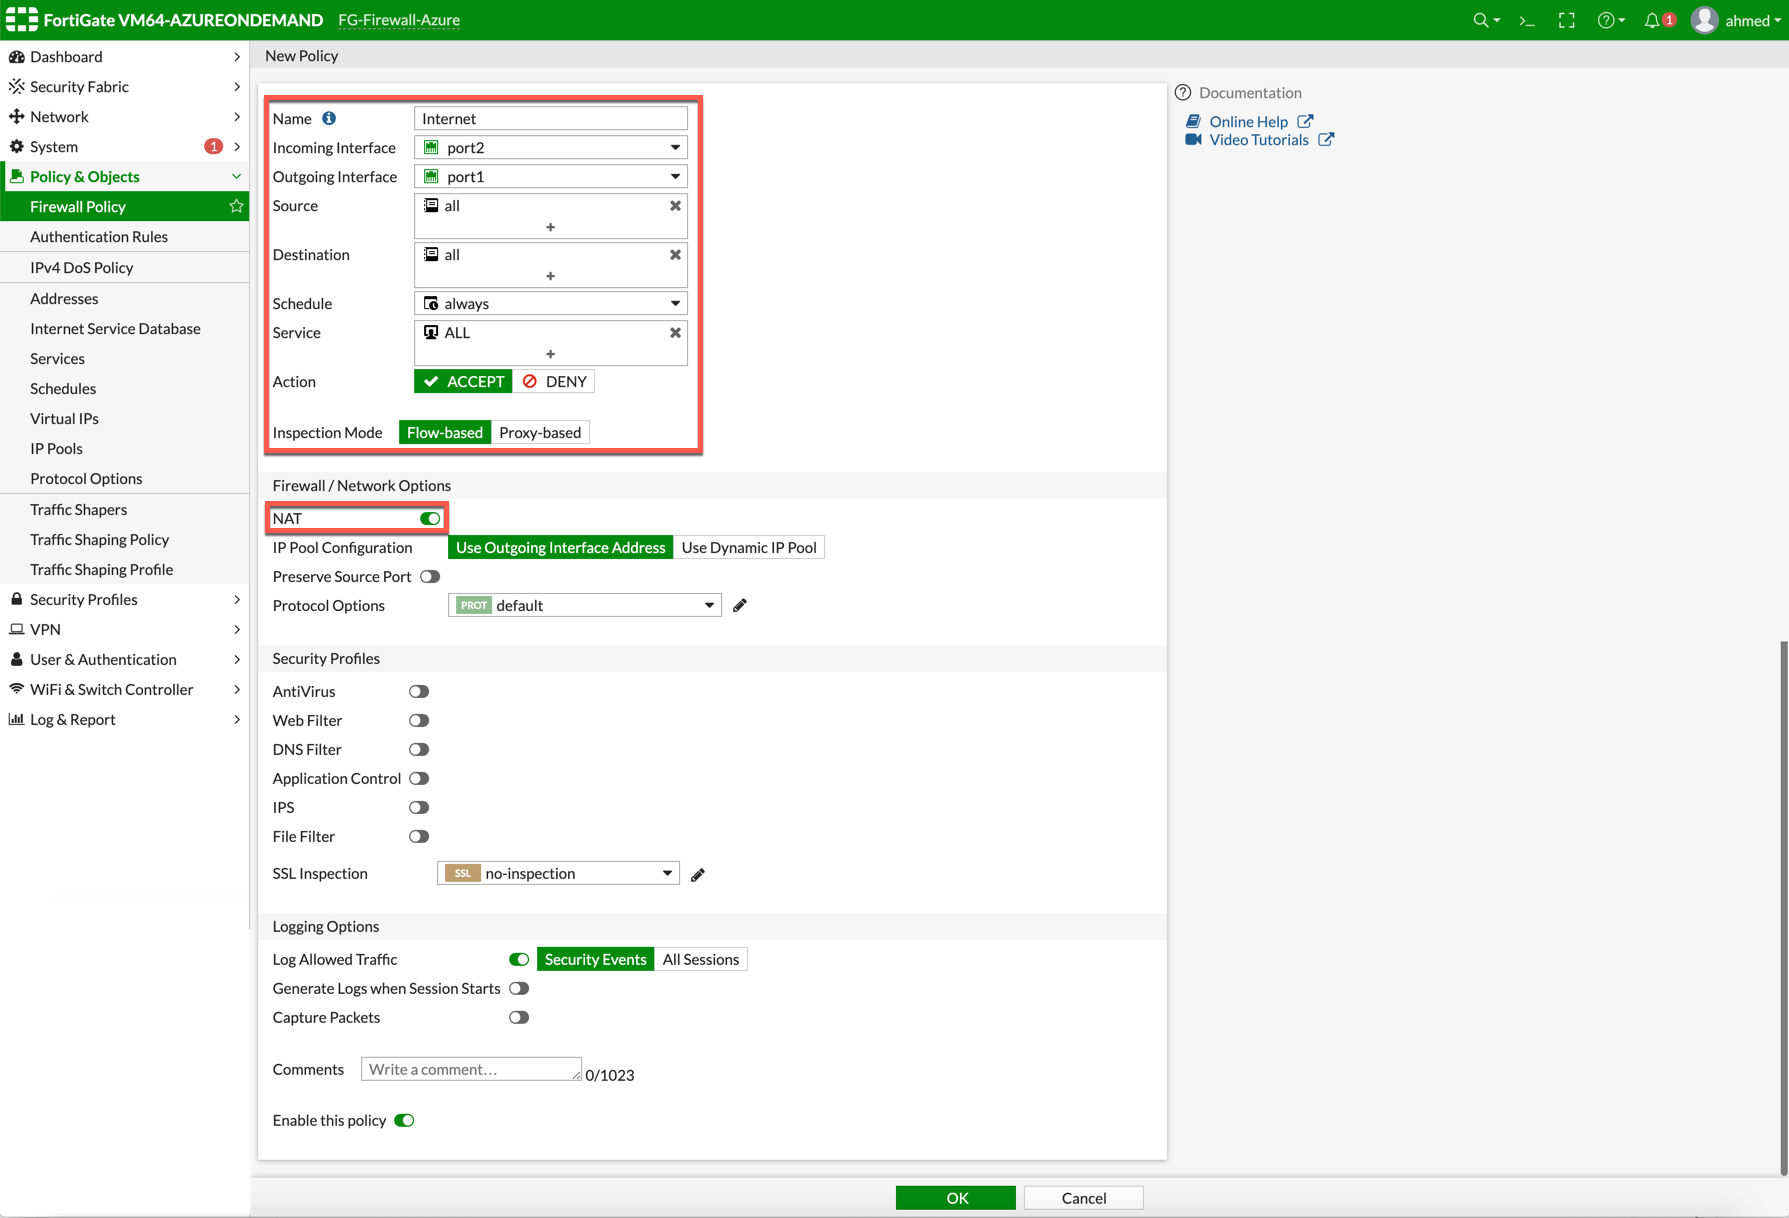
After validating that your traffic is being routed through your firewall instances, you can customize the security policy to tailor to your requirements.
Ready to Go
Now your Security Gateway instance is configured and ready to receive packets.
The next step is to validate your configurations and polices using FlightPath and Diagnostic Tools (ping, traceroute etc.).
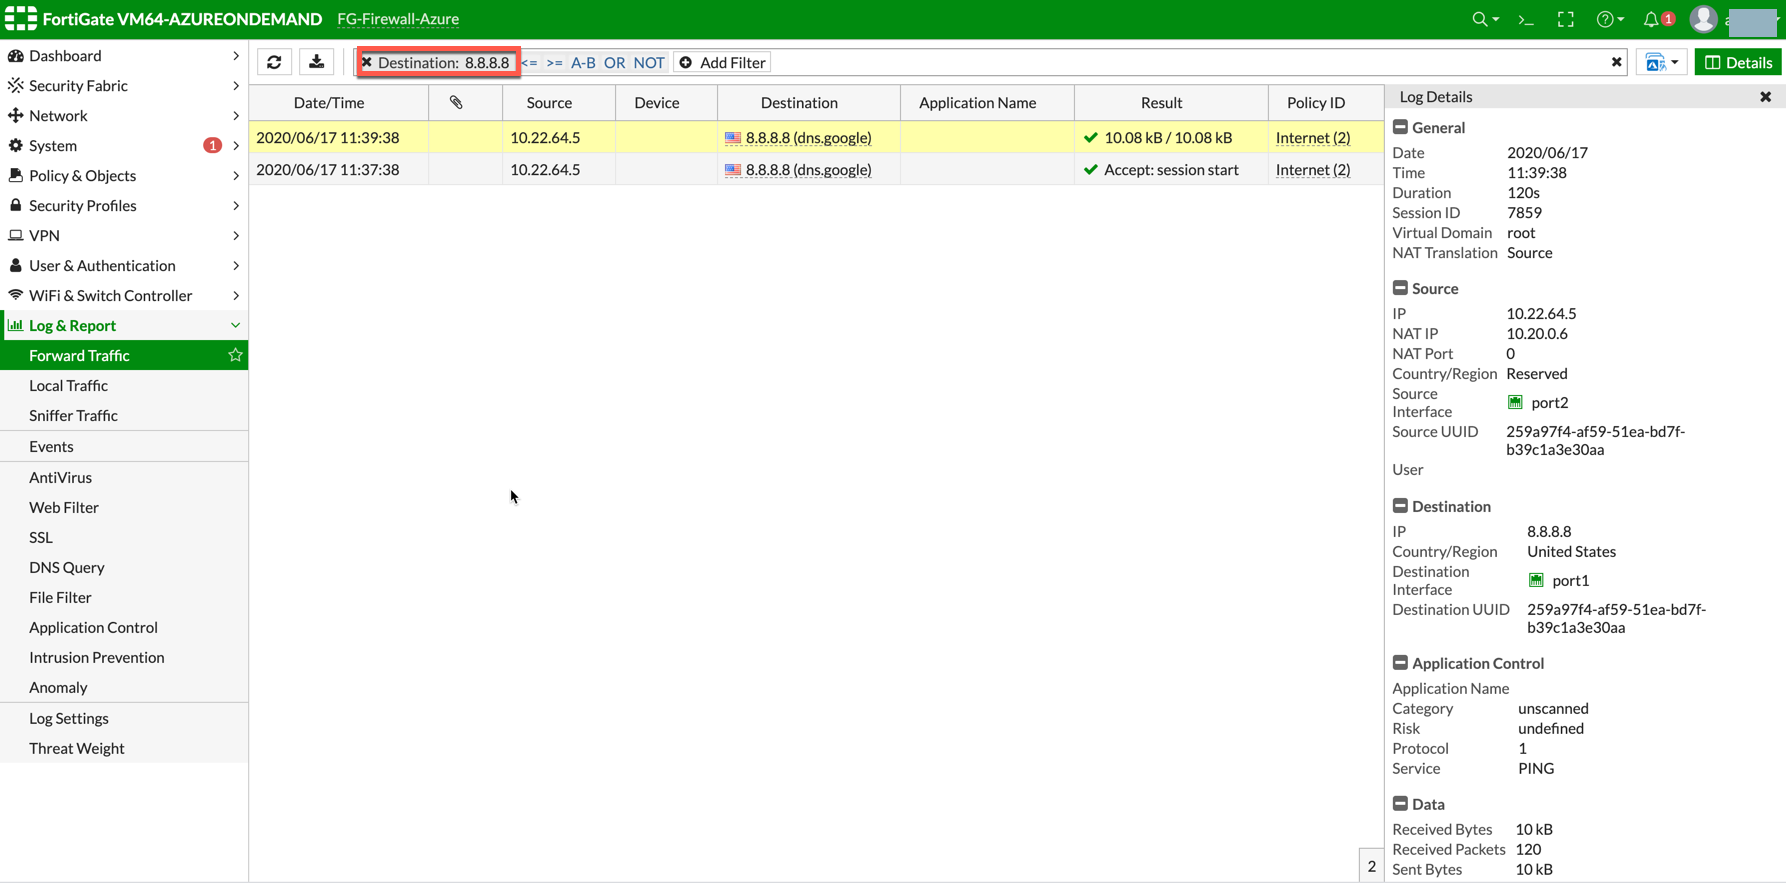
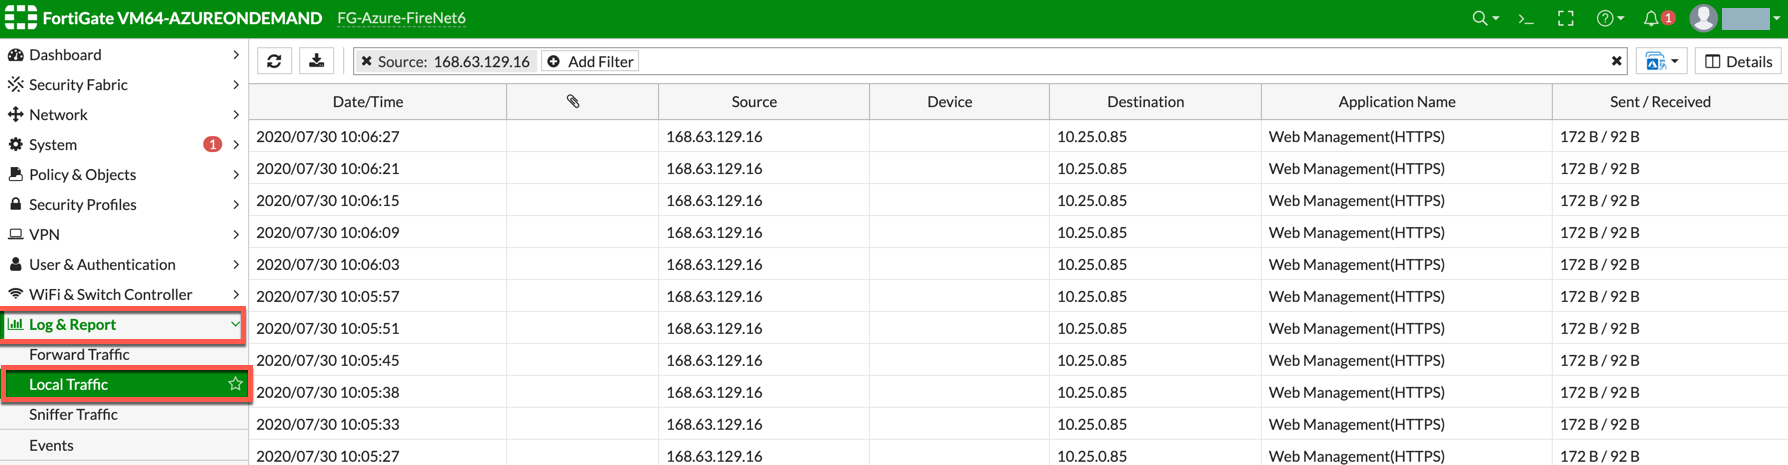
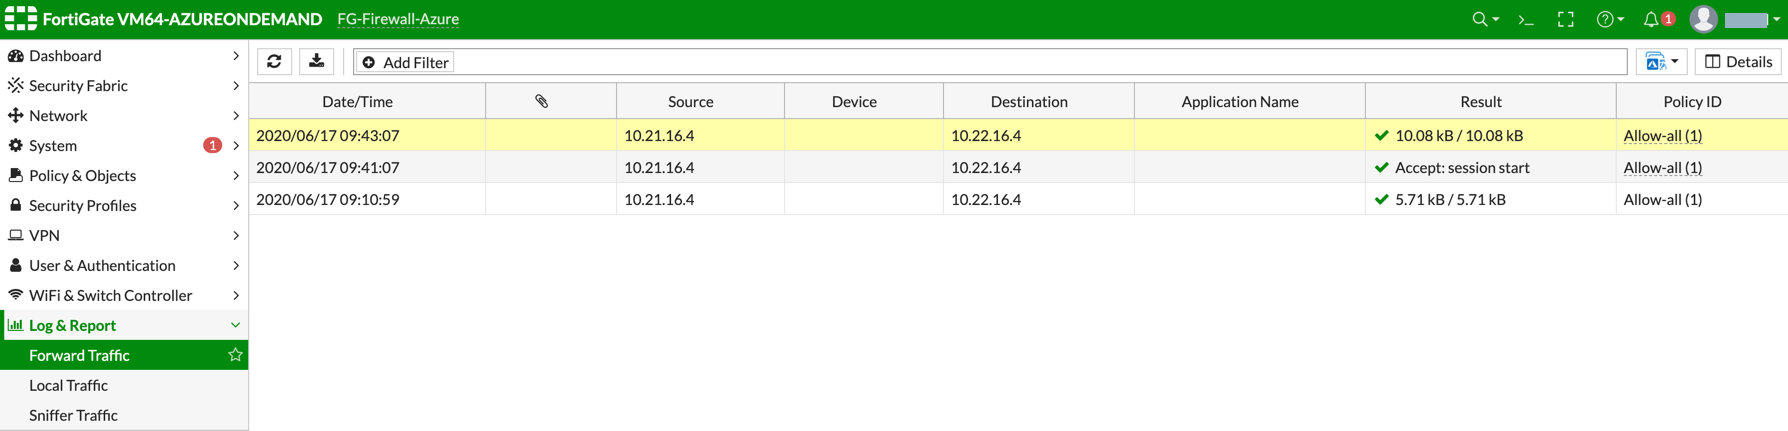
Viewing Traffic Log
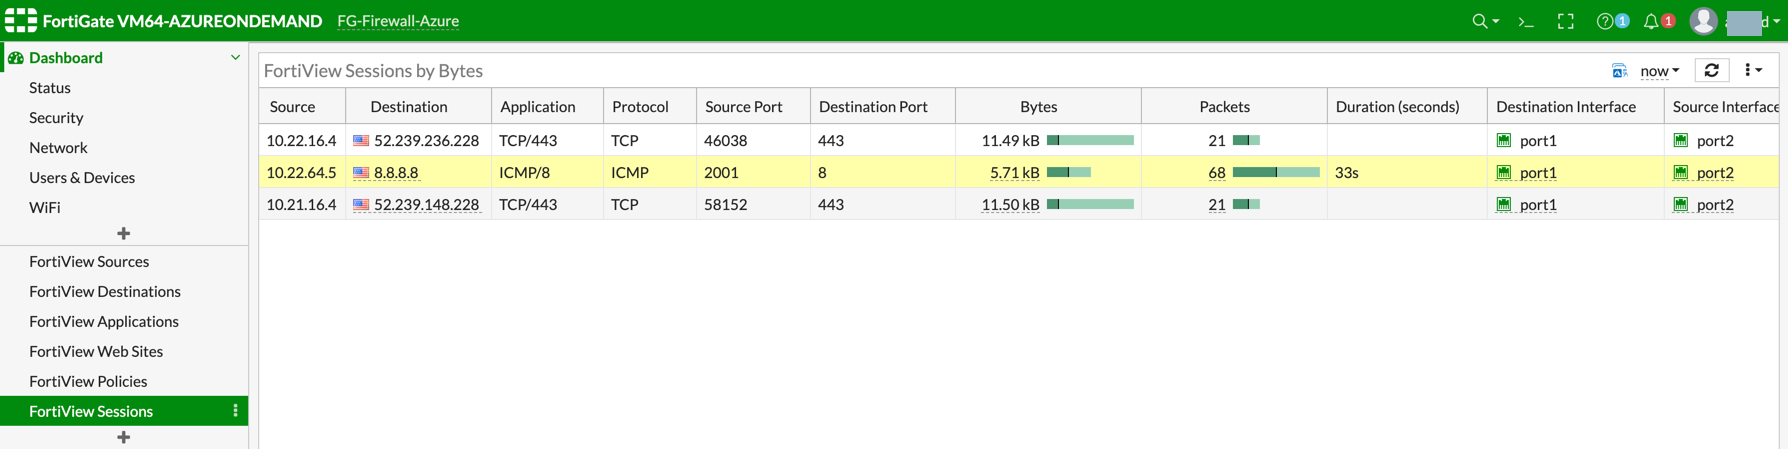
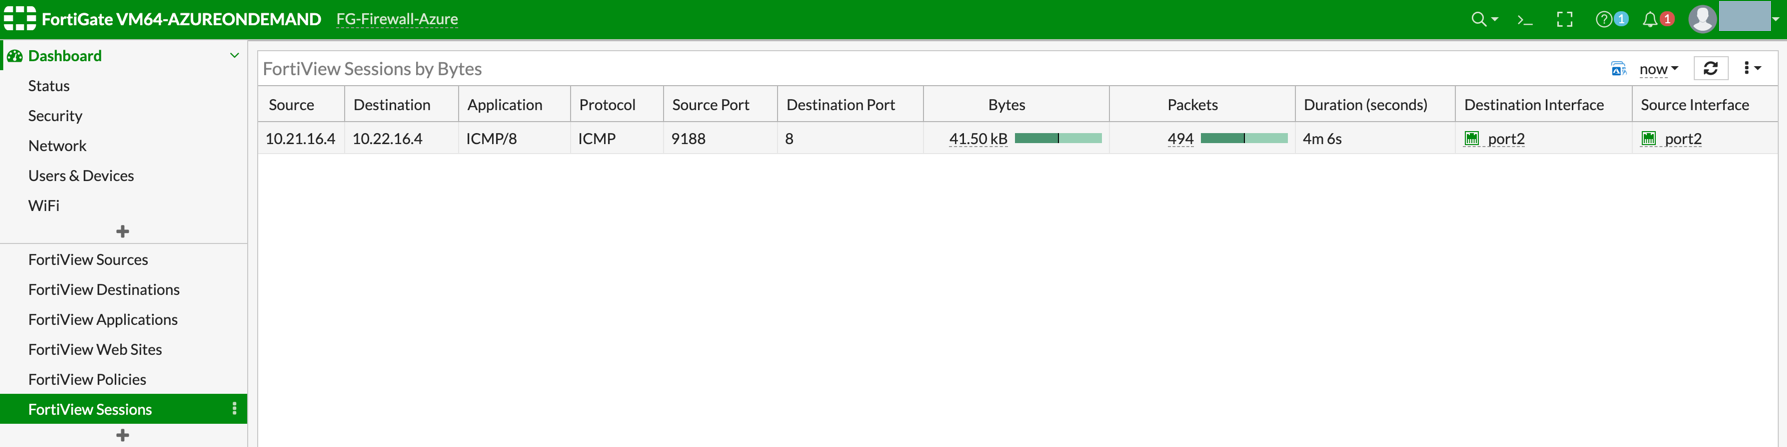
You can view if traffic is forwarded to the firewall instance by logging in to the FortiGate Next Generation Firewall console. Go to Dashboard > FortiView Sessions or FortiView Destinations. Traffic can also be viewed from Logs & Report.
|
To view Forward Traffic logs under Logs & Report, go to Policy & Objects > Firewall Policy > Select a Policy. Click Edit > Logging Options > Select All Sessions for Log Allowed Traffic. |
VNet to VNet Traffic
Launch one instance in PROD Spoke VNet and another in DEV Spoke VNet. Start pinging packets from an instance in DEV Spoke VNet to the private IP of another instance in PROD Spoke VNet. The ICMP traffic should go through the firewall and be inspected in the firewall.
(Optional) VNet to Internet Traffic
Launch a private instance in the Spoke VNet (i.e. PROD Spoke VNet) and start pinging packets from the private instance towards the Internet (e.g. 8.8.8.8) to verify the egress function. The ICMP traffic should go through and get inspected on the firewall.
|
Egress Inspection is only applicable to all VNets that deploy non-public-facing applications. If you have any Spoke VNets that have public facing web services, you should not enable Egress Inspection. This is because Egress Inspection inserts a default route (0.0.0.0/0) toward the Transit GW to send the Internet traffic toward the firewall to get inspected. Azure’s System Default Route pointing towards the Internet will be overwritten by the User-defined default route inserted by the Controller. |