Tuning For Sub-10 Seconds Failover Time in Overlapping Networks
Introduction
The purpose of this document is to provide the instructions for tuning network configurations for sub-10 seconds failover time when network address ranges on-prem and cloud are overlapping.
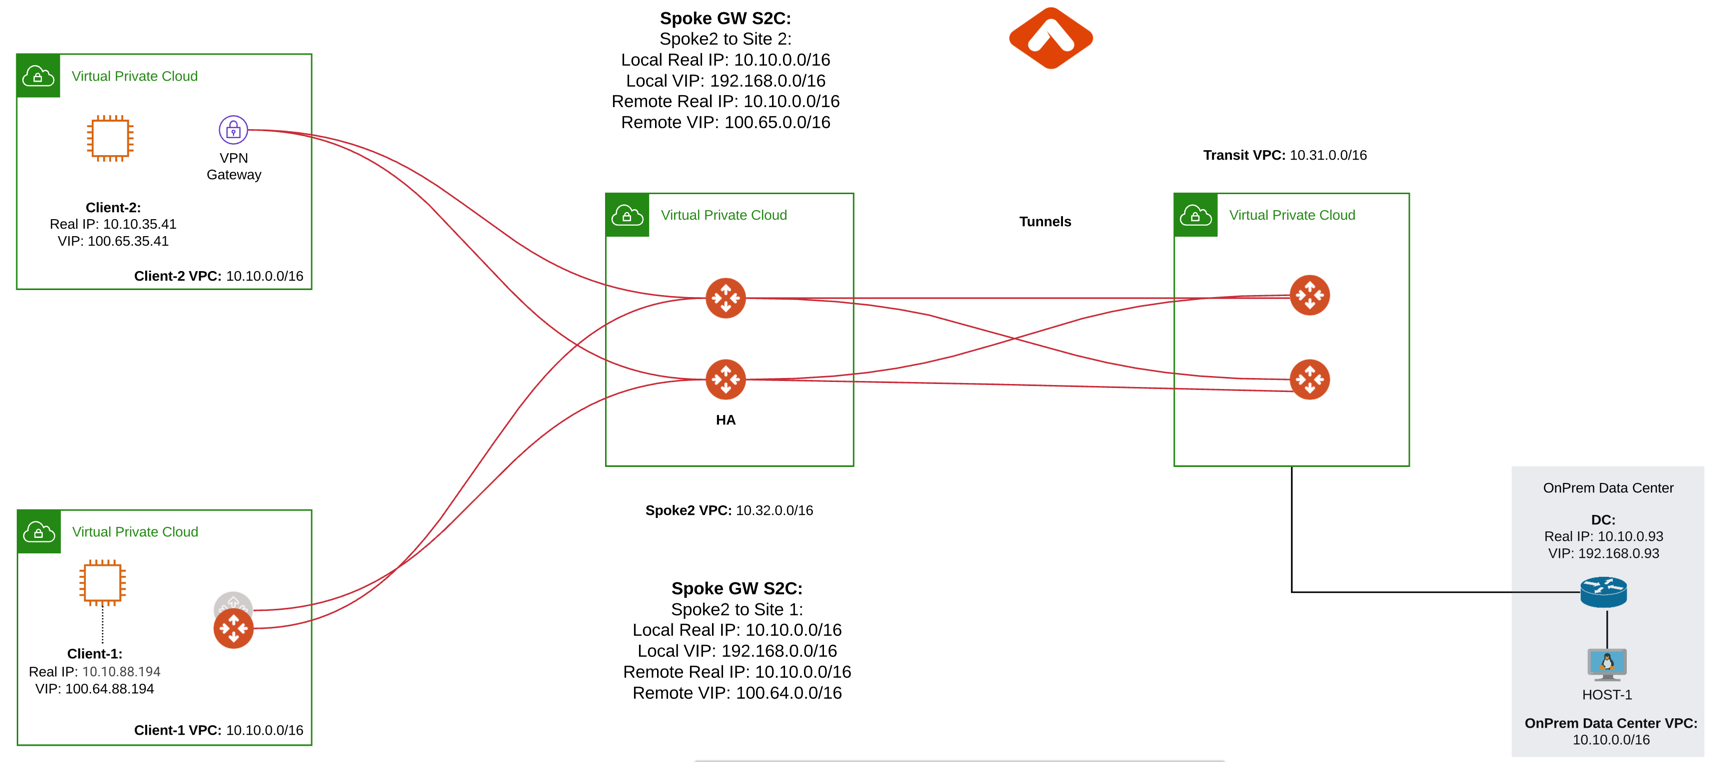
The scenario is described in the following diagram.

In the above diagram, Client-1 and Client-2 need to communicate with on-prem network. However, both Client-1 and Client-2 network address ranges overlap with each other, and worse yet, they both overlap with on-prem network address range (10.0.0.0/16). Such scenarios happen when Client-1, Client-2 and the on-prem networks belong to three different organizations.
The traditional solution is to build IPsec tunnel between the two networks and use SNAT/DNAT rules to translate each addresses, as demonstrated in this example. Such solution requires a potentially large number of SNAT/DNAT rules which is difficult to configure and maintain.
With the introduction of Mapped Site2Cloud for address overlapping networks, you no longer need to wrestle with the individual SNAT/DNAT rules.
Configuration Steps
|
This example uses Aviatrix Gateway on client site to simulate fast convergence environment |
Step 1: Follow the Multicloud Transit workflow to launch gateways
Log in to the Controller console, go to Multi-CLOUD TRANSIT. Follow step 1, step 4 and step 6 respectively to launch transit and spoke gateways, and attach spoke gateways to transit.
Create VPN tunnel between Transit Gateway and On-prem.
Step 2: Create a Site2Cloud tunnel between Spoke Gateway and Client-1
2.1 Configure S2C from Spoke Gateway to Client-1
Go to Controller Console → Site2Cloud → Setup.
Click "+Add New". Fill the form and click OK. Select "Mapped" for the Connection Type field.
| Field | Value |
|---|---|
VPC ID/VNet Name |
Choose VPC ID (Select Spoke Gateway VPC) |
Connection Type |
Mapped |
Connection Name |
Arbitrary (e.g. S2C-SPK-to-Client1) |
Remote Gateway Type |
Aviatrix |
Tunnel Type |
Route-based |
Algorithms |
Uncheck this box |
IKEv2 |
Uncheck this box |
Over Private Network |
Uncheck this box |
Enable HA |
Check this box |
Primary Cloud Gateway |
Select the Aviatrix Gateway created above |
Backup Gateway |
Select the Aviatrix Gateway HA |
Remote Gateway IP Address |
Public IP of Client-1 Primary Gateway |
Remote Gateway IP Address (Backup) |
Public IP of Client-1 Backup Gateway |
Pre-shared Key |
Optional (auto-generated if not entered) |
Same Pre-shared Key as Primary |
Check this box |
Custom Mapped |
Uncheck this box |
Remote Subnet (Real) |
10.10.0.0/16 (Client-1 Real CIDR) |
Remote Subnet (Virtual) |
100.64.0.0/16 (Client-1 Virtual CIDR) |
Local Subnet (Real) |
10.10.0.0/16 (On-Prem Network CIDR) |
Local Subnet (Virtual) |
192.168.0.0/16 (On-Prem Virtual CIDR) |
2.2 Configure S2C from Client Side
Go to Controller Console → Site2Cloud → Setup.
Click "+Add New". Fill the form and click OK. Select "unmapped" for the Connection Type field.
| Field | Value |
|---|---|
VPC ID/VNet Name |
Choose VPC ID (Select Client-1 VPC) |
Connection Type |
Unmapped |
Connection Name |
Arbitrary (e.g. S2C-Client1-to-SPK-GW) |
Remote Gateway Type |
Aviatrix |
Tunnel Type |
Route-based |
Algorithms |
Uncheck this box |
IKEv2 |
Uncheck this box |
Over Private Network |
Uncheck this box |
Enable HA |
Check this box |
Primary Cloud Gateway |
Select the Aviatrix Gateway created above |
Backup Gateway |
Select the Aviatrix Gateway HA |
Remote Gateway IP Address |
Public IP of Spoke Primary Gateway |
Remote Gateway IP Address (Backup) |
Public IP of Spoke Backup Gateway |
Pre-shared Key |
Optional (auto-generated if not entered) |
Same Pre-shared Key as Primary |
Check this box |
Remote Subnet |
192.168.0.0/16 (On-Prem Virtual CIDR) |
Local Subnet |
10.10.0.0/16 (Client-1 Local Network CIDR) |
Step 3: Configure global parameters
Go to Controller Console → Settings → Advanced
-
Click on "Tunnel" tab and change "Status Change Detection Time" and save settings.
| Field | Value |
|---|---|
Aviatrix Entity |
Choose Controller |
Detection time (secs) |
20 |
-
Click on "Keepalive" tab and modify Keepalive Template Configuration
| Field | Value |
|---|---|
Keep Alive Speed |
fast |
Step 4: Configure site2cloud parameters
Go to Aviatrix Controller’s Console → Site2Cloud → Setup.
4.1 Spoke Gateway Side
Select Spoke Gateway VPC, spoke gateway to client site2cloud connection and click "Edit"
-
Make sure only one tunnel is UP and HA status Active-Standby
-
DPD Timer is enabled, configure DPD timers as shown below and click "Save and Apply".
| Field | Value |
|---|---|
Initial Delay |
1 |
Retry |
1 |
Maxfail |
1 |
-
Forward Traffic to Transit Gateway is enabled
-
Event Triggered HA is enabled
4.2 Client Side
Select Client VPC, client to spoke site2cloud connection and click "Edit"
-
Make sure only one tunnel is UP and HA status Active-Standby
-
DPD Timer is enabled, configure DPD timers as shown below and click "Save and Apply".
| Field | Value |
|---|---|
Initial Delay |
1 |
Retry |
1 |
Maxfail |
1 |
-
Active Active HA is disabled
-
Event Triggered HA is enabled