Multicloud Transit Network Workflow Instructions (AWS/Azure/GCP/OCI)
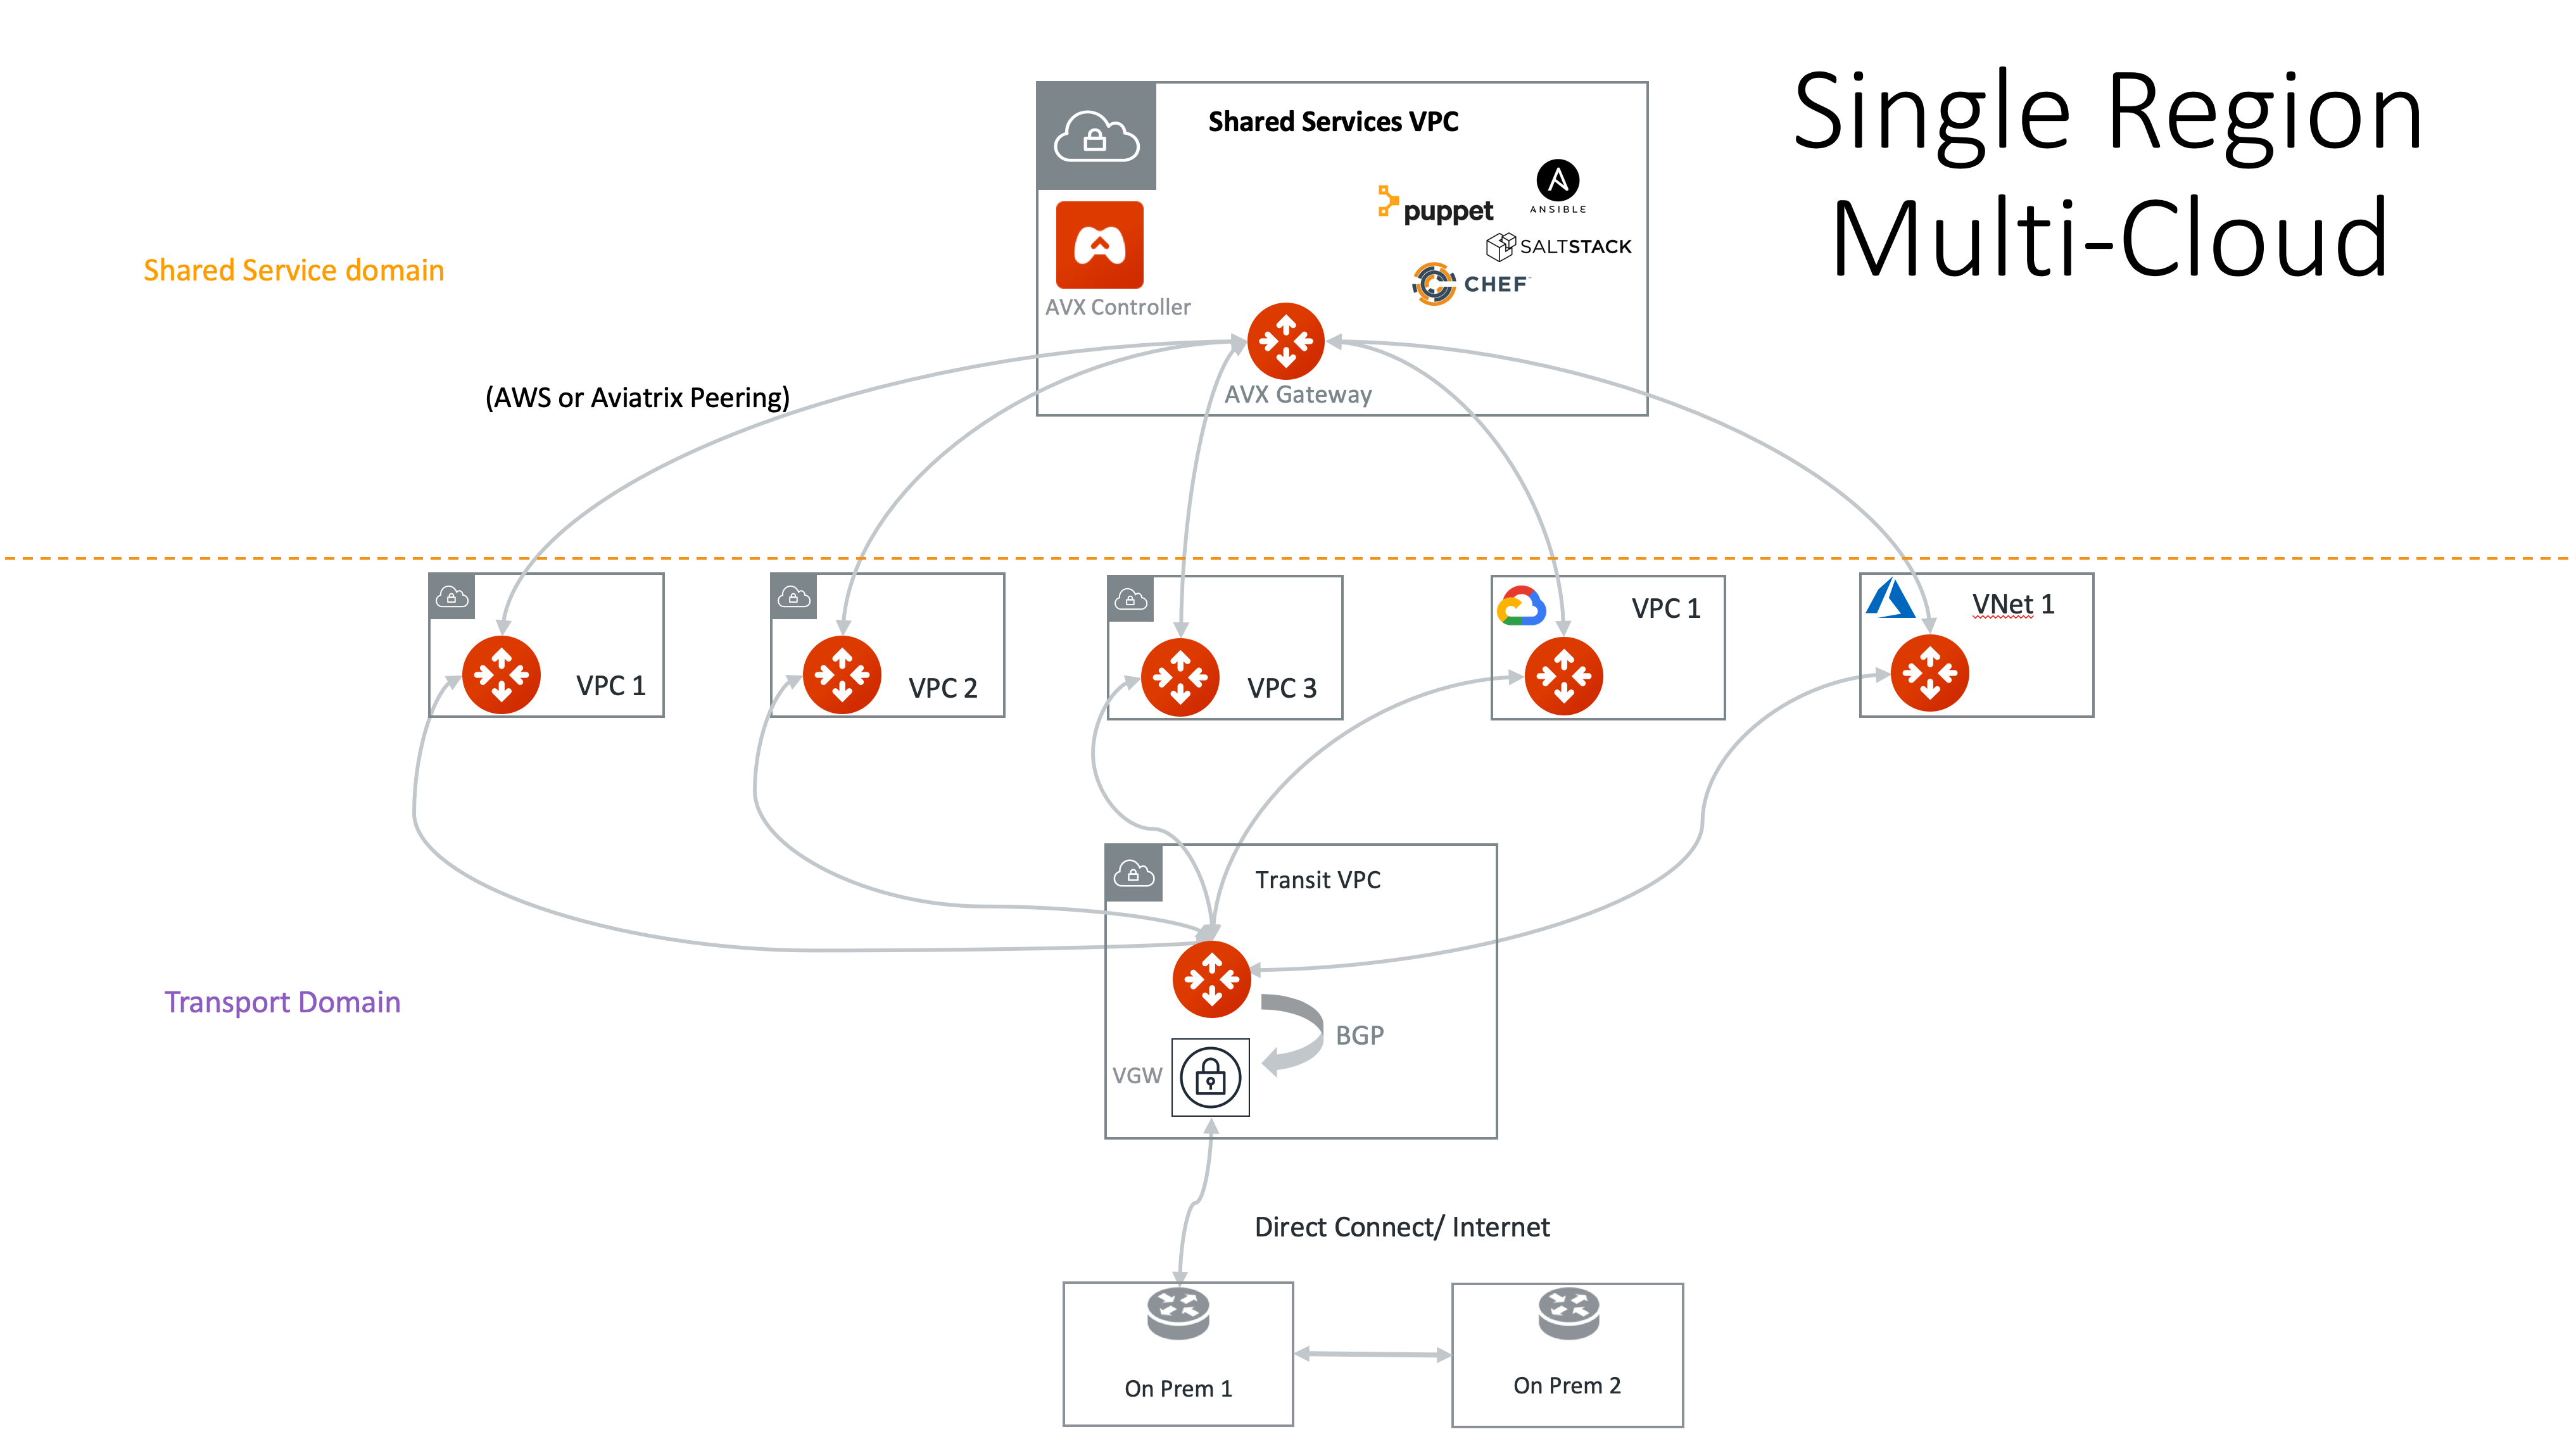
This document describes using Aviatrix Transit and Spoke Gateways to set up an Aviatrix Multicloud Transit Network within a single-region.
| If you intend to deploy a transit network using AWS Transit Gateway (TGW), see TGW Plan. |
This workflow provides you with step-by-step instructions to build an encrypted Transit Network in AWS/Azure/GCP/OCI or a Transit Network with Azure native peering. This Multicloud Transit Network consists of a Transit Gateway and a set of Spoke Gateways for communications between Spoke VPC or VNet instances and your on-prem network.
While the instructions below reference AWS, these functionalities apply to any public cloud in which Aviatrix Transit Network is supported.
For more information about Aviatrix Multicloud Transit Network, see Multicloud Transit Network FAQ.
For Aviatrix Multicloud Transit Network design guide, see Multicloud Transit Network Design Patterns.
For other Aviatrix functions, such as VPN access for users and VPN access for sites, see the Aviatrix Overview.
Planning and Prerequisites
-
If you have not launched an Aviatrix Controller, start with:
-
Identify a VPC/VNet and name it Transit VPC/VNet, in a region where you want to launch the Transit gateway.
We recommend using the Aviatrix Create a VPC tool with the option Aviatrix Transit VPC to create a transit VPC/VNet that has all infrastructure fully populated. For a transit network in AWS, see Prerequisites for a Transit Network in AWS.
-
Create a VGW or reuse an existing VGW. The VGW should not be attached to the Transit VPC/VNet if you plan to launch Transit GW in the same VPC/VNet. This VGW can be attached to a different VPC/VNet if this VPC/VNet CIDR is different from the Transit VPC/VNet where the Transit GW is launched or in a different region and account (see 10Gbps Transit Network use case). This VGW should be connected to on-prem either over Direct Connect or over the Internet.
-
If this is your first time using Aviatrix, make sure you go through the Aviatrix Controller on-boarding process to create an Aviatrix account that corresponds to an IAM role. For instructions on how to launch an Aviatrix Controller, see Getting Started.
Log in to the Aviatrix Controller
-
Open a browser and navigate to https://<_Controller Public IP address_>/.
-
Once authenticated, select MULTI-CLOUD TRANSIT > Setup in the left navigation bar.
The Multi-Cloud Transit Network Workflow page opens. Use the four tabs at the top (Transit, Spoke, Attach/Detach, and External Connection) to set up a Multi-Cloud Transit Network.
Launch an Aviatrix Transit Gateway
-
Go to MULTI-CLOUD TRANSIT > Setup on the left sidebar.
-
On the Multi-Cloud Transit Network Workflow page, select the Transit tab on top to launch a Transit Gateway.
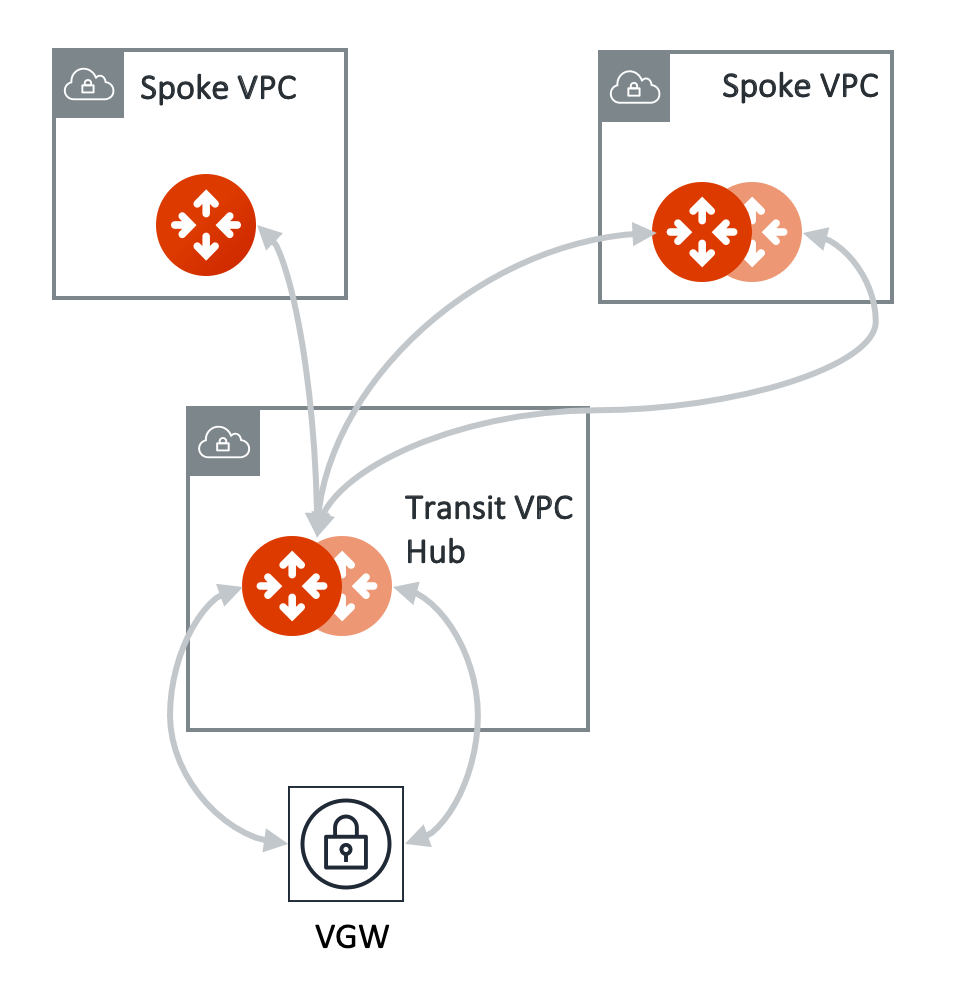
The Transit Gateway is the hub gateway. It serves to move traffic between a Spoke VPC/VNet and an on-prem network; among Spoke VPC/VNets; and among networks behind peering Transit gateways. The Transit Gateway must be launched on a public subnet where its associated route table has a route 0.0.0.0/0 that points to AWS IGW.
-
Provide the following information to set up your Transit Gateway.
Setting Value Cloud Type
Select the cloud type.
Gateway Name
A unique name to identify the Transit Gateway.
Access Account Name
An Aviatrix account that corresponds to an IAM role or account in AWS.
Region
One of the AWS regions.
VPC ID
The Transit VPC/VNet/VCN ID.
Public Subnet
The public subnet on which Transit Gateway instance is deployed.
Gateway Size
Transit Gateway instance size.
When selecting Transit Gateway instance size, choose a t2 series for Proof of Concept (POC) or prototyping only. Transit GW of t2 series instance type has a random packet drop of 3% for packet size less than 150 bytes when interoperating with VGW. This packet drop does not apply to Spoke Gateway. You can change the Transit Gateway size later by following Resize a Transit Gateway Instance.
Allocate New EIP
Select this checkbox to have the Controller allocate a new EIP and associate it with the Transit Gateway instance. If you do not select this option, the Controller looks for an allocated but unassociated EIP in the Transit Gateway account.
High Performance Mode Encryption
If selected, Transit Gateway can peer and connect to Spoke Gateway with High Performance Encryption.
Enable Transit Firenet Function
Enable the FireNet function on the Transit gateway.
BGP over LAN (Azure and GCP only)
Allow the Transit gateway to communicate with multiple instances in the same VPC/VNet without using a tunneling protocol such as IPsec.
Number of Interfaces (Azure and GCP only)
The number of BGP interfaces to create.
Add/Edit Tags
Additional AWS Tags for the Transit Gateway instance.
-
(Optional) Enable Transit Gateway High Availability
When gateway high availability (HA) is enabled, a second Transit Gateway instance is launched.
Both Transit Gateways will forward traffic in an event of tunnel failure between a Spoke VPC/VNet and Transit VPC/VNet, and between the Transit Gateway and on-prem (such as VGW for the AWS/Site2Cloud connection). As a best practice, the Transit HA gateway instance should be launched on a different public subnet (in AWS, GCP, or OCI) in a different availability zone (AZ). 
Provide the following information to set up your Transit HA Gateway instance.
Setting Value Aviatrix Transit Gateway
Select the Transit Gateway for which you want to enable HA.
HA Gateway Subnet
Select the subnet in which you want to enable HA. A best practice is to select a different public subnet from the original Transit Gateway in a different AZ.
Allocate New EIP
Select this checkbox to have the Controller allocate a new EIP and associate it with the HA Gateway instance. If you do not select this option, the Controller looks for an allocated but unassociated EIP in the Transit GW account.
Disable Transit GW HA
| If the Transit Gateway is connected to VGW or Site2Cloud on-prem, or there are Spoke Gateways attached to the Transit Gateway, you cannot disable the Transit HA Gateway. If you need to disable a Transit GW HA (for example, if you deployed it in the wrong subnet or AZ), use the Gateway page to do so. A best practice is to make sure there is no traffic going through the backup Transit GW before disabling it. |
-
Go to the Gateways page and locate the Transit HA Gateway instance.
-
Highlight the gateway and click Delete.
Launching a Spoke Gateway
To launch an Aviatrix Spoke Gateway:
-
Go to MULTI-CLOUD TRANSIT > Setup on the left sidebar.
-
On the Multi-Cloud Transit Network Workflow page, select the Spoke tab on top to launch a Spoke Gateway.
If you are building Azure transit solution and do not require traffic encryption between Spoke VNet and Transit VNet, go to Attach Azure ARM Spoke through Native Peering section to attach Spoke VNet directly. 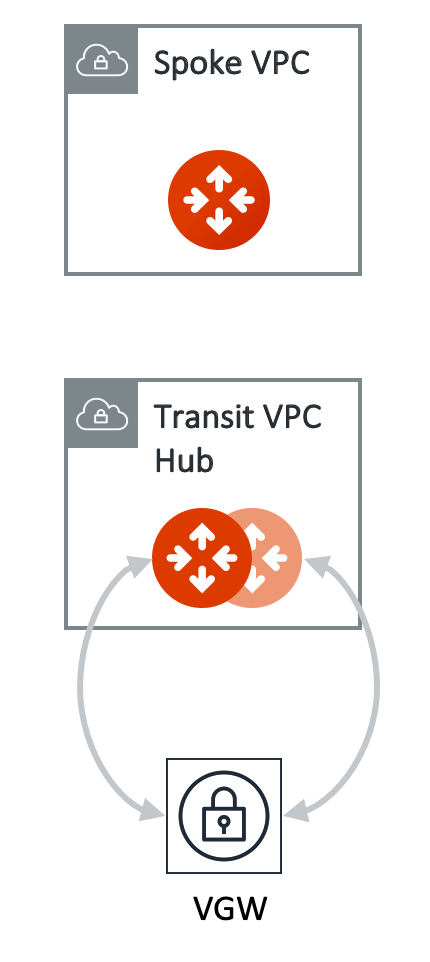
-
Provide the following information to set up your Spoke Gateway.
Setting Value Cloud Type
Select the cloud type.
Gateway Name
A unique name to identify the Spoke Gateway.
Access Account Name
An Aviatrix account that corresponds to an IAM role or account in AWS.
Region
One of the AWS regions.
VPC ID
The Spoke VPC/VNet ID.
Public Subnet
The public subnet where the Spoke GW instance is deployed.
Gateway Size
Spoke Gateway instance size.
Enable SNAT
Select this option if the Spoke Gateway will also be the NAT gateway for the Spoke VPC/VNet.
You can enable NAT function on the Spoke Gateway if egress to the Internet is intended to go through the Spoke Gateway. Once NAT is enabled, you can further configure FQDN whitelists for egress filter.
Enable BGP
Select this option to enable BGP for this Spoke Gateway.
BGP over LAN
Allow the Spoke gateway to communicate with multiple instances in the same VPC/VNet without using a tunneling protocol such as IPsec.
Number of Interfaces
The number of BGP interfaces to create?
Allocate New EIP
If this option is selected, the Controller allocates a new EIP and associates it with the gateway instance. If not selected, the Controller looks for an allocated but unassociated EIP in the Transit GW account.
High Performance Mode Encryption
If selected, Transit Gateway can peer and connect to Spoke Gateway with High Performance Encryption.
Add/Edit Tags
Additional AWS Tags for the Transit Gateway instance.
-
(Optional) Enable Spoke Gateway High Availability
When gateway high availability (HA) is enabled, a second Spoke Gateway is launched.
Both Spoke Gateways will forward traffic in an event of tunnel failure between a Spoke VPC/VNet and Transit VPC/VNet. For best practice, the HA Gateway instance should be launched on a different public subnet (in AWS, GCP, or OCI) in a different Availability Zone (AZ).
Provide the following information to set up the Spoke HA gateway.
Setting Value Aviatrix Spoke Gateway
Select the Spoke Gateway for which you want to enable HA.
HA Gateway Subnet
Select the subnet in which you want to enable HA. A best practice is to select a different public subnet from the original Spoke GW in a different AZ.
Allocate New EIP
Select this checkbox to have the Controller allocate a new EIP and associate it with the HA Gateway instance. If you do not select this option, the Controller looks for an allocated but unassociated EIP in the Spoke GW account.
To disable Spoke HA Gateway, go to the Gateways page and delete the Spoke HA Gateway.
Attach Spoke Gateway to Transit Network
This step attaches a Spoke VPC/VNet to the Transit Gateway by building an encrypted peering and transitive peering between the Spoke Gateway and the Transit Gateway. The Controller also instructs the Transit Gateway to start advertising the Spoke VPC/VNet CIDR to VGW via the established BGP session.
To attach a Spoke Gateway to a Transit Gateway:
-
Go to MULTI-CLOUD TRANSIT > Setup from the sidebar.
-
In the Multi-Cloud Transit Network Workflow page, select the Attach/Detach tab on top to attach the Spoke Gateway.
-
Scroll down to Attach Spoke Gateway to Transit Network section.
-
Click on the Spoke Gateway/Source Gateway dropdown menu and select the Spoke Gateway to attach.
-
Click on the Transit Gateway/NextHop Gateway dropdown menu and select a Transit Gateway.
-
(Optional) To create the maximum number of tunnels for the Spoke-to-Transit attachment, check Max Performance.
-
Max Performance option is valid when both the Spoke and Transit gateways are launched with High Performance Encryption enabled and are in the same cloud type.
-
The number of tunnels that are created depends on the gateway instance sizes.
-
If Max Performance unchecked, only one tunnel is created even when HPE is enabled for both Spoke and Transit Gateway.
-
To switch between high number of tunnels or one tunnel, detach and reattach the Spoke Gateway to the Transit Gateway.
-
-
Click Attach.
To attach more Spoke VPC/VNets to this Transit Gateway, click on the Spoke Gateway/Source Gateway dropdown menu and select a new Gateway to attach.
Detach Aviatrix Spoke Gateway
This step detaches a Spoke Gateway from a Transit Gateway. The Controller also instructs the Transit Gateway to stop advertising the Spoke VPC/VNet CIDR to VGW.
To detach a Spoke Gateway from a Transit Gateway:
-
Go to MULTI-CLOUD TRANSIT > Setup
-
In the Multi-Cloud Transit Network Workflow page, select the Attach/Detach.
-
Scroll down to Detach Aviatrix Spoke Gateway section.
-
Click on the Aviatrix Transit Gateway dropdown menu and select the Transit Gateway.
-
Click on the Aviatrix Spoke Gateway dropdown menu and select the Spoke Gateway to detach.
-
Click Detach.
| Detaching a Spoke Gateway from a Transit Gateway does not delete the Spoke Gateway. You can attach the Spoke Gateway to the Transit Gateway again, if needed. |
To delete a Spoke Gateway, go to GATEWAY > select the gateway and click Delete.
Attach Azure ARM Spoke through Native Peering
You can build Azure transit solution (without having to launch a gateway in a Spoke VNet) with native peering if you do not require traffic encryption between the Transit VNet and the Spoke VNet.
| The Spoke VNet must be in the same subscription or a different subscription but in the same AD as the Transit VNet subscription. If the Spoke VNet is in the different subscription than that of the Transit VNet, follow these Creating virtual network peering instructions, and complete Step 5 to 10 for each subscription to build a trust relationship. |
Do not perform peering function on the Azure portal.
To attach Azure ARM through native peering:
-
Go to MULTI-CLOUD TRANSIT > Setup on the sidebar.
-
In the Multi-Cloud Transit Network Workflow page, select the Attach/Detach.
-
Scroll down to Attach Azure ARM Spoke through Native Peering section.
-
Provide the following information.
Setting Value Cloud Type
Azure.
Transit Gateway Name
A unique name to identify the Transit Gateway.
Spoke VNet Account Name
An Aviatrix account that corresponds to a subscription in Azure.
Spoke VNet Region
Spoke VNet region.
Spoke VNet Name: Resource Group
The Spoke VNet name.
Detach Azure Native Spoke
This step detaches an Azure Native Spoke from an Aviatrix Transit Gateway.
-
Go to MULTI-CLOUD TRANSIT > Setup
-
In the Multi-Cloud Transit Network Workflow page, select the Attach/Detach tab.
-
Scroll down to Detach Azure Native Spoke section.
-
Click on the Cloud Type dropdown and select the cloud type.
-
Click on the Aviatrix Transit Gateway Name dropdown menu and select the Transit Gateway.
-
Click on the Spoke VNet dropdown menu and select the name of the Spoke VNet to detach.
-
Click Detach.
Connect to External Device
To connect to an AWS VGW, External Device, or Azure VNG:
-
Go to MULTI-CLOUD TRANSIT > Setup on the sidebar.
-
In the Multi-Cloud Transit Network Workflow page, select the External Connection tab.
This page displays the three options to connect to a Transit Gateway to an on-prem network. Choose one option that meets your network requirements.
-
AWS VGW (This is the default setting)
-
External Device (over Direct Connect or over Internet)
-
Azure VNG
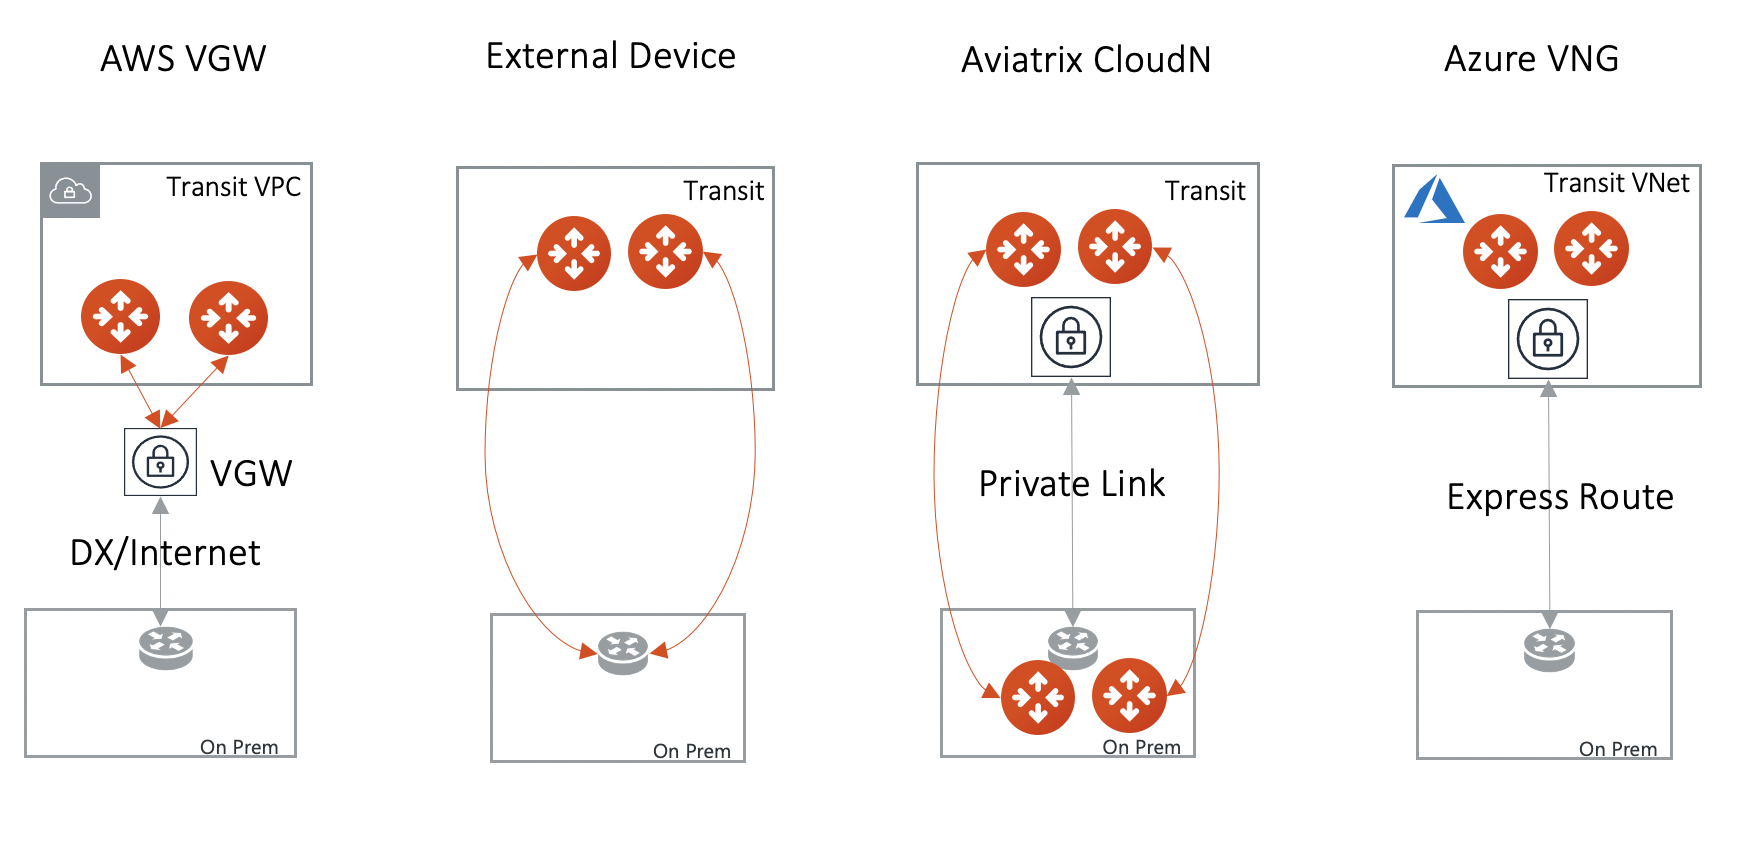
Transit Gateway Connect Type Performance HA Route Limit Deployment notes AWS VGW
1.25Gbps
Active/Active
100
VGW should be detached. Use the instruction here to build encryption between VGW and on-prem router.
External Device
Up to 10Gbps
Active/Standby
Unlimited
VGW should be attached. Aviatrix Transit Gateway establishes BGP + IPSEC with on-prem router.
Azure VNG
10Gbps
Active/Active
Unlimited
VNG should be attached.
-
-
To connect AWS VGW, go to AWS VGW (VPN Gateway).
-
To connect to External Device, go to External Device.
-
To connect to Azure VNG, go to Azure VNG.
AWS VGW (VPN Gateway)
Aviatrix automates the process of discovering and connecting to AWS VGW. The instruction below is for connecting Aviatrix Transit Gateway to AWS VGW.
Before executing this step, a VGW must have already been created on AWS console.
Select the VGW ID in the dropdown menu.
As a result of this step, a Customer Gateway and a Site2Cloud Connection between the VGW to the Aviatrix Transit Gateway will be automatically created. The Site2Cloud IPsec tunnel establishes a BGP session to exchange routes between on-prem and the cloud. You also can view them under Customer Gateways and Site-to-Site VPN Connections of the AWS console.
| You are responsible for building the connection between VGW and on-prem. The connection is either over the Internet, over Direct Connect, or both. |
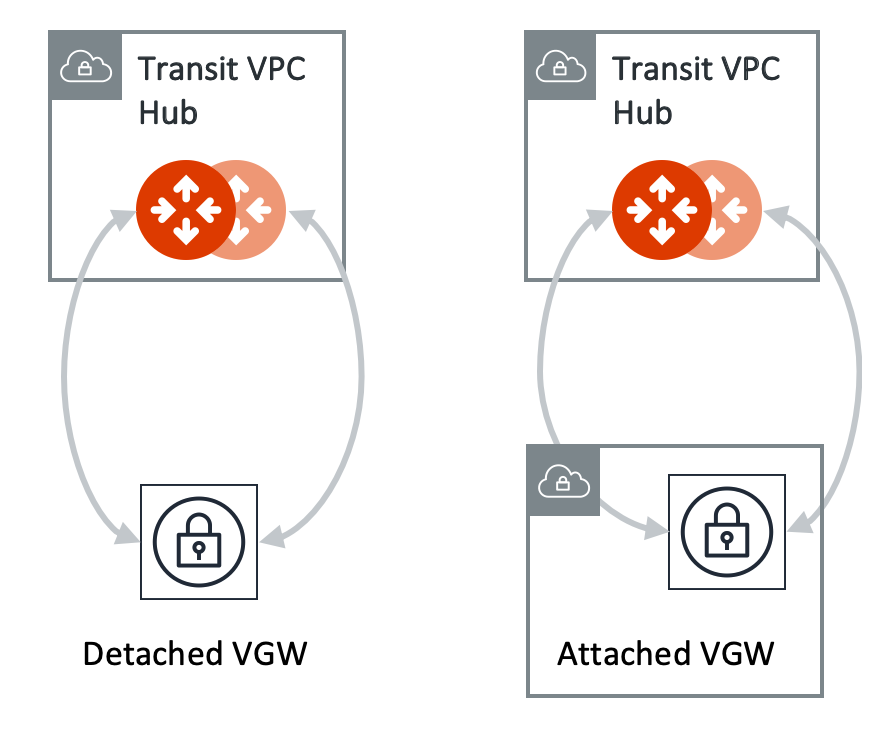
We support two patterns of connections: Detached VGW and Attached VGW. The VGW should not be attached to the Transit VPC/VNet.
Currently, only one connection is supported on a specific Transit Gateway/VPC, regardless of which of the three options above is chosen.
Provide the following information to connect to AWS VGW.
| Setting | Value |
|---|---|
VPC ID |
The Transit VPC ID where Transit GW was launched. |
Connection Name |
A unique name to identify the connection to VGW. |
Aviatrix Gateway BCP ASN |
The BGP AS number the Transit GW will use to exchange routes with VGW. |
Primary Aviatrix Gateway |
The Transit Gateway you created in Step 1. |
AWS VGW Account Name |
The Aviatrix account that VGW is created with. This account could be the same as the account used by Transit GW, or it could be by a different account. |
VGW Region |
The AWS region where VGW is created. |
VGW ID |
VGW that is created in the VGW Region in the AWS VGW Account. |
The Aviatrix Transit Gateway can connect to a VGW that belongs to a different AWS account in a different region.
It takes a few minutes for the VPN connection to come up and routes from VGW to be propagated. When the IPsec tunnel with a VGW is up, the Controller admin should receive an email notification.
If you log in to the AWS Console and select service VPC in the region where the VGW is, you should see Customer Gateway and VPN Connections have been created. Do not delete or modify them from AWS Console. These resources are deleted if you Disconnect the VGW.
You can check if routes are properly propagated by going to MULTI-CLOUD TRANSIT > Advanced Config on the left sidebar, and selecting BGP. Select the Transit Gateway and click Details. The learned routes should be the list of the routes propagated from VGW. Scroll down to see the total number of learned routes.
External Device
The External Device option allows you to build IPsec tunnel, GRE tunnel or Ethernet LAN directly to on-prem or in the cloud device. It bypasses the AWS VGW or Azure VPN gateway for exchanging routes with on-prem, thus overcoming the route limit by these native services.
To learn how to leverage External Device to connect to variety of devices, see External Device FAQ.
To connect an external device, follow the instructions in Aviatrix Transit Gateway to External Devices.
Azure VNG
With this option, data packets are forwarded natively to on-prem through Azure Virtual Network Gateway (VNG) either over Express Route or Internet, and in the meantime, Aviatrix Transit Gateways are inserted in the data path between VNG and Spoke VNet. This allows you to run advanced function such as firewall inspection for on-prem to Spoke and between the Spokes.
To connect to Azure VNG, see Multi-Cloud Transit Integration with Azure VNG.
Disconnect AWS VGW/External Device/Azure VNG
To disconnect AWS VGW/External Device/Azure VNG connections:
-
Go to MULTI-CLOUD TRANSIT > Setup from the sidebar.
-
In the Multi-Cloud Transit Network Workflow page, select External Connection tab on the top.
-
Scroll down to Disconnect AWS VGW/External Device/Azure VNG section.
-
Click on the Connection Name dropdown menu and select the connection to disconnect.
-
Click Detach.
View the Network Topology
After setting up your Multi-Cloud Transit Network Workflow, you can view the network topology by going to the Dashboard and reviewing the Map View.
Troubleshoot BGP
To troubleshoot BGP:
-
Go to MULTI-CLOUD TRANSIT > BGP.
The Transit Gateway will have BGP Mode as Enabled.
-
To view Advertised Networks and Learned Networks, select the Transit Gateway and click Details .
Learned Networks are network CIDR blocks that BGP learned from VGW. Advertised Networks are Spoke VPC/VNet CIDRs.
You can also click Diagnostics. Select one of the show commands or type in yourself if you know the commands to see more BGP details.
To troubleshoot connectivity between a Spoke VPC/VNet instance and a on-prem host, see Troubleshooting Spoke VPC/VNet and On-Prem Connection.
Transit Network APIs
There are multiple resources to help you automate Transit Network setup. Note that if you are building a Transit Network following the workflow, you should follow the Terraform example.
Extras
The above workflow abstracts and combines multiple existing Aviatrix features, such Encrypted Peering and Site2Cloud to bring you a wizard like experience so that you do not go to multiple pages on the Controller console when building the Transit network.
After you have built the Transit Gateway and Spokes, you can view the connection between Transit Gateway and VGW on the Site2Cloud page. You can also see the Spoke to Transit Gateway connections on the Peering page.