Oracle Cloud Infrastructure (OCI) Getting Started Guide
Introduction
The Aviatrix cloud network solution consists of two components, the Controller and Gateways, both of which are cloud VMs (Virtual Machines). Gateways are launched from the Controller console to specific VCNs. This guide helps you to launch the Controller in OCI.
|
Important
The Aviatrix Controller is a secure multicloud networking platform. Aviatrix recommends you deploy your controller in clouds that offer metered pricing, then deploy your gateways in any supported cloud. Metered pricing offers you a true pay-as-you-go option without any up-front commitments or contract negotiations. The AWS and Azure clouds offer metered pricing for running the Aviatrix Controller image. The GCP and OCI clouds do not offer metered pricing for running the Aviatrix Controller image. |
Subscribing to the Controller
-
Go to Oracle Cloud Marketplace and search for Aviatrix to subscribe to the Aviatrix platform.
-
Click Get App at the top of the App page.
-
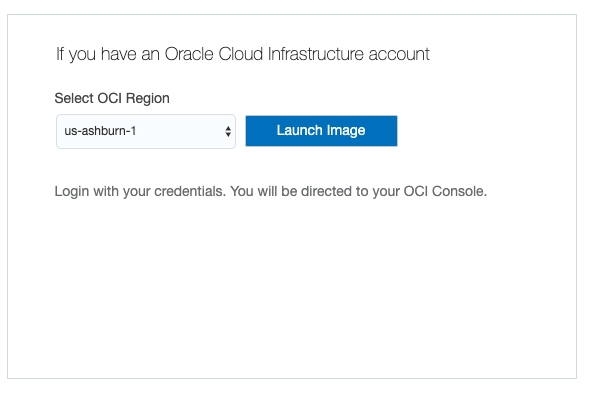
Select an OCI region and click Launch Image.
-
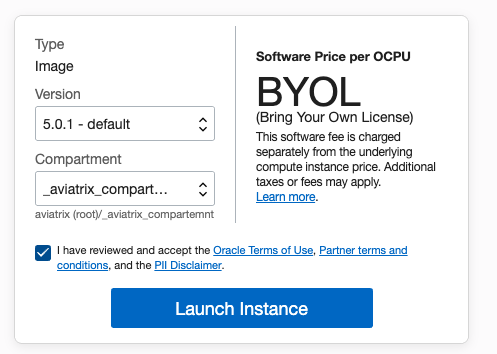
Choose the version and compartment and click Launch Instance.
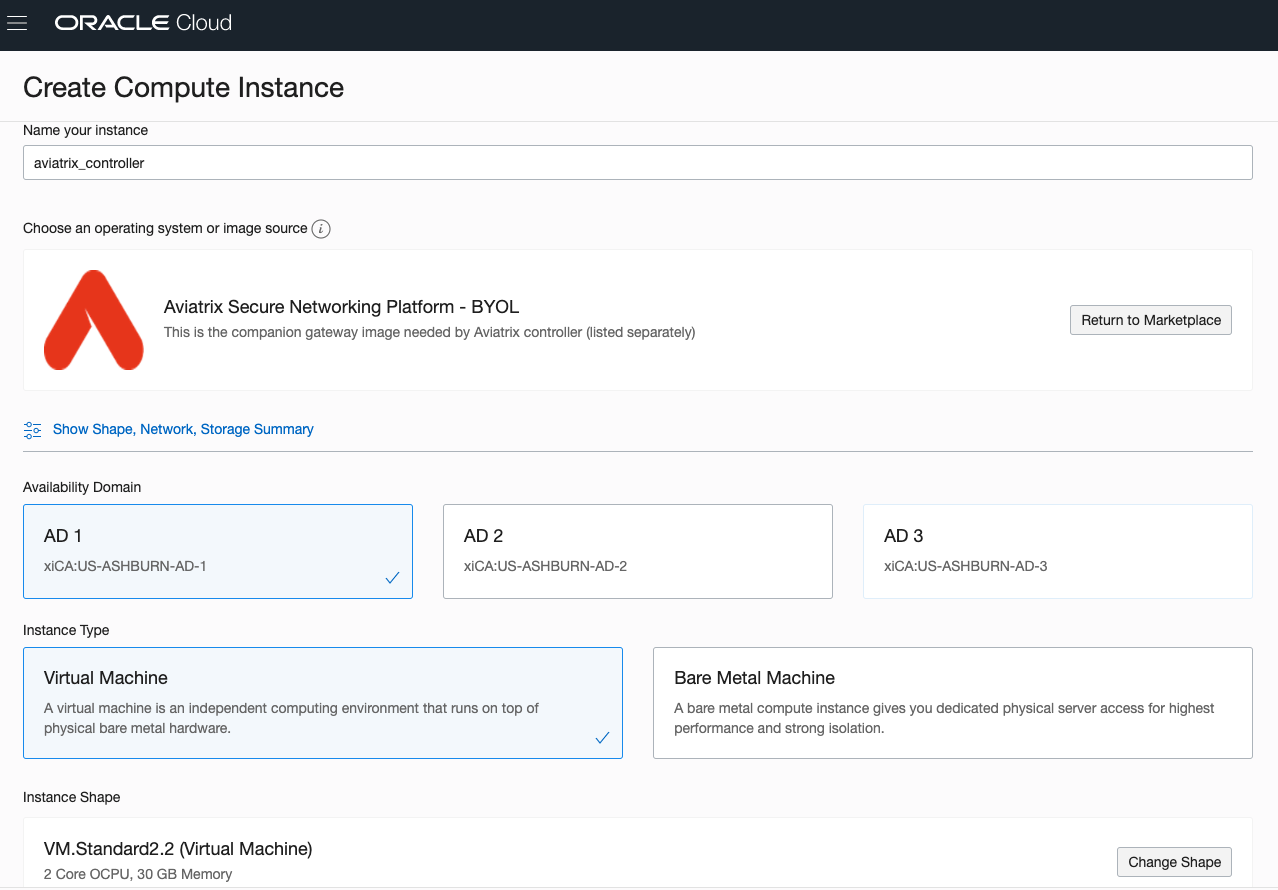
On the "Create Compute Instance" page: 5. Choose name, availability domain, and Virtual Machine as instance type. 6. Choose an Instance Shape. The recommended shape is Standard2.2.
-
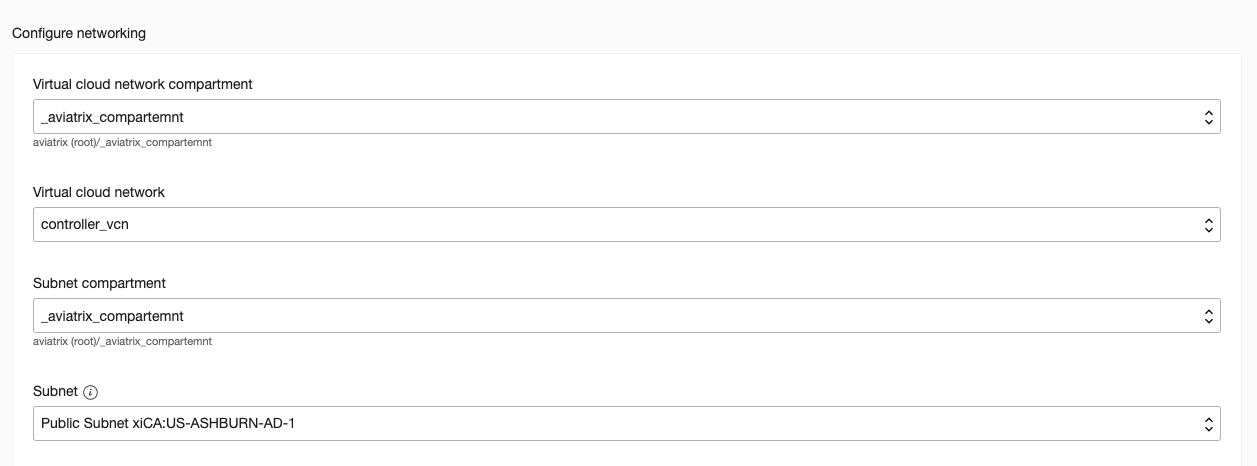
Choose the proper compartment for VCN and subnet. Optional: you could select Use network security groups to control traffic if you have one, otherwise leave it as you can create one later.
-
Choose an ssh public key file.
-
Click Create to launch the instance.
Choosing an Aviatrix License
There are three different types of licenses option available in Aviatrix Controller.
-
Bring Your Own License (BYOL) License - This license supports public cloud AWS, Azure, GCP and OCI. Please open a support ticket at Aviatrix Support Portal to get BYOL license.
-
Metered or Platinum Metered License - This is only applicable to AWS public cloud.
-
Utility - The utility machine image (AMI/VM Image) is available in AWS and Azure both and supports maximum 100 tunnels and limited number of VPN users.
To check your license type, navigate to the Aviatrix Controller’s console > Settings > Controller > License.
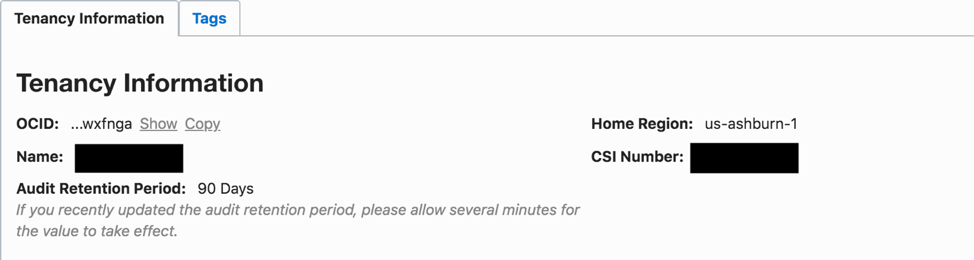
Locating your Controller ID
Controller ID is a 32-digit Universal Unique Identifier (UUID). This ID is unique per customer and used for tracking purposes.
This 32-digit UUID is available under Settings > Controller > License.
Preparing Your Account in OCI
-
Create an OCI account if you do not already have one.
-
Set up your compartment. Although you can use default account and root compartment, it is recommended that you follow this doc to create your own user, group, and compartment with the right policy. For more details, refer to Setting Up Your Tenancy.
-
Create a VCN that has Internet access by navigating to Networking > Virtual Cloud Networks in the OCI console. Then, click Create Virtual Cloud Network and select create virtual cloud network plus related resources.
-
Alternatively, if you want to create a VCN with your own CIDR, select create virtual cloud network only. Continue to create a subnet and Internet gateway. Then, add a default route in the VCN default routing table to point to the newly created Internet gateway. This is to grant Internet access to the Controller inside of this VCN.
Oracle Cloud Infrastructure (OCI) Onboarding
Onboarding helps you set up an account on the Aviatrix Controller that corresponds to an Oracle Cloud Infrastructure (OCI) account with compartment policies so that the Controller can launch gateways using OCI APIs.
To onboard the OCI account in the Aviatrix Controller, you need the following four pieces of information:
-
User OCID
-
Tenancy OCID
-
Compartment OCID
-
API Private Key File
This document explains where you can find these four pieces of information and how to use them to onboard your OCI account to your Aviatrix Controller.
Accessing Your User OCID
-
Log in to your OCI console and open the Navigation menu in the top left > Identity > Users.
-
Identify the IAM User who will be making the API calls and copy the User OCID.

Accessing Your Compartment OCID
-
Log in to your OCI console and open the Navigation menu in the top left > Identity > Compartments.
-
Choose the csompartment and copy the Compartment OCID.
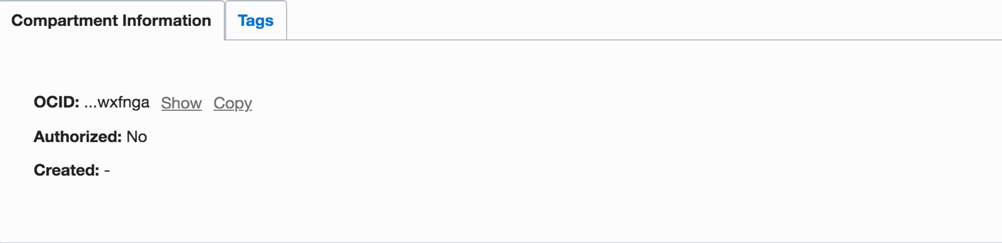
Please note that if you have multiple compartments, choose one that has right set of policies which are required for Aviatrix to work. The best practice is to create a separate compartment for your operations and assign right policies to it.
Accessing Your API Key
If you already have an existing RSA key pair in .pem format, you can use that as well. However, please note that this key pair is not the SSH key that is used to access compute instances. Both the private key and public key must be in PEM format (not SSH-RSA format). If you do not have an existing RSA key pair, you can follow the aforementioned steps from the terminal in your laptop to generate the API key.
Generate an API Signing Key
If you’re using Windows, you’ll need to install “Git Bash for Windows” and run the following commands with that tool. Mac and Linux users can run the following commands on their terminal
-
Create a. oci directory to store the credentials: mkdir ~/ .oci
-
Generate the private key without passphrase: openssl genrsa -out ~/.oci/oci_api_key.pem 2048
-
Change the key settings, so that only you can read the file: chmod go-rwx ~/.oci/oci_api_key.pem
-
Generate the Public Key: openssl rsa -pubout -in ~/.oci/oci_api_key.pem -out ~/.oci/oci_api_key_public.pem
5. Copy the contents of the public key in clipboard locally in your computer: cat ~/.oci/oci_api_key_public.pem | pbcopy. Note: You may have to install pbcopy, if it is not already installed on your system. Alternatively, you can also open the public key file on the terminal and copy the file from there
Uploading the Public Key in the Console
-
Log in to your OCI console and open the Navigation Menu in the top left > Identity > Users.
-
Select the user who will be making the API call.
-
Click Add Public Key.
-
Paste the contents of the PEM public key and click Add. Once you complete this, you will see the Key’s fingerprint.

For more details, please see Required Keys and OCIDs
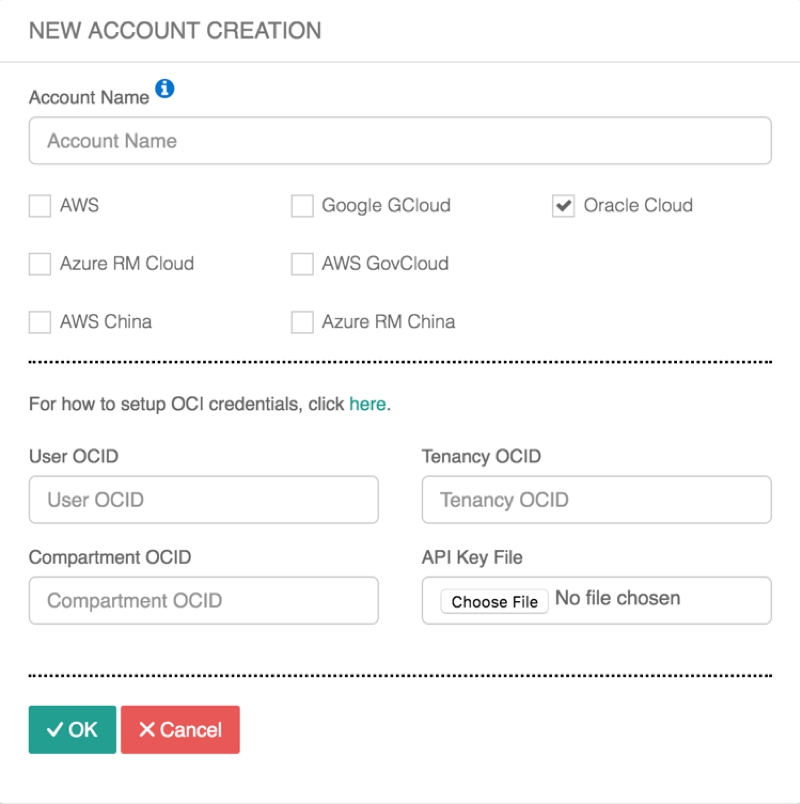
Onboarding Your OCI Account in Your Aviatrix Controller
Once you have your User OCID, Tenancy OCID, Compartment OCID, and API Private Key File, please go to Aviatrix Controller > Accounts > Access Accounts > New Account and fill the required information. Please note that you should upload the Private Key file in the Aviatrix controller (which is different than the one you put in the OCI console). You can find that key in the folder where you generated the key in the above steps (.oci folder in above example)
OCI Gov (oc2) Support
Aviatrix provides support in OCI Gov (oc2) for customers interested in running workloads in this environment. See Oracle Cloud Infrastructure US Government Cloud with FedRAMP Authorization.
OCI Gov (oc2) is a separate operating realm comprised of two regions:
-
us-langley-1 (Ashburn)
-
us-luke-1 (Phoenix)
Initial OCI Gov support is tailored for customers interested in multicloud transit patterns. In future releases, if there is demand, Aviatrix will evaluate adding additional functionality.
FireNet is not supported in initial release.
Oracle Cloud Infrastructure (OCI) Gov Account Onboarding
You need to subscribe to the Aviatrix image from OCI Marketplace in the same region and compartment used to onboard the OCI Gov account in the OCI Gov tenancy to your Aviatrix Controller.
If you have an OCI Gov tenancy, the workflow for onboarding OCI Gov accounts is identical to commercial OCI.
|
Important
|
There are some limitations to using OCI Commercial (oc1) and OCI Gov (oc2) gateways in the same network.
-
OCI Gov and OCI Commercial have different regions, separate accounts, and separate compartments; they are completely isolated from each other. Therefore, you should treat them as two separate clouds.
-
HPE peering between OCI Commercial and OCI Gov gateways is not supported because oc2 and oc1 are two completely different environments and there is no native private connectivity between oc2 and oc1.
To create a VCN with all the dependencies, please navigate to the Useful Tools menu at the main menu on the left sidebar and select Create a VPC > +Create.
For more info, please see the Aviatrix product documentation at https://docs.aviatrix.com/.
For more info, please see the Aviatrix product documentation at https://docs.aviatrix.com/.
Setting up OCI account credentials
Follow the instructions on Oracle Cloud Infrastructure Documentation..