Aviatrix BGP over LAN with Cisco Meraki in AWS
Introduction
This Tech Note is a step-by-step guide for using BGP over LAN to interoperate with Cisco Meraki as the third party appliance in AWS. BGP over LAN also works in Azure, make adjustments accordingly when applying to deployment in Azure.
Two supported design patterns are described as below:
Design Pattern #1 with Aviatrix Multicloud Transit
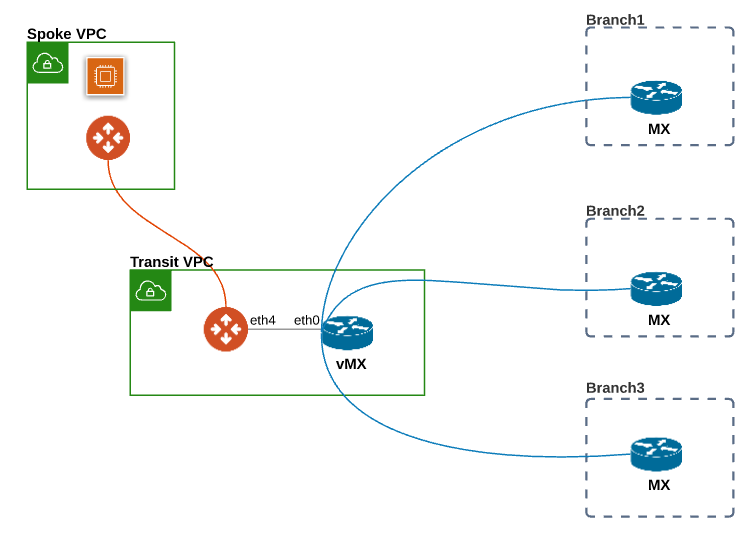
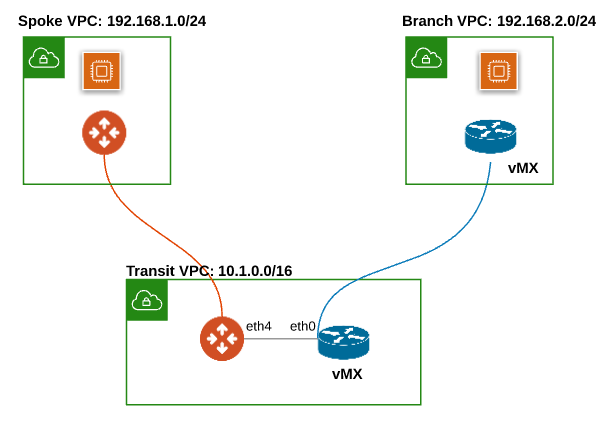
In this design pattern, Aviatrix Multicloud transit is deployed to connect Spoke VPCs to the Transit VPC and Aviatrix Transit Gateway is used to connect to Meraki vMX in the same Transit VPC.
Design Pattern #2 with AWS TGW Orchestrator
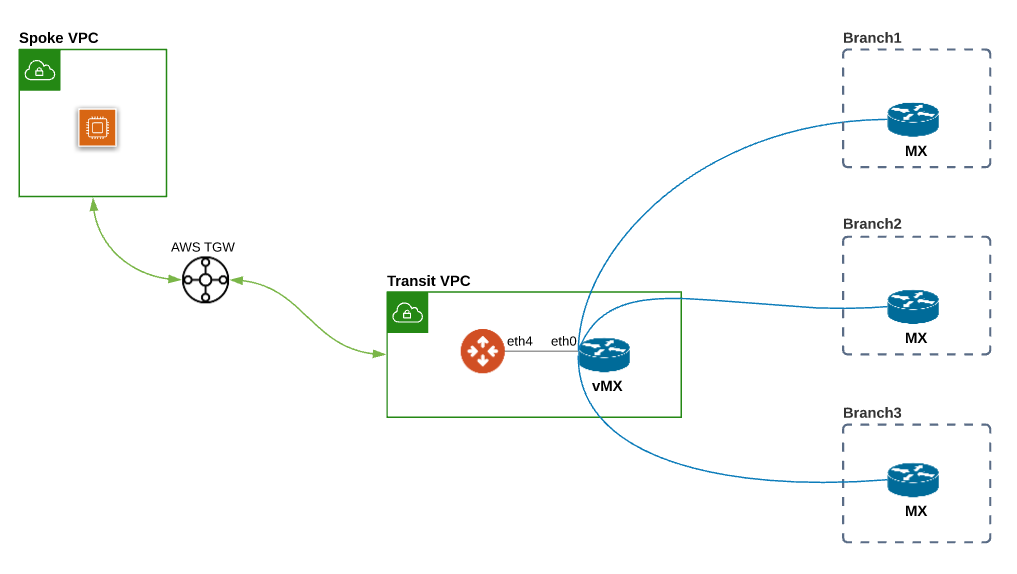
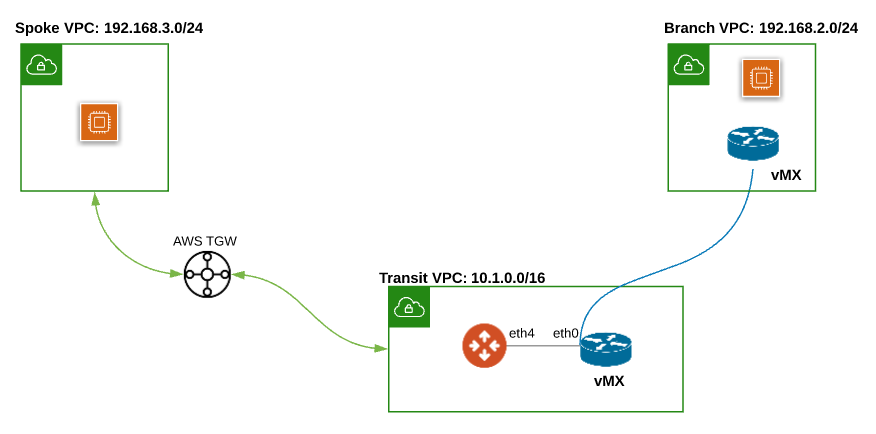
In the second design pattern, AWS TGW is deployed for connecting to Spoke VPC and Aviatrix Multicloud transit is used to connect to Meraki vMX in the same Transit VPC.
This Tech Note consists of:
-
Workflow on launching Cisco Meraki vMX in AWS
-
Workflow on deploying branch Cisco Meraki device
-
Workflow on deploying Aviatrix Multicloud Transit Solution
-
Workflow on building BGP over LAN
For more information about how to configure BGP over LAN, please refer to the doc links as follows:
For more information about Multicloud Transit Network, External Device, and AWS TGW Orchestrator, please check out the below documents:
|
Prerequisite
-
This feature is available for 6.3 and later. Upgrade the Aviatrix Controller to at least version 6.3.
-
In this Tech Note, the following VPC CIDRs are used for illustration purposes:
-
Transit VPC (10.1.0.0/16). You can create this VPC by using Create a VPC with Aviatrix FireNet VPC option enabled.
-
Spoke VPCs (192.168.1.0/24, 192.168.2.0/24, 192.168.3.0/24). You can create the Spoke VPCs by using Create a VPC or manually deploying them in AWS console. Use existing Spoke VPCs also works.
-
1. Launch Cisco Meraki vMX in AWS
Step 1.1. Deploy Cisco Meraki vMX in Transit VPC
-
Follow the steps in vMX Setup Guide for Amazon Web Services (AWS) to launch Cisco Meraki vMX in Transit VPC
-
Meraki Dashboard Configuration
-
AWS Setup, Accessing the AMI, and Configuring the EC2 Image
-
-
Step "Additional VPC Configuration" in vMX Setup Guide for Amazon Web Services (AWS) here is an optional as we will provide a guideline how to advertise spoke VPC CIDRs to branch Cisco Meraki through BGP protocol in the following steps.
|
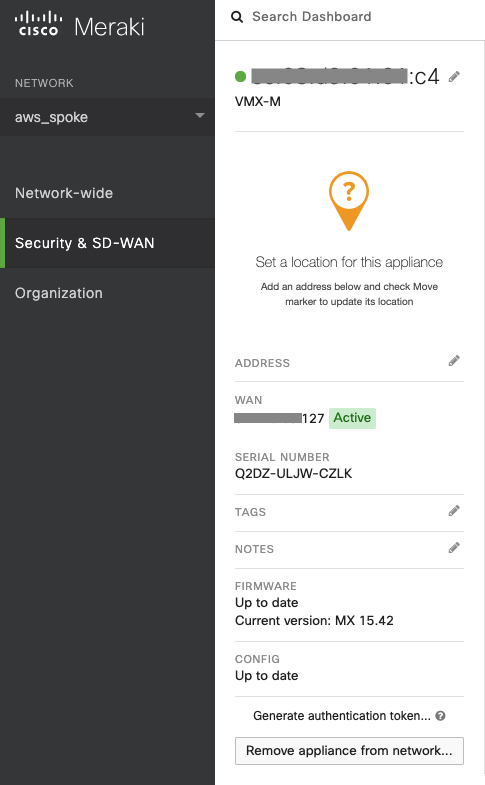
Step 1.2. Check Cisco Meraki vMX status on Meraki Dashboard
-
Log in to the Meraki Dashboard.
-
Select the "NETWORK" where this Cisco Meraki vMX in Transit VPC locates.
-
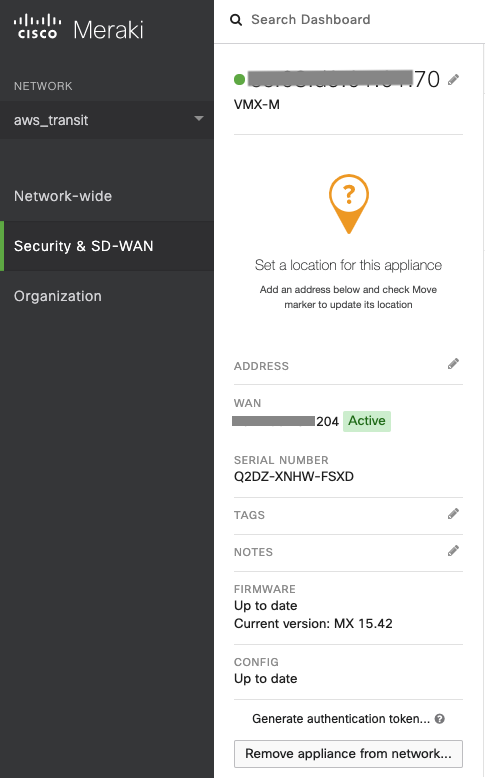
Go to Security & SD-WAN → MONITOR → Appliance status.
-
Check whether Cisco Meraki vMX displays "Active" status.
Step 1.3. Enable Hub (Mesh) type
-
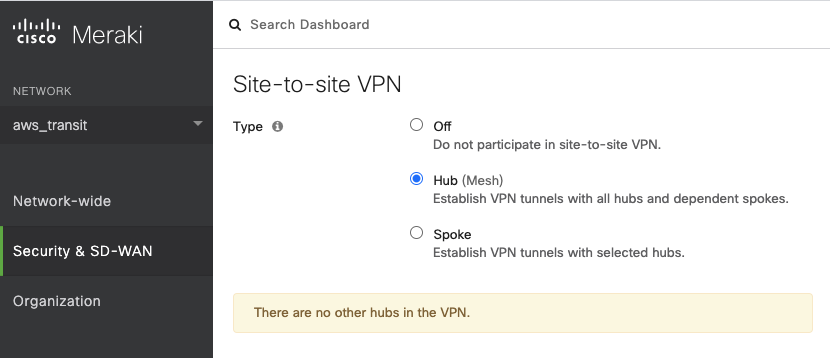
Go to Security & SD-WAN → CONFIGURE → Site-to-site VPN.
-
Find the panel "Type" on the top.
-
Select the radio button "Hub (Mesh)" to establish VPN tunnels with all hubs and dependent spokes for this Cisco Meraki vMX.
Step 1.4. Enable BGP settings
-
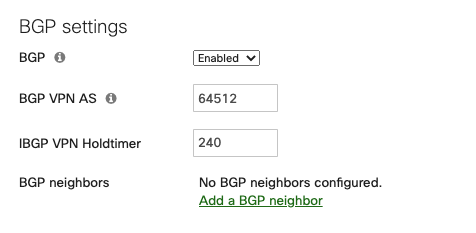
Find the panel "BGP settings."
-
Select the option "Enabled" for the field "BGP"
-
Adjust the values for the fields "BGP VPN AS" and "IBGP VPN Holdtimer" if needed and write down the BGP ASN
-
Click "Save."
|
Will guide how to set up BGP neighbors for eBGP in the later workflow. |
2. Deploy branch Meraki device
In this workflow example, we deploy another Meraki vMX in a Spoke VPC as a branch device and configure Hub-and-spoke Auto VPN Connection to verify this solution. Please adjust the topology depending on your requirements.
For more Meraki VPN info, please check out the below documents:
Step 2.1. Deploy branch Meraki vMX in Spoke VPC
-
Follow step 1.1 but deploy Meraki vMX in the Spoke VPC.
|
Since Meraki vMX is deployed as a branch device in AWS as an example here, please follow the checklist as below:
|
Step 2.2. Check branch Meraki vMX status on Meraki Dashboard
-
Log in to the Meraki Dashboard.
-
Select the "NETWORK" where this Cisco Meraki vMX in Spoke VPC locates.
-
Go to Security & SD-WAN → MONITOR → Appliance status.
-
Check whether branch Cisco Meraki device displays "Active" status.

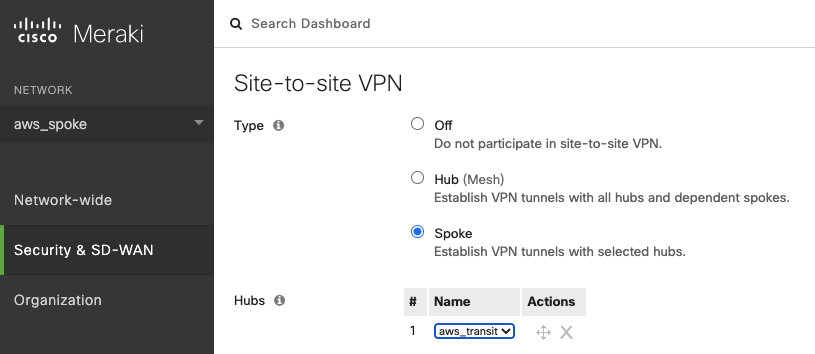
Step 2.3. Enable Spoke type
-
Select the "NETWORK" where this Cisco Meraki vMX in Spoke VPC locates.
-
Go to Security & SD-WAN → CONFIGURE → Site-to-site VPN.
-
Find the panel "Type" on the top.
-
Select the radio button "Spoke" to establish VPN tunnels with selected hubs.
-
Click the link "Add a hub" for the field "Hubs."
-
Select the "NETWORK" where the Cisco Meraki vMX in Transit VPC locates for Hubs.
Step 2.4. Advertise Spoke VPC CIDR
-
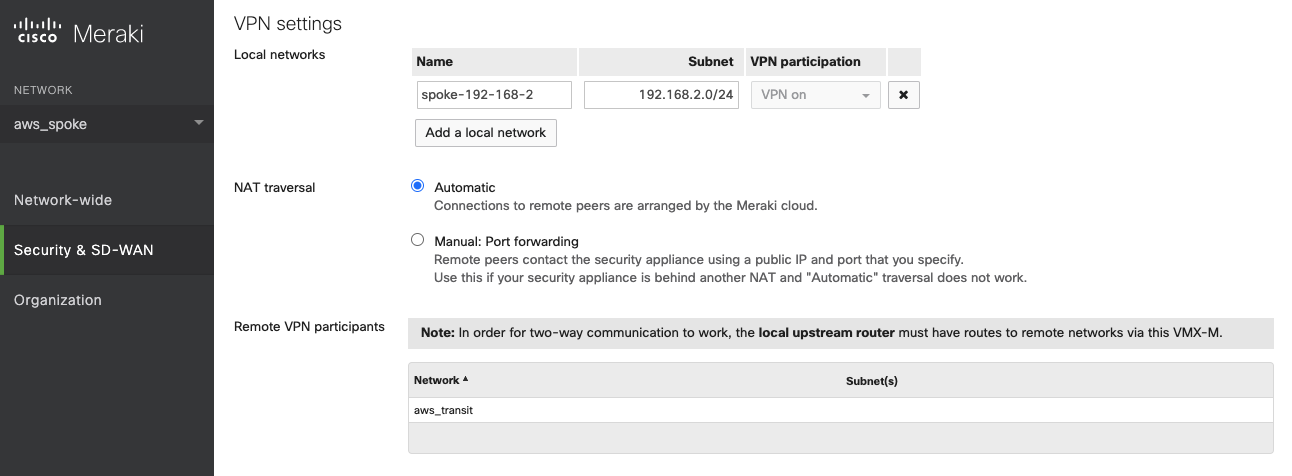
Locate "Local networks" in the panel "VPN settings."
-
Click the button "Add a local network."
-
Fill the parameters to advertise Spoke VPC CIDR.
Name |
Provide a unique name for the Local networks |
Subnet |
Configure Spoke VPC CIDR as an example (192.168.2.0/24) |
VPN participation |
VPN on |
-
Click "Save."
3. Deploy Aviatrix Multicloud Transit Solution
Refer to Global Transit Network Workflow Instructions for the below steps. Please adjust the topology depending on your requirements.
Step 3.1. Deploy Aviatrix Multicloud Transit Gateway
-
Follow this step Deploy the Transit Aviatrix Gateway to launch Aviatrix Transit gateway in Transit VPC.
-
In this example, size c5n.4xlarge is selected.
|
The Aviatrix Transit Gateway must be deployed in the same available zone where Cisco Meraki vMX locates. |
Step 3.2. Deploy Aviatrix Spoke Gateway for encryption traffic
-
Follow this step Deploy Spoke Gateways to launch an Aviatrix Spoke gateway in the Spoke VPC.
Step 3.3. Attach Spoke Gateways to Transit Network
-
Follow this step Attach Spoke Gateways to Transit Network to attach Aviatrix Spoke Gateways to Aviatrix Transit Gateways.
Step 3.4. Deploy Spoke VPC through AWS TGW Orchestrator
-
Follow Aviatrix TGW Orchestrator workflow TGW Plan to:
-
Create an AWS TGW.
-
Create a New Network Domain and Build Your Domain Connection Policies.
-
Prepare Aviatrix Transit GW for TGW Attachment. # Attach Aviatrix Transit GW to TGW.
-
Follow the Aviatrix TGW Orchestrator workflow TGW Build to Attach the VPC to the TGW.
-
4. Build BGP over LAN
Step 4.1. Configure BGP over LAN on Aviatrix Transit Gateway
-
Log in to the Aviatrix Controller.
-
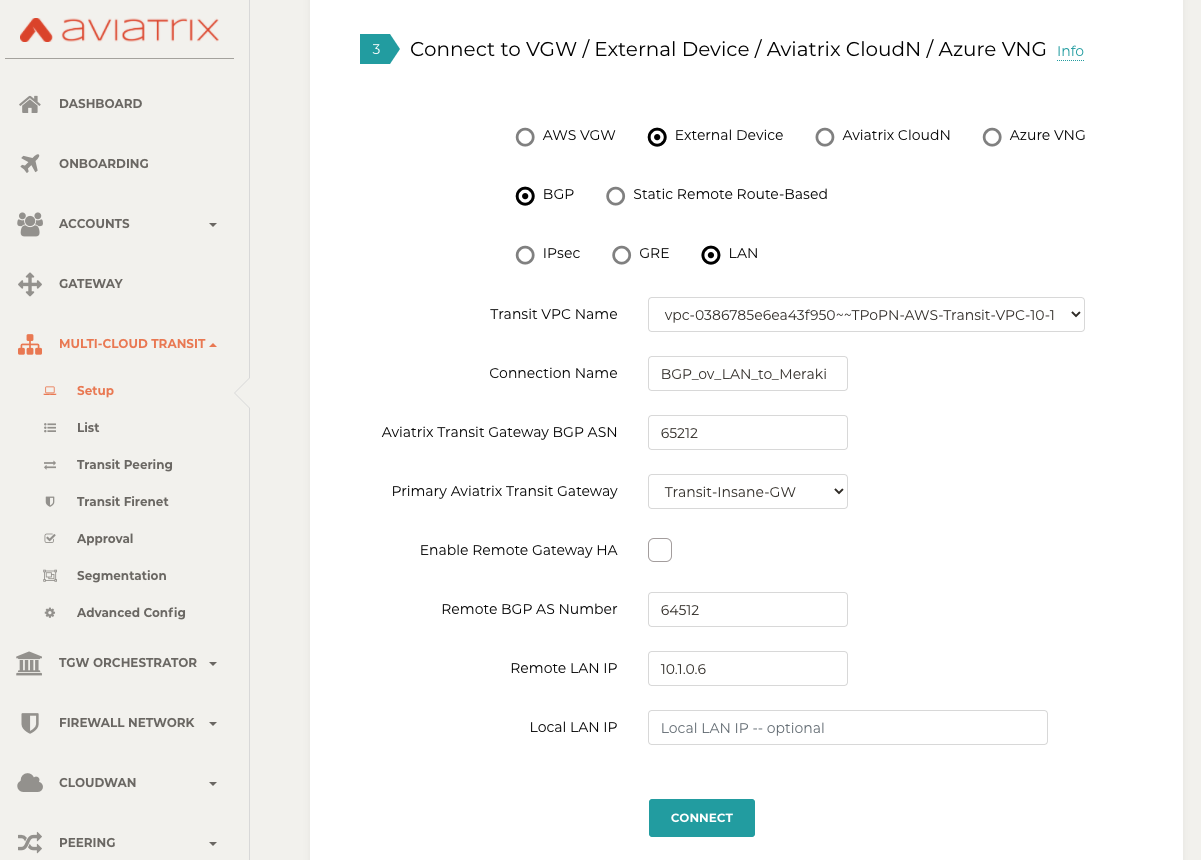
Go to MULTI-CLOUD TRANSIT → Setup → 3) Connect to VGW / External Device / Aviatrix CloudN / Azure VNG.
-
Select option "External Device" → "BGP" → "LAN."
-
Fill the parameters to set up BGP over LAN to Meraki vMX in Transit VPC.
Transit VPC Name |
Select the Transit VPC ID where Transit GW was launched |
Connection Name |
Provide a unique name to identify the connection to external device |
Aviatrix Transit Gateway BGP ASN |
Configure a BGP AS number that the Transit GW will use to exchange routes with external device |
Primary Aviatrix Transit Gateway |
Select the Transit GW |
Enable Remote Gateway HA |
Uncheck this option in this example |
Remote BGP AS Number |
Configure a BGP AS number that Meraki vMX will use to exchange routes with Aviatrix Transit Primary |
Remote LAN IP |
Use the private IP of the Network Interface on Meraki vMX |
Local LAN IP |
Leave it blank and the controller will assign an IP in the same subnet where the Remote LAN IP locates. Optionally configure an IP of your choosing within the same subnet where the Remote LAN IP locates. |
-
Click "CONNECT" to generate BGP session over LAN.
Step 4.2. (Optional) Download the BGP over LAN configuration sample from Aviatrix Controller
-
Navigate to SITE2CLOUD → Setup.
-
Select the connection that you created with “Connection Name� in the previous step.
-
Click the button "EDIT."
-
Select Vendor type, Platform, and Software.
-
Click "Download Configuration."
Step 4.3. Enable and configure BGP over LAN on Cisco Meraki vMX
For more Cisco Meraki BGP information, please check this document.
-
(Optional) Open the downloaded BGP over LAN configuration file.
-
Login Meraki Dashboard.
-
Select the "NETWORK" where this Cisco Meraki vMX in Transit VPC locates.
-
Go to Security & SD-WAN → CONFIGURE → Site-to-site VPN.
-
Find the section "BGP neighbors" in the panel "BGP settings."
-
Click the link "Add a BGP neighbor."
Neighbor IP |
Use Aviatrix Transit gateway’s eth4 private IP. This IP belongs to the same subnet where Meraki vMX eth0 locates. |
Remote AS |
Configure Aviatrix Transit Gateway BGP ASN |
Receive limit |
Leave it blank or optional in this example |
Allow transit |
Uncheck this option in this example |
EBGP Holdtimer |
30 for this example |
EBGP Multihop |
1 for this example |
-
Click "Save."

|
Update Meraki vMX’s security group to allow traffic coming from Aviatrix Transit Gateway properly. One of the secure approaches is to specify Aviatrix Transit Gateway’s eth4 security group ID as the source for the Inbound rule in Meraki vMX’s security group. Please check "Security group rules" in this AWS doc for more info. |
Step 4.4. Verify LAN status on Aviatrix Controller
-
Navigate back to the Aviatrix Controller.
-
Go to SITE2CLOUD → Setup.
-
Find the connection that you created with “Connection Name� in the previous step.
-
Check the Tunnel Status.

-
Go to MULTI-CLOUD TRANSIT → List.
-
Select the Transit Primary Gateway that was created in the previous step.
-
Click the button "DETAILS/DIAG."
-
Scroll down to the panel "Connections" → "On-prem Connections."
-
Find the connection that you created with “Connection Name� in the previous step.
-
Check the Tunnel Status.

Step 4.5. Verify BGP session status on Aviatrix Controller
-
Go to MULTI-CLOUD TRANSIT → BGP.
-
Find the connection that you created with “Connection Name� in the previous step.
-
Check the BGP Status.

Step 4.6. Verify BGP session status on Cisco Meraki vMX
-
Login Meraki Dashboard.
-
Select the "NETWORK" where this Cisco Meraki vMX in Transit VPC locates.
-
Go to Security & SD-WAN → MONITOR → Event log.

Step 4.7. Verify routing info on Cisco Meraki vMX
-
Login Meraki Dashboard.
-
Select the "NETWORK" where this Cisco Meraki vMX in Transit VPC locates.
-
Go to Security & SD-WAN → MONITOR → Route table.
-
Check whether Cisco Meraki vMX has the routes to branch Cisco Meraki device via VPN.
-
Check whether Cisco Meraki vMX has the routes to Aviatrix Spoke VPC via BGP on LAN.

Step 4.8. Verify routing info on branch Cisco Meraki device
-
Log in to the Meraki Dashboard.
-
Select the "NETWORK" where this branch Cisco Meraki locates.
-
Go to Security & SD-WAN → MONITOR → Route table.
-
Check whether Cisco Meraki vMX has the routes to Aviatrix Spoke VPC via Cisco Meraki vMX in Transit VPC.

|
Note
If iBGP protocol betweeen Meraki vMX in Transit VPC and branch Meraki device does not establish properly, please attempt to reboot Meraki vMX in Transit VPC. |
5. Ready to go!
At this point, run connectivity and performance test to ensure everything is working correctly.
6. Troubleshooting Tips
-
Check to make sure "Source/Dest check" on Meraki vMX’s interface is disabled.
-
Check whether the routing table and security group are configured properly.
-
Check eBGP is established between Aviatrix Transit Gateway and Meraki vMX in Transit VPC.
-
Check iBGP is established between Meraki vMX and branch Meraki device.
