Setting up API Access to Palo Alto Networks VM-Series
Complete the following steps to enable Palo Alto Networks API programming.
Enabling Ping
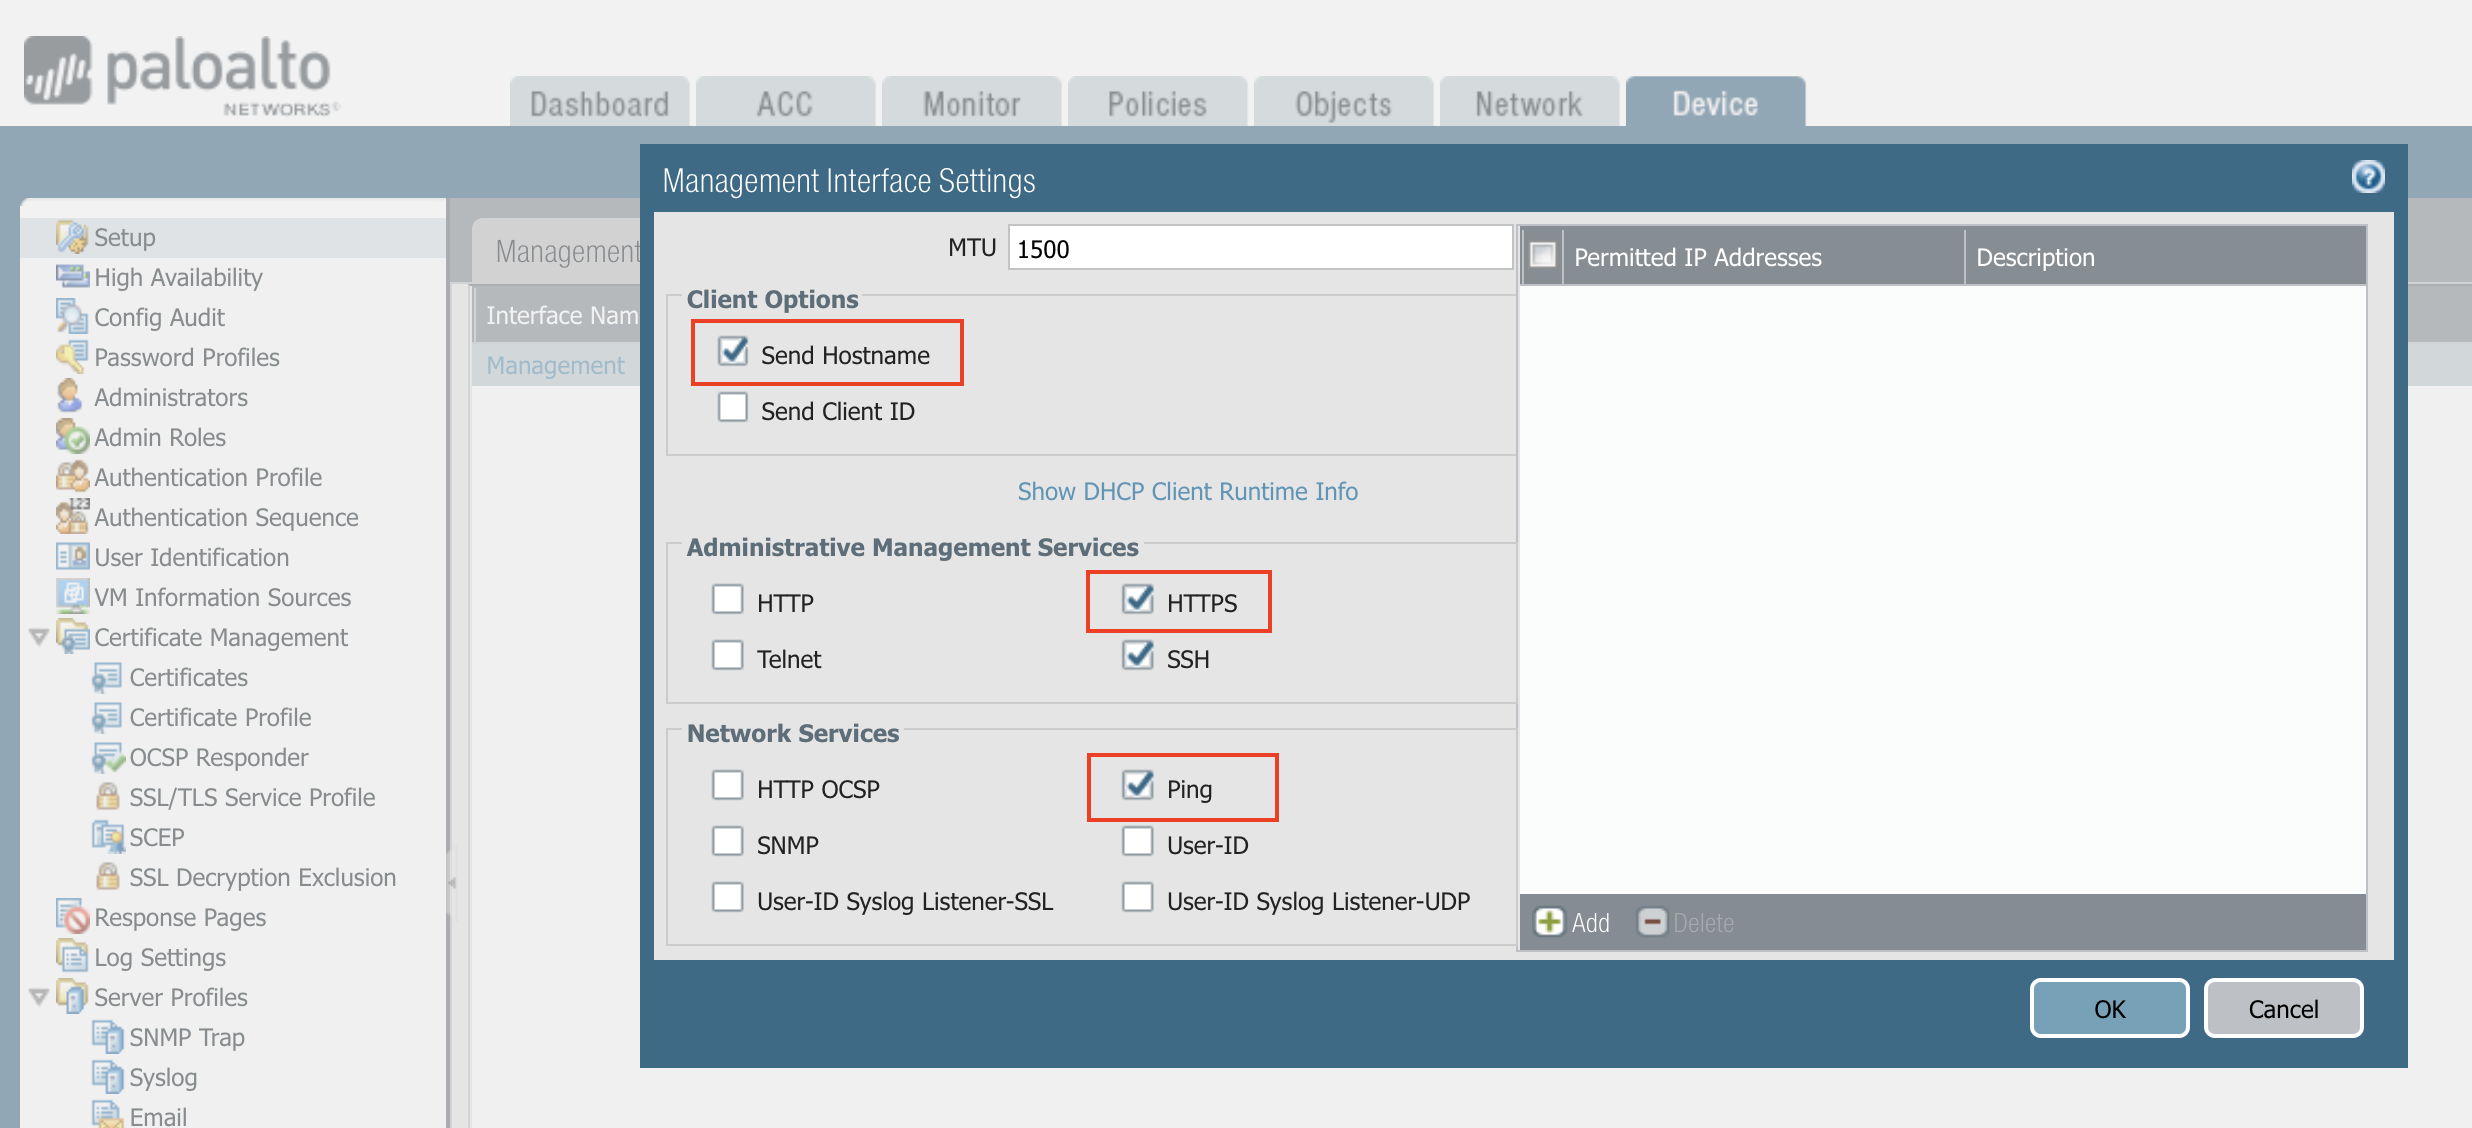
Make sure the Palo Alto Networks management interface has ping enabled and the instance’s security group has ICMP policy open to the Aviatrix Controller’s public IP address.
In the Palo Alto VM-Series console:
-
Click Device.
-
Click Interfaces.
-
Click Management.
-
Make sure the setup matches the following screenshot.

Creating API Administrator Role Profile
-
To create a new role profile, go to Device > Admin Roles > +Add.
-
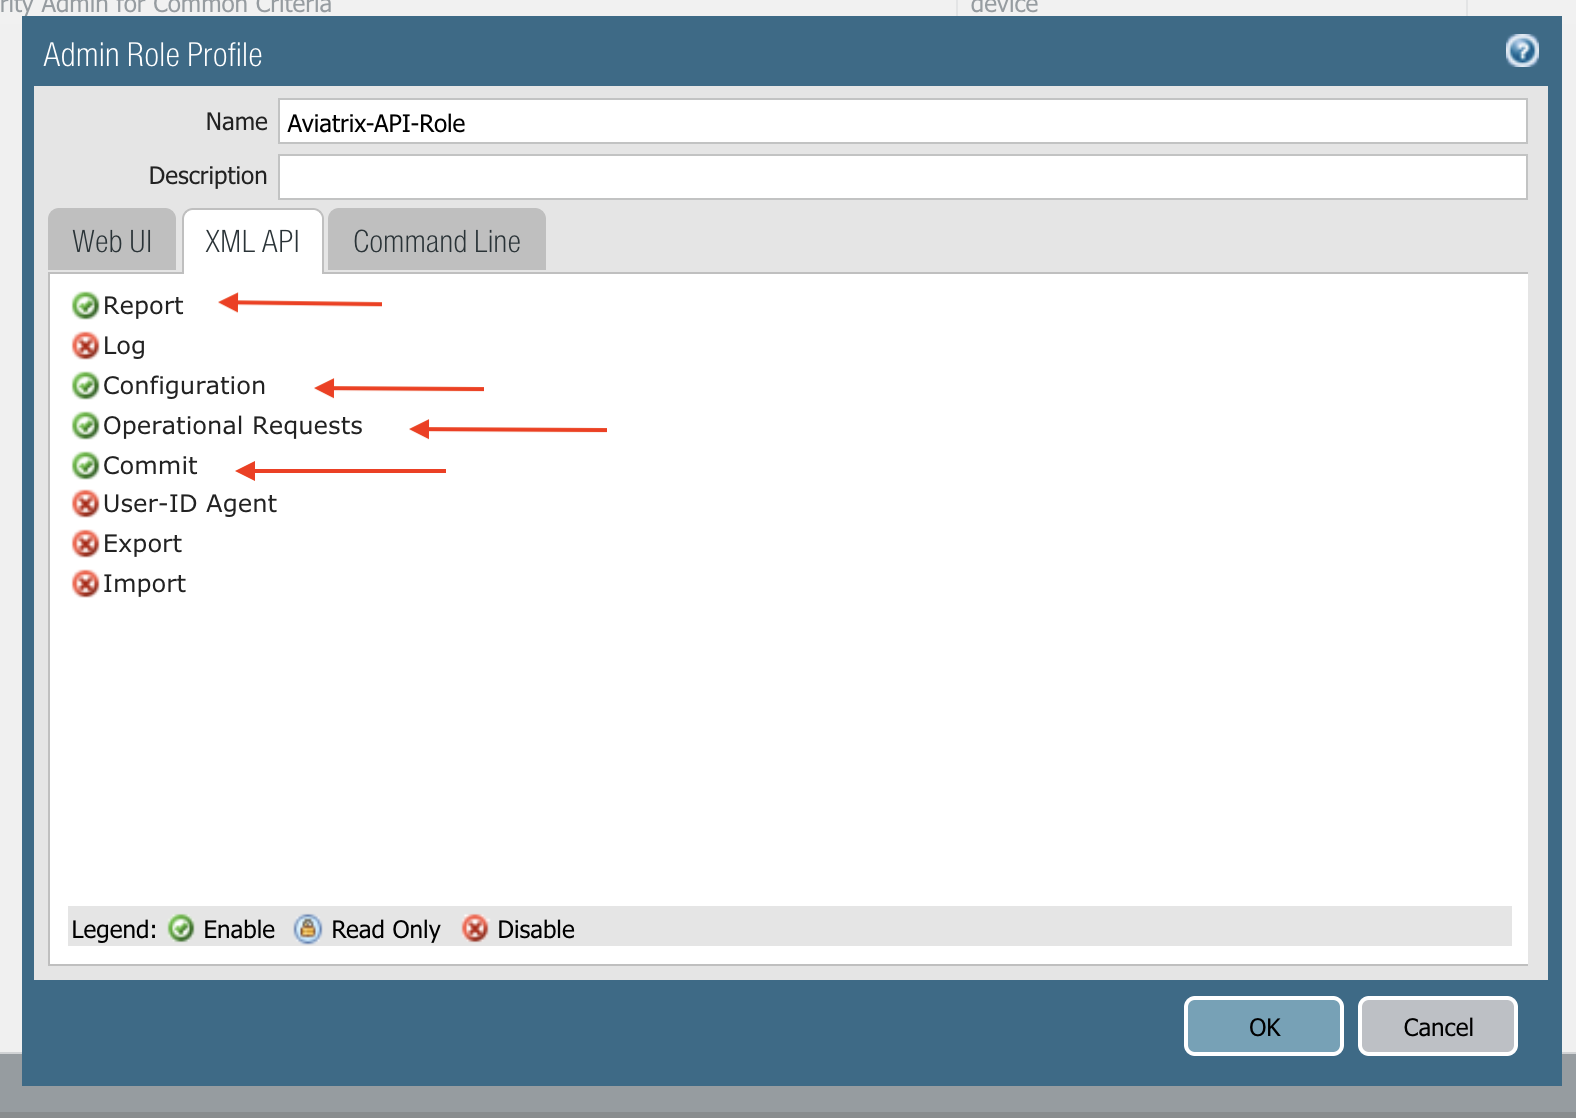
In the Name field, enter Aviatrix-API-Role.
-
Click the XML/API tab.
-
Click Report, Configuration, Operation Requests and Commit.
-
Click OK and then commit.

Adding an Administrator for API
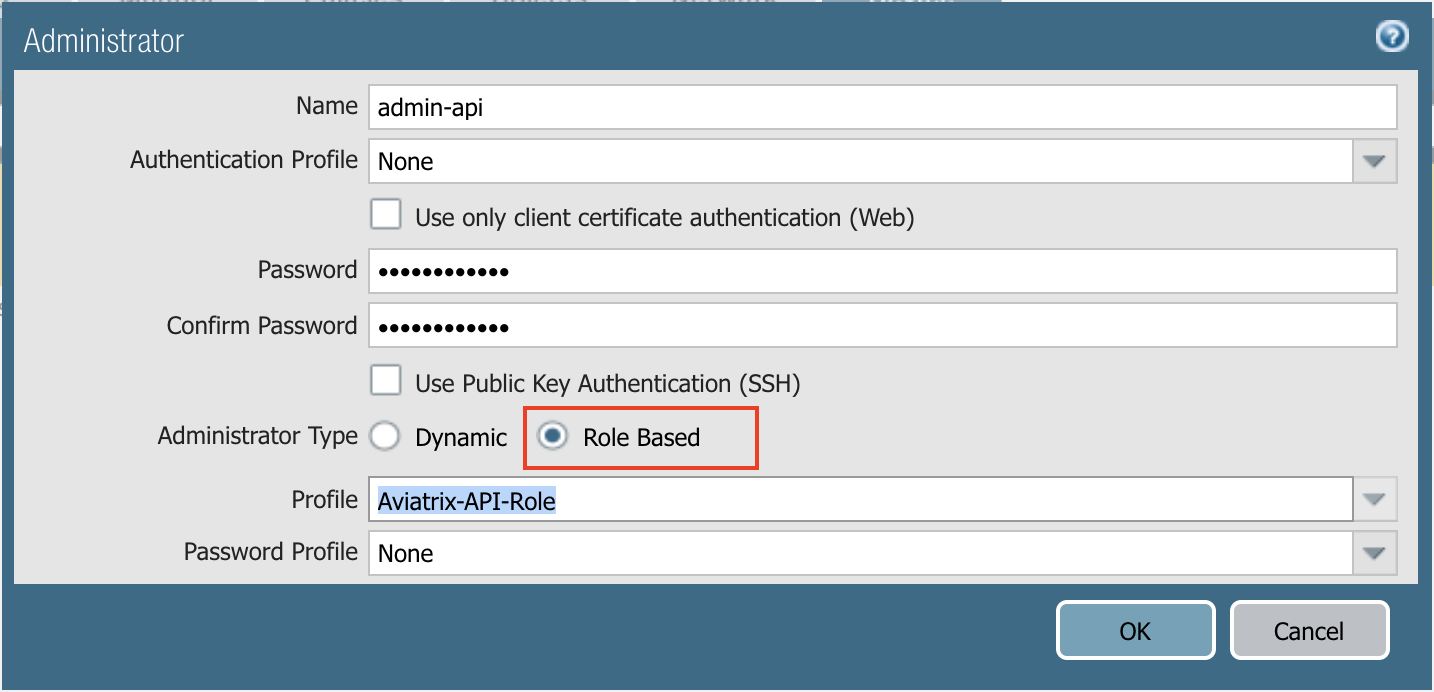
To add an administrator for Role-Based access, in the VM-Series Console, go to Device > Administrators > +Add, as shown below. Use the profile created in the previous step. Click OK and then commit.

Managing VM-Series Directly
Login to the Aviatrix Controller and navigate to Firewall Network > Vendor Integration > Firewall. Configure the following parameters and click Save.
| Setting | Value |
|---|---|
FireNet VPC/VNet ID |
The FireNet VPC/VNet ID for the Firewall Network deployment. |
Firewall instance ID |
The firewall virtual machine (EC2/GCE) instance ID. Aviatrix Controller monitors the health of this instance and determines fail over when it becomes unreachable. |
Firewall Name (Optional) |
A name to remember. |
Firewall Vendor Type |
Select PAN |
Firewall Login User Name |
firewall login name for API calls from the Controller. For example, admin-api. |
Firewall Login Password |
firewall login password for API calls. |
Firewall Management IP Address |
The public IP address of the firewall management interface for API calls from the Aviatrix Controller |
Firewall Virtual Router name (Optional) |
Specify the firewall virtual Router name you wish the Controller to program. If left unspecified, the Controller programs the firewall’s default router. |
|
The Aviatrix Controller only supports one virtual router. If the Firewall Virtual Router name is not specified, the controller takes the first virtual router in the list. |
Managing VM-Series by Panorama
If Panorama is used to manage the VM-Series, any dynamic route updates initiated by Aviatrix Controller are sent to Panorama. The Aviatrix Controller does not check the health of Panorama; it only checks the health of the VM-Series instances.
The Aviatrix Controller communicates with Palo Alto Panorama to its private IP address, if Panorama is reachable via private IP.
If you are using two cross-sites, the primary IP address of Panorama can be determined via the Vendor Integration function.
Before you integrate Panorama with the Aviatrix Controller, you need to first launch and configure Panorama. The steps are as follows:
Launching Panorama
Launch Panorama from the AWS portal and SSH in to set the UI password, which is the same as the PAN firewall.
Change the Panorama management interface security group to allow port 3978. This is the port used by Panorama and the firewall to exchange information.
Install a license in Panorama. Without the correct license, it won’t work.
Upgrading Panorama
| Panorama must be on the same or higher software version as its managed firewalls. |
If your version of Panorama is lower than version 9.0.6 or 9.1.2, you must upgrade.
-
Go to Panorama > Dynamic Updates, click Check Now, and select the latest version of Panorama in Applications and Threats.
-
Download and install.
-
Navigate to Panorama > Software, select the desired version, download and install. After installation, Panorama will reboot. This will take a few minutes.
Creating Templates and Template Stack
Templates and template stacks are used to configure Network properties, such as interfaces, zones, and route tables. This is the one that needs monitoring and updates via the API.
-
- Create Template
-
You should create a template for each firewall group: One for the FireNet primary Gateway and one for FireNet backup Gateway.
-
- Configure Template
-
Add interfaces (ethernet1/1, ethernet1/2), zones (LAN, WAN), and Virtual Routers (route tables). Do not name the route table as "default" since this may conflict with the firewall’s default route table. Please refer to step 7 and 10 of the Example Config for Palo Alto Network with VM-Series.
- Create Template Stack
-
A Template stack is a bundle to bind templates with managed devices. When creating, select template(s) and devices. Create one template stack for the primary FireNet Gateway, another for the backup FireNet Gateway. Remember the template stack name. Commit and push.
Creating Device Group
A Device Group is used to manage all the firewall policies.
-
Navigate to Panorama > Device Groups.
-
Click Add to create a new device group for both FireNet GWs.
-
Add managed VMs to the device group. Remember the device group name, for example "west2-firenet-primary". You may create two device groups if you want to edit each FireNet gateway separately.
-
(optional if internet traffic is needed) Add "Outbound" policy to the newly created device group.
-
(optional) If you plan to deploy Egress inspection, add source-nat and security outbound rule policies.
-
Commit and push the changes.
After the above steps, once VM-Series instances are added to Panorama, all configuration should be done through the Panorama console.
Creating Admin role and User
This is the same as for individually managed VM-Series. Create an admin role with XML API permission and create an admin user with the admin role. After you have set up and configured your Panorama, go to the Aviatrix Controller > Firewall Network > Vendor Integration > Firewall Manager (Panorama) and configure the following.
| Setting | Value |
|---|---|
FireNet VPC/VNet ID |
The FireNet VPC/VNet ID for the Firewall Network deployment. |
FireNet Gateway |
The FireNet Gateway name. |
Vendor Type |
Select Palo Alto Panorama. |
Management IP Address |
The public IP address of the Panorama instance. |
Login User Name |
Panorama login name for API calls from the Controller. For example, admin-api. |
Login Password |
Panorama login password for API calls. |
Template Name |
Panorama template for each FireNet Gateway. (If FireNet Gateway HA is configured, there should be two templates) |
Template Stack Name |
Panorama template stack for each FireNet Gateway.((If FireNet Gateway HA is configured, there should be two template stacks) |
Router name (Optional) |
Specify the firewall virtual Router name you wish the Controller to program. If left unspecified, the Controller programs the Panorama template’s first router. |
|
Migrating from Individual VM to Panorama
Assuming you have existing individually managed VM-Series in the Aviatrix Controller and have prepared your Panorama, follow the instructions below to migrate individual VMs to Panorama.
Removing the Firewall Integration as PAN
If any firewall for a FireNet Gateway is already integrated with the Controller with PAN as the Vendor type, you need to remove that configuration.
-
Navigate to Controller > Firewall Network > Vendor Integration > Firewall.
-
Select the Transit VPC/VNet ID and the Firewall Instance ID.
-
For the Firewall Vendor Type, select Generic.
-
Click Save. This effectively removes the Controller integration.
Removing Firewall Configuration (if this is a new VM, skip this step)
From your firewall console, remove the interfaces, zone, virtual router, policies, api admin role and api administrator.
Adding Firewall to Panorama
-
Add the firewall to the Panorama-managed devices list.
-
Log into Panorama, select Panorama > Managed Devices and click Add.
-
Enter the serial number of the firewall and click OK.
-
Commit. For the Commit Type, select Panorama and click Commit again.
-
-
Set up a connection from the firewall to Panorama.
-
Log in to the firewall, select Device > Setup, and edit the Panorama Settings.
-
In the Panorama Servers fields, enter the IP addresses of the Panorama management server.
-
Click OK and Commit.
-
-
Make any necessary configuration changes and commit your changes to the VMs.
-
Click Commit and for the Commit Type select Device Group.
-
Select Merge with Device Candidate Config, mark the Include Device and Network Templates checkbox, and click Commit.
-
-
Go back to Panorama > Managed Devices > Summary and mark the checkbox for the device which should show "Connected."
Port 3978 also needs to be allowed on the firewall side. After 4.7, newly launched firewalls through the AVX Controller will handle this, but for existing firewalls, you must do it manually.
API calls
The integrated functions by the Controller are the following:
-
The Controller monitors the health of Palo Alto Network software by using the VM-series API and performs switch over based on the API return status.
-
The Controller dynamically programs Palo Alto Network route tables for any new propagated new routes discovered both from new Spoke VPC/VNets and new on-premise routes.
Examples of Palo Alto Networks API used:
-
get key:
https://54.149.55.193/api/?password=password&type=keygen&user=apiadmin
-
get route tables:
https://54.149.55.193/api/?type=config&xpath=/config/devices/entry[@name='localhost.localdomain']/network/virtual-router/entry[@name='default']&key=LUFRPT1YQk1SUlpYT2xIT3dqMUFmMlBEaVgxbUxwTmc9RFRlWncrbURXZVpXZUUyMFE3V3ZWVXlaSlFvdkluT2F4dzMzWUZpMGtZaz0=&action=get
-
show interfaces:
https://54.149.55.193/api/?key=LUFRPT1BbkNIbXJZNlVBOVdRMXNMSUNVRis1VWRHaTA9RFRlWncrbURXZVpXZUUyMFE3V3ZWU2ZEZzdCNW8yUEpwU3Q1NXEzeDBnST0=&type=op&cmd=<show><interface>ethernet1/2</interface></show>
-
add route:
https://13.58.10.51/api/?type=config&xpath=/config/devices/entry[@name='localhost.localdomain']/network/virtual-router/entry[@name='default']/routing-table/ip/static-route/entry[@name='test2']&key=LUFRPT1BbkNIbXJZNlVBOVdRMXNMSUNVRis1VWRHaTA9RFRlWncrbURXZVpXZUUyMFE3V3ZWU2ZEZzdCNW8yUEpwU3Q1NXEzeDBnST0=&action=set&element=<nexthop><ip-address>10.201.1.1</ip-address></nexthop><bfd><profile>None</profile></bfd><path-monitor><enable>no</enable><failure-condition>any</failure-condition><hold-time>2</hold-time></path-monitor><metric>10</metric><destination>10.40.0.0/24</destination><route-table><unicast/></route-table>
-
delete route:
https://13.58.10.51/api/?type=config&xpath=/config/devices/entry[@name='localhost.localdomain']/network/virtual-router/entry[@name='default']/routing-table/ip/static-route/entry[@name='test2']&key=LUFRPT1BbkNIbXJZNlVBOVdRMXNMSUNVRis1VWRHaTA9RFRlWncrbURXZVpXZUUyMFE3V3ZWU2ZEZzdCNW8yUEpwU3Q1NXEzeDBnST0=&action=delete
-
commit
https://13.58.10.51/api/?type=commit&key=LUFRPT1BbkNIbXJZNlVBOVdRMXNMSUNVRis1VWRHaTA9RFRlWncrbURXZVpXZUUyMFE3V3ZWU2ZEZzdCNW8yUEpwU3Q1NXEzeDBnST0=&cmd=<commit></commit>