Aviatrix Spoke Gateway to External Devices (BGP-Enabled Spoke)
Using the Multi-Cloud Transit workflow, you can connect an external (or third party) device ( Router or Firewall) to Aviatrix Spoke gateways that are enabled with BGP. NAT may or may not be required by the BGP Spoke external connection.
BGP is run on top of a Site-to-Cloud (S2C) connection that terminates on active-mesh Spoke gateways.
This document describes connecting an external device to an Aviatrix Spoke gateway that is BGP-enabled.
Using BGP-enabled Spoke gateways is currently supported for AWS Commercial and Azure Commercial cloud service providers, including Government regions.
What is a use case for connecting a BGP-enabled Spoke gateway to an external router?
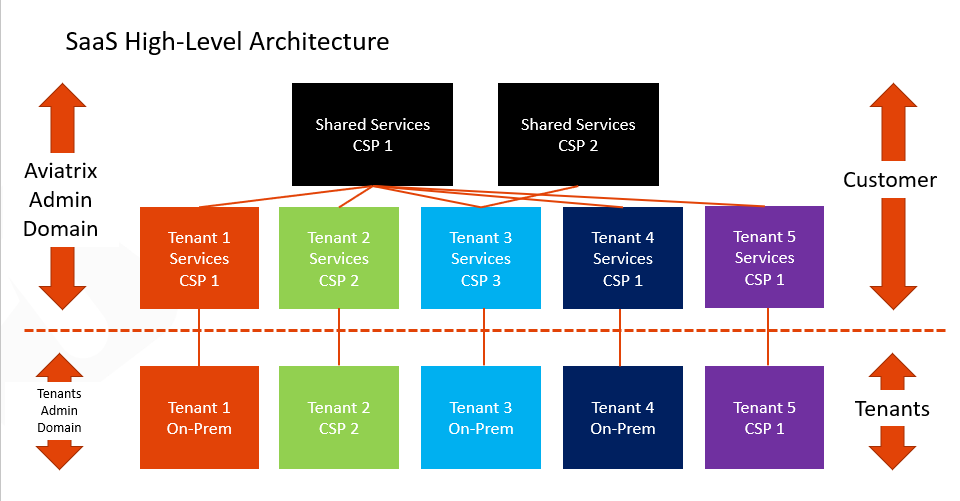
Previously, Software-as-a-Service (SaaS) providers with certain architectures had to deploy Transit gateways for each of their tenants to enable the tenant to connect to their in-cloud network.
By using BGP-enabled Spoke gateways in their network architecture, SaaS providers can solve several requirements:
-
Requirement: Connect a large number of tenants (1000+).
Solution: Distribute the tenants across Spoke gateways, for horizontal scaling and blast radius minimization.
-
Requirement: Provide both dedicated tenant services, and shared services.
Solution: Host dedicated services in tenant-specific Spoke VPCs. Host shared services in common Spoke VPCs.
-
Requirement: Onboard the tenants with BGP: dynamic control plane that fits their operational model.
Solution: Terminate BGP on the tenant Spoke gateways.
-
Requirement: Handle overlapping IPs across tenants, and between tenants and shared services.
Solution: Use NAT on the tenant Spoke gateways.
-
Requirement: Maintain isolation across tenants.
Solution: Use segmentation domains on the tenant Spoke gateways.
-
Requirement: Provide the highest throughput to tenant services.
Solution: Horizontal scaling. Tenant services are directly hosted in the Spoke VPC where BGP terminates. They are directly accessed by tenants, without the transit layer to be a bottleneck.
How does using a BGP-enabled Spoke gateway to an external device work?
The Aviatrix Spoke gateway runs a BGP session to an external router to dynamically exchange routes. It also establishes an IPSEC tunnel or a LAN connection to the router for packet forwarding. BGP is run on top of a S2C connection that terminates on active-mesh Spoke gateways. All Spoke gateways are ActiveMesh by default (no standalone gateway). Each Spoke gateway must have a unique Autonomous System (AS) number.
The following features are supported:
-
Fully integrated with ActiveMesh 2.0 control plane.
-
Route-based only.
-
Active/Active HA is supported towards ActiveMesh and towards on-prem with ECMP across multiple BGP connections. Active-Standby Site2Cloud is also supported.
-
Co-existence of BGP S2C with static S2C connections under the same Spoke gateway is supported.
-
FireNet is supported. The inspection policy is the entire Spoke gateway including all the BGP routes (not individual S2C BGP sessions).
The following features are not supported on a BGP-enabled Spoke gateway in the current (6.6) release:
-
ActiveMesh 1.0.
-
Mapped NAT.
-
Manual Spoke Encrypted peering.
-
User VPN.
-
CloudWAN.
-
Stateful Firewall.
-
Private S3.
-
Egress transit.
-
Customize Spoke VPC Routing Table.
-
Private VPC Default Route.
-
Skip Public VPC Route Table.
-
Select Route Tables upon Spoke Gateway Attachment to Transit.
The following features configured on a Transit gateway take no effect on a Spoke VPC equipped with a BGP-enabled Spoke gateway (they still work for any other Spoke VPC):
-
Customize Attached Spoke VPC Routing Table.
-
Exclude Learned CIDRs to Spoke VPC.
Interactions with Segmentation Domains
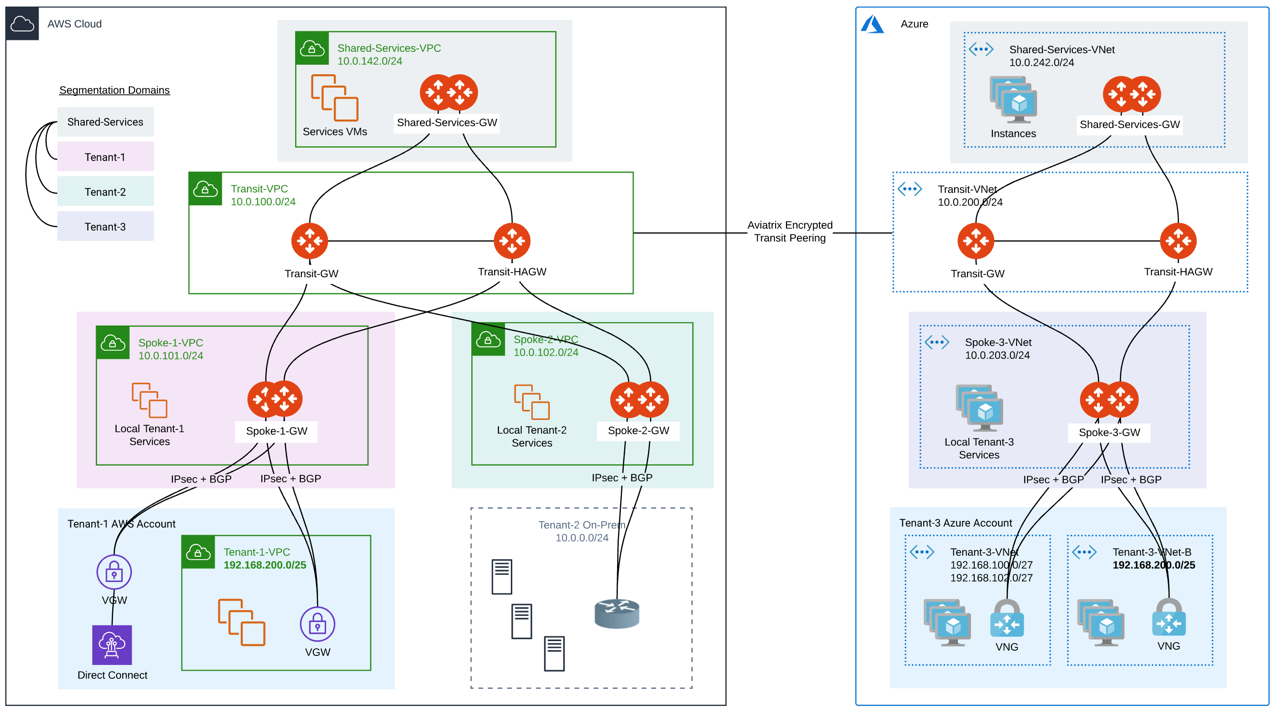
When using BGP-enabled Spoke gateways, SaaS providers can use segmentation domains per Spoke gateway to enforce isolation across tenants. When segmentation domains are set per BGP-enabled Spoke gateway, the Site-to-Cloud (S2C) BGP connection respects the domain of the Spoke gateway for traffic enforcement and route advertisement.
All S2C connections on a given Spoke gateway belong to the Spoke gateway domain (currently, you cannot have different S2C connections on a given spoke gateway be assigned to different domains).
In the current release:
-
BGP routes of a tenant are always advertised to all other tenants connected with S2C BGP under the same Spoke Gateway. No segmentation policies can control that. Connection Manual BGP Advertised Network List can control it.
-
BGP routes of a tenant are propagated into ActiveMesh based on the connection policies of the spoke gateway.
-
ActiveMesh routes are advertised over BGP based on the connection policies of the Spoke.
Interactions with NAT
In the current release, the following applies for NAT and BGP-enabled spoke gateways:
-
Customized NAT under Gateway config is supported (mapped NAT under S2C config is not currently supported).
-
S2C BGP connections are available as option in the NAT connection.
-
ActiveMesh connections are available in the NAT connection but ONLY for non-HPE spoke gateways.
-
Many:1 and 1:1 NAT are possible.
-
Active/Active HA for both gateways and S2C connections (with flow affinity) is supported.
Route Propagation
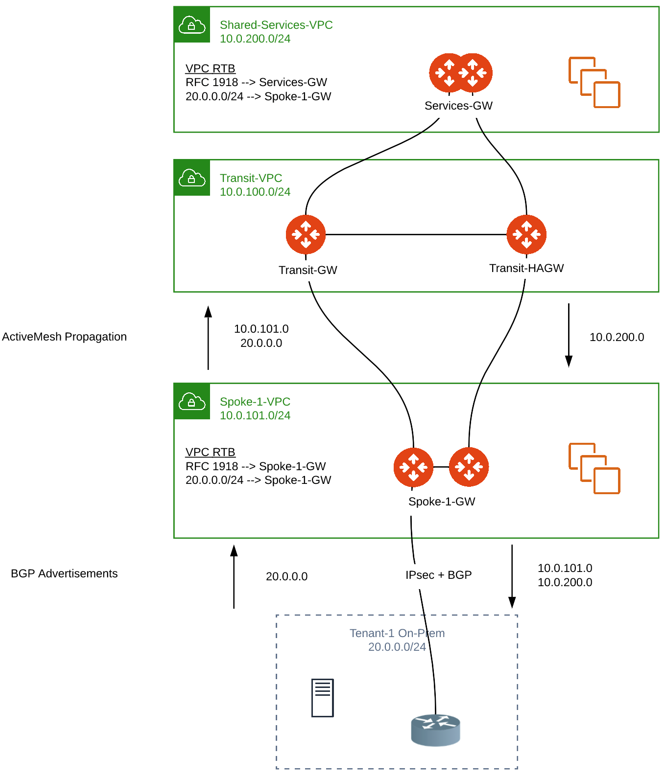
Spoke VPC CIDR + BGP prefixes received on the Spoke gateway are propagated into ActiveMesh (Subnets outside of RFC 1918 are programmed on the VPC RTBs).
All CIDRs known to ActiveMesh (Spoke VPCs for all regions and clouds
BGP prefixes + custom advertisements, etc.) are advertised over BGP on
the Spoke GW S2C BGP connections.
Connected Transit
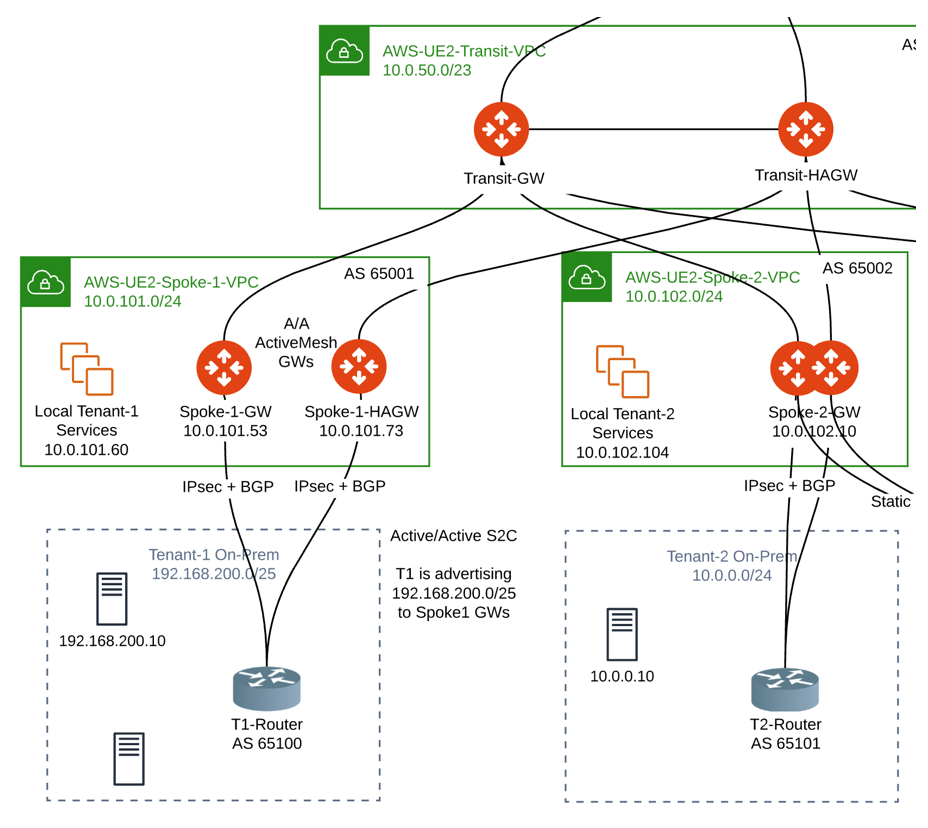
The propagation of BGP routes learned on a Spoke GW to other Spoke gateways under the same Transit complies with Connected Transit.
If Connected Transit = Disabled, those routes are not propagated to other Spoke GWs under the same Transit.
In this example, 192.168.200.0/25 learned via BGP on Spoke-1-GW is not propagated to Spoke-2-GW:
How do I configure a BGP-enabled Spoke gateway and connect it to an external router?
This section describes how to:
-
Create a Spoke Gateway that is BGP enabled.
-
Create the S2C BGP tunnel (build a site-to-cloud IPsec or LAN BGP attachment for the newly created Spoke).
-
Configure your router with the connection details.
-
Configure additional settings.
Step 1: Create a BGP-Enabled Spoke Gateway
To create a BGP-enabled spoke gateway:
|
BGP must be enabled at the creation of the Spoke gateway. A Spoke gateway enabled with BGP has a few restrictions compared to a non-BGP Spoke. For information about these restrictions, see How does using a BGP enabled spoke gateway to an external device work? |
-
Log in to the Aviatrix Controller.
-
Navigate to Multi-Cloud Transit > Setup > Spoke. The Launch an Aviatrix Spoke Gateway page opens.
-
Under Launch an Aviatrix Spoke Gateway, specify the following:
-
Gateway Name: Specify the name for your spoke gateway.
-
Region: Select the region in which you want to deploy the spoke.
-
VPC ID: Select the VPC in which to launch the Spoke gateway.
-
Select Enable BGP.
-
-
Click Create.
-
(Optional) Under Enable/Disable HA to an Aviatrix Spoke Gateway, select the Spoke gateway and the HA Gateway subnet to enable HA for the Spoke gateway.
If HA is enabled, a second Spoke gateway is launched. As a best practice, the HA gateway should be launched in a different public subnet in a different Availability Zone.
If a BGP Spoke gateway already has an external connection configured, you cannot enable or disable HA. -
Scroll back up to the top of the Launch an Aviatrix Spoke Gateway workflow page.
-
Click External Connection.
Now that you have created the Spoke gateway, you can connect it to the external device (device in an on-prem network). In this case, you will build a Site2Cloud BGP over an IPsec or LAN connection as instructed in the next section.
Step 2: Create the S2C BGP Tunnel
To create the S2C BGP tunnel:
-
In the Controller, navigate to Multi-Cloud Transit Workflow > Setup > External Connection and select External Device.
You use the External Device option on the Spoke Gateway to build a BGP tunnel directly to the on-prem device for exchanging routes with a remote site.
-
Select BGP so that the Spoke gateway runs dynamic routing with the remote site.
For ActiveMesh design notes, check out ActiveMesh Design Notes.
| Setting | Value |
|---|---|
External Device |
Select this option to build a connection to a remote site. |
BGP |
Select BGP if the Spoke GW runs dynamic routing with remote site. |
Static Remote Route-Based |
Select this option if the remote site supports route-based VPN with static configuration. |
IPsec |
Select this option to run BGP and build a IPSEC connection to a remote site. |
Remote Subnet(s) (Static Remote Route-based only) |
Remote subnet for the static route. Remote route-based IPsec tunnel connection. |
GRE |
Select this option to run BGP and build a GRE connection to a remote site. |
LAN |
Select this option to run BGP and data plane via a LAN interface in the same VPC/VNet. |
VPC Name/Site ID |
The Spoke VPC ID where Transit GW was launched. |
Connection Name |
A unique name to identify the connection to the external device. |
Aviatrix Gateway BGP ASN |
The BGP AS number the Spoke gateway will use to exchange routes with the external device. |
Primary Aviatrix Gateway |
The BGP-enabled Spoke gateway you created. This field only displays if the Spoke gateway is BGP-enabled. |
Algorithms |
Optional parameters. Leave it unselected if you don’t know. |
AWS VGW Account Name |
The name of the AWS VGW account. Only available if you select External Connection > AWS TGW. |
IKEv2 |
Select the option to connect to the remote site using IKEv2 protocol. |
Enable Remote Gateway HA |
Select HA if there are two external devices. |
Over Private Network |
Select this option if your underlying infrastructure is private network, such as AWS Direct Connect and Azure Express Route. See How does using a BGP-enabled Spoke gateway to an external device work? for more details. When this option is selected, BGP and IPSEC run over private IP addresses. |
Remote BGP AS Number |
When BGP is selected, the BGP AS number the external device will use to exchange routes Aviatrix Spoke GW. |
Remote Gateway IP |
IP address of the remote device. |
Pre-shared Key |
Optional parameter. Leave it blank to let the pre-shared key to be auto generated. |
Local Tunnel IP |
Optional parameter. This field is for the tunnel inside IP address of the Spoke gateway. Leave it blank. |
Remote Tunnel IP |
Optional parameter. This field is for the tunnel inside IP address of the External device. Leave it blank. |
Over Private Network (Backup) |
Select this option if Enable Remote Gateway HA is enabled. |
Remote BGP AS Number (Backup) |
When BGP is selected, the remote ASN for backup should be the same as the primary remote ASN. |
Remote Gateway IP (Backup) |
IP address of the remote device. If "Over Private Network" is selected, enter the private IP address of the external device. |
Pre-shared Key (Backup) |
Optional parameter. Leave it blank to let the pre-shared key to be auto generated. |
Local Tunnel IP (Backup) |
Optional parameter. This field is for the tunnel inside IP address of the Spoke gateway. Leave it blank. |
Remote Tunnel IP (Backup) |
Optional parameter. This field is for the tunnel inside IP address of the External device. Leave it blank. |
Step 3: Configure the External Device
To configure the external device:
-
From the sidebar, expand the Site2Cloud option, and then select Setup.
From the list of connections, take note that the Status of the connection you created to the external device is Down.
-
From the table, click on the name of the connection you created to the external device (for example, Spoke-S2C-IPsec-T2Router) and then click Edit.
The Connection Detail page opens.
-
For Vendor, select the device you are using (any device that is capable of running IPsec and BGP).
(For example, Cisco.)
-
For Platform, select the applicable platform for the chosen device.
(For example, ISR, ASR, or CSR.)
-
Click Download Configuration.
Open the downloaded Aviatrix Site2Cloud configuration template.
-
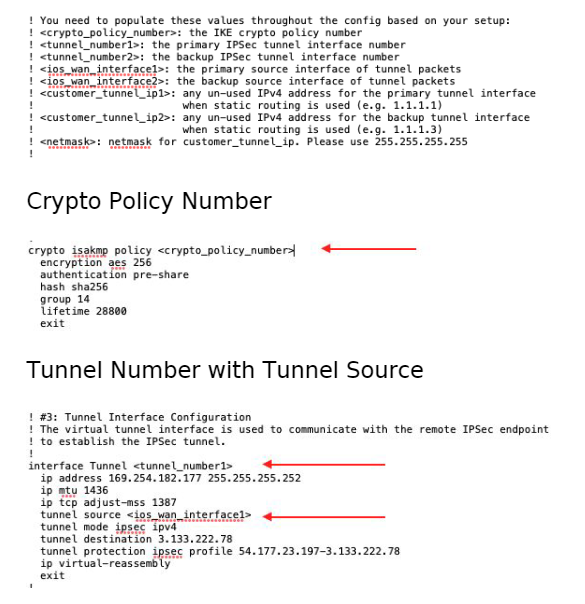
Apply the following changes on your external device configuration (for example, on your CiscoASA) to configure the on-prem device with IPSEC tunnel and BGP:
-
Crypto Policy Number
-
Tunnel Number with Tunnel Source
-
-
Make similar changes on the configuration of the backup tunnel.
Step 4: Verify Status of Connection is UP
(Verify status of connection is Up) After configuring the router, the tunnel should change the status from down to up. Go back to the controller Site2Cloud option Setup page and click the refresh icon. Verify the status of your connection is now Up.
You can also check connection status at Multi-Cloud Transit > List > Details/Diagnostics.
Step 5: Verify the BGP Routes
(To verify the BGP routes) On the controller, from the sidebar, expand the Multi-Cloud Transit option and then select BGP. Under Diagnostics, select the Gateway name (of the BGP-enabled spoke). From the predefined show list, select show ip bgp to verify the BGP Routes.
Step 6: Customize Spoke Advertised VPC CIDRs
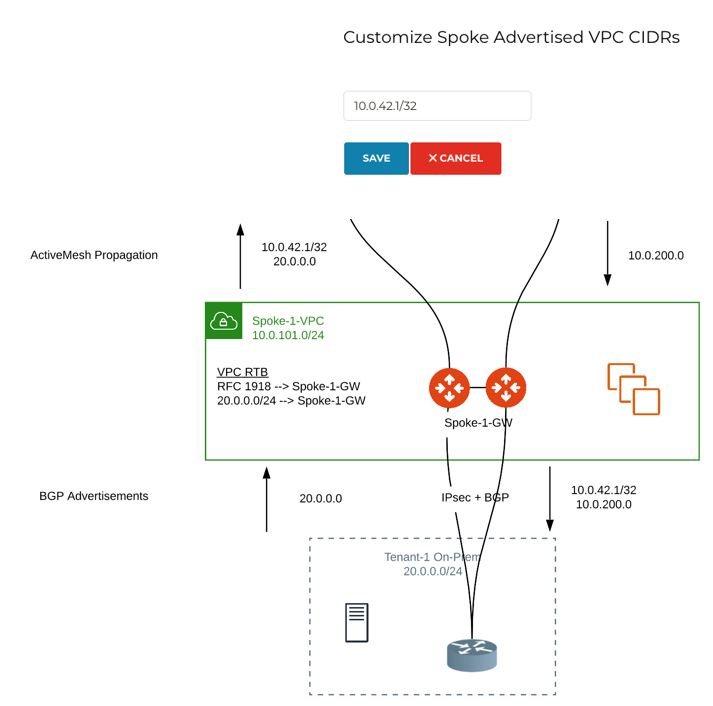
You can customize spoke advertised VPC CIDRs for your BGP-enabled spoke gateway. The CIDRs are propagated into ActiveMesh and into BGP as belonging to the Spoke Gateway shown in the example.
The actual Spoke VPC CIDR is not advertised by default, but you can add it to the list.
ActiveMesh propagation: those CIDRs are combined with the BGP prefixes received on the S2C BGP connection(s) of the Spoke GW.
BGP advertisement: those CIDRs are combined with all other ActiveMesh CIDRs from the Aviatrix transit.
Step 7: Set Up Approval for Gateway Learned CIDR
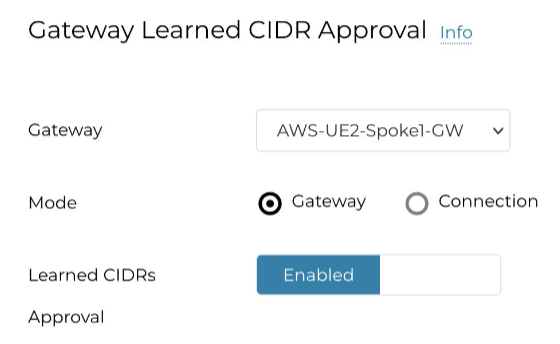
You can set up approval for gateway learned CIDRs for your BGP-enabled spoke gateways. You must select Gateway mode (connection-level route approval is currently not supported). Route approval completely blocks a BGP prefix to even be considered by the control plane. Prefixes blocked are not programmed in the gateway route table.
Step 8: Set Up BGP Route Control
-
From the sidebar, expand the Multi-Cloud Transit option, and then select Advanced Config.
-
At the top of the page, click Edit Spoke.
-
Select the BGP enabled spoke gateway.
-
Specify the parameters to suit your business requirements (they are similar to BGP controls on transit gateways):
-
Local AS Number
-
BGP ECMP
-
Active-Standby
-
Gateway Manual BGP Advertised Network List
-
Connection Manual BGP Advertised Network List
-
Disconnect the External Device
To disconnect the external device from the BGP-enabled Spoke GW:
-
Log in to Aviatrix Controller.
-
From the sidebar, expand the Multi-Cloud Transit option, and then select Setup.
-
In the Multi-Cloud Transit Network Workflow page, click the Detach option.
-
In Aviatrix Spoke Gateway, select the Spoke GW you created from the list menu.
-
Click Detach.