AWS Limitations and Solutions
It is good to know about the AWS network limitations both for planning and troubleshooting: you can build your architecture to allow you to overcome these limits, and it saves you time of troubleshooting when there is a failure or downtime in your network.
AWS Route Limitation
An AWS VGW carries a hard limit of 100 BGP routes in total. When the BGP prefixes exceed 100, VGW randomly resets the BGP session, leading to unpredictable potential network downtime.
AWS publishes VPC limits at this link.
In addition to limits, there are limitations in functionality.
Below is a list of commonly asked limits and limitations by network engineers.
| Functions | Limits | Comments |
|---|---|---|
VPC Peering Limit per VPC |
125 |
Default limit is 50. Constrained also by route limit of 100 |
VPC Route entries in a route table |
100 |
Default is 50. Performance impact on 100 routes. |
BGP prefix total on VGW |
100 |
Exceeding the limit results in random BGP resets |
VGW instance size scaling DNAT function in VGW SNAT function in VGW NAT Gateway policies VPN connections per VPC |
reset BGP not available not available not available 10 |
Trigger a BGP downtime |
VPN traffic initiation VIF per Direct Connect |
from on-prem 50 |
Traffic must be initiated from on-prem to establish a VPN tunnel with VGW |
Inter region peering MTU size |
1500 bytes |
Unlike intra region peering, there is no jumbo frame support, therefore inter region performance is maxed out at 5Gbps. |
Outgoing SMTP traffic on port 25 |
throttled |
You can send a request to lift the throttle. |
I have more than 100 VPCs. How do I overcome AWS Route Limits (100)?
When AWS VGW carries more than 100 routes, its BGP session will crash unexpectedly, resulting in your network outage.
Azure network has similar limitations; the following techniques work for both cloud providers.
These are the options Aviatrix solution provides:
1. Summarizing Spoke VPC/VNet Routes
Enable Spoke VPC route summarization so that Aviatrix Transit Gateway advertises as few routes to VGW as possible. As long as you can limit the number of total routes on the VGW to less than 100, the Aviatrix Transit Network can support as many Spoke VPC/VNets as you need.
Aviatrix Controller sends alert and warning messages when it determines that the total routes carried by the VGW exceeds 80. This is to alert you to start reducing routes carried by the VGW to avoid potential network outage. This alert message is sent each time there is a route VGW advertised from VGW to Transit GW.
2. Bypassing VGW
To permanently solve the route limit problem and not have to worry about summarizing routes, use External Device Option to connect to on-prem directly over Direct Connect or the Internet.
Connect to Floating IP Addresses in Multiple AWS Availability Zones
A subnet cannot span more than one Availability Zone (AZ) in AWS[1]. Because of this, the IP address assigned to an instance in one AZ cannot be reassigned to another instance in a different AZ.
Applications that require users to have a single IP address for connectivity, such as cloud-based NFS and CIFS services, need a way to failover to a different instance when the node fails. This fault tolerance is key to services like NetApp’s ONTAP Cloud. A single AZ solution does not satisfy users' demands for a guarantee of an always-on solution.
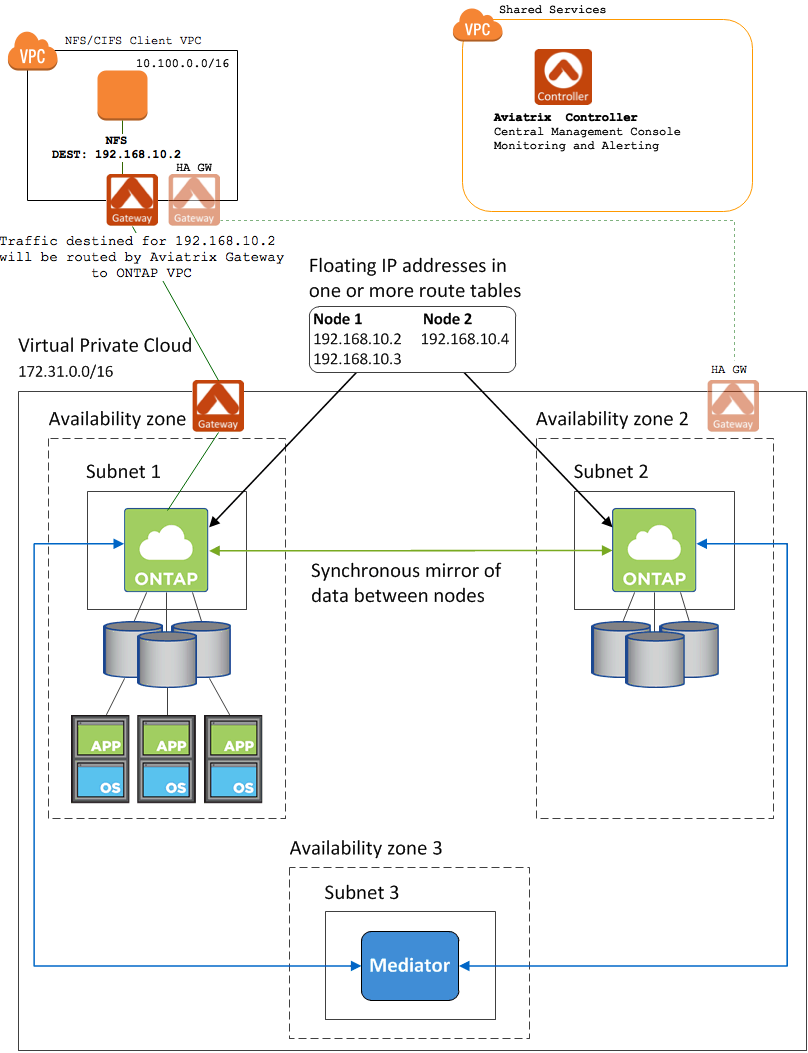
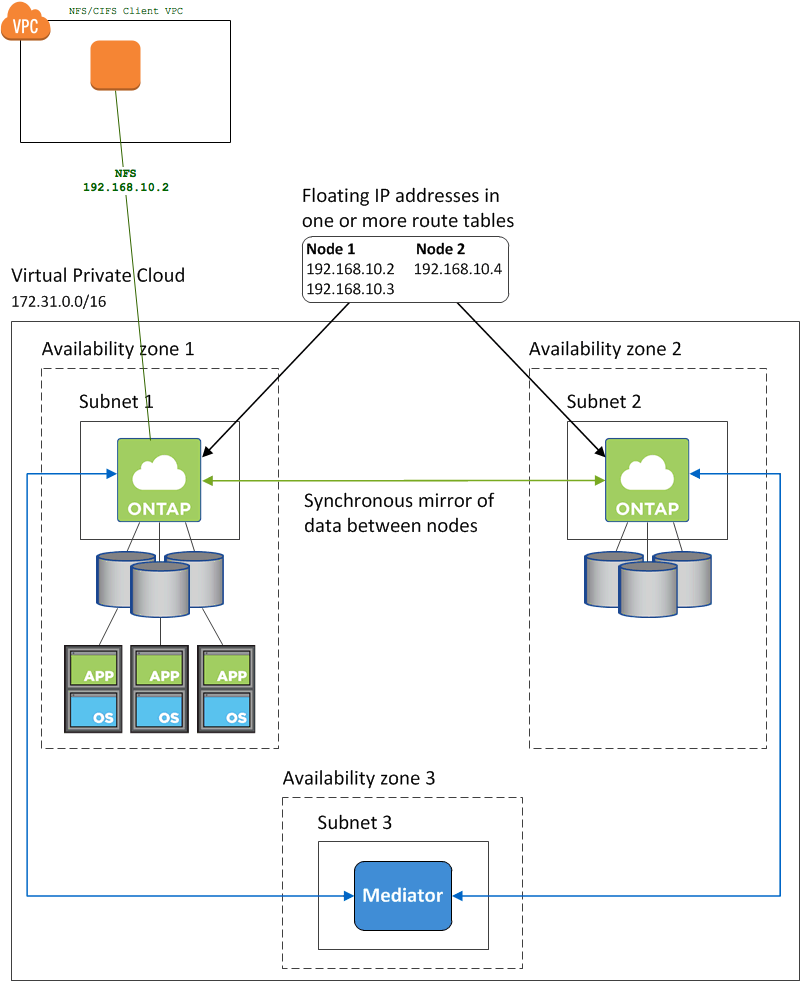
To overcome this AWS limitation, applications like NetApp Cloud rely on "floating" IPs addresses for failover between nodes in different AZs. Floating IP addresses are outside the range of the VPC CIDR. In order to route to these addresses within AWS, they must not overlap with any CIDR range in the same AWS region.
Clients connect to the floating IP address rather than the IP address of the node itself. When a node failure (or even an entire AZ failure) is detected, the floating IP address is "moved" to an instance in another AZ.
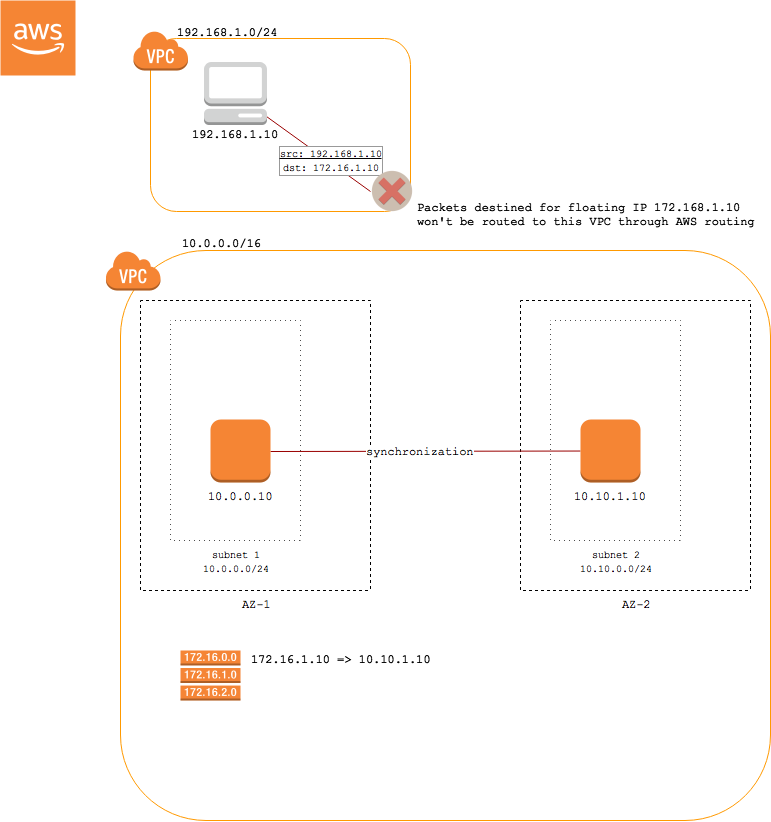
Problem
The floating IP solution works well if the client is in the same VPC as the server. However, if the client is not in the same VPC, AWS routing does not support routing to these IP addresses that are outside of the CIDR range for the VPC. Those packets will never exit the VPC.
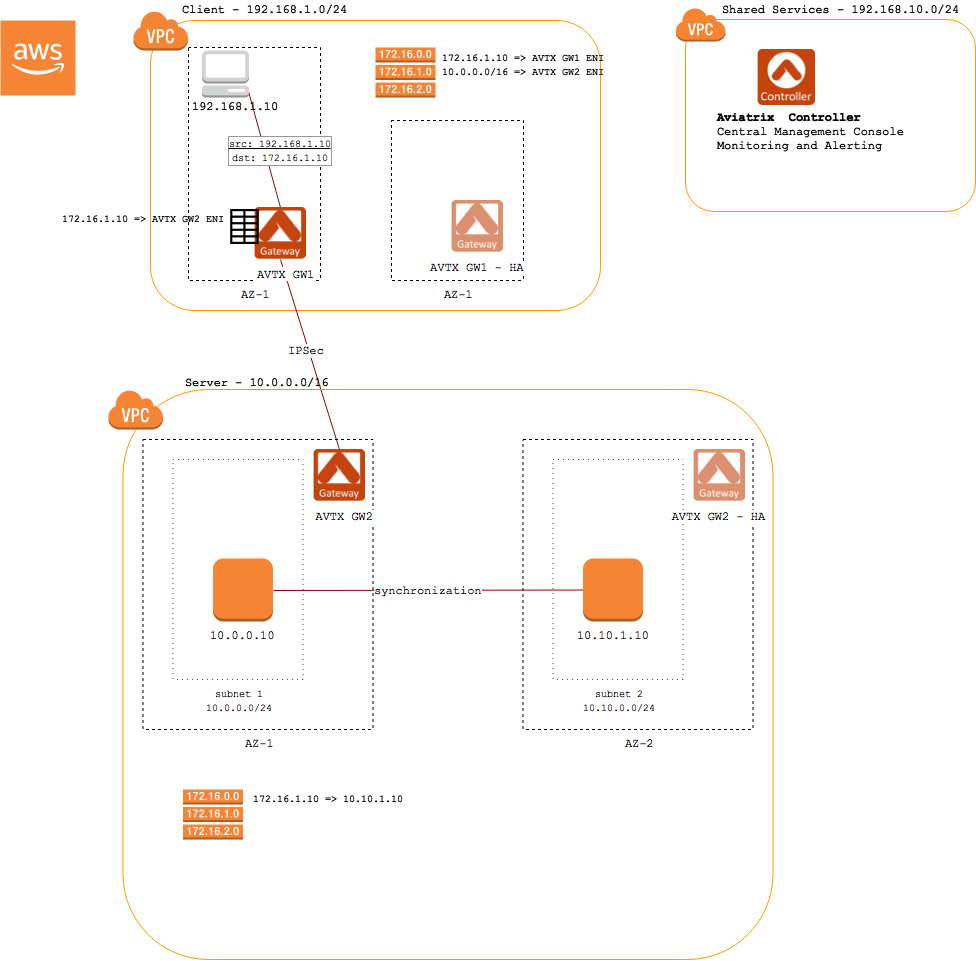
Aviatrix Solution
Aviatrix solves this problem by handling routing of the floating IP addresses in the client VPC. All packets destined for the floating IP address(es) will be delivered to the Aviatrix Gateway. The gateway maintains an internal route table that points those packets to an Aviatrix gateway in the server VPC.
Aviatrix Step-by-Step Deployment Guide for NetApp
Overview
What you will need:
-
A shared services VPC where the Aviatrix central controller will be installed.
-
AWS account credentials or the ability to create new IAM roles. This is how the Aviatrix Controller will connect to your AWS account.
-
Access to the VPC where the client resides.
-
Access to the VPC where the NetApp ONTAP Cloud is installed.
Aviatrix Controller
If you have already installed an Aviatrix Controller, you can skip this step.
-
Follow the steps in this guide to install a Controller in a VPC of your choice (a shared services VPC, for example).
Client VPC
Provision an Aviatrix Gateway in the VPC where your client application resides:
|
The Aviatrix gateway must be installed in a public subnet. If you do not have one created in the VPC where your client application resides, please create one before continuing. |
-
Login to your Aviatrix Controller
-
Click on the Gateways item in the navigation menu
-
Click on + New Gateway to create a new Gateway
-
Select the VPC and subnet and provide a name for this Gateway (e.g., "netapp-client")
-
Leave the other options at their default values
-
Click OK
NetApp ONTAP Cloud VPC
Next, create a Gateway in the VPC of your NetApp Cloud installation.
|
The Aviatrix gateway must be installed in a public subnet. If you do not have one created in the VPC where your NetApp Cloud is installed, please create one before continuing. |
-
Login to your Aviatrix Controller
-
Click on the Gateways item on the navigation menu
-
Click on + New Gateway to create a new Gateway
-
Select the VPC and subnet and provide a name for this Gateway (for example, "netapp-ontap")
-
Leave the other options at their default values
-
Click OK
For redundancy, enable HA:
|
The Aviatrix HA gateway must be installed in a public subnet. If you do not have one created in the VPC where your NetApp Cloud is installed, please create (another) one before continuing in a different AZ than the previous gateway. |
-
Login to your Aviatrix Controller
-
Click on the Gateways item on the navigation menu
-
Select the gateway just created (for example, "netapp-ontap")
-
Click on the Edit button above the table
-
Below Gateway for High Availability Peering, select the public subnet that is in a different AZ from the earlier gateway
-
Click Create
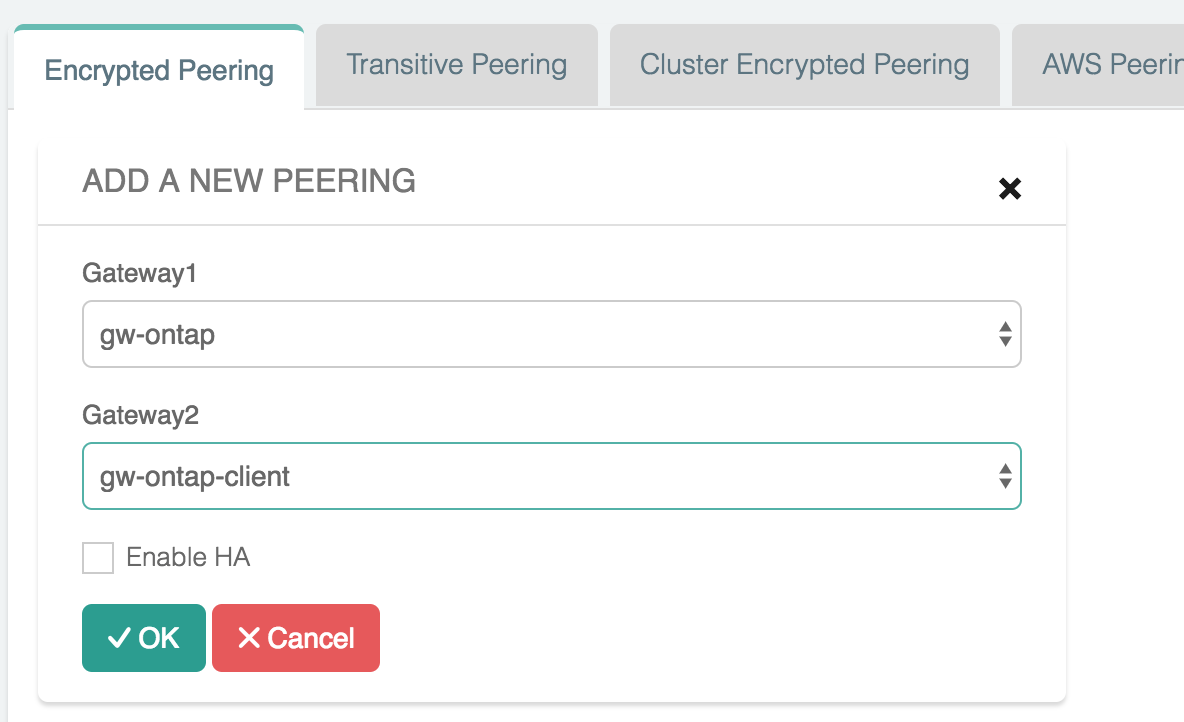
Peer the Client VPC with the ONTAP VPC
First, set up a connection for traffic to go between the client and the ONTAP VPC:
-
Login to your Aviatrix Controller
-
Click on the Peering item on the navigation menu
-
Click on + New Peering to create a new peer
-
Select netapp-client for Gateway1 and netapp-ontap for Gateway2
-
Click OK
Route Floating IP routes from client to the ONTAP VPC
Next, set up a route for traffic for the floating IP addresses through the client gateway to the ONTAP gateway:
-
Login to your Aviatrix Controller
-
Click on the Peering item on the navigation menu
-
Click on the Transitive Peering tab
-
Click on + New Peering to create a new transitive peer definition
-
Select the netapp-client for the Source Gateway and netapp-ontap for the NextHop Gateway
-
In the Destination CIDR, enter the list of floating IP addresses (comma-separated). For example,
192.168.10.2/32, 192.168.10.3/32, 192.168.10.4/32. -
Click OK.
Add Floating IP routes to ONTAP Controllers
In the NetApp Cloud Manager, be sure to select the subnet(s) where the Aviatrix Gateway(s) is installed when modifying AWS route tables with the routes to the floating IPs.