Azure Getting Started Guide
The Aviatrix Cloud Networking Platform is a management and control plane that enables you to manage and support a single or multicloud network architecture. You can deploy the platform, including Aviatrix Controller and CoPilot, through the Azure Marketplace.
Aviatrix Controller is a cloud instance of the Aviatrix software that processes network operations. The Controller manages connections, gateways, users, security, and other networking operations.
CoPilot is the Aviatrix software GUI used to configure all your network connections and policies, and monitor all gateways and traffic on your network. Customizable monitoring tools give you views of network resource usage, performance, security threats, and financial data.
Descriptions of the Aviatrix Subscription Offers
Four Azure Marketplace subscriptions, described in the following table, are available.
Launching a new Controller, or migrating Controller images, requires two offers from the Azure Marketplace:
-
Aviatrix billing license
There is one license offer.
-
Aviatrix Controller subscription
There are two Controller offers available, depending on the Aviatrix base image OS. All new deployments must use Aviatrix Cloud Network Controller, which is based on a more recent Linux OS version. The other Controller offer is for existing customers running an older image.
You can also subscribe to the CoPilot offer, which provides a UI for configuring and monitoring your network. This is optional, but recommended.
Offer |
Required or Optional |
Description |
Aviatrix Cloud Network Controller |
Required |
This Bring Your Own License (BYOL) offer is for the Aviatrix Cloud Network Controller for all new deployments. This offer integrates with the Aviatrix Cloud Network License Service which issues a license and calculates billing. All new deployments use this offer. |
Aviatrix Secure Networking Platform BYOL |
Required |
This BYOL metered offer is for Aviatrix Controllers being added to existing deployments running an older version of the operating system. This offer integrates with the Aviatrix Cloud Network License Service which issues a license and calculates billing. |
Aviatrix Cloud Network CoPilot |
Optional (recommended) |
This BYOL offer is for the Aviatrix Cloud Network CoPilot. This offer integrates with the Aviatrix Cloud Network License Service which issues a license and calculates billing. |
Aviatrix Cloud Network License Service |
Required |
The Aviatrix Cloud Network License Service provides the customer IDs (licenses) that are needed to access the Aviatrix Cloud Network Controller and Aviatrix Cloud Network CoPilot. This service also calculates Aviatrix bills based on usage, which are then sent to Azure Marketplace for customer billing purposes. A free trial is available with this offer. |
Aviatrix Cloud Network License Service was renamed from Aviatrix Metered Offer.
Aviatrix Cloud Network Controller deploys Controller 7.1.4105 and later. To deploy Controller version 7.1.4101 or earlier, subscribe to Aviatrix Secure Networking Platform BYOL.
|
If you subscribe to the free trial license, you receive notification emails 14, seven, and one day before the free trial expires and billing begins. |
When you subscribe to the Aviatrix Cloud Network License Service you receive a Customer ID (license key) by email. You must enter that ID when you subscribe to the Aviatrix Cloud Network Controller BYOL offer to deploy the Aviatrix Controller. You then subscribe to the Aviatrix Cloud Network CoPilot offer.
Complete the following instructions:
|
These instructions apply generally to both Azure commercial and Azure Government clouds for deploying an Aviatrix Controller. Some screenshots may show regions that are only available for commercial Azure accounts. Commercial Azure offers multiple regions worldwide while Azure Government offers limited US regions. See documentation about Azure Geographies or Azure Government for details. |
Subscribing to the Aviatrix License Service Offer
You must subscribe to the Aviatrix Cloud Network License Service offer before subscribing to the Aviatrix Cloud Network Controller (BYOL) offer.
| With the Aviatrix License, you are billed monthly. No upfront cost and pay as you go. |
-
Go to the Aviatrix Cloud Network License Service page on the Azure Marketplace.
-
Click Get it Now on the left side of the page.
-
Mark the permissions checkbox and click Continue.
-
Click Subscribe.
-
Enter your Subscription name, Resource group, Name, and Recurring billing preference. Then, click Review + subscribe.
-
Click Subscribe.
-
After the subscription process completes, click Configure account now.
It might take several seconds before the configuration button becomes active.
-
Enter your email address in the Email field and click Submit.
You receive an email from admin@aviatrix.io with the subject line "License key for Aviatrix Metered Controller and CoPilot." This email contains your Controller customer ID, CoPilot customer ID, and offer subscription ID.
-
Save these values in a secure place to use later for onboarding.
Next, you must subscribe to the Aviatrix Cloud Network Controller offer.
Subscribing to the Aviatrix Controller Offer
After subscribing to the Aviatrix license and receiving your license key, you must subscribe to the Aviatrix Controller offer to activate your subscription.
-
Go to the Azure Marketplace to subscribe to the Aviatrix Cloud Network Controller offer.
Alternatively, search for "Aviatrix Controller."
-
Click on the subscription offer, and then click Get It Now.
-
On the Create this app in Azure window, click Continue.
-
On the Aviatrix Cloud Network Controller window, click Create.
If you want to view Azure recommended size choices, click "Start with a pre-set configuration". Do not choose the "Deploy programmatically" option.
-
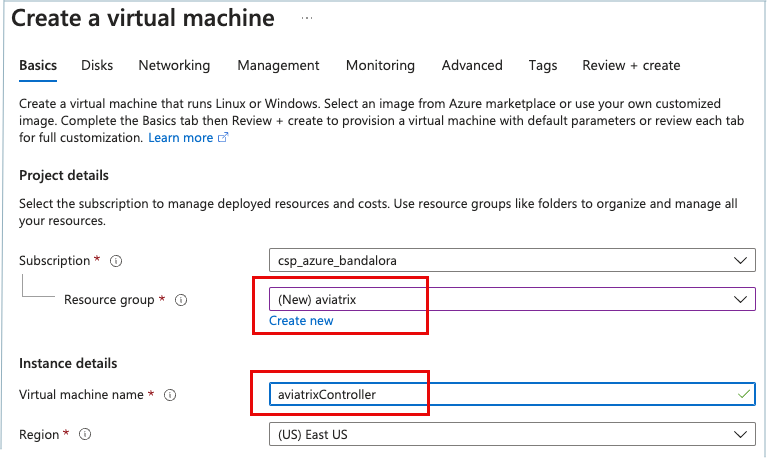
On the Basics tab, do the following:
-
Create a new Resource Group. Example: "aviatrix."
-
Name the virtual machine. Example: "aviatrixController."
-
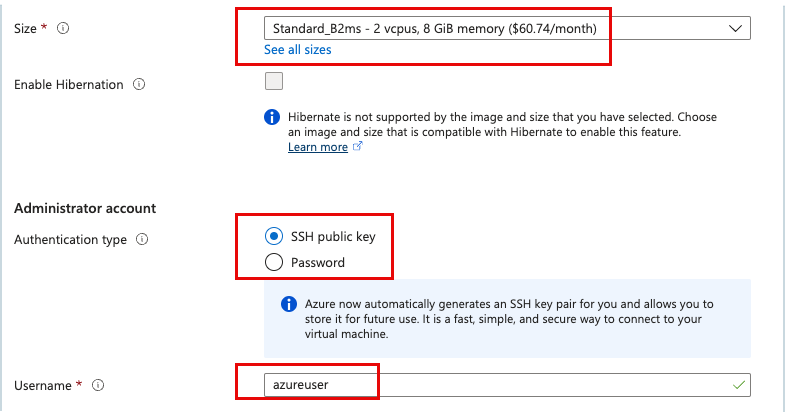
For the instance size, at least 8GB of RAM is recommended (the B2ms instance size should be sufficient).
-
Select an authentication type.
-
Enter a username.
Do not use "ubuntu" as username if you use password as the authentication type.
-
If you selected the password authentication type, enter a password.
-
-
On the Disks tab, you can accept the defaults or enter your choices.
-
On the Networking tab:
-
A default subnet and a security group are preconfigured. You can accept the defaults.
-
Scroll to Select inbound ports and select HTTPS(443).
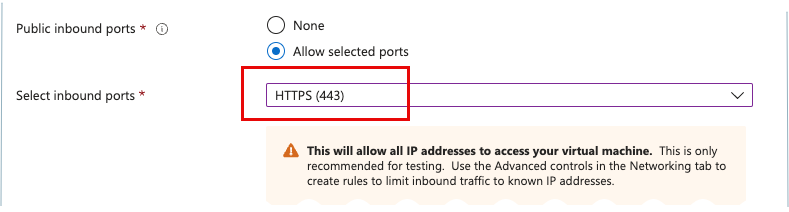
A warning message displays about access to the VM. However, this port must be open so Controller has access to the internet.
-
-
You can accept the default settings or modify the settings, as needed, on the Management, Monitoring, Advanced, and Tags tabs. No configuration changes are required.
-
When you are finished making all of your selections, click Review + subscribe.
After several seconds, the Create button becomes active.
-
Click Create.
-
If you selected the option to use an SSH public key for authentication, the Generate new key pair window displays. Click Download private key and create resource.
Resource creation takes several seconds.
The private key is not stored by Azure or Aviatrix. This is the only opportunity to download the key. Keep the key in a safe place because you will need it in the future. -
When a message displays indicating the deployment is complete, click Go to resource to see resource details.
-
Find the VM’s public IP address, which you will use to access the Controller.

-
Scroll to the Networking section of the VM page and make a note of the private IP address, which is your login password.
-
Use a browser to access the Controller VM’s public IP address.
-
At the login page, enter "admin" as the username.
The initial password is the internal private IP address of the VM.
-
Log into your new Controller.
-
After logging in, click on the Onboarding tab.
|
If you need to delete any resources created by the Controller, such as Aviatrix gateways, Azure routing entries, subnets, etc., they must be deleted from the Controller console. If you delete them directly on Azure console, the Controller’s view of the resources will be incorrect, which will lead to features not working properly. |
Onboarding Your Azure Account in the Aviatrix Controller
Onboarding helps you set up an account on the Aviatrix Controller that corresponds to an Azure account with policies so that the Controller can launch gateways using Azure APIs.
Follow the Azure Accounts document to create an Aviatrix account that corresponds to your Azure account credential.
|
Subscribing to the Aviatrix CoPilot Offer
For a CoPilot deployment, the first step is to log in to the CSP marketplace and subscribe to the Aviatrix Cloud Network CoPilot offer.
-
Log in to the Azure Marketplace using your provider user account credentials and go to Aviatrix Cloud Network CoPilot.
Alternatively, search for "Aviatrix CoPilot."
-
Click on the subscription offer, review the subscription pricing information, and then click Get It Now.
-
On the Create this app in Azure window, click Continue.
If you prefer to deploy CoPilot by using Terraform scripts, you can stop here and refer to the instructions for that deployment method. -
On the Aviatrix Cloud Network CoPilot window, click Create.
If you want to view Azure recommended size choices, click "Start with a pre-set configuration". Do not choose the "Deploy programmatically" option.
-
In the Create a virtual machine form complete the provisioning steps for the Basics section by specifying the subscription, resource group, VM name, and size values and other values as needed for the Project details, Instance details, and Administrator account details sections. Take note of the Instance (Virtual Machine) System Requirements for CoPilot. Click Next: Disks.
-
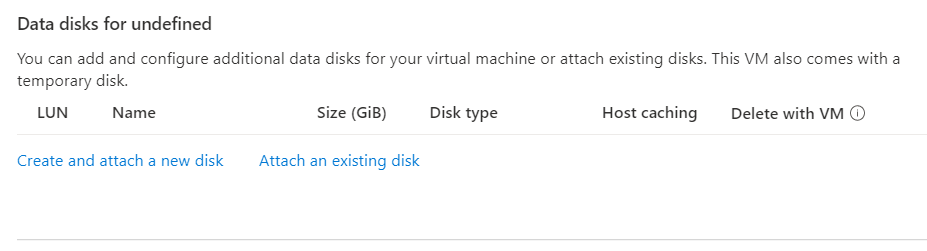
You must attach at least one data disk to your CoPilot VM to be used for expandable storage. This is in addition to the 25GB root disk that comes with CoPilot. Click Create and attach a new disk or Attach an existing disk to add and attach an additional disk.
-
Specify the disk options you want or click OK to accept the default disk options.
-
Click Next: Networking and specify the network interface details.
For Public IP, click Create new. In the Create public IP address dialog, for Assignment, select Static and click OK.
-
Complete the rest of the provisioning steps for the Management, Advanced, and Tags sections.
-
Click Next: Review + create. If blank, type your phone number in the Preferred phone number field. If the validation passed, review your settings and click Create.
Verify that your instance is up and running in the Azure console.
-
After the instance is created, and you receive a message that your deployment is complete, click on Go to resource. Select the copilot instance name and take note of its External IP address.
-
Go to your Controller instance in your cloud service provider. Add your CoPilot IP address into your Controller security group with TCP protocol and port 443 on the cloud service provider so that CoPilot server can communicate with Controller API.
-
You are ready to launch CoPilot in your web browser and perform initial setup. See Initial Setup of CoPilot.
Subscribing Gateway and Firewall Offers to Private Azure Marketplace for Aviatrix Deployments
Depending on your company’s security policies, you may need to add and subscribe Aviatrix gateways and firewalls to the private Azure Marketplace using PowerShell. This document explains how to use PowerShell commands to add and subscribe gateways and firewalls in Azure, and partner firewall offers, to your private Azure Marketplace.
Since our gateway images are not publicly available, you cannot subscribe to these offers directly in your private Marketplace through the Azure portal. Please follow the instructions below to complete the subscription process.
| The examples in the following sections demonstrate how to apply Azure commands to subscribe on the private Marketplace. Because the Azure commands could change, you can verify command usage in Azure documentation. See Manage a private Azure Marketplace using PowerShell and Get storage account configuration information to check for the most current updates and commands. |
Subscribing an Aviatrix Gateway Offer to Azure Private Marketplace
Prerequisites
-
You must have the administrative permissions required to run the commands in this task. If you can’t run the commands, contact your security admin.
-
Ensure the Azure collection you plan to use for this task is enabled on the Azure Manage marketplace page.
-
If you have multiple Azure subscriptions, identify which subscription should be used for resource billing.
See Manage a private Azure Marketplace using PowerShell for more details about how to choose an appropriate subscription.
-
Run the following command to confirm that your current Azure subscription is in the Enabled state:
az account show --query "{Name:name, SubscriptionId:id, State:state}" -o table
Steps to Subscribe an Aviatrix Gateway Offer to Your Private Azure Marketplace
Complete the following steps:
-
Log into your Azure account.
-
Run the following command to install the necessary packages:
Install-Module -Name AZ.Marketplace -
(Optional) If you have multiple Azure subscriptions, set the subscription in which the resources should be billed.
Skip this step if you only have one subscription.
Set-AzContext -SubscriptionId <subscription_id> -
Run the following command and copy your Private Store ID.
Get-AzMarketplacePrivateStore -
Run the following command and copy the collection ID.
The collection ID must already be enabled.
Get-AzMarketplacePrivateStoreCollection -PrivateStoreId <private_store_id> -
Run the following command and copy the Uniform Resource Name (URN).
az vm image list --output tableThe URN is in a format similar to, aviatrix-systems:aviatrix-gateway:aviatrix-gateway-g3:20240806.2003.0.
-
Run the following command to accept the terms of the image on the private Azure Marketplace:
az vm image accept-terms --urn <urn>Where <urn> is the URN value you retrieved from the previous step.
-
Run the following commands to add a gateway offer to the private Azure Marketplace, if your offer is not yet in the private Marketplace.
$Params = @{
privateStoreId = "<private_store_id>"
collectionId = "<collection_id>"
offerId = "<offer_id>"
SpecificPlanIdLimitation =@("<specific_plan_id_limitation>")
}

Set-AzMarketplacePrivateStoreCollectionOffer @Params
Replace the variables <private_store_id> and <collection_id> with the values copied in previous steps.
Replace <offer_id> and <specific_plan_id_limitation> (or
sku) with the appropriate values according to your Controller’s current software version. Use the following table:Release offerID SpecificPlanIdLimitation >= 6.7
aviatrix-systems.aviatrix-companion-gateway-v10
aviatrix-companion-gateway-v10u
>=6.8
aviatrix-systems.aviatrix-companion-gateway-v13
aviatrix-companion-gateway-v13u
>=6.9
aviatrix-systems.aviatrix-companion-gateway-v15
aviatrix-companion-gateway-v15u-6-9
>=7.0
aviatrix-systems.aviatrix-companion-gateway-v16
aviatrix-companion-gateway-v16
>=7.1.3958
aviatrix-systems.aviatrix-gateway
aviatrix-gateway-g3
The Aviatrix Gateway image is now part of your private Azure Marketplace.
Next Steps
-
In the Azure portal, onboard the service principal created under the subscription you used to add the gateway offer to the private Marketplace.
See Microsoft documentation, if needed.
-
You can deploy Aviatrix Gateways for Azure from the Aviatrix Controller.
See Building Your Network in the Aviatrix documentation.
Example Code
Below is a full example code snippet that demonstrates the workflow.
Replace variables with your account’s values.
# Install the AZ.Marketplace module
Install-Module -Name AZ.Marketplace

# (Optional) If you have multiple subscriptions, set the appropriate subscription
Set-AzContext -SubscriptionId <subscription_id>

# Get the Private StoreID
Get-AzMarketplacePrivateStore

# Get the CollectionID
Get-AzMarketplacePrivateStoreCollection -PrivateStoreId <private_store_id>

# Get the URN
az vm image list --output table

# Accept the terms of the image on Azure Private Marketplace
az vm image accept-terms --urn aviatrix-systems:aviatrix-gateway:aviatrix-gateway-g3:20240512.1500.0

# Add the offer to the private Azure Marketplace
$Params = @{
    privateStoreId = "e796cf6d-fb86-4621-99b5-6764cafeee58"
    collectionId = "e796cf6d-fb86-4621-99b5-6764cafeee58"
    offerId = "aviatrix-systems.aviatrix-gateway"
    SpecificPlanIdLimitation =@("aviatrix-gateway-g3")
}

# Set the offer to the private Marketplace
Set-AzMarketplacePrivateStoreCollectionOffer @Params
Subscribing an Aviatrix Firewall Offer to Your Private Marketplace
Repeat the steps above to add an offer for the Azure Firewall to your private Marketplace. Use the table below to find the correct Publisher and OfferID values.
| Name | Publisher | OfferID (plan product) | SKU (plan name) |
|---|---|---|---|
PAN |
paloaltonetworks |
vmseries1, vmseries-flex |
bundle1, bundle2, byol |
Fortinet |
fortinet |
fortinet_fortigate-vm_v5 |
fortinet_fg-vm fortinet_fg-vm_payg fortinet_fg-vm_payg_20190624 |
Check Point |
checkpoint |
check-point-cg-r81, check-point-cg-r8110 |
sg-ngtp, sg-ngtx, sg-byol, mgmt-byol |
After following these steps, you can now deploy Azure Firewalls from your Azure Private Marketplace through the Aviatrix Controller.