Setting up your PFSense Firewall
A few important notes before we launch the instance:
-
This document complements the existing deployment guide that was designed to help you to associate a Palo Alto VM-Series. We are going to assume that you have completed all steps up to launching and associating a firewall instance before launching this firewall instance. Launching and associating a firewall instance is not necessary as it is Palo Alto VM-Series specific.
-
Currently we do not have a full integration between the Aviatrix dashboard and the Netgate pfSense, which means that you will not be able to dynamically update the firewall routing table, as it is currently possible with the Palo Alto VM-Series.
Setting up Firewall Network (FireNet) for Netgate PFSense
Complete the first six steps (up to Launching and Associating a Firewall Instance) of the Firewall Network Workflow in Aviatrix Controller to prepare your Firewall VPC (FireNet VPC). This will also set up the subnets that you need for launching your pfSense instance.
Deploying a pfSense Instance
-
Go to aws.amazon.com/marketplace and search for the pfSense AMI in AWS Marketplace. Continue to Subscribe.

-
On the next screen, accept the terms, and you should be able to continue.
-
On the next page, choose Amazon Machine Image as fulfillment option, choose the proper region and click Launch.
-
On the next page, Choose Action should be set to Launch through EC2 and then click Launch. You may want to refer to the pfSense docs page as well.
-
Now, choose your instance size. For this deployment you need two network interfaces: management/egress and LAN. A three-interface deployment is possible (separating management from egress) but not required, as it will also require a larger instance (due to the extra ENI).
-
You can start with a t3.large for example, although for better network performance you might want to select a different instance type (m5, c5 or c5n) and a larger instance size. For more information on this subject, see this AWS document and the pfSense docs page.
-
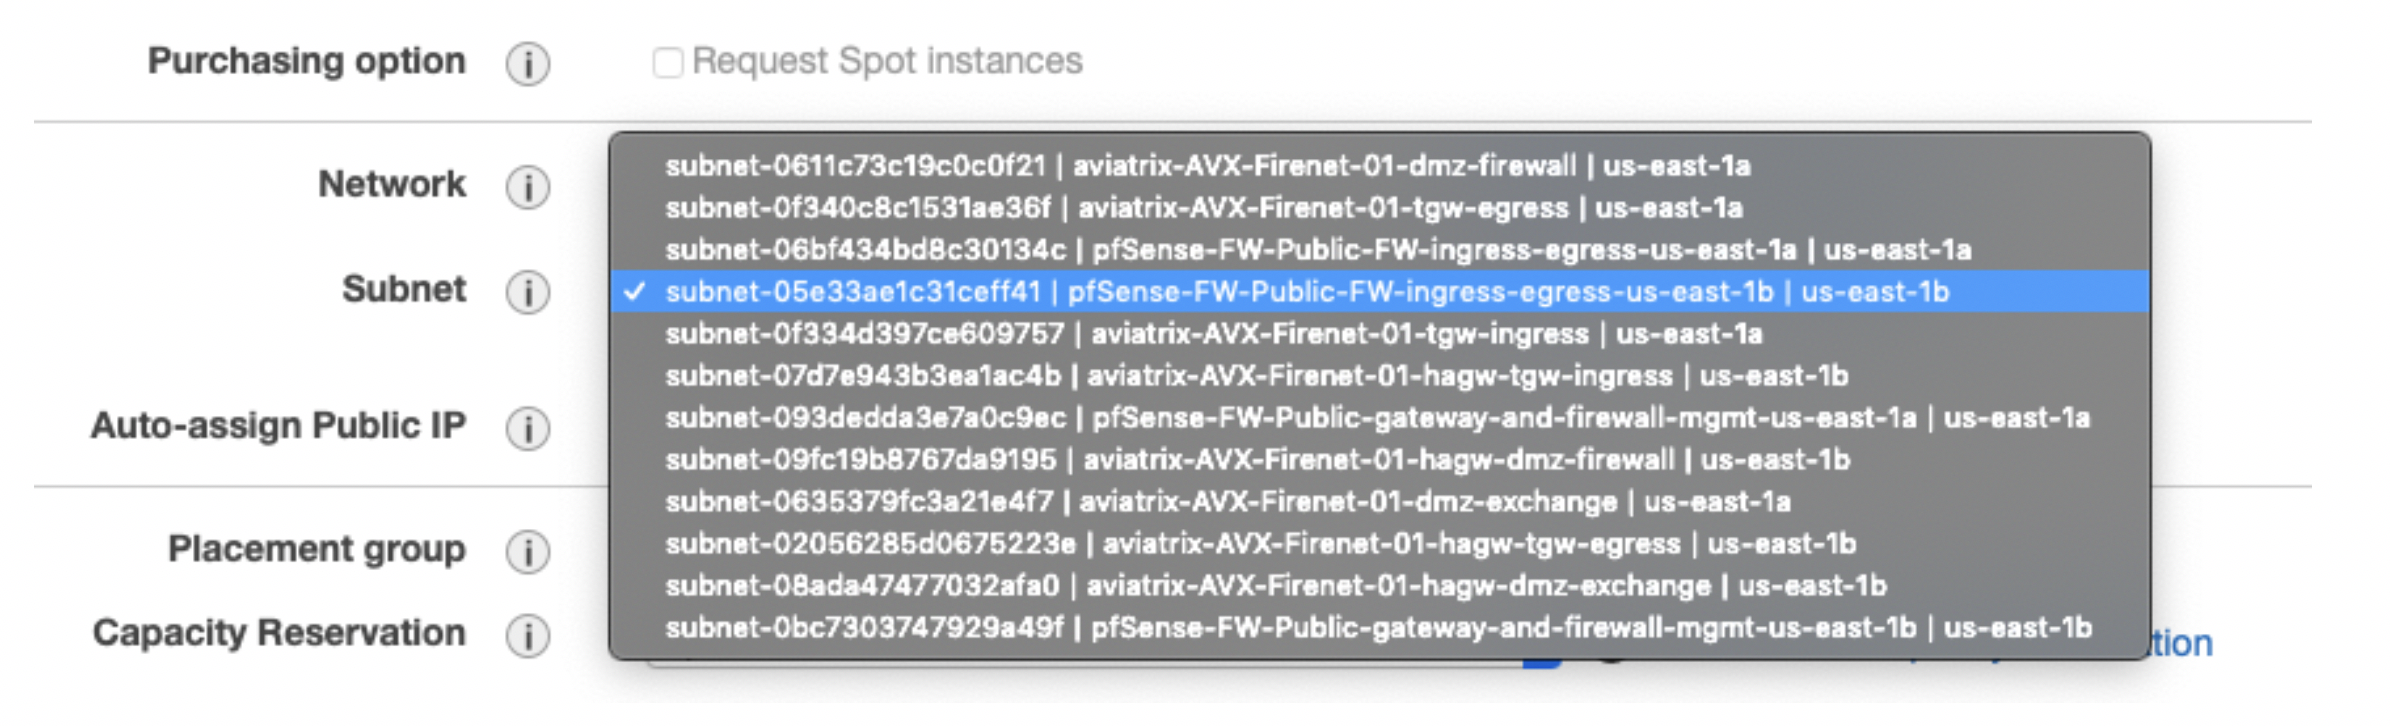
On the instance details page, the most relevant setting for any deployment is the subnet selection for the ENIs eth0 and eth1. If you have followed all the steps on the Firewall page, then your subnet selection should follow this logic:
-
Eth0 for both management and egress; it should be placed in the subnet FireNet-vpc-Public-FW-ingress-egress.
-
Eth1 as the LAN interface should be placed in the subnet aviatrix-FW-GW-dmz-firewall (same AZ as eth0).
-
-
At the bottom of this page, click Add device to create eth1 and select the proper subnet.

-
Click Next: Add storage – the default setting is acceptable.
-
Click Next: Add Tags – if you use tags in your environment, configure them here.
-
Click Next: Configure Security Group – by default you are going to see pfSense default rules for HTTP, HTTPS, SSH and OpenVPN. You can then click Review and Launch or you can isolate the instance public interfaces with the following three rules.
-
All inbound traffic allowed for your own public IP (you will have to SSH to the instance)
-
All inbound traffic allowed for the Controller IP (even though only TCP port 443 and ICMP will be used)
-
All inbound traffic allowed for RFC 1918 addresses (this should cover your spoke CIDRs and allow you to perform IDS/IPS)
-
| As soon as you attach an EIP to any instance, it will start receiving random hits from the Internet and you should guarantee that unwanted traffic is being dropped so that you don’t pay for “rejects/resets” being sent from your firewall/VPC. |
-
The next page is a summary containing all of your previous choices, as well as any relevant AWS warnings on how you can improve your deployment (e.g: open security groups, AMI usage tier consideration, etc.).
-
After you click Launch you are prompted to choose the .pem key. Please download the key now if you have not done so already and archive it in a secure location, as you are going to use it to SSH into the instance to enable GUI/web interface access.
-
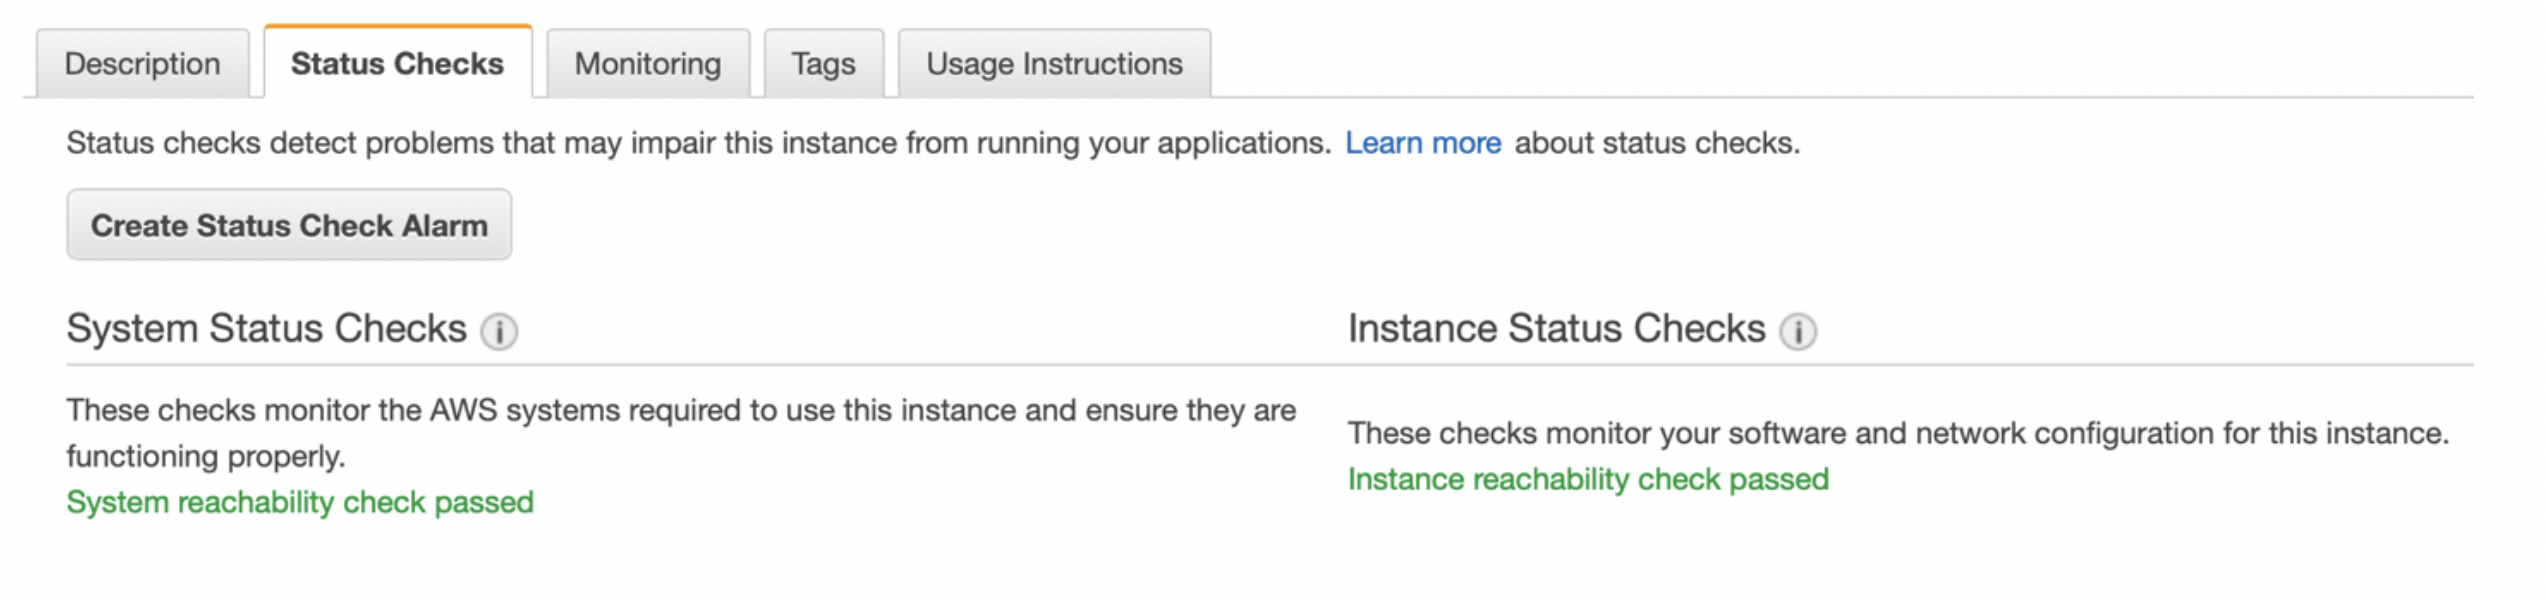
If desired, you can monitor the instance until it is up via the AWS console (see the screenshot below). Once the instance passes all the health checks, open a terminal and SSH into the instance using the proper keys and the user “admin,” so that you can grep the auto-generated password.
-
The pfSense console allows you to assign the interfaces and its IPs using options 1 and 2; you can also do that via the web interface.


Logging on to the pfSense UI
-
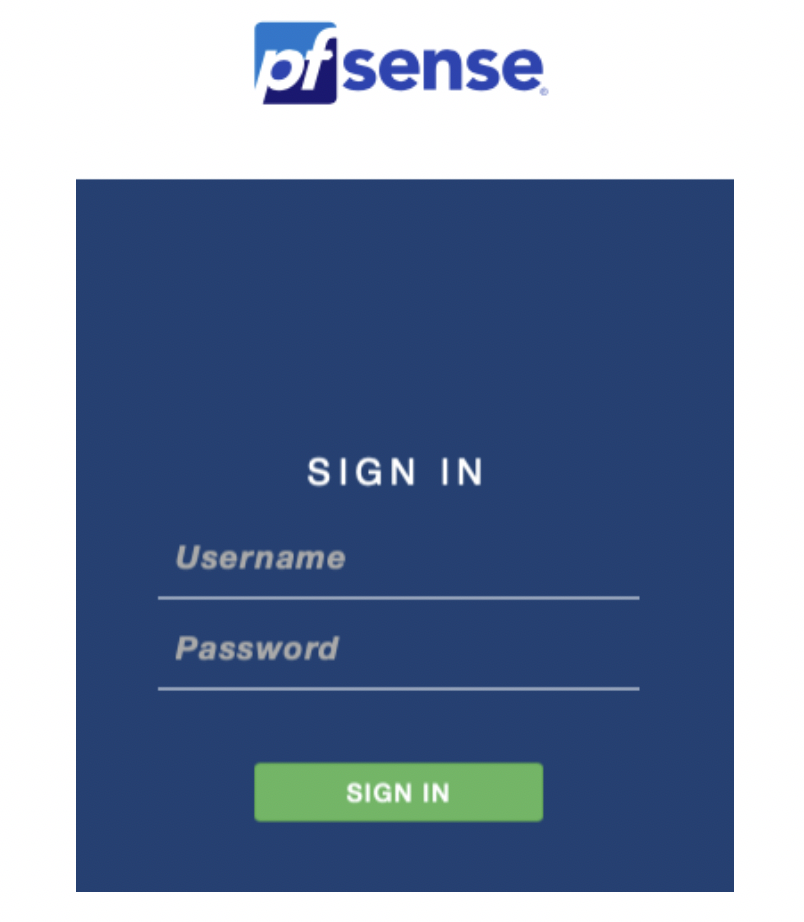
Open a browser and go to https://the_instance_EIP. You must accept the self-assigned certificate. After that you are prompted with the below screen. Enter the username as admin and the password you saved in the previous step.
-
The Setup Wizard will take you through some basic steps, which will allow you to configure:
-
On step 2: Hostname and domain for the instance, primary and secondary DNS servers and whether DHCP should be able to override it. If you want to use AWS VPC DNS, leave the checkbox marked.
-
On step 3: The timezone and NTP server. The AWS NTP server can be reached at 169.254.169.123.
-
On step 6: You can change your password.
-
Step 7 reloads the configuration.
-
-
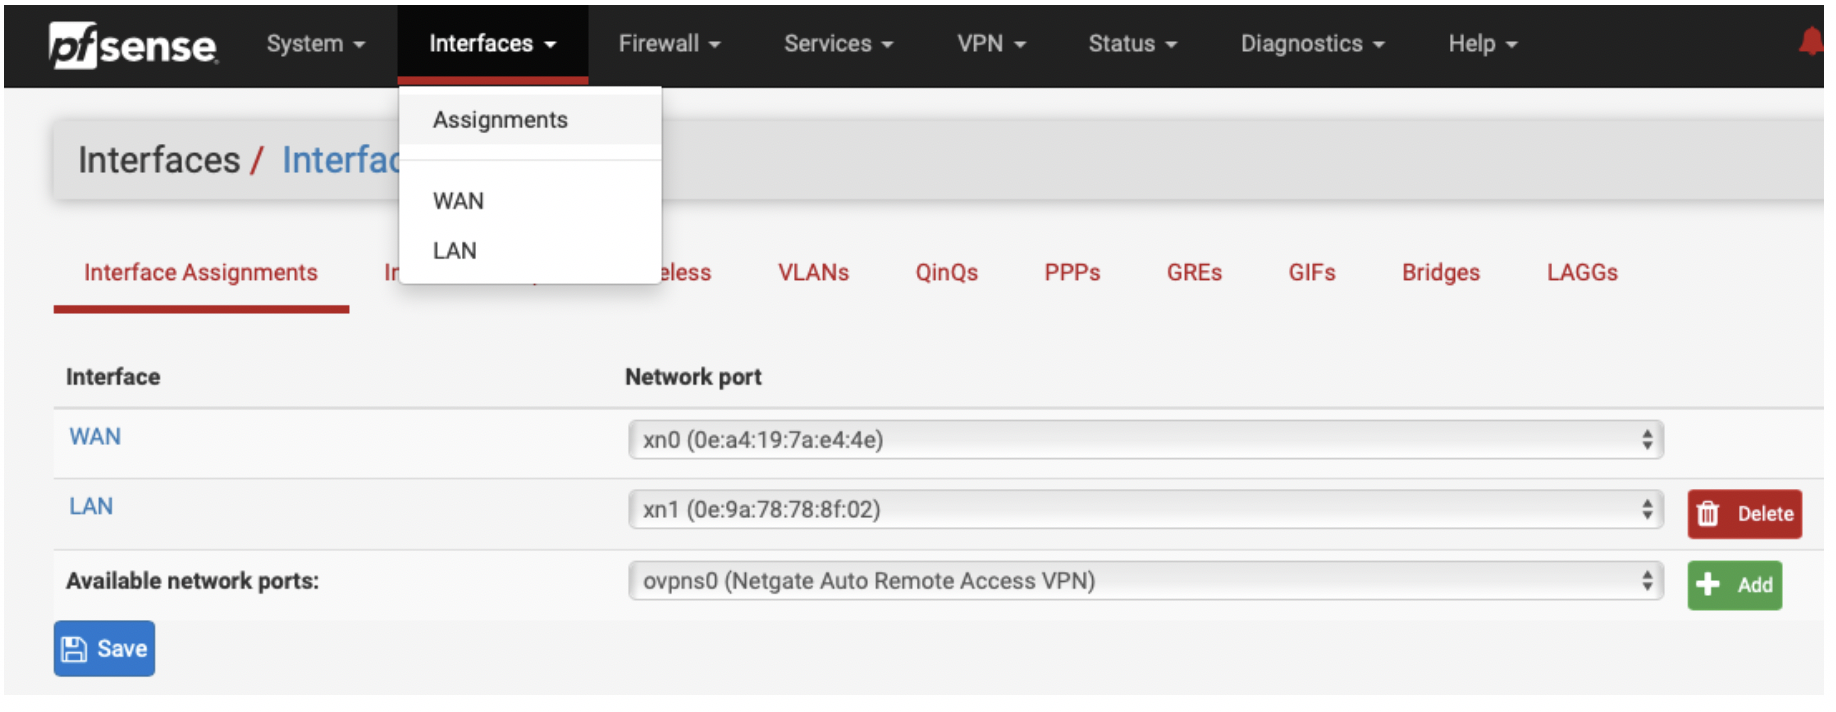
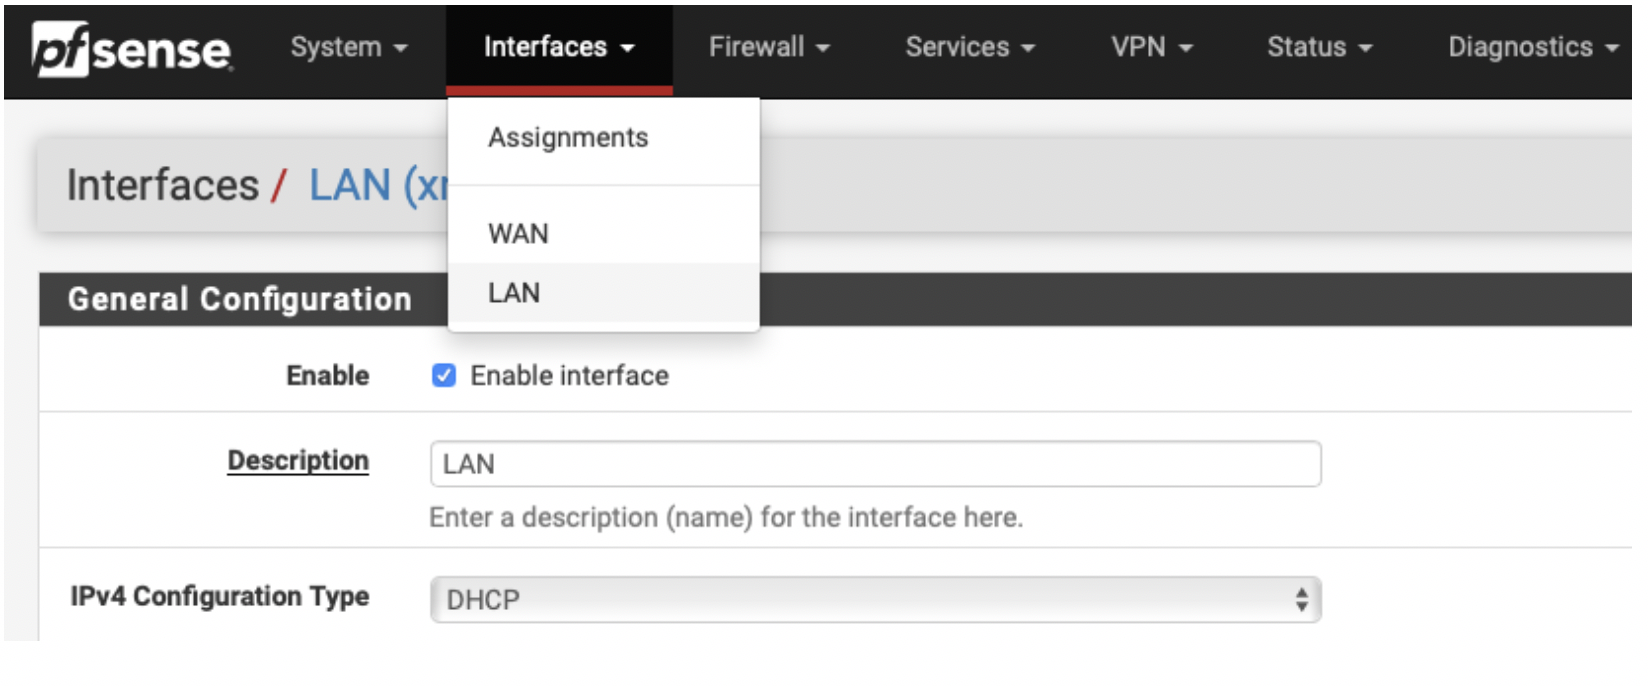
Once you are done with the Setup Wizard, you should double-check your interface assignments (xn0/WAN and xn1/LAN) and set xn1 to DHCP. Also, you must disable Source/dest Check for the eth1 interface in the AWS Console as explained here.
-
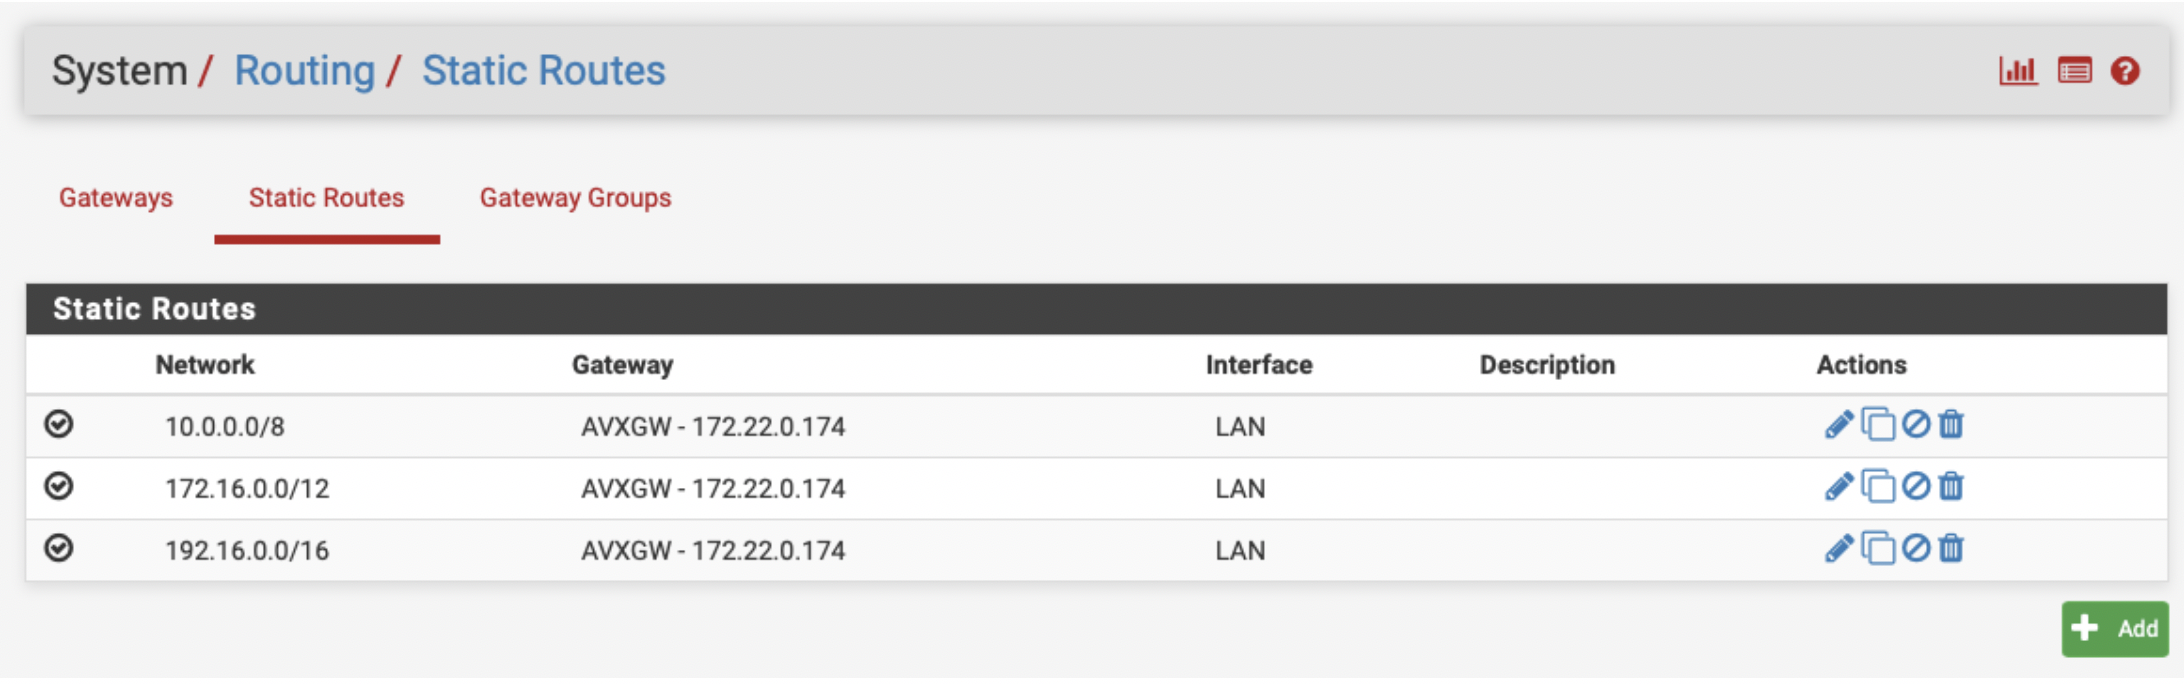
The next step is to update the route table. For the purpose of this guide, we suggest adding three routes, each for a RFC1918 address pointing to the private IP of the eth2/ENI of the Aviatrix Gateway in question (whether you are attaching the instance to the main or to the backup gateway).
-
Please make sure that the gateway of the xn0/WAN interface has been selected as the default, so your egress traffic can be routed to the VPC IGW.

-
The next step is to configure the Aviatrix Gateway that the instance will be attached to (either the main or the backup) as an object. Go to System > Routing > Gateway and click + Add. The IP address of the eth2 interface of the Aviatrix Gateway selected can be found in the AWS: EC2 > Network Interfaces.

-
One you have configured the Aviatrix Gateway, you can use it as next hop. Go to System > Routing > Static Routes and click + Add. Repeat this step for all three RF1918 subnets:
-
Now you can configure the NAT policy. By default, pfSense will perform automatic outbound NAT for both interfaces, which we cannot have for the xn1/LAN interface. Go to Firewall > NAT > Outbound and create an exception mapping like the one below – to not NAT anything exiting via xn1:

-
Change the default selection of NAT to be the second option: “Hybrid Outbound NAT rule generation (Automatic Outbound NAT + rules below)” – then click Save and then Apply Changes.
-
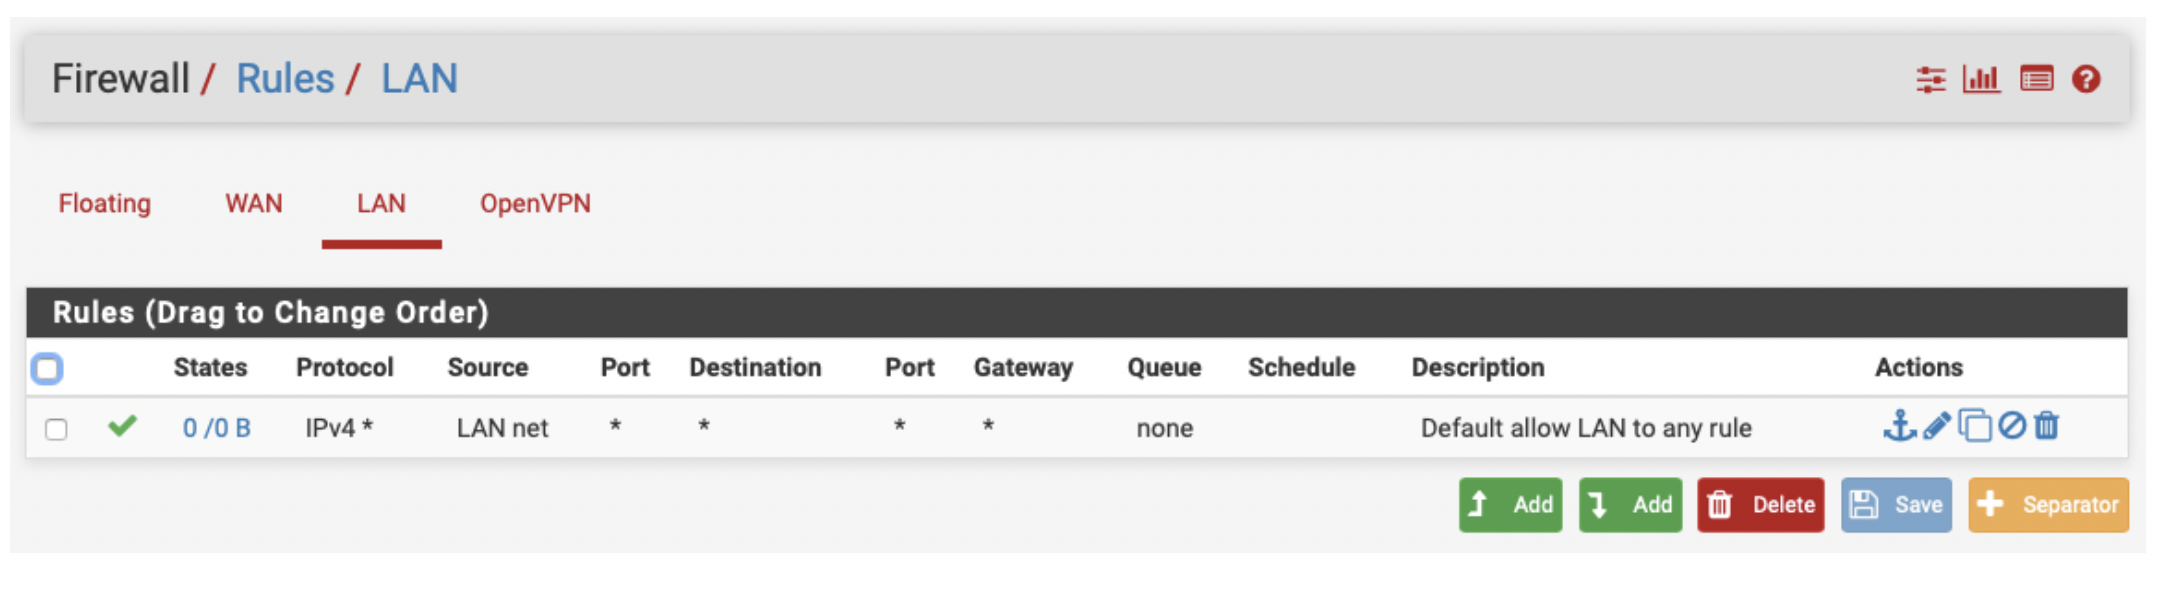
Double-check the firewall rules are according to your project. If you have already enforced the WAN inbound control at the Security Group level while launching the instance, all you need to confirm is that you are not being more restrictive at the firewall level, so please make sure you are allowing everything at the LAN level.
-
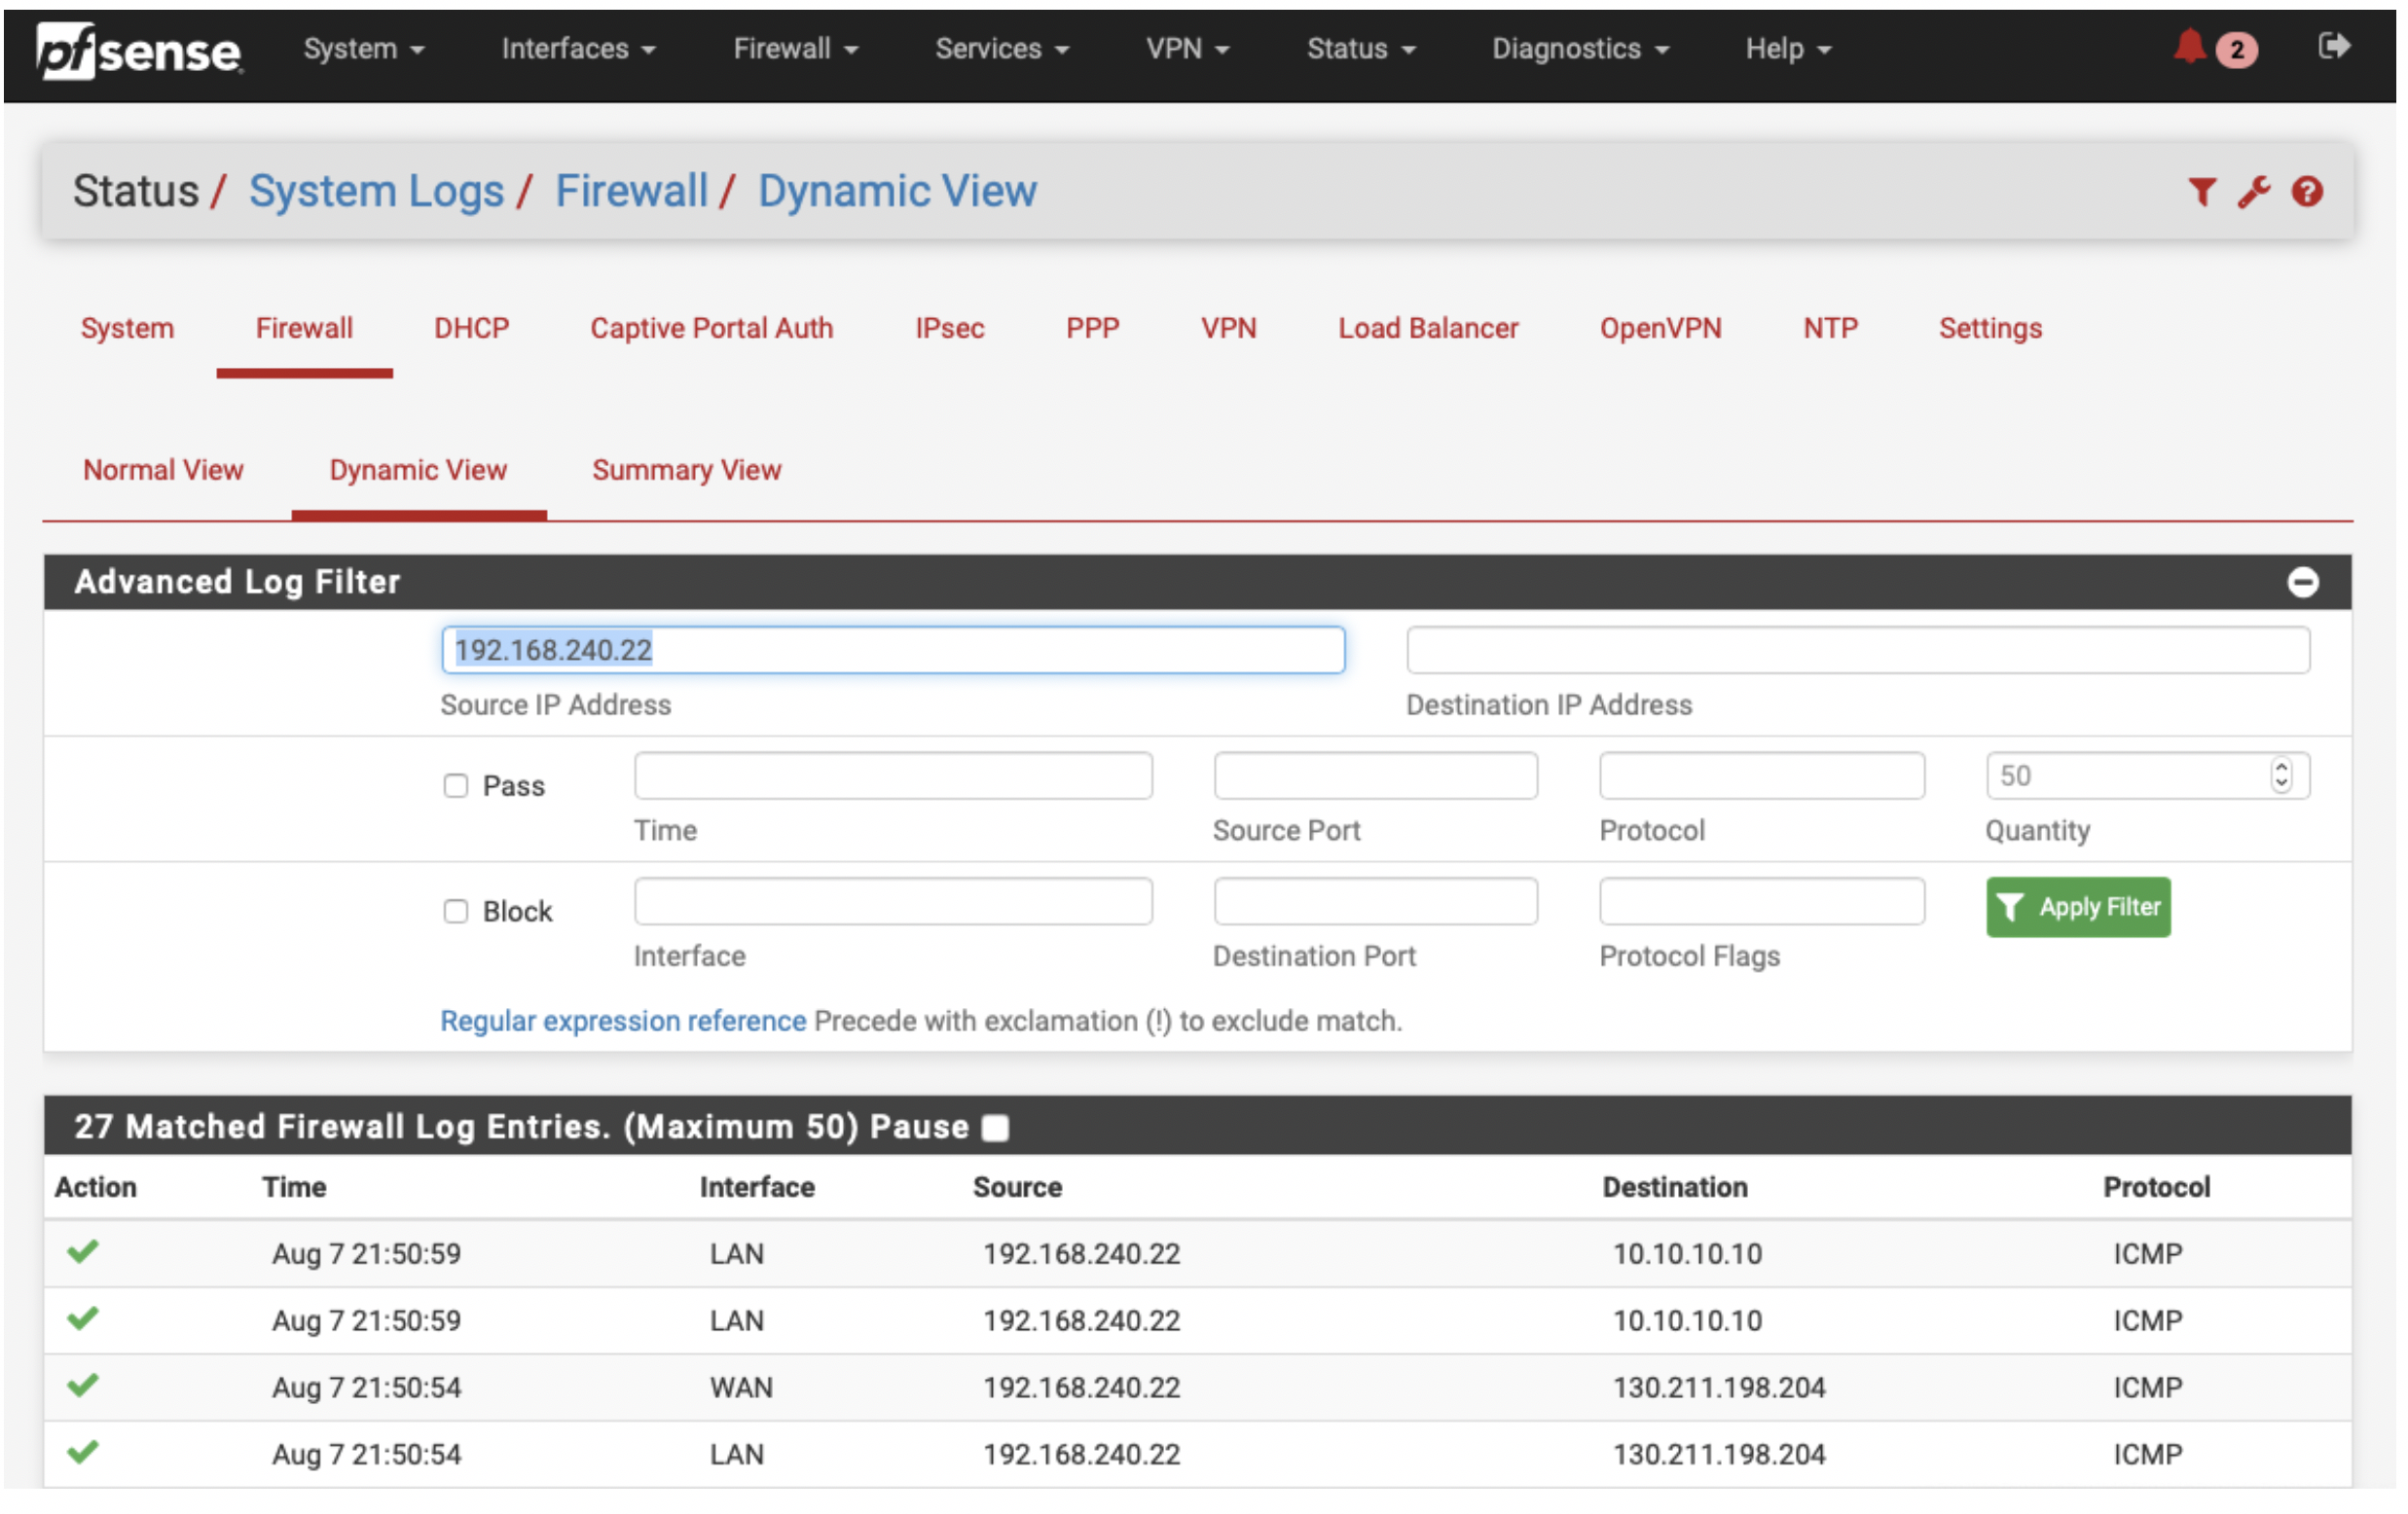
Monitor your traffic to confirm that the inspection is being performed as configured. Please go to Status > System Logs > Firewall > Dynamic View. Use the funnel icon to filter your logs accordingly. In this example we have ICMP traffic being inspected in an East-West flow (192.168.240.22 > 10.10.10.10), as well as egress pings to disney.com from the same host.
You can now repeat this process to add more instances to talk to the main gateway and also to the backup gateway. The difference regarding the backup gateway attachment is that the subnets will be in a different AZ.
For more information on the Firewall network solution, please refer to this link.