Private Mode (CoPilot)
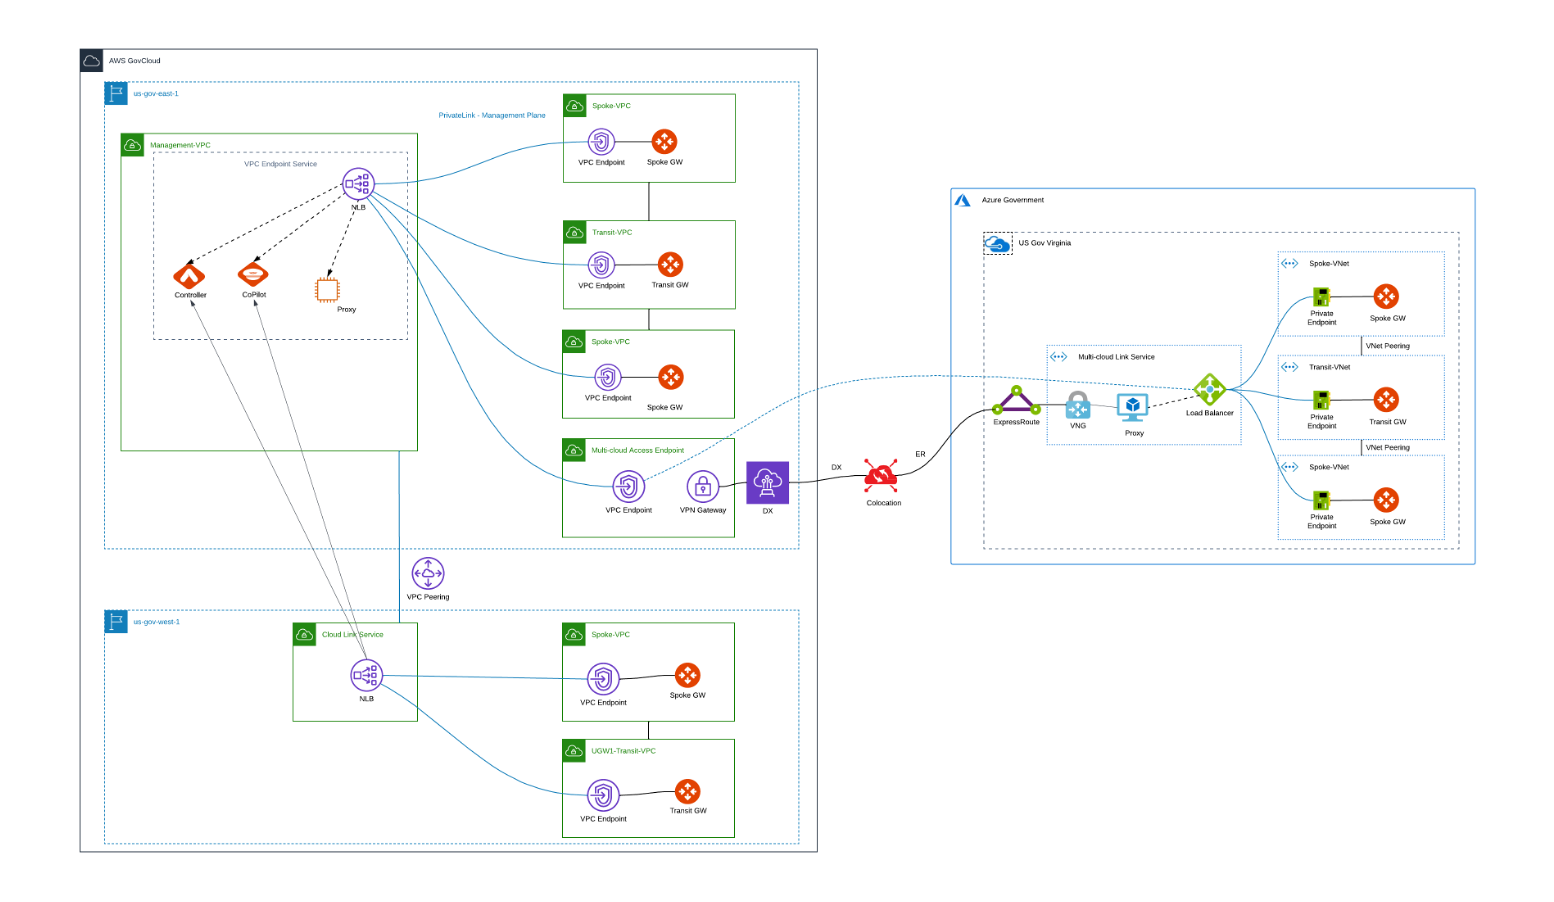
Private Mode is a global setting that offers secure orchestrated intra- and multicloud networking by removing the need for public IPs for Aviatrix gateways. Web proxies are used for the gateways to access the internet. All communication is done via native cloud constructs such as Load Balancers, Private Link Services, and peering connections, which act as the underlay for the Aviatrix encrypted Transit network.
After Private Mode is configured you can create gateways. Starting with Controller release 6.9, DNAT and SNAT are supported on gateways while using Private Mode.
Cloud environments (providers) that support this feature are AWS, AWS GovCloud, Azure, and Azure Government.
| Controller Location | Gateways |
|---|---|
AWS GovCloud |
AWS, Azure, Azure Government |
AWS |
AWS GovCloud, Azure, Azure Government |
Limitations
In Private Mode the following limitations exist:
-
Site2Cloud can only be created over a private network using a private IP (not possible over the internet)
-
Aviatrix TGW Orchestrator not available (AWS does not accept private IPs to create tunnels)
-
BGP over LAN not available
-
Controller Security tab: features on this tab not supported
-
High Performance Encryption (HPE) over the internet not supported
-
Egress for Transit FireNet not supported
-
Creation of VPN, Public Subnet Filtering Gateways not supported
-
Launching gateways in the same VPC/VNet as the Link Service VPC/VNet not supported
-
Distributed Cloud Firewall (DCF) not supported
-
Egress through Firewall: cannot enable internet-bound egress traffic for inspection
-
Software rollback to 6.7 not supported (since Private Mode did not exist prior to 6.8)
-
Cross-cloud Spoke-Transit peering is not supported with private IPs
Prerequisites
-
Configure the permissions for Private Mode and GWLB-Based FireNet. This is very important; you cannot deploy your Private Mode resources without these permissions. Please see sections 6 and 15 in the referenced document. These permissions are configured in your AWS console.
-
Upgrade to version 6.8 or later.
-
An Aviatrix Controller in AWS or AWS GovCloud. It is best to set up Private Mode from a new Controller that does not have any previously deployed gateways. Private Mode will not work if you already have public gateways deployed.
-
The Aviatrix Controller VPC requires space for N * /28 subnets for the deployment of the Link Services. (N = the number of Availability Zones in the given region).
-
For a multi-cloud Private Mode environment, it is best to create a dedicated VPC which will host the multi-cloud access VPC endpoint in the same region as the Link Service VPC for multi-cloud connectivity.
-
A version of CoPilot that supports Private Mode, if you want to send syslog or Netflow data to CoPilot from the gateways. This CoPilot instance must have outbound Internet access.
(AWS) For CoPilot ARM-based images, Private Mode is currently not supported. -
If you want to associate a CoPilot instance, it must be in the same VPC as the Controller.
-
If setting up Private Mode in a multi-cloud deployment, a private underlay between the CSPs must exist (Direct Connect for AWS or Express Route for Azure).
Preparing Your Private Mode Environment
If preparing a single cloud Private Mode environment, you:
-
Create Intra-Cloud Link Service in the selected AWS region that endpoints in the cloud can connect with
-
Configuring Proxies for CoPilot and Controller to send traffic safely to the Internet
-
Create gateways and select private subnets
If preparing a multicloud Private Mode environment, you:
-
Create Intra-Cloud Link Service as per above
-
Create multi-cloud access endpoints in a multi-cloud access VPC: this is the Azure network load balancer and Azure private underlay setup.
-
Configure Proxy Servers for CoPilot and Controller to send traffic safely to the Internet
-
Complete Azure Proxy Server configuration that attaches to the Link Service target
-
Create gateways and select private subnets
Enabling Private Mode
-
To enable Private Mode, in CoPilot navigate to Settings > Configuration > Private Mode.
-
On the Private Mode card, toggle Off to On.
| If you see a warning on the Configuration > Private Mode tab that your CoPilot proxy configuration does not match your Controller proxy configuration, you must enter the necessary information in the Proxy Servers card and click Save. |
After enabling Private Mode:
-
All gateways you create will use private IPs. You will not be able to create or deploy non-private gateways. A mixture of public and private IPs is not possible.
-
The existing eth0 private IP is used for the Controller.
Associating CoPilot Instance with Private Mode
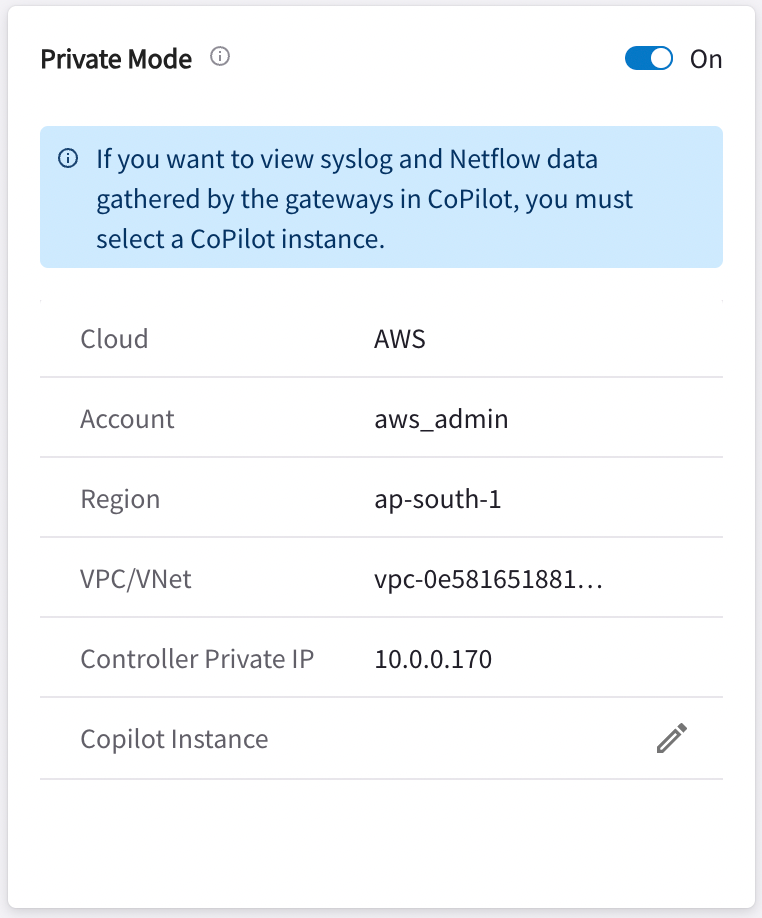
If you want to view syslog and Netflow data gathered by the gateways in CoPilot, you must select a CoPilot instance.
-
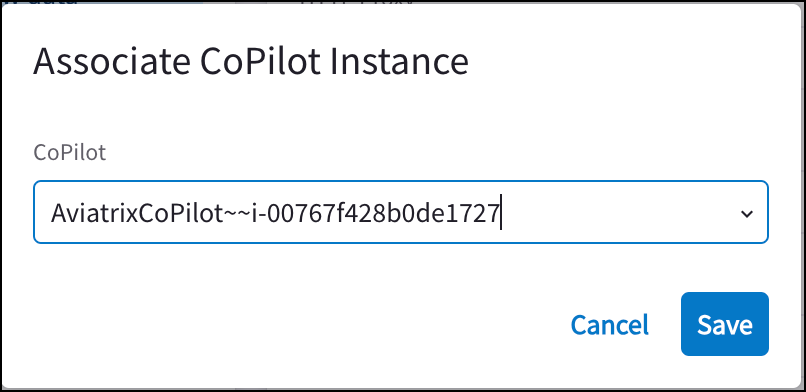
After enabling Private Mode, click the Edit icon
 on the Private Mode card.
 -
On the Associate CoPilot Instance dialog, select the CoPilot instance from the drop-down.
-
Click Save. A message displays indicating the CoPilot instance ID was updated successfully.
Creating Link Services
-
For a single cloud Private Mode environment, create an Intra-Cloud Link Service (AWS only).
-
For multicloud, create an Intra-Cloud Link Service and a Multicloud Link Service. Before you create the latter you should create your multi-cloud access endpoints.
Creating Intra-Cloud Link Service
Both a single and a multi-cloud Private Mode environment require the setup of an Intra-Cloud Link Service.
You need to add an Intra-Cloud Link Service that endpoints in that cloud can connect with. This also attaches the CoPilot instance (if configured). You can only create one Link Service per region (AWS and Azure).
The expected Link Service configuration for AWS/AWS GovCloud is having one Intra-Cloud Link Service in each region where you want to launch gateways. However, if you have two AWS/AWS GovCloud accounts, you can have one Intra-Cloud Link Service used by both accounts in the same region, or you can have an Intra-Cloud Link Service in each account in the same region.
-
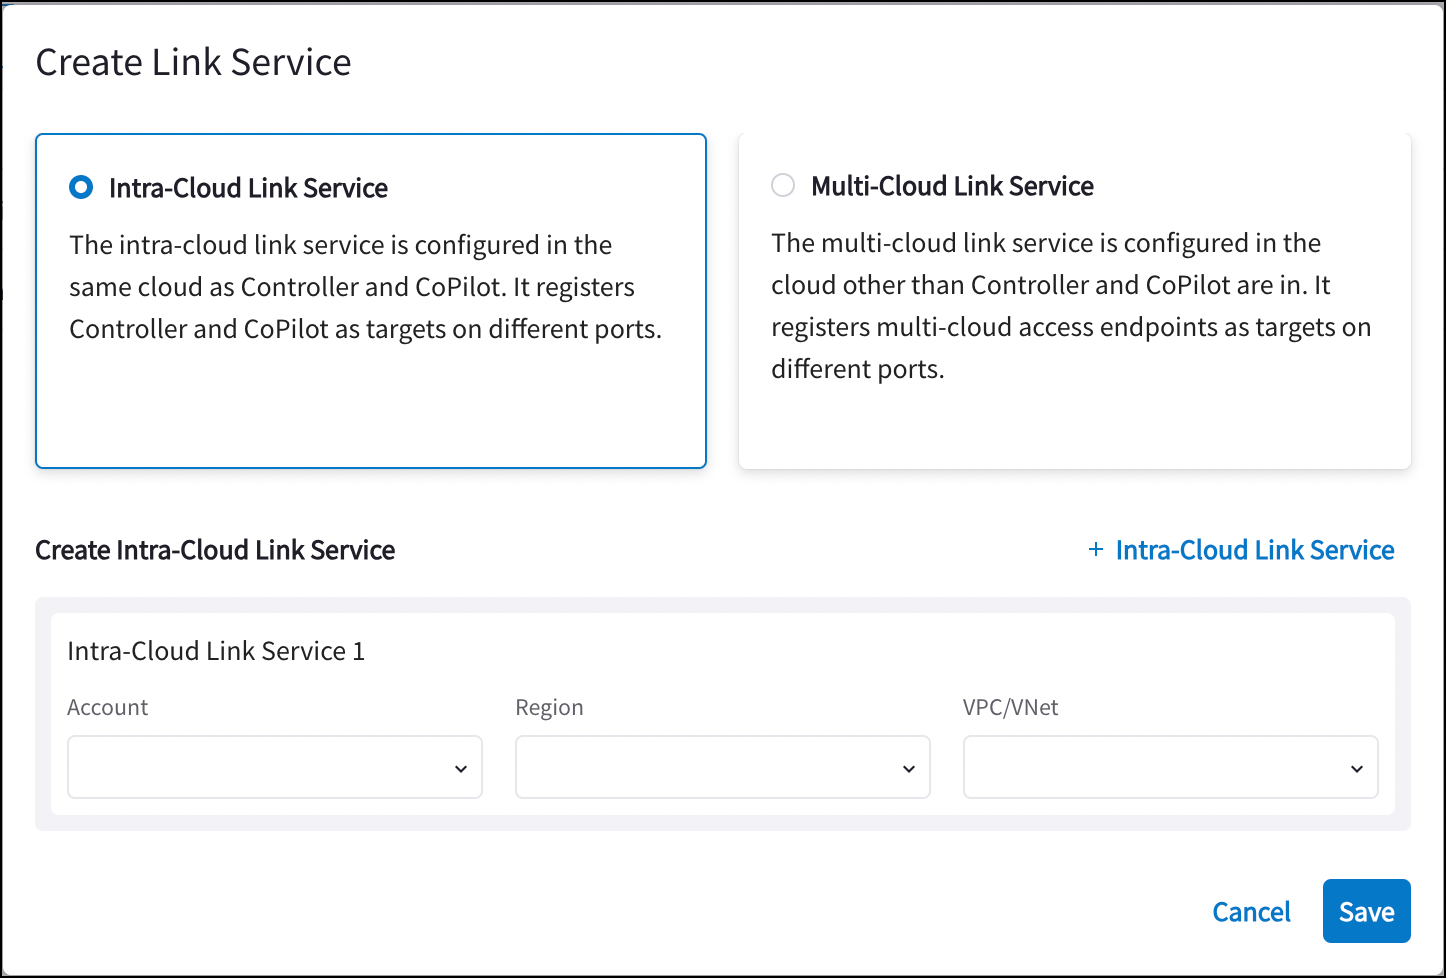
On the Private Mode > Link Service tab, click +Link Service.
-
On the Create Link Service dialog, click Intra-Cloud Link Service.
-
Select the AWS Account, Region, and VPC/VNet for the Intra-Cloud Link Service.
-
If needed, add other Intra-Cloud Links here for gateways in other AWS regions.
-
Click Save.
|
You can view the private endpoints for Link Services after they are created (click |
Creating Multi-Cloud Link Service (multi-cloud Private Mode only)
You should do this after creating your multi-cloud access endpoints in a multi-cloud access VPC.
The Multi-Cloud Link Service functions as a Load Balancer. When you update your Azure proxy information, you select the Multi-Cloud Link Service from the Load Balancer field.
|
In Azure, you only need to create multiple Link Services if desired for scalability. You must have already set up the private underlay (cross-cloud link, such as Direct Connect or ExpressRoute) that will connect the two clouds. |
-
Navigate to Private Mode > Link Service tab and click +Link Service.
-
On the Create Link Service dialog, click Multicloud Link Service.

-
Select the Cloud, Account, Region, VPC/VNet, and Multicloud Access Endpoint VPC/VNet.
-
Add another Multicloud Link Service if desired, for scalability.
-
You can create multicloud access endpoints directly from this dialog if needed (from the Multicloud Access Endpoint drop-down menu).

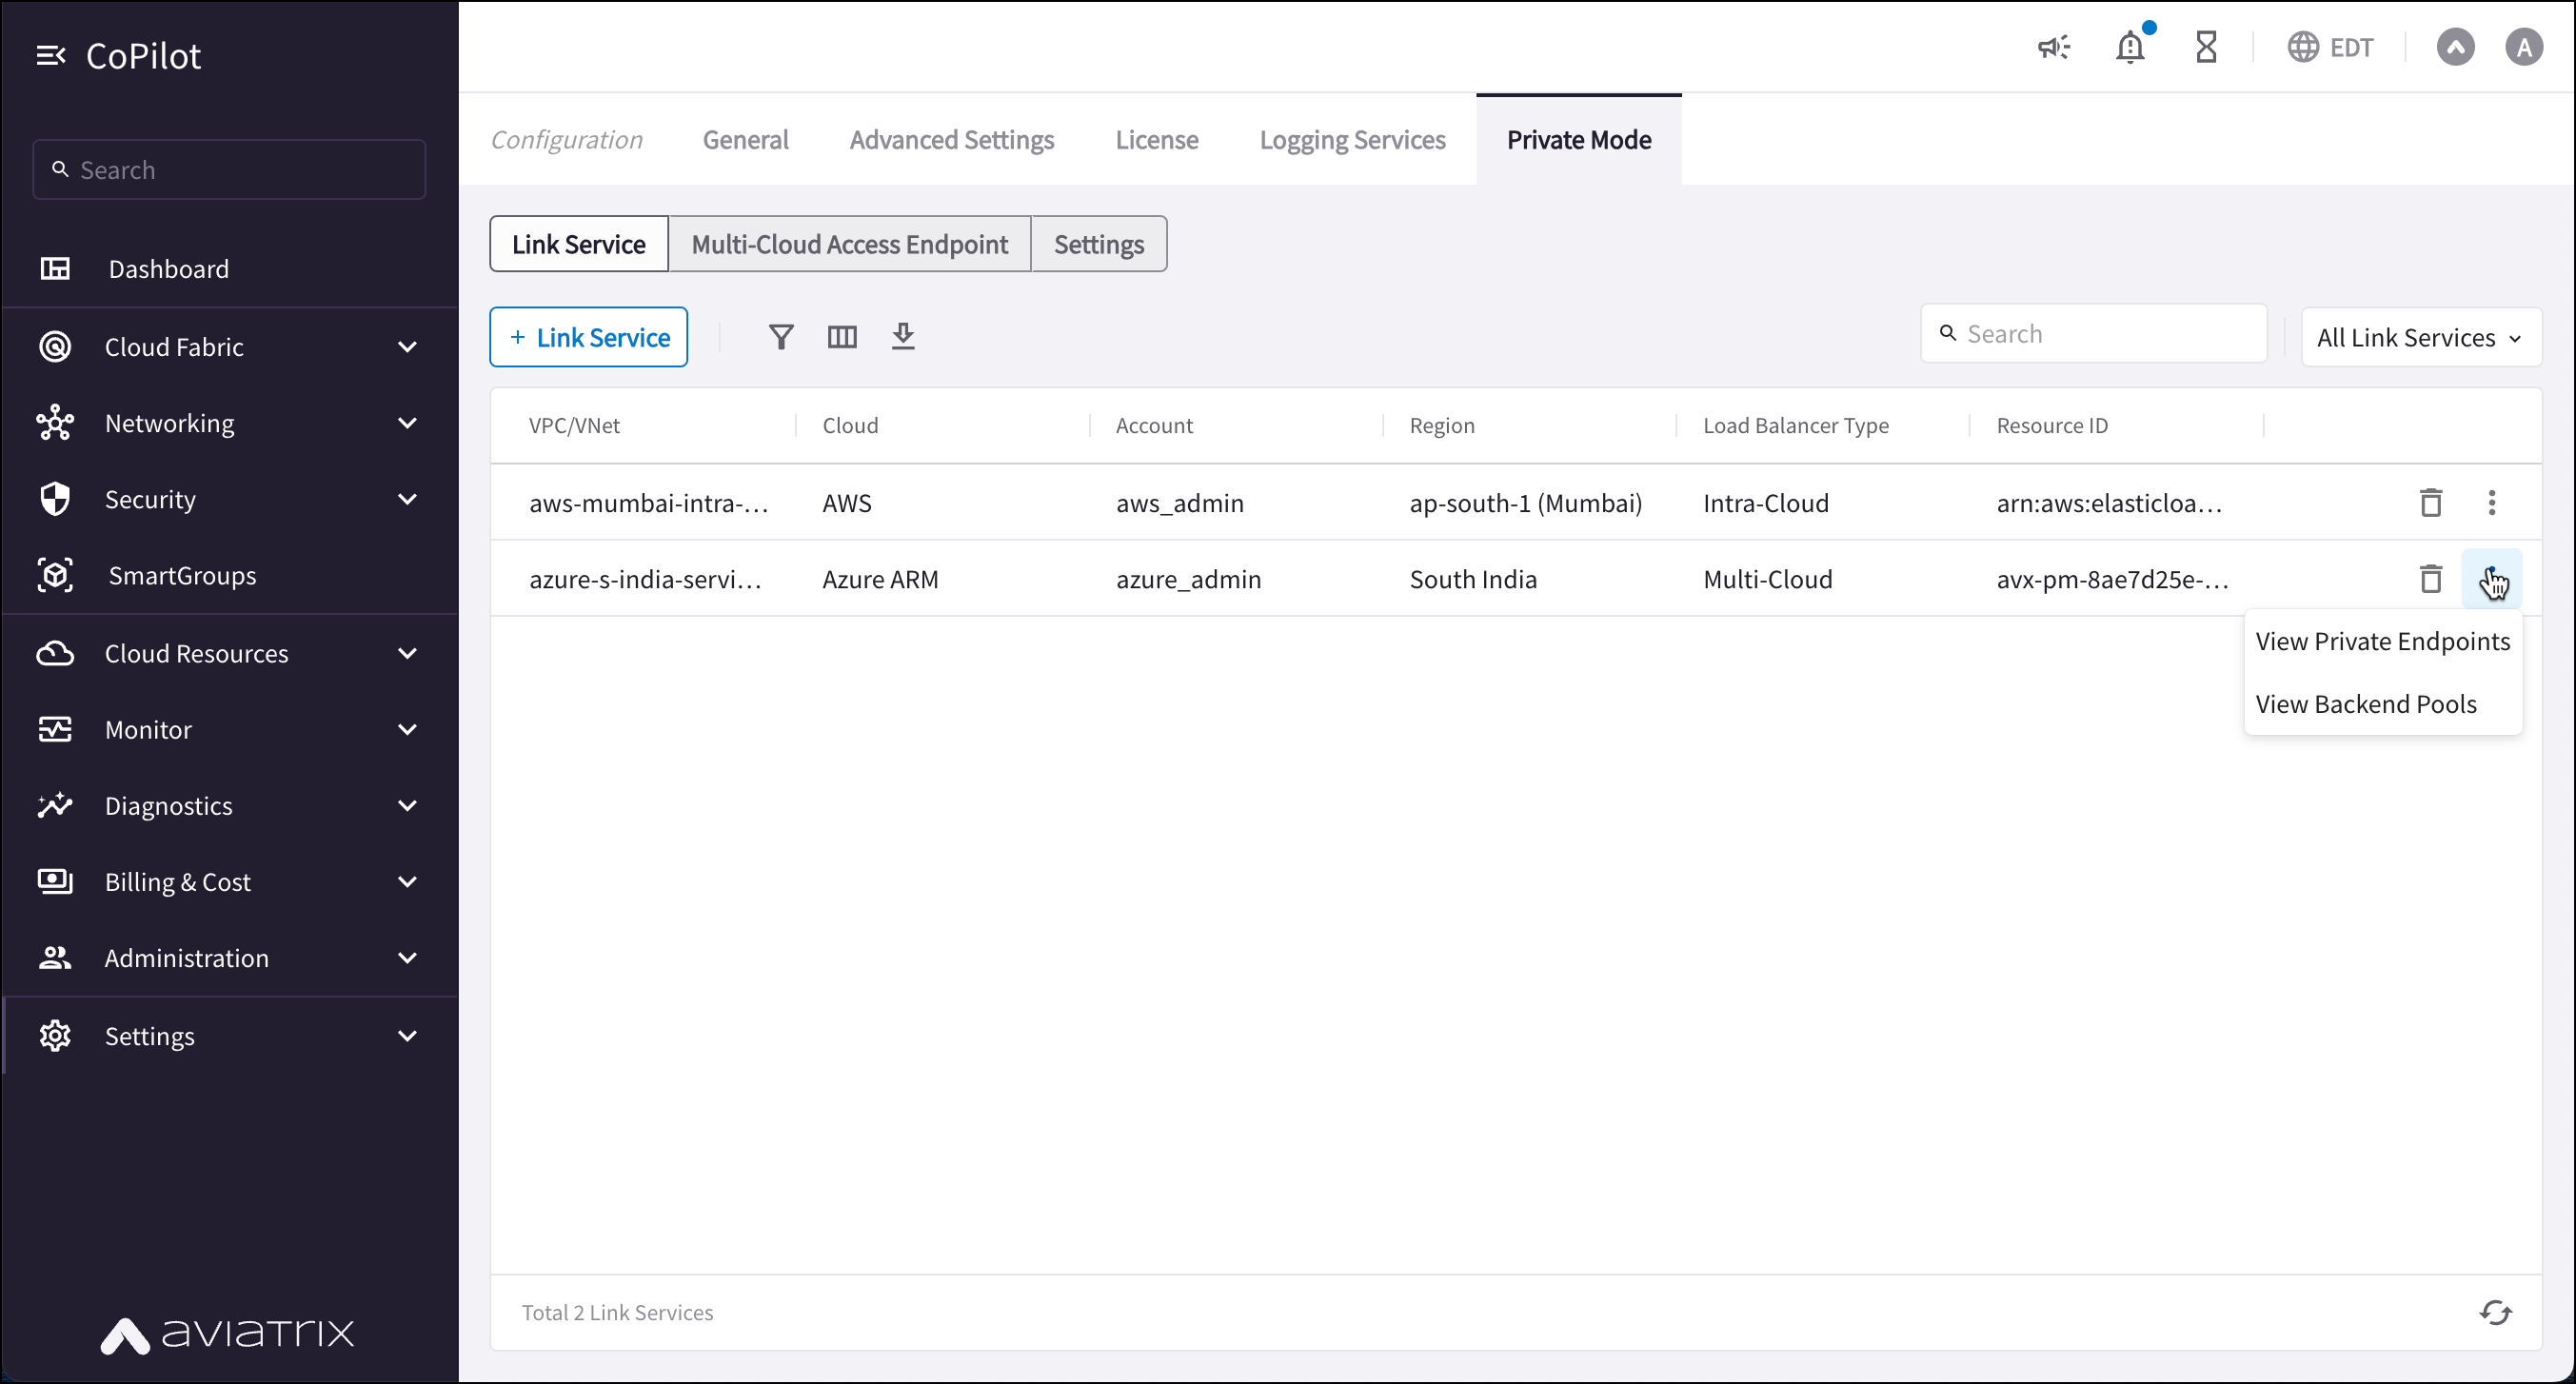
Viewing Private Endpoints and Backend Pools
You can right-click the vertical ellipsis ![]() in a Link Service row to view details on the following:
in a Link Service row to view details on the following:
-
Private Endpoints: view details on the standalone NICs that are securely connected to the Load Balancers, allowing traffic to flow to the front end.
-
Backend Pools: view details on the resources that hold the targets of the Load Balancer.
Creating Multi-Cloud Access Endpoints (multi-cloud Private Mode only)
In a multi-cloud Private Mode environment, you must create endpoints in a multi-cloud access VPC that is attached to the Intra-Cloud Link Service. These endpoints provide connectivity between the multi-cloud network and the Intra-Cloud Link service.
You should do this before creating a Multi-Cloud Link Service.
-
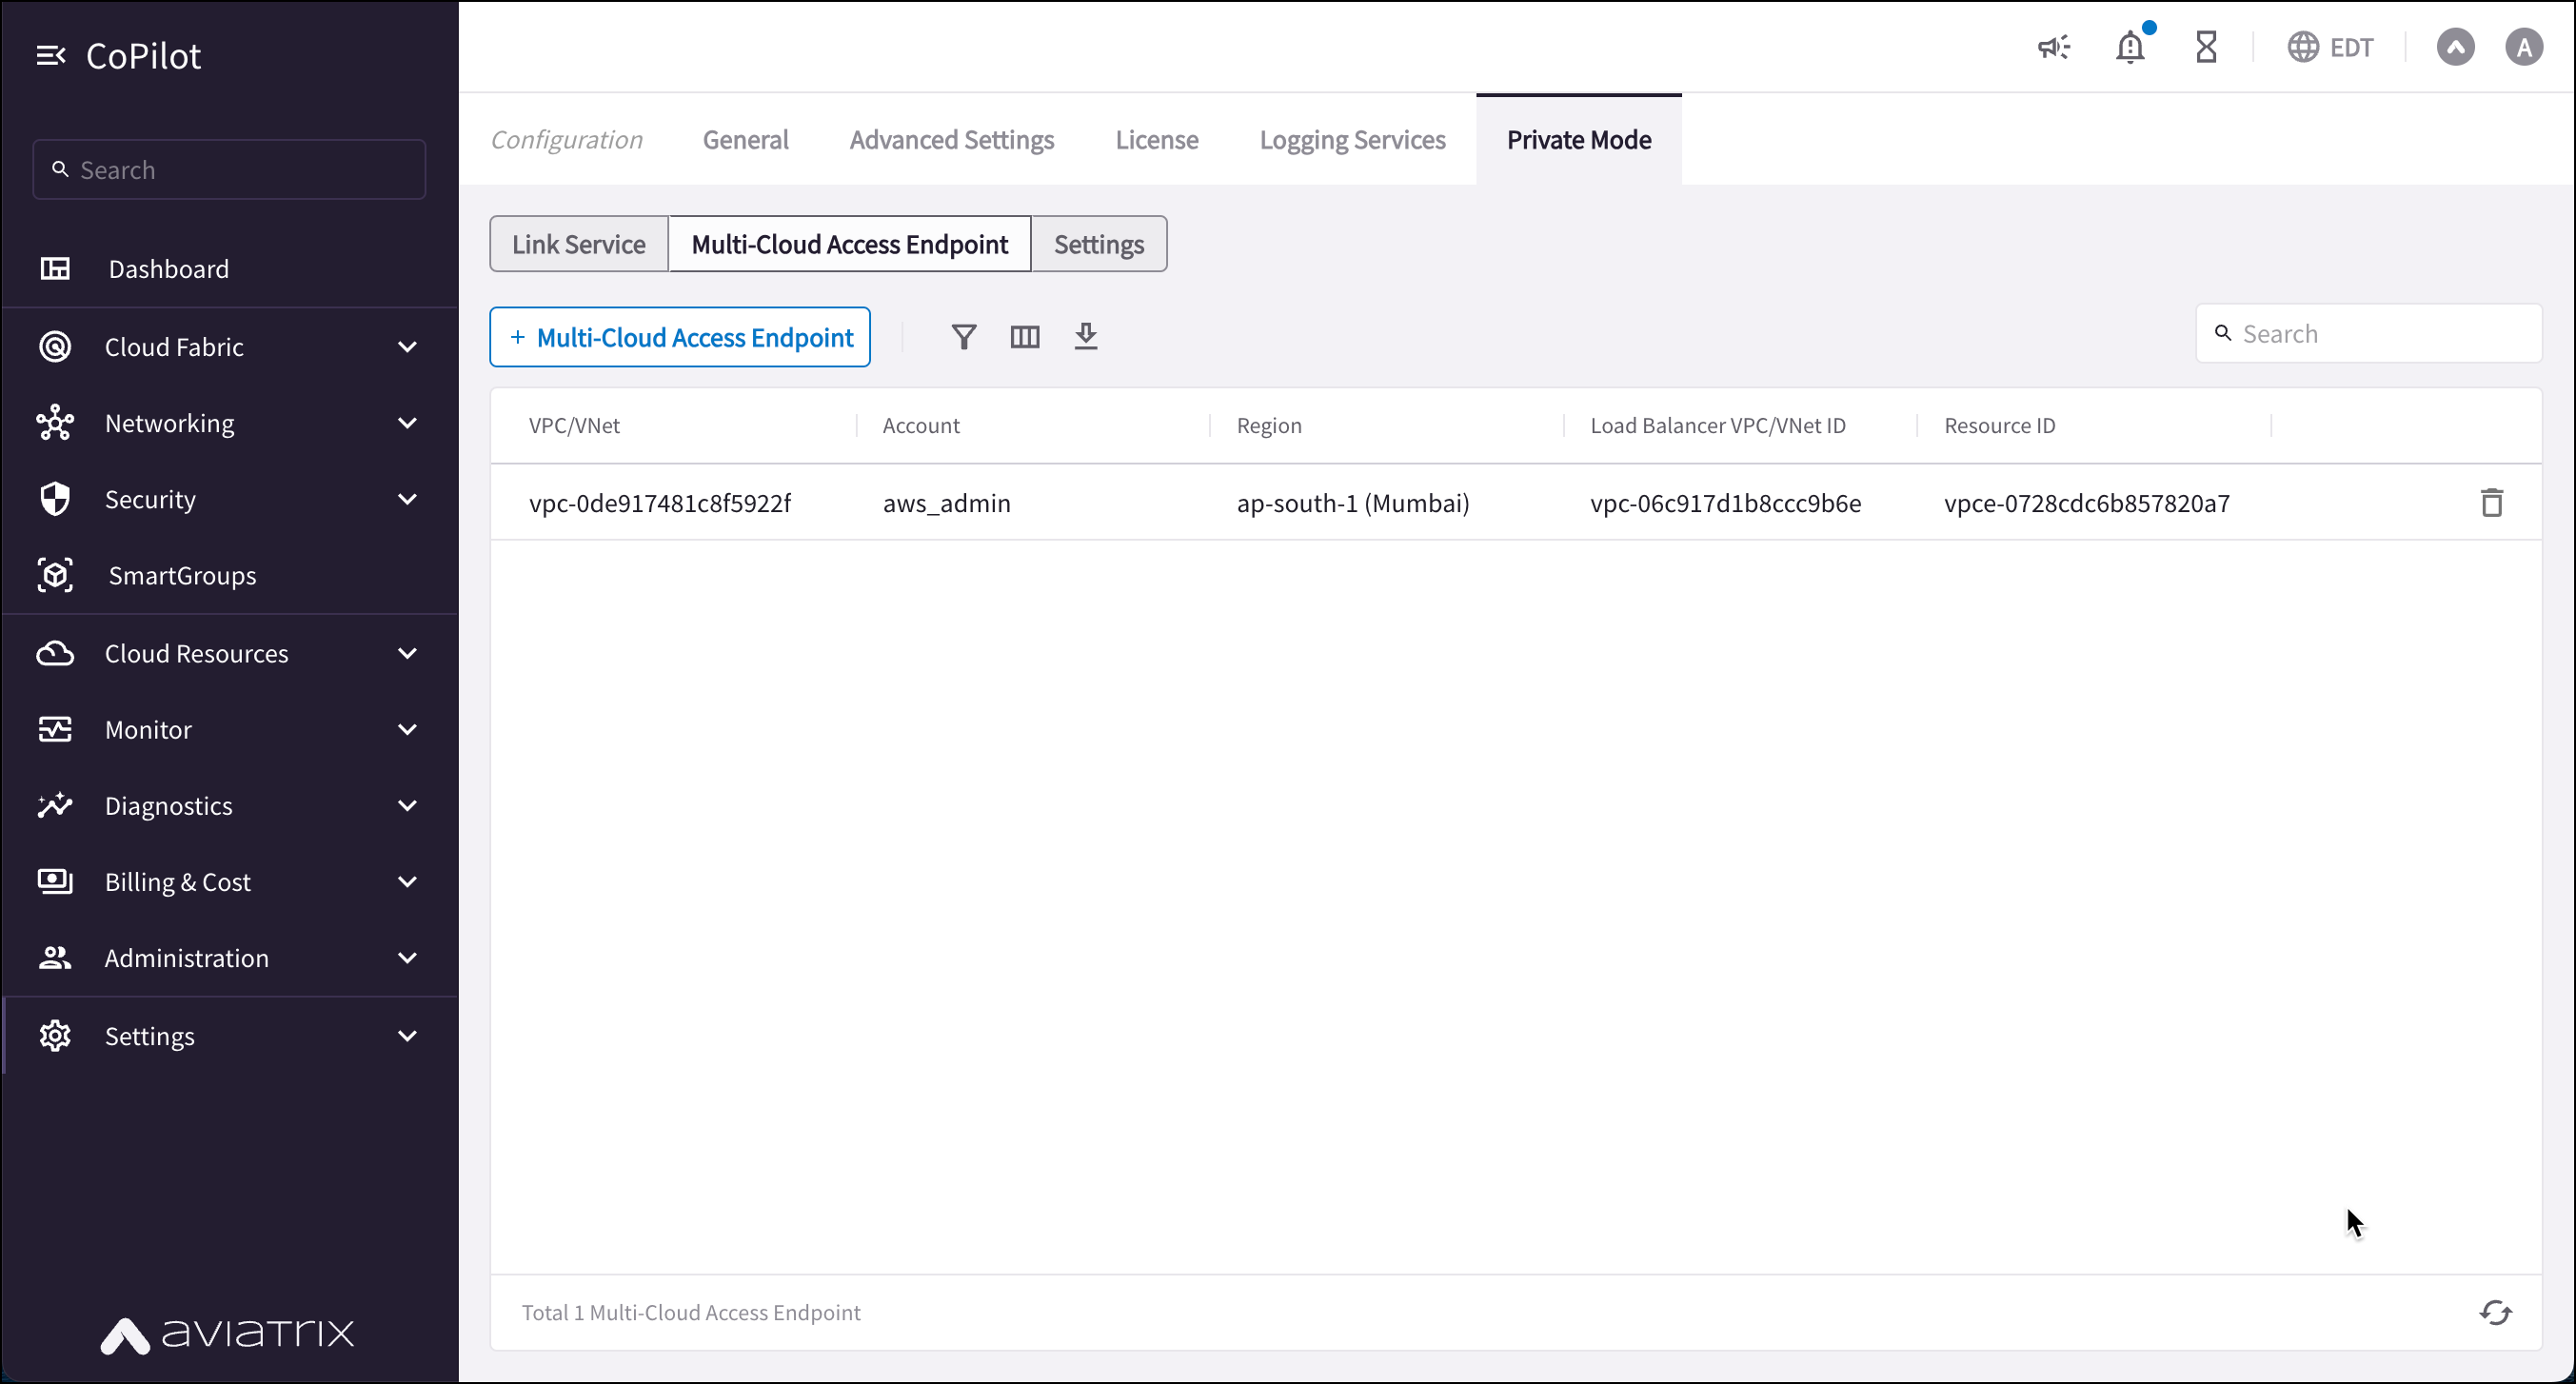
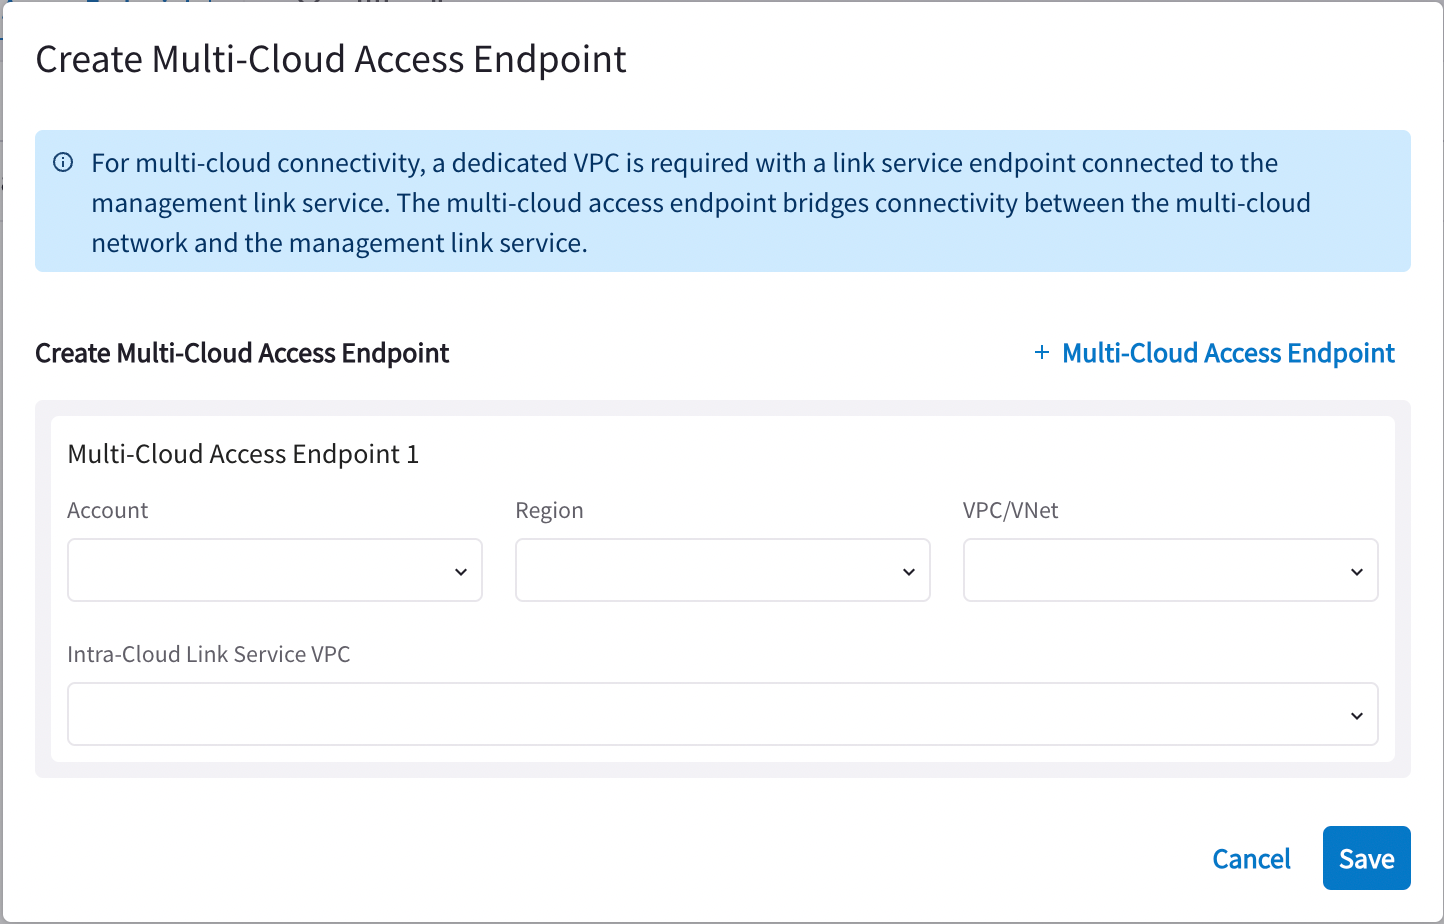
On the Private Mode > Multi-Cloud Access Endpoint tab, click +Multi-Cloud Access Endpoint.
-
On the Create Multi-Cloud Access Endpoint dialog, enter the Account, Region, VPC/VNet of the multi-cloud access VPC/VNet, and the Intra-Cloud Link Service VPC to connect to.
-
Click +Multi-Cloud Access Endpoint in the dialog if you need to create additional endpoints.
-
Click Save.
Configuring Proxies
CoPilot Proxy Servers
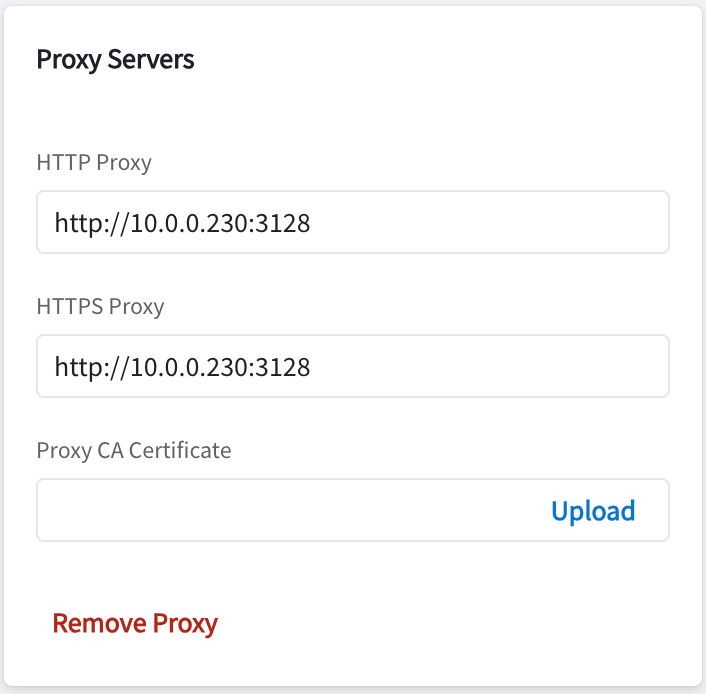
Use the CoPilot > Settings > Configuration > Private Mode > Settings page for CoPilot proxy server management. You configure the HTTP or HTTPS proxy fields when you want to run CoPilot only on internal IPs, and use a proxy to pass updates back to those IPs.
In Private Mode, you configure these fields so that all internet-bound HTTP and HTTPS traffic initiated by CoPilot/Controller is forwarded to the Proxy Server for inspection before being allowed to enter the Internet.
| If you are configuring proxy servers for Private Mode, this is only supported for AWS-based Controllers. |
| Field | Description |
|---|---|
HTTP Proxy |
Proxy Server IP address for HTTP traffic. |
HTTPS Proxy |
Proxy Server IP address for HTTPS traffic (usually the same as the above). |
Proxy CA Certificate (optional) |
When a CA certificate is uploaded, the Controller and gateway expect that the Proxy Server will terminate a HTTPS request initiated by them and will initiate a new HTTPS request on behalf of them. When this option is not used, the proxy server simply forwards HTTP/HTTPS traffic. |
| If your proxy configuration does not match your environment, you will not be able to access the upgrade server, and other features (such as geolocation) will not be able to update their data sources. |
Updating the Azure Proxy
You only need to update the Azure proxy if you are connecting Azure/Azure Government to your existing AWS/AWS GovCloud.
-
In your Azure cloud account, create the Azure-related proxy (Azure HTTPS and proxy must be in the same VNet as the Link Service it is associated with).
For the TCP proxy, the ports should forward requests for ports 443, 31283 and 5000 to the DNS entry for the multi-cloud access endpoint that the proxy is communicating with on the Controller cloud. The DNS entry is located under Settings > Private Mode > List > Multi-Cloud Access Endpoint List.
If your proxy has a public IP, make sure the SKU is Standard and not Basic.
-
In your Azure cloud account, launch your preferred TCP proxies. These must be in the same VM as each other.
-
In CoPilot, navigate to Settings > Configuration > Private Mode.
-
Select the Settings sub-tab.
-
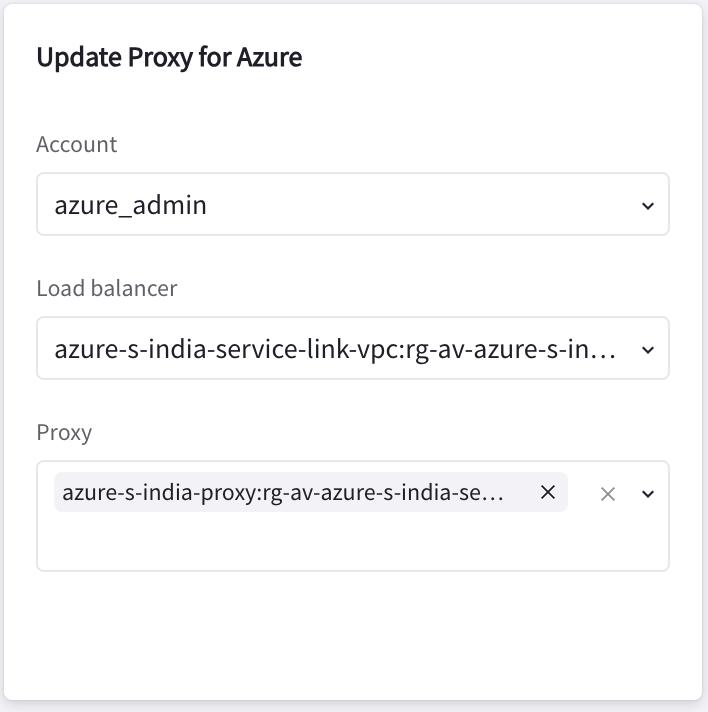
On the Update Proxy for Azure card:
-
Select the Azure account where you created the proxy.
-
Select the Load Balancer (this is the Multi-Cloud Link Service you created above).
-
Select the appropriate proxy. This may take a few minutes. You should see a message that multi-cloud proxies were successfully updated in the Azure VNet.
-
Creating Gateways
After completing your single or multi-cloud Private Mode setup, you can launch Spoke or Transit gateways. These gateways will not use public IPs.
| If you create both an AWS and an Azure Transit gateway in your multi-cloud Private Mode setup, and both gateways have HPE enabled, you must add a new Transit peering in Aviatrix Controller under Multi-Cloud Transit > Transit Peering that connects these two gateways. The Peering over Private Networks checkbox must be selected. |
-
In CoPilot, navigate to Cloud Fabric > Gateways. On the Transit Gateways and Spoke Gateways tabs, enter the information required to launch your gateways.
Field Description Name
Enter a name for the Private Mode Transit or Spoke gateway.
Cloud
AWS or Azure (depends on if you are using multi-cloud Private Mode)
Account
Cloud Account Name
Region
Region in which to create the gateway.
VPC/VNet
VPC/VNet where the Transit or Spoke gateway will be deployed.
Instance Size
Minimum sizes:
AWS: c5.xlarge
Azure: Standard_B2ms
High Performance Encryption
Enable for higher throughput.
Cloud Link Service VPC/VNet
Select the Cloud Link Service in the same cloud; this is where the gateway is created.
Peer to Transit Gateways (optional) (Transit gateway only)
Peer with another Private Mode Transit gateway.
Attach to Transit gateway (optional) (Spoke gateway only)
Attach this Spoke gateway to a Private Mode Transit gateway.
BGP (Spoke gateway only)
On/Off
Enable BGP on the Spoke gateway.
Instances
Attach to Private Subnet
-
Click Save.
You can run gateway diagnostics to check that traffic is flowing.
Deleting and Disabling Private Mode Elements
Deleting Multi-Cloud Access VPC
You can remove the multi-cloud access endpoint by navigating to the Private Mode > Link Service tab and clicking the Delete icon next to the endpoint. If you have dependent resources you must resolve the dependencies first.
Deleting Link Service
You can remove a link service by navigating to the Private Mode > Link Service tab and clicking the Delete icon next to the endpoint.
Disabling Private Mode
If you want to disable Private Mode, you must:
-
Delete all gateways and Private Mode resources. If you do not delete gateways or resources first, you will receive errors when you attempt to disable Private Mode.
-
On the Settings > Configuration > Private Mode tab, clear the HTTP Proxy field on the Proxy Servers card.
-
Click Remove Proxy on the same card.
-
Click Save.
-
On the Settings > Configuration > Private Mode tab, slide the toggle on the Private Mode card to Off.