AWS Ingress Firewall Setup Solution
AWS Ingress Firewall Traffic Inspection
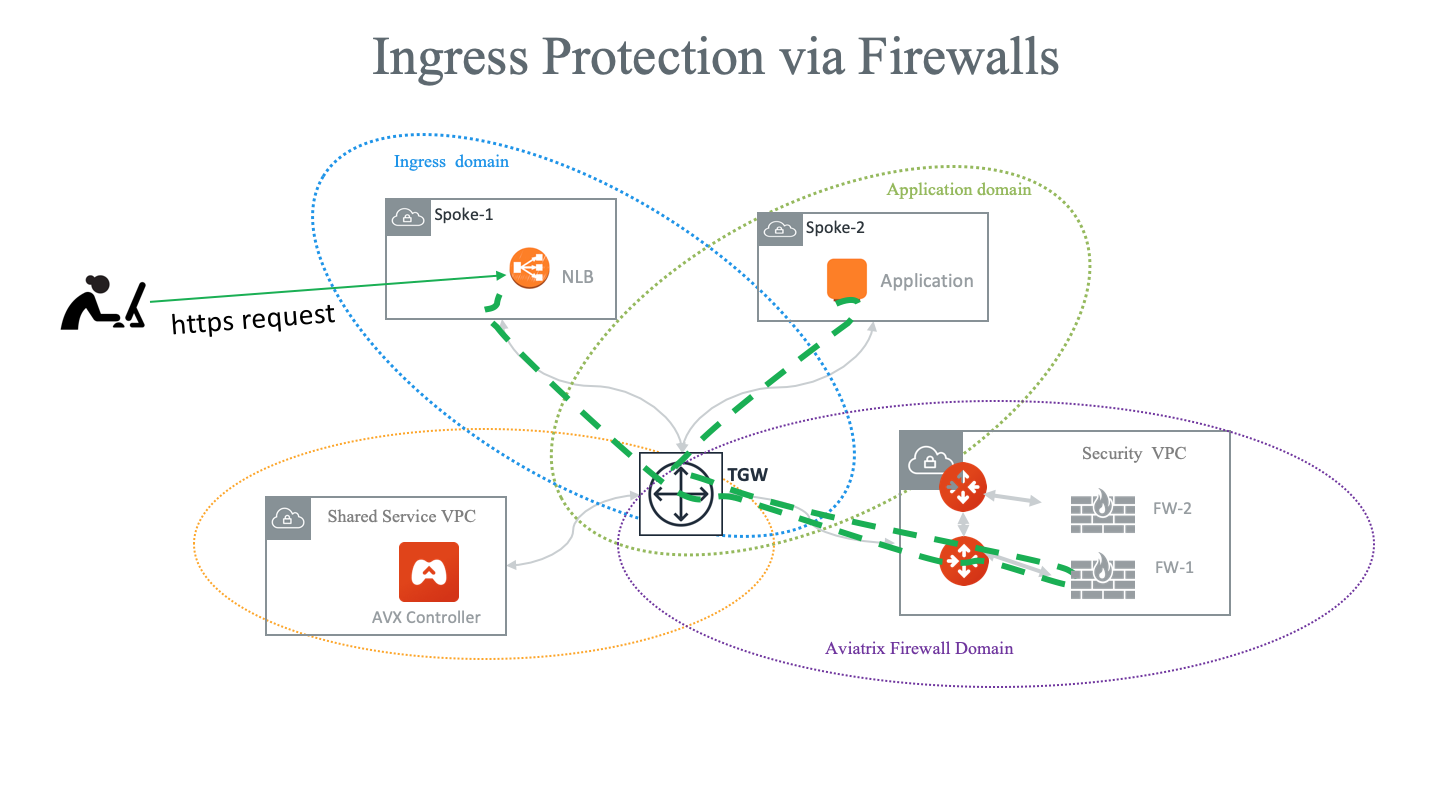
This document illustrates a simple architecture for Ingress traffic inspection firewall that leverages AWS Load Balancers and Aviatrix TGW Orchestrator. The solution also allows you to view the client IP address.
The deployment is shown in the below diagram.

The key idea is that from the FireNet point of view, the ingress inspection is simply a VPC-to-VPC traffic inspection. This is accomplished by:
-
Placing an Internet-facing AWS ALB/NLB in a spoke VPC in a separate domain (in the diagram, this domain is called Ingress domain) from the domains where applications reside (Application domain).
-
Building a connection policy to connect the Ingress domain with the Application domain.
-
Connecting the Application domain traffic that requires inspection with the Aviatrix Firewall Domain.
In this unified architecture, firewalls can be used for Ingress, Egress, North-South and VPC-to-VPC filtering. The solution does not need AWS ALB/NLB to directly attach to firewall instances which then requires firewall instances to source NAT the incoming traffic from the Internet. Firewall instances can scale out as applications scale for all traffic types.
|
This architecture works for both AWS Network Load Balancer and AWS ALB. NLB is used for illustration purposes. You can create multiple load balancers in the Ingress VPC. |
Ingress Firewall Example Prerequisite Setup
-
Follow Aviatrix Transit FireNet workflow to launch FireNet gateways and firewall instances.
-
Follow the Aviatrix TGW Orchestrator workflow to:
-
Create an Ingress domain (this domain can be named something else and can be an existing domain, just make sure it is in a different domain than Application domain).
-
Build Connection policy between the Ingress domain and the Application domain.
-
Build Connection policy between Application domain and Firewall domain so that traffic in and out of the domain is inspected.
-
Attach the Application domain VPC (Spoke-2 in the diagram) to the TGW.
-
Attach the Ingress domain VPC (Spoke-1 in the diagram) to the TGW.
-
Create AWS Network Load Balancer
In the AWS console, on Ingress domain VPC (Spoke-1), create an AWS Network Load Balancer (NLB) and make sure you select the following.
-
Under Basic configuration, select Internet-facing.
-
On the Target groups page under Basic configuration, select the IP addresses target type.
Verifying the AWS Ingress Firewall Setup Solution
-
From the AWS Console, make sure NLB target group is in healthy state.
-
Run a https request on the NLB DNS name.
-
The application can also reach the Internet through firewall instances if you enable Egress on the FireNet.
Capturing Client IP
Using AWS Application Load Balancer
AWS ALB automatically preserves client IP addresses. You can find the client IP address in the HTTP header field "X-Forwarded-For".
To view the client IP address in the access log, follow the instructions in How to save client IP in access logs.
Using AWS Network Load Balancer
When NLB uses IP addresses as the target group, the client IP address of the packet reaching to the application is one of the NLB node private IP address. If you want to obtain the original client IP address, you need to enable the function proxy_protocol_v2.enabled under Target Group Attributes on the NLB. Review the section "Proxy Protocol" in the above AWS document or follow the steps below to enable this function on NLB using the AWS console.
-
Open the Amazon EC2 console at https://console.aws.amazon.com/ec2/.
-
On the navigation pane, under Load Balancing, select Target Groups.
-
Select the target group.
-
Click the Attributes tab.
-
Click Edit.
-
Enable the Proxy protocol v2 toggle and click Save.
Also, you need to configure/support the Proxy Protocol feature on your web server to retrieve the client original IP address. Please follow the steps below which reflect the AWS document How do I capture client IP addresses in the web server logs behind an ELB?.
-
In Apache/2.4.41 (Ubuntu) (for example), find and open the Apache configuration file.
/etc/apache2/apache2.conf
-
Edit/add remoteip module configuration into Apache configuration file as below:
LoadModule remoteip_module /usr/lib/apache2/modules/mod_remoteip.so
-
Confirm that the mod_remoteip module loads by issuing the command as below:
$sudo apachectl -t -D DUMP_MODULES | grep -i remoteip
-
Review the output and verify that it contains a line similar to:
remoteip_module (shared)
If you are not able to view the prompt message, make sure that your Apache version supports that module or attempt to load that module into the Apache configuration. -
Configure the following line in your Apache configuration file (use /etc/apache2/sites-available/000-default.conf as an example) to enable Proxy Protocol support.
RemoteIPProxyProtocol On
-
To view client IP address in the access log, edit/add commands into the LogFormat section as below:
LogFormat "%h %p %a %{remote}p %l %u %t \"%r\" %>s %b \"%{Referer}i\" \"%{User-Agent}i\"" combined -
Save the changes.
-
Reload the Apache service by issuing the command:
#systemctl reload apache2
-
Open the Apache access logs on your Apache server.
-
Verify that client IP addresses are now recorded under the X-Forwarded-For header.
|