

Overview of Gateway Logging
The Aviatrix managed gateways can be configured to forward their logs to a syslog log management system. All managed gateways will forward the logs directly to the logging server. Therefore, each managed gateway needs network connectivity to the logging server. Aviatrix supports using remote syslog (rsyslog) for forwarding log messages. Remote syslog as the log forwarder is both efficient and the industry standard. Most log collectors support rsyslog as a log forwarder. In the Aviatrix Platform-as-a-Service (PaaS) console, you can enable log data collection from Aviatrix gateways to the following log server: In addition to standard information on syslog, Aviatrix logs also provide informational insights into security rule violation statistics, gateway stats, and FQDN filter violations. Your log management system can sift through the Aviatrix logs to get meaningful trend charts that can help monitor aspects of your network. See Aviatrix Log Formats for a list of useful Aviatrix logs that can be parsed on the log management system to display relevant analytics of data collected from Aviatrix gateways. The process the Aviatrix gateways use for exporting their log files is as follows:- Aviatrix gateways stream the log lines being written to the syslog and auth.log files.
- When you use the default rsyslog server configuration, the logs streamed from the gateways have multiple files.
- Each file is named with the application that generated the log. For example, all logs generated by the avx-gw-state-sync application are re-directed to a file named avx-gw-state-sync” on the log server.
Log Format
The log format is shown below. Your syslog collectors and any related automation for ingesting logs must accept the log format.Mar 23 19:17:50 GW-gg-aws-usw2-s127-35.162.124.66
The Aviatrix Remote Syslog Forwarder
If you want to forward syslog data collected on Aviatrix gateways, the Aviatrix Platform-as-a-Service (PaaS) console offers a remote syslog forwarder for sending syslog data from Aviatrix gateways to your designated remote syslog server. You can configure the Aviatrix Remote Syslog forwarder in Settings > Logging Services > Remote Syslog. Before configuring the Aviatrix Remote Syslog forwarder, collect the following information:- FQDN or IP address of the remote syslog server
- Port number and protocol type of the listening port of the remote syslog server
- Certificate Authority (CA) certificate for the server
- Public client certificate signed by the same CA
- Private client key that pairs with the public certificate
Syslog Profiles
You configure profiles for remote syslog to define the remote server where logs are sent, the protocol and port for access, certificates (optional), and from which VPCs or VNets to collect logs. A total of 9 profiles are supported for remote syslog. Newly deployed gateways are added to a profile if it is the only profile enabled. If more than one profile is enabled, the newly deployed gateway will not be added to any profile. You can use the advanced options in the logging “Edit Options” window to edit the exclude and include list. Configure the following:Configure Remote Syslog
- Go to Settings > Logging Services.
- Under Remote Syslog, click + Profile.
-
Configure the following:
- Click Enable. The agent details display on the Logging Services page.
Configure Remote Syslog on the Remote Syslog Server
Configure the remote server to receive data from Aviatrix Platform-as-a-Service (PaaS). On the remote syslog (rsyslog) server:- Install rsyslog and rsyslog-gnutls packages.
-
Create a new configuration file in /etc/rsyslog.d to enable the TLS
connection.
The file should contain content similar to what is shown in the example
below, depending on your rsyslog version. Make sure key paths are readable by
the syslog user.
Remote Syslog version 8 or later:
Remote Syslog version 7 or earlier:
- Make sure the output directory /var/log is writable by rsyslog user/daemon.
- Restart rsyslog service and verify that the port is listening and there are no errors in /var/log/syslog.
- Confirm the port is allowed in the security group/firewall for incoming traffic.
- Go to the /var/log/aviatrix directory.
-
Find the directory of the desired gateway.
- The gateway directory name is in a format of GW-gateway_name-public_IP_of_gateway
-
Each gateway directory should have:
- auth.log
- syslog
Related Links for Log Collectors
Aviatrix supports using Remote Syslog (rsyslog) for forwarding log messages. Most log collectors support rsyslog as a log forwarder. The following are links related to log collectors and rsyslog:- Sumo document about using rsyslog
- Splunk document about creating a listener
- Logstash document about creating a TCP listener
Edit or Disable Remote Syslog
You can edit an existing profile. You can also disable a profile. When a profile is disabled, the configuration is deleted and no longer available.- Go to Settings > Logging Services.
- Under Remote Syslog, click Edit Profile.
- If there is more than one profile, select the profile you want to edit.
- Do one of the following:
- Make the desired updates and click Save.
- Click Disable and confirm disabling the profile. The profile is deleted and no longer available.
The Aviatrix Datadog Agent
If you use Datadog, the Aviatrix Platform-as-a-Service (PaaS) console offers a Datadog agent for sending system metrics from Aviatrix gateways to your configured Datadog instance. You can configure the Aviatrix Datadog agent in Settings > Logging Services > Datadog Agent. Before configuring the Aviatrix Datadog agent, collect the following information:- Datadog API key
- Datadog site you want to send to
- If only specific VPCs or VNets should forward logs to Datadog, have their names available
Configure the Aviatrix Datadog Agent
If you use Datadog, you can configure the Aviatrix Remote Syslog forwarder to send syslog data from Aviatrix gateways to your configured Datadog instance.- In Settings > Logging Services > Datadog Agent, click Enable.
-
Configure the following:
- Click Enable. The agent details display on the Logging Services page.
Edit or Disable the Datadog Agent
You can edit an existing agent configuration. You can also disable a logging agent. When an agent is disabled, the configuration is deleted and no longer available.- Go to Settings > Logging Services.
- Under Datadog Agent, click Edit.
-
Do one of the following:
- Make the desired updates and click Save.
- Click Disable and confirm disabling the agent. The agent configuration is deleted.
- Click Save. The agent details display on the Logging Services page.
The Aviatrix CloudWatch Agent
If you use CloudWatch, the Aviatrix Platform-as-a-Service (PaaS) console offers a CloudWatch agent for sending syslog from Aviatrix gateways to your configured AWS CloudWatch instance.Only gateways on AWS cloud accounts onboarded using CloudFormation are supported.AWS gateways created from an access account with an AWS secret key and access
key are not supported.
- Assign the required roles and policies in AWS
- Enable the CloudWatch agent in Aviatrix at Settings > Logging Services > CloudWatch Agent
Assign Roles and Policies to CloudWatch
You can configure Aviatrix gateways in different AWS accounts to send and update logs to the collector’s AWS account. Follow the instructions below to set up an IAM role and policies on the collector’s AWS account.Logs from CloudWatch can be exported to S3 buckets. See the AWS
Documentation.
-
Log in to the collector’s AWS account, go to Identity and Access Management
(IAM) > Roles and click Create role.
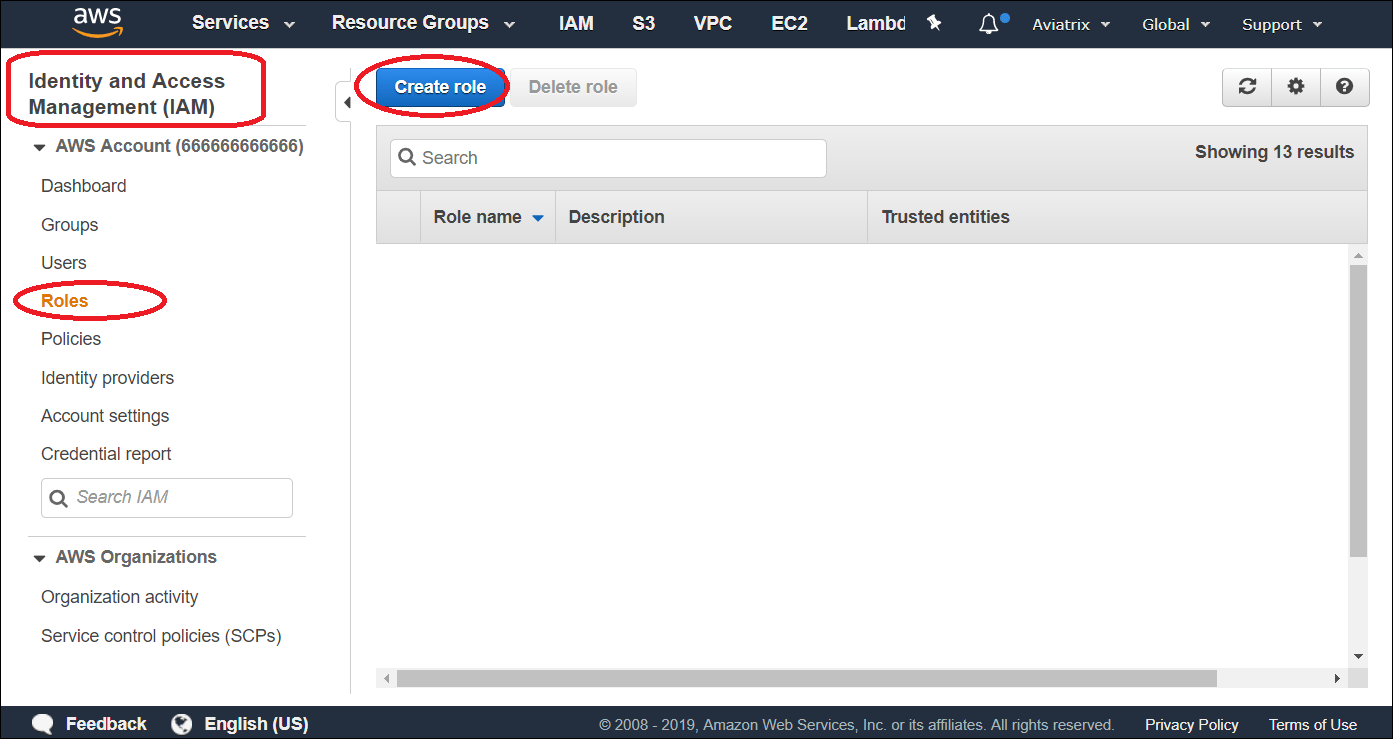
- Under Trusted entity type, select AWS account.
- Under An AWS account, select your current account or a new account and click Next.
- Under Permissions policies, find and select the policy CloudWatchAgentServerPolicy and click Next.
-
Under Role details, enter the Role name
aviatrix-role-cloudwatch. Do not change the role name. -
Under Select trusted entities, click Edit and add trust relationships for
all Aviatrix gateway AWS accounts.
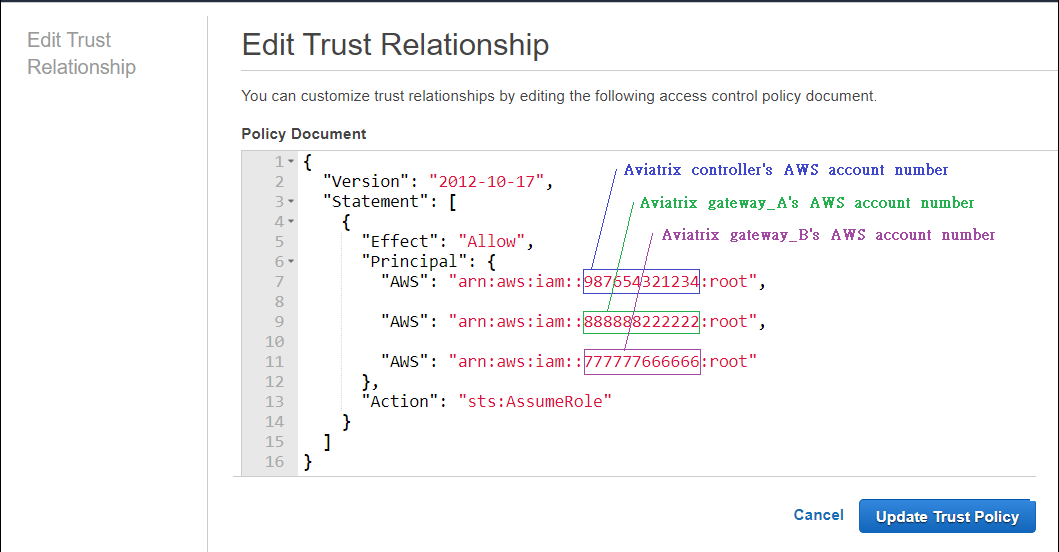
- Click Create role.
- On the Roles page, click the name of the new role aviatrix-role-cloudwatch and copy the ARN value under Summary. Keep this ARN value as you will need it to configure another policy and to enable CloudWatch in Aviatrix Platform-as-a-Service (PaaS) console.
-
Return to the Roles page and click the role name
aviatrix-role-ec2-<long-id>. Example: aviatrix-role-ec2-a-bb1cc222dd3e44f5g6hh7i88j99k0mm111 - Under Permissions policies, click Add permissions > Attach policies.
- On the Roles page > Permissions tab, click Add permissions > Create inline policy.
- On Specify permissions, select the JSON editor.
-
In the Policy editor, enter (or select in the right pane) the following:
- Sid: VisualEditor0
- Effect: Allow
- Action: sts:AssumeRole
- Resource: arn:aws:iam:<your-account-number>:role/aviatrix-role-cloudwatch
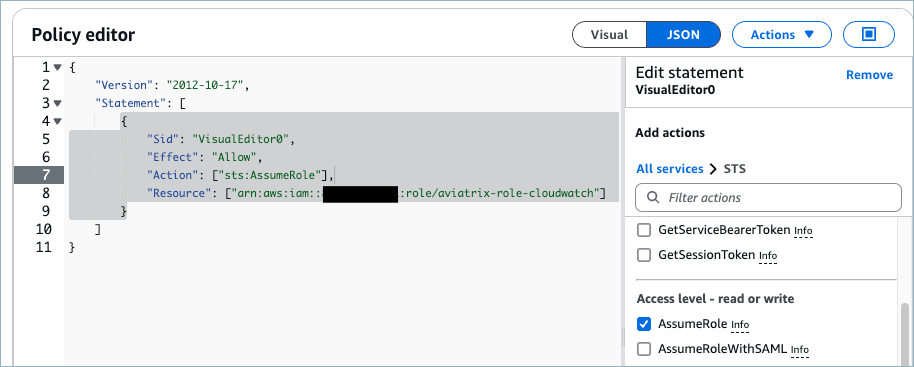
- Click Next.
- Enter a policy name, review the policy, and click Create policy. The new permission policy displays on the aviatrix-role-ec2-<your-id> page.
Configure the CloudWatch Agent in Aviatrix
If you use AWS CloudWatch, you can configure the Aviatrix Remote Syslog forwarder to send syslog data from Aviatrix gateways to AWS CloudWatch. Prerequisites You must have configured the CloudWatch agent in AWS, including assigning roles and policies required by Aviatrix Platform-as-a-Service (PaaS). Before configuring the Aviatrix CloudWatch agent, collect the following information:- CloudWatch role ARN
- AWS Cloud Type
- AWS Region
- Log group name (optional)
- VPC/VNets to forward logs (all, or specific names)
- On Settings > Logging Services > CloudWatch Agent, click Enable.
-
Configure the following:
- Click Enable. The agent details display on the Logging Services page.
Edit or Disable the CloudWatch Agent
You can edit or disable an existing agent configuration in Aviatrix Platform-as-a-Service (PaaS). When an agent is disabled, the configuration is deleted and no longer available.- In Aviatrix Platform-as-a-Service (PaaS) console, go to Settings > Logging Services.
- Under CloudWatch Agent, click Edit.
- Do one of the following:
- Make the desired updates and click Save.
- Click Disable and confirm disabling the agent. The agent configuration is deleted.