

- Network Attachment
- External Connections (S2C)
- AWS TGW
- Native Peering
- External CA Certificates
- Settings
Purpose
The Network Attachment page creates and manages network attachment connections that link Transit or Spoke gateways together for multi-cloud and hybrid network deployments.Elements
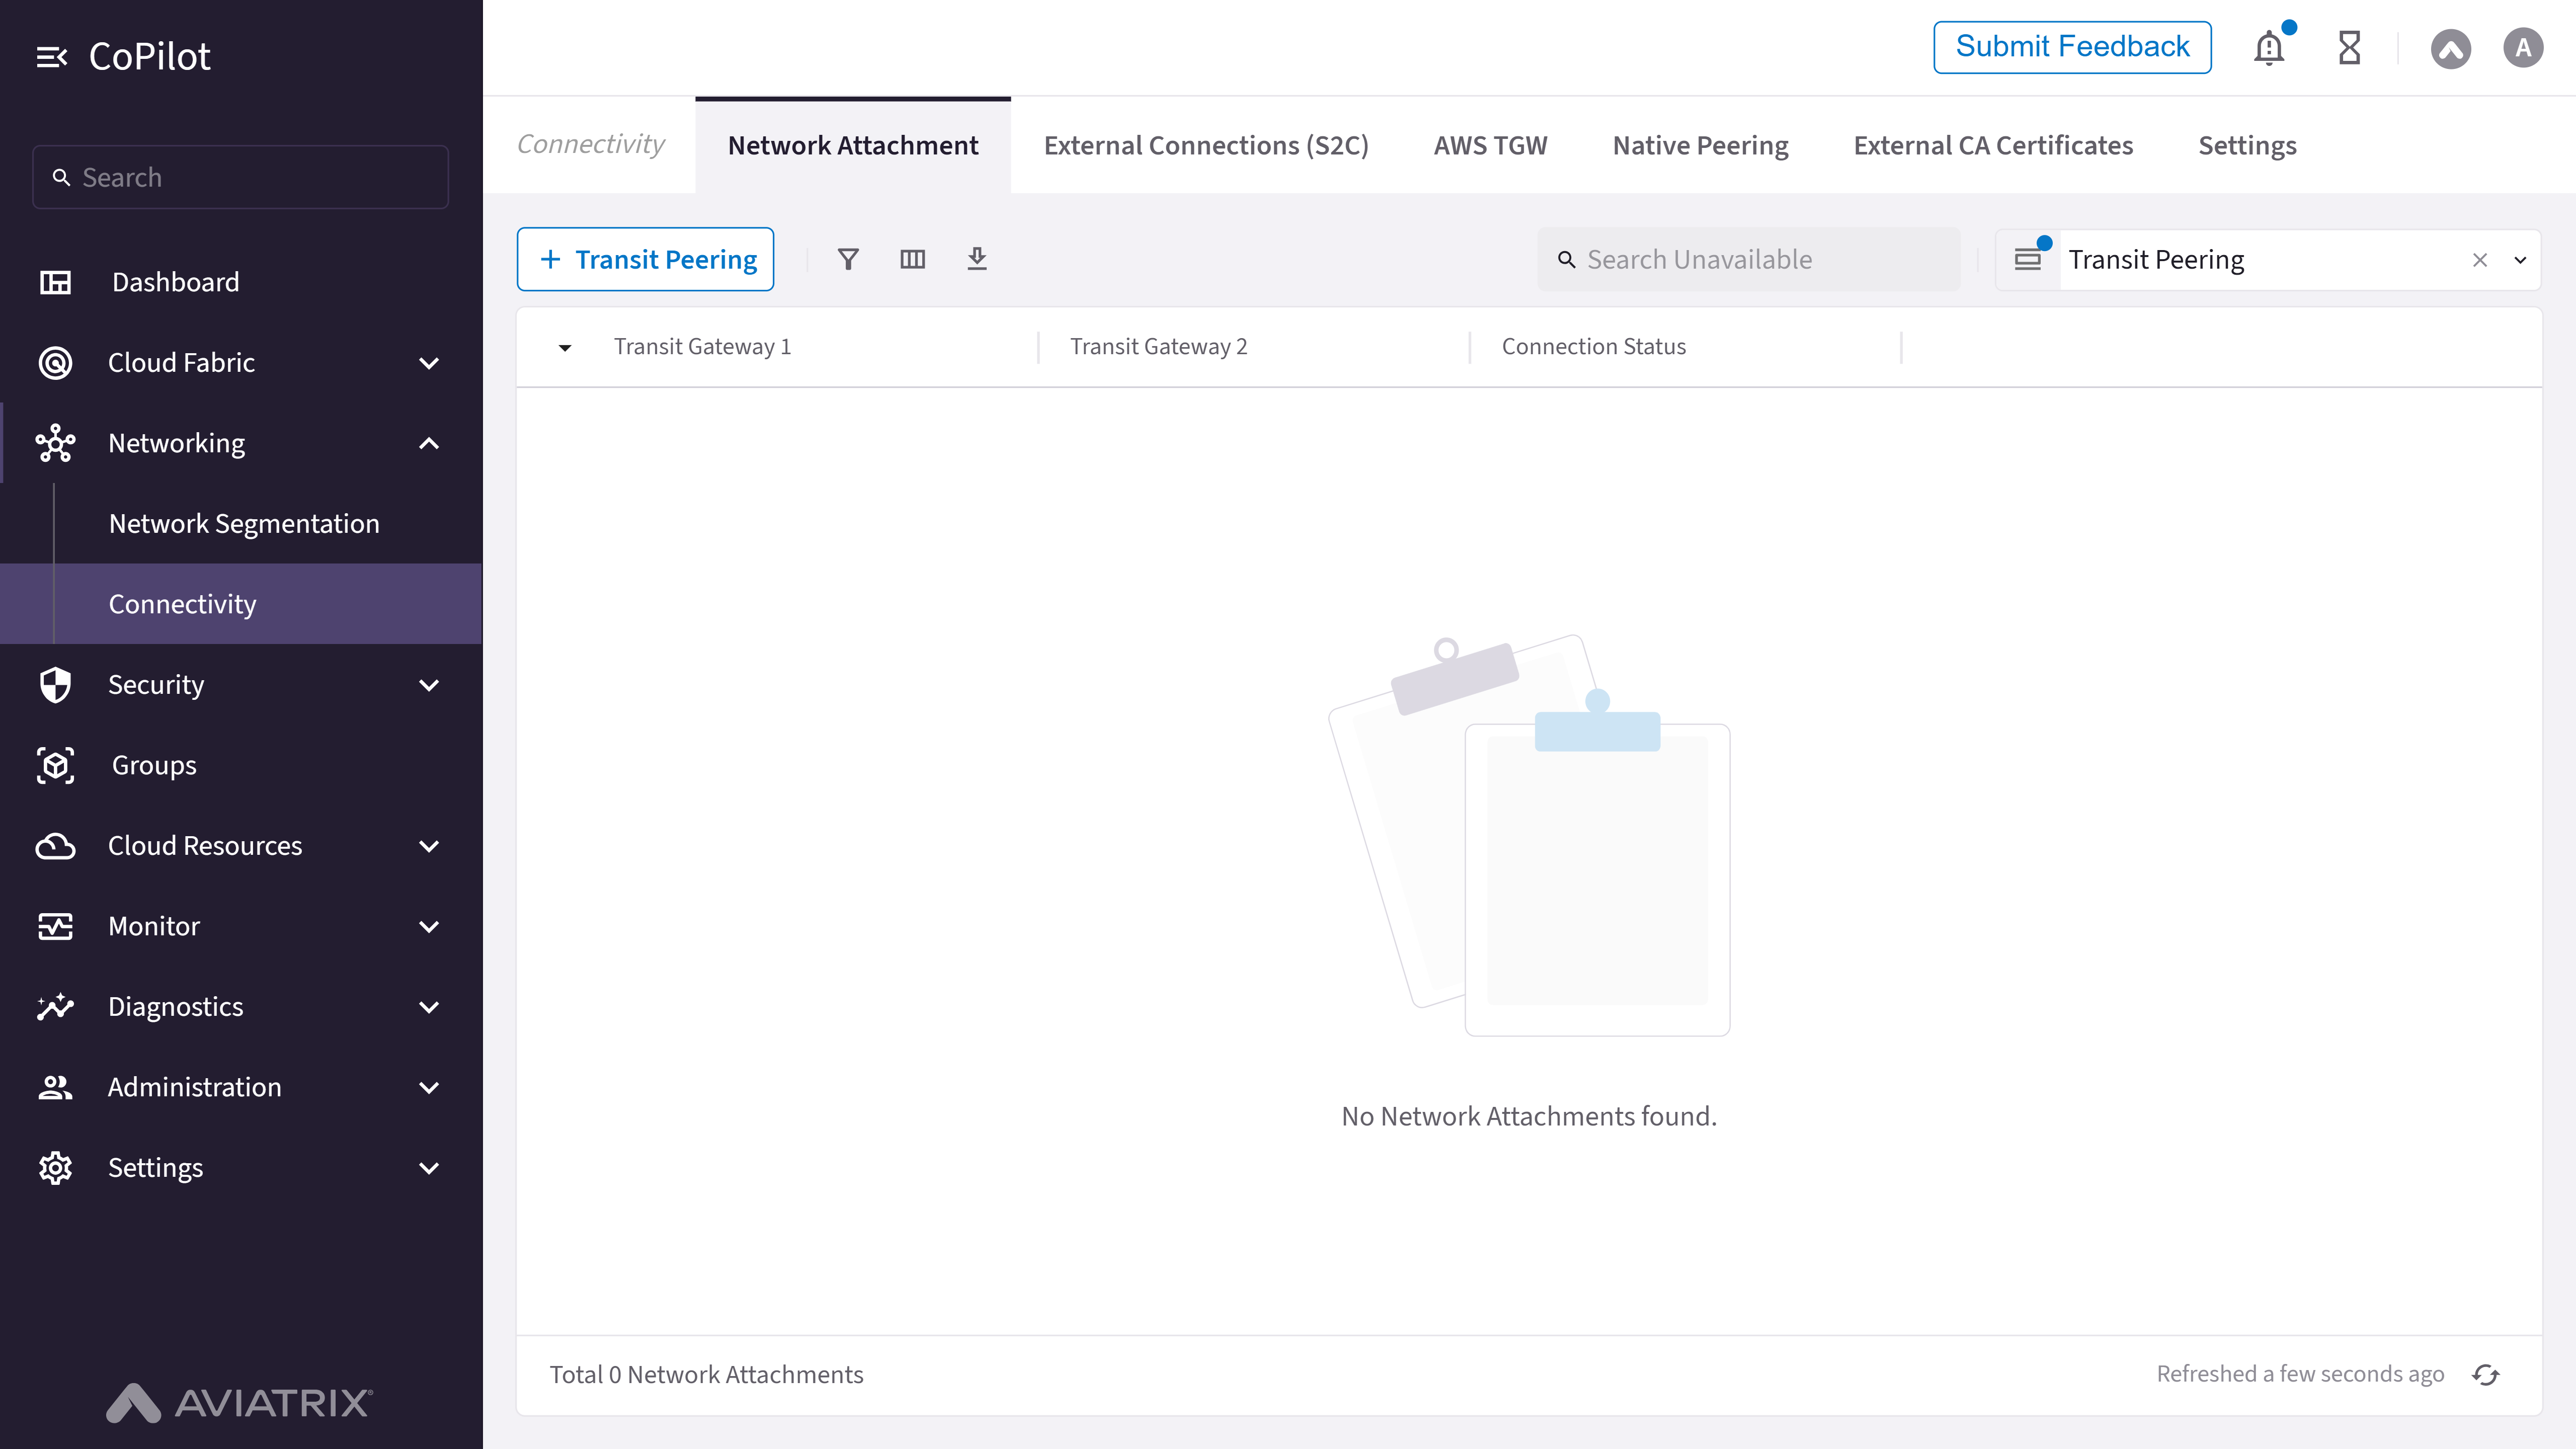
- Network Attachment table: Displays existing network attachment connections with gateway names and connection status.
- + Network Attachment button: Opens the Create Network Attachment dialog to connect two gateways.
- Edit button: Opens the Edit Network Attachment dialog to modify an existing connection.
- Delete button: Removes a network attachment connection.
Actions
Create Network Attachment
Create Network Attachment
To create a network attachment between two gateways:
- Go to Networking > Connectivity > Network Attachment.
- Click + Network Attachment.
- Select the Source Gateway type (Transit or Spoke) and choose the source gateway.
- Select the destination gateway from the attachment list.
- Click Save.
Parameter Details
| CoPilot Parameter Name | Description |
|---|---|
| Source Gateway | The Transit or Spoke gateway that initiates the network attachment. This field is read-only when editing. |
| Transit Gateway 1 | The first Transit gateway in the attachment connection. |
| Transit Gateway 2 | The second Transit gateway in the attachment connection. |
| Spoke Gateway 1 | The first Spoke gateway in the attachment connection. |
| Spoke Gateway 2 | The second Spoke gateway in the attachment connection. |
| Connection Status | The current status of the network attachment connection. |
Delete Network Attachment
Delete Network Attachment
To delete a network attachment:
- Go to Networking > Connectivity > Network Attachment.
- Locate the connection in the table and click the Delete button.
- Confirm the deletion.
Purpose
The External Connections (Site2Cloud) page configures and manages Site2Cloud connections between Aviatrix Gateways and external devices.Elements

- + External Connection button: Starts the workflow to create a new External Device, AWS Virtual Gateway, Azure Virtual Network Gateway, or Microsoft SSE Solution connection.
- BGP Settings button: Configures BGP settings to receive notifications on overlapping BGP address and route limitations, and to set the maximum BGP AS path length.
- External Connections (S2C) table: Displays the list of existing S2C connections and their details.
- Delete button: Removes an existing S2C connection from the table.
- Actions button: Download configuration files, connectivity Diagnostics, and BGP Diagnostics for an S2C connection.
Actions
Create External Connection
Create External Connection
To create an external Site2Cloud connection:
- Go to Networking > Connectivity > External Connections (S2C).
- Click + External Connection.
- Select the connection type (External Device, AWS Virtual Gateway, Azure Virtual Network Gateway, or Microsoft SSE Solution).
- Configure the connection parameters (Name, Tunnel Type, Local Gateway, Remote Device IP, subnets, and BGP settings as applicable).
- Click Save.
Parameter Details
| CoPilot Parameter Name | Description |
|---|---|
| Name | Name of the external connection. |
| Tunnel Type | Type of tunnel used for the connection, for example BGP over IPsec. |
| Local Gateway | Name of the Aviatrix Gateway that initiates the connection. |
| Local Gateway IP | Public IP address of the local gateway. |
| Gateway Interface | Network interface on the local gateway used for the tunnel. |
| Remote Device IP | Public IP address of the remote device. |
| Local Subnet | Subnet or tag advertised from the local side. |
| Remote Subnet | Subnet or tag advertised from the remote side. |
| Local ASN | Autonomous system number used by the local gateway. |
| Remote ASN | Autonomous system number used by the remote device. |
| BGP Local IP | Local IP address used for the BGP session. |
| BGP Neighbor IP | Remote IP address used for the BGP session. |
| BGP Neighbor Status | Current status of the BGP session. |
| BFD Status | Status of Bidirectional Forwarding Detection for the connection. |
Configure BGP Settings
Configure BGP Settings
To configure BGP settings for Site2Cloud connections:
- Go to Networking > Connectivity > External Connections (S2C).
- Click BGP Settings.
- Configure notifications for overlapping BGP address and route limitations.
- Set the maximum BGP AS path length.
- Save your changes.
Delete External Connection
Delete External Connection
To delete an external Site2Cloud connection:
- Go to Networking > Connectivity > External Connections (S2C).
- Locate the connection in the External Connections (S2C) table.
- Click the Delete button for the connection.
- Confirm the deletion.
Download Configuration or Run Diagnostics
Download Configuration or Run Diagnostics
To download configuration files or run diagnostics for an S2C connection:
- Go to Networking > Connectivity > External Connections (S2C).
- Locate the connection in the External Connections (S2C) table.
- Click the Actions button for the connection.
- Select Download configuration files, Connectivity Diagnostics, or BGP Diagnostics as needed.
BGP over LAN: In AWS, BGP over LAN allows BGP-enabled Spoke Gateways to connect to third-party instances in the same VPC without IPsec or GRE. In Azure, it allows connection to third-party instances in the same VNet. Each connection can connect to one or at most two third-party instances. BGP over LAN is not supported for GCP, OCI, and Alibaba Cloud. For Azure, you must indicate the number of LAN interfaces (maximum eight). Adding new LAN interfaces to an Azure Spoke Gateway reboots the gateway and may cause traffic disruption. You cannot delete an interface after the Spoke Gateway is created.
Purpose
The AWS TGW page creates AWS Transit Gateway and manages the integration by attaching an Aviatrix Transit Gateway and other AWS resources, reviewing TGW attachments, and controlling routing and network domain connections for hybrid and multicloud deployments.Elements

- + AWS TGW button: Starts the workflow to create a new AWS Transit Gateway.
- Audit Settings button: Turns On or Off Auto Audit (Every night) for TGW attachments.
- AWS TGW table: Displays the list of existing AWS TGWs and their details.
- Edit button: Modifies an existing AWS TGW from the table.
- Delete button: Removes an existing AWS TGW from the table.
- Actions button: Audits the AWS TGW and views the TGW routes.
Actions
Create AWS TGW
Create AWS TGW
To create an AWS Transit Gateway:
- Go to Networking > Connectivity > AWS TGW.
- Click + AWS TGW.
- Configure the AWS TGW parameters (Name, Account, Region, TGW CIDR, and other settings).
- Save the configuration.
Parameter Details
| CoPilot Parameter Name | Description |
|---|---|
| Name | Name assigned to the AWS Transit Gateway. |
| TGW ID | AWS-generated identifier of the AWS Transit Gateway. |
| Account | AWS account where the AWS Transit Gateway is created. |
| Cloud | Cloud provider associated with the Transit Gateway. |
| Region | AWS region where the Transit Gateway resides. |
| FireNet Inspection Mode | Inspection mode used when integrating the AWS Transit Gateway with FireNet. |
| Peered AWS TGWs | Number or list of AWS Transit Gateways peered with this gateway. |
| TGW CIDR | CIDR block assigned to the AWS Transit Gateway. |
Configure Audit Settings
Configure Audit Settings
To configure audit settings for TGW attachments:
- Go to Networking > Connectivity > AWS TGW.
- Click Audit Settings.
- Turn Auto Audit (Every night) On or Off for TGW attachments.
- Save your changes.
Edit AWS TGW
Edit AWS TGW
To edit an existing AWS TGW:
- Go to Networking > Connectivity > AWS TGW.
- Locate the AWS TGW in the table and click the Edit button.
- Update the desired parameters.
- Save your changes.
Delete AWS TGW
Delete AWS TGW
To delete an AWS TGW:
- Go to Networking > Connectivity > AWS TGW.
- Locate the AWS TGW in the table and click the Delete button.
- Confirm the deletion.
Audit AWS TGW
Audit AWS TGW
To audit an AWS TGW:
- Go to Networking > Connectivity > AWS TGW.
- Locate the AWS TGW in the table and click the Actions button.
- Select Audit to run the TGW attachment audit.
View TGW Routes
View TGW Routes
To view TGW routes:
- Go to Networking > Connectivity > AWS TGW.
- Locate the AWS TGW in the table and click the Actions button.
- Select View TGW routes.
Purpose
The Native Peering page manages native cloud VPC or VNet peering connections to enable direct connectivity without using Transit Gateways.Elements

- + Native Peering button: Starts the workflow to create a new native peering connection.
- Native Peering table: Displays the list of existing native peering connections and their details.
- Delete button: Removes an existing native peering connection from the table.
Actions
Create Native Peering
Create Native Peering
To create a native peering connection:
- Go to Networking > Connectivity > Native Peering.
- Click + Native Peering.
- Configure the peering parameters (VPC/VNet pairs, regions, accounts, and CIDR blocks).
- Save the configuration.
Parameter Details
| CoPilot Parameter Name | Description |
|---|---|
| Name | Name of the native peering connection. |
| VPC/VNet 1 | First VPC or VNet in the peering connection. |
| VPC/VNet 1 CIDR | CIDR block of the first VPC or VNet. |
| Region 1 | Cloud region of the first VPC or VNet. |
| Account 1 | Cloud account that owns the first VPC or VNet. |
| VPC/VNet 2 | Second VPC or VNet in the peering connection. |
| VPC/VNet 2 CIDR | CIDR block of the second VPC or VNet. |
| Region 2 | Cloud region of the second VPC or VNet. |
| Account 2 | Cloud account that owns the second VPC or VNet. |
Delete Native Peering
Delete Native Peering
To delete a native peering connection:
- Go to Networking > Connectivity > Native Peering.
- Locate the connection in the Native Peering table and click the Delete button.
- Confirm the deletion.
Purpose
The External CA Certificates page manages external certificate authority certificates used to authenticate and secure Aviatrix connections.Elements

- + Certificate button: Starts the workflow to add a new external CA certificate.
- Download Aviatrix CA Certificate button: Downloads the Aviatrix CA certificate for external use.
- External CA Certificates table: Displays the list of existing external CA certificates and their details.
- Delete button: Removes an existing external CA certificate from the table.
Actions
Add External CA Certificate
Add External CA Certificate
To add an external CA certificate:
- Go to Networking > Connectivity > External CA Certificates.
- Click + Certificate.
- Upload or configure the certificate and enter the required details.
- Save the certificate.
Parameter Details
| CoPilot Parameter Name | Description |
|---|---|
| Name | Name assigned to the external CA certificate. |
| Unique Serial | Unique serial number of the certificate. |
| Issuer Name | Certificate authority that issued the certificate. |
| Common Name | Common name defined in the certificate. |
| Expiration | Date and time when the certificate expires. |
Download Aviatrix CA Certificate
Download Aviatrix CA Certificate
To download the Aviatrix CA certificate for external use:
- Go to Networking > Connectivity > External CA Certificates.
- Click Download Aviatrix CA Certificate.
Delete External CA Certificate
Delete External CA Certificate
To delete an external CA certificate:
- Go to Networking > Connectivity > External CA Certificates.
- Locate the certificate in the External CA Certificates table and click the Delete button.
- Confirm the deletion.
Purpose
The Settings page manages the internal Certificate Authority (CA) configuration used to secure external connections.Elements
- Rotate Certificate button: Rotates the internal Certificate Authority (CA) certificate used to secure external connections.
- Download Trust Bundle button: Downloads the trust bundle containing the internal Certificate Authority (CA) certificate and the new Certificate Authority (CA) certificate.
- Certificate table: Displays the list of existing certificates and their details.
Actions
Rotate Certificate
Rotate Certificate
To rotate the internal Certificate Authority (CA) certificate:
- Go to Networking > Connectivity > Settings.
- Click Rotate Certificate.
- Select the new Certificate Authority (CA) certificate and click Prepare.
Download Trust Bundle
Download Trust Bundle
To download the trust bundle containing the internal Certificate Authority (CA) certificate and the new Certificate Authority (CA) certificate:
- Go to Networking > Connectivity > Settings.
- Click Download Trust Bundle. The trust bundle is downloaded for external use.