

- Network Attachment
- External Connections (S2C)
- AWS TGW
- Native Peering
- External CA Certificates
- Settings
Purpose
The Network Attachment page creates and manages Transit-to-Transit peering, Spoke-to-Spoke encrypted peering, and Azure VNet-to-Transit attachment connections for multicloud and hybrid network deployments.Elements

- View selector: Dropdown (default Transit Peering) to switch the table and add-row button between Transit Peering, Encrypted Peering (Spoke), and Azure VNet Attachment.
- + Transit Peering / + Encrypted Peering / + Azure VNet button: Opens the create dialog for the selected view.
- Network Attachment table: Displays existing connections for the selected view.
- Edit button: Opens the edit dialog for a Transit Peering or Encrypted Peering row (admin only, not available for Azure VNet Attachment).
- Delete button: Removes a Transit Peering or Encrypted Peering connection (admin only).
- Actions button: Opens a menu with View Peering Details and Run Ping Test for a Transit Peering or Encrypted Peering row (admin only).
- Detach button: Removes an Azure VNet Attachment row (admin only).
- Show filters button, Select columns button, and Export button: Standard table toolbar controls.
Actions
Create a Transit Peering or Encrypted Peering (Spoke) Attachment
Create a Transit Peering or Encrypted Peering (Spoke) Attachment
- Go to Networking > Connectivity > Network Attachment.
- In the view selector, choose Transit Peering or Encrypted Peering (Spoke).
- Click + Transit Peering or + Encrypted Peering.
- Select the Source Gateway.
- Add one or more destination gateways to attach to the source gateway.
- Click Save.
Parameter Details
| CoPilot Parameter Name | Description |
|---|---|
| Source Gateway | The Transit or Spoke gateway that initiates the attachment. Read-only when editing. |
| Transit Gateway 1 / Spoke Gateway 1 | The source gateway in the attachment connection (Transit Peering or Encrypted Peering view). |
| Transit Gateway 2 / Spoke Gateway 2 | The destination gateway in the attachment connection (Transit Peering or Encrypted Peering view). |
| Connection Status | The current status of the attachment connection. |
Create an Azure VNet Attachment
Create an Azure VNet Attachment
- Go to Networking > Connectivity > Network Attachment.
- In the view selector, choose Azure VNet Attachment.
- Click + Azure VNet.
- Select the Source Gateway (an Azure Transit Gateway).
- Select one or more Azure VNets to attach.
- Click Save.
Parameter Details
| CoPilot Parameter Name | Description |
|---|---|
| Transit Gateway | The Azure Transit Gateway the VNet is attached to. |
| Azure VNet | The name of the attached Azure VNet. |
| Resource Group | The Azure resource group containing the VNet. |
| Account | The cloud account that owns the VNet. |
| Region | The Azure region of the VNet. |
| VNet ID | The Azure VNet GUID. |
| Route Tables | The private route table configuration for the attachment. |
Edit, Delete, or View Details for a Transit Peering or Encrypted Peering Attachment
Edit, Delete, or View Details for a Transit Peering or Encrypted Peering Attachment
- Go to Networking > Connectivity > Network Attachment.
- In the view selector, choose Transit Peering or Encrypted Peering (Spoke).
- Locate the connection in the table.
- Click Edit to change the destination gateways, or Delete to remove the connection (confirm when prompted).
- Click the Actions menu and select View Peering Details to view peering configuration, or Run Ping Test to test connectivity between the two gateways.
Detach an Azure VNet Attachment
Detach an Azure VNet Attachment
- Go to Networking > Connectivity > Network Attachment.
- In the view selector, choose Azure VNet Attachment.
- Locate the attachment in the table and click Detach.
- Confirm the removal.
Purpose
The External Connections (Site2Cloud) page configures and manages Site2Cloud connections between Aviatrix Gateways and external devices.Elements

- + External Connection button: Starts the workflow to create a new External Device, AWS Virtual Gateway, Azure Virtual Network Gateway, or Microsoft SSE Solution connection.
- BGP Settings button: Configures BGP settings to receive notifications on overlapping BGP address and route limitations, and to set the maximum BGP AS path length.
- External Connections (S2C) table: Displays the list of existing S2C connections and their details.
- Default View dropdown: Selects, saves, or manages saved views of the table.
- Delete button: Removes an existing S2C connection from the table.
- Actions button: Download configuration files, connectivity Diagnostics, and BGP Diagnostics for an S2C connection.
Actions
Create External Connection
Create External Connection
- Go to Networking > Connectivity > External Connections (S2C).
- Click + External Connection.
- Select the connection type (External Device, AWS Virtual Gateway, Azure Virtual Network Gateway, or Microsoft SSE Solution).
- Configure the connection parameters (Name, Tunnel Type, Local Gateway, Remote Device IP, subnets, and BGP settings as applicable).
- Click Save.
Parameter Details
| CoPilot Parameter Name | Description |
|---|---|
| Name | A name for the connection (all four workflows). |
| Type |
|
| Local Gateway | The Aviatrix gateway that connects to the remote device.
|
| Static Routing Type |
|
| Remote Subnet CIDR(s) | Static Route-Based (ActiveMesh) only: remote network CIDR(s) to route toward the remote destination; use commas to separate multiple CIDRs. |
| Attach Over |
|
| Jumbo Frame |
|
| Algorithms |
|
| Internet Key Exchange |
|
| Local ASN |
|
| ActiveMesh |
|
| BFD |
|
| Manual Learned CIDR Approval |
|
| Advertise BGP Communities |
|
| BGP Multihop |
|
| Support for IPv6 | Toggle to enable IPv6 for that connection type. |
| Advertise IPv6 via IPv4 Peer | When enabled, advertises IPv6 routes over an IPv4 BGP session. |
| Authentication Method | Static Route-Based (ActiveMesh) only: Pre-Shared Key or Certificate; for certificate authentication, select the Remote CA Certificate uploaded from the remote device. |
| Remote Device Tunnel Destination IP |
|
| Remote Device IP | BGP over LAN only (LAN Configuration): remote device interface IP address. |
| Remote ASN |
|
| Advertise IPv6 via IPv4 Peer | BGP over IPsec only: when enabled, advertises IPv6 routes over an IPv4 BGP session. |
| BGP Local IP (Optional) |
|
| BGP Neighbor IP (Optional) |
|
| BGP Neighbor IPv6 | BGP over IPsec only: remote tunnel inner IPv6 CIDR range. |
| Local Gateway Instances | BGP over LAN only: Primary or HA Local Gateway instance for the LAN row. |
| Local LAN IP | BGP over LAN only: Local Gateway interface IP address. |
| Remote LAN IP | BGP over LAN only: remote device interface IP address. |
| Local LAN IPv6 (Optional) | BGP over LAN only: Local Gateway interface IPv6 address. |
| Remote LAN IPv6 | BGP over LAN only: remote device interface IPv6 address. |
| Local Tunnel IP | Static Route-Based (ActiveMesh) only: local tunnel inner CIDR allowed over the tunnel. |
| Remote Tunnel IP | Static Route-Based (ActiveMesh) only: remote tunnel inner CIDR allowed over the tunnel. |
| Tunnel Source IP |
|
| Pre-Shared Key (Optional) |
|
| Remote Identifier SAN | Static Route-Based (ActiveMesh) only with certificate authentication: Subject Alternative Name (SAN) of the remote CA certificate. |
| Add remote peers |
|
AWS Virtual Gateway
| CoPilot Parameter Name | Description |
|---|---|
| Name | Identifier for the connection to the AWS VGW. |
| Local Gateway | Transit Gateway that peers with the VGW. |
| Local ASN | BGP AS number the Transit Gateway uses with the VGW. |
| VGW Account Name | AWS account (access account) where the VGW was created. |
| VGW Region | AWS Region that contains the VGW. |
| VGW ID | Unique identifier of the target Virtual Private Gateway. |
| Manual CIDR Approval | When the selected gateway requires learned CIDR approval at connection level, this follows that policy; otherwise it stays off by default. |
Azure Virtual Network Gateway
| CoPilot Parameter Name | Description |
|---|---|
| Name | Identifier for the connection to the Azure VPN Gateway. |
| Aviatrix Gateway | Transit Gateway that connects to the VNG (must be in the Transit VNet where the VNG is deployed). |
| VNG Name | Azure Virtual Network Gateway to use for the connection. |
Microsoft’s SSE Solution
| CoPilot Parameter Name | Description |
|---|---|
| Name | Identifier for the BGP over IPsec connection to Microsoft’s SSE Solution. |
| Local Gateway | Aviatrix Gateway (BGP-enabled) that connects to Microsoft’s SSE Solution. |
Configure BGP Settings
Configure BGP Settings
- Go to Networking > Connectivity > External Connections (S2C).
- Click BGP Settings.
- Configure notifications for overlapping BGP address and route limitations.
- Set the maximum BGP AS path length.
- Save your changes.
Delete External Connection
Delete External Connection
- Go to Networking > Connectivity > External Connections (S2C).
- Locate the connection in the External Connections (S2C) table.
- Click the Delete button for the connection.
- Confirm the deletion.
Download Configuration or Run Diagnostics
Download Configuration or Run Diagnostics
- Go to Networking > Connectivity > External Connections (S2C).
- Locate the connection in the External Connections (S2C) table.
- Click the Actions button for the connection.
- Select Download configuration files, Connectivity Diagnostics, or BGP Diagnostics as needed.
- AWS TGW
- Attachments
Purpose
The AWS TGW view creates AWS Transit Gateways and manages the integration by attaching an Aviatrix Transit Gateway and other AWS resources, reviewing TGW attachments, and controlling routing and network domain connections for hybrid and multicloud deployments.Elements

- AWS TGW / Attachments toggle: Switches the page between the AWS TGW table and the Attachments view.
- + AWS TGW button: Starts the workflow to create a new AWS Transit Gateway.
- Audit Settings button: Turns On or Off Auto Audit (Every night) for TGW attachments.
- AWS TGW table: Displays the list of existing AWS TGWs and their details (Name, Account, Region, FireNet Inspection Mode, Peered AWS TGWs, TGW CIDR). TGW ID and Cloud are hidden by default; enable them from Select columns.
- Name link: Opens the detail page for that AWS TGW.
- Edit button: Modifies an existing AWS TGW from the table.
- Delete button: Removes an existing AWS TGW from the table.
- Actions (⋮) button: Opens a menu with Audit AWS TGW to run a TGW attachment audit.
- Show filters button, Select columns button, and Export button: Standard table toolbar controls.
Actions
Create AWS TGW
Create AWS TGW
- Go to Networking > Connectivity > AWS TGW.
- Click + AWS TGW.
- Configure the AWS TGW parameters (Name, Account, Region, TGW CIDR, and other settings).
- Save the configuration.
Parameter Details
| CoPilot Parameter Name | Description |
|---|---|
| Name | Name assigned to the AWS Transit Gateway. |
| TGW ID | AWS-generated identifier of the AWS Transit Gateway (hidden by default). |
| Account | AWS account where the AWS Transit Gateway is created. |
| Cloud | Cloud provider associated with the Transit Gateway (hidden by default). |
| Region | AWS region where the Transit Gateway resides. |
| FireNet Inspection Mode | Inspection mode used when integrating the AWS Transit Gateway with FireNet. |
| Peered AWS TGWs | Number or list of AWS Transit Gateways peered with this gateway. |
| TGW CIDR | CIDR block assigned to the AWS Transit Gateway. |
Configure Audit Settings
Configure Audit Settings
- Go to Networking > Connectivity > AWS TGW.
- Click Audit Settings.
- Turn Auto Audit (Every night) On or Off for TGW attachments.
- Save your changes.
Edit AWS TGW
Edit AWS TGW
- Go to Networking > Connectivity > AWS TGW.
- Locate the AWS TGW in the table and click the Edit button.
- Update the desired parameters.
- Save your changes.
Delete AWS TGW
Delete AWS TGW
- Go to Networking > Connectivity > AWS TGW.
- Locate the AWS TGW in the table and click the Delete button.
- Confirm the deletion.
Audit AWS TGW
Audit AWS TGW
- Go to Networking > Connectivity > AWS TGW.
- Locate the AWS TGW in the table and click the Actions (⋮) button.
- Select Audit AWS TGW to run the TGW attachment audit.
View AWS TGW Details
View AWS TGW Details
- Go to Networking > Connectivity > AWS TGW.
- Click the Name link for the AWS TGW.
Purpose
The Attachments view lists every resource attached to any AWS TGW, across all AWS Transit Gateways, in one table.Elements
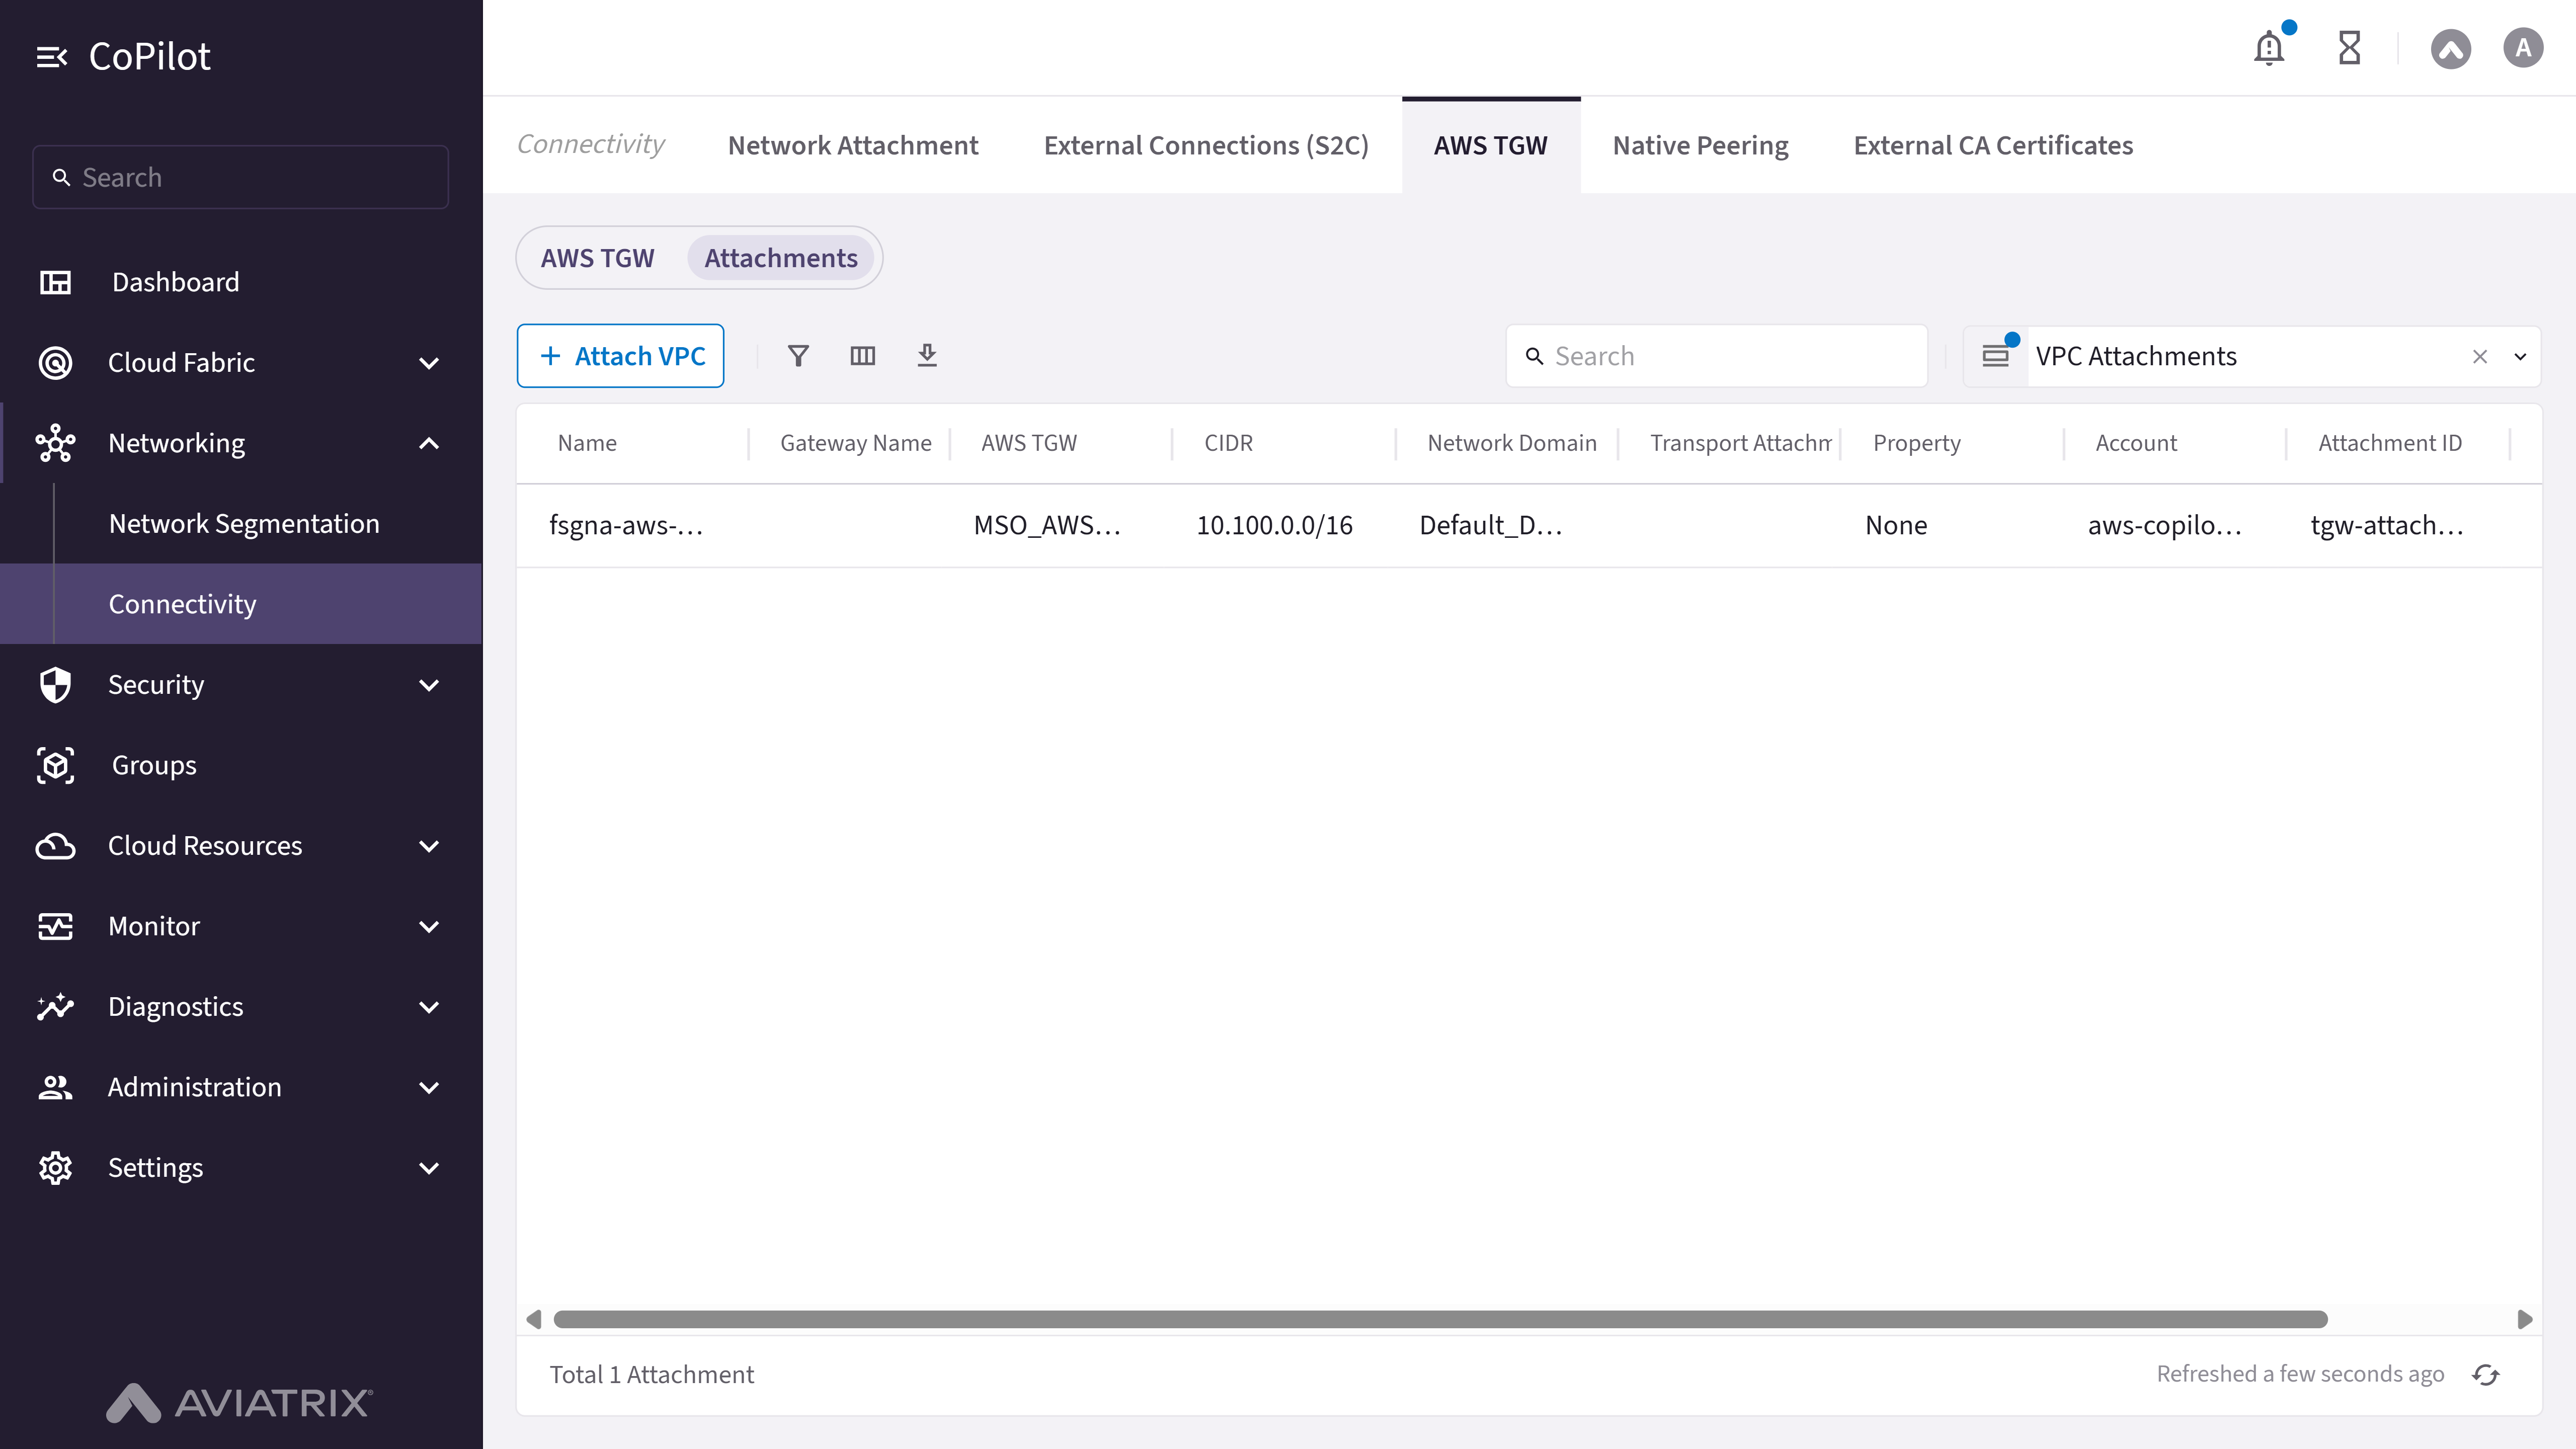
- AWS TGW / Attachments toggle: Switches the page between the AWS TGW table and the Attachments view.
- View dropdown: Selects the attachment-type view (VPC Attachments, Transit Gateway Attachments, VPN Attachments, Direct Connect Attachments, AWS TGW Peering Attachments, or TGW Connection Attachments); also saves the current table layout as a new view, or manages (applies) any of the views from the Manage Views dialog. All views share the same table columns; the add-row button label and dialog change per selected view.
- + Attach button: Starts the workflow to attach a resource for the selected view (admin only). Labeled + Attach VPC, + Attach Transit Gateway, + Attach VPN, + Attach Direct Connect, + Attach AWS TGW Peering, or + Attach TGW Connection, depending on the selected view.
- Attachments table: Displays the attached resources for the selected view. The search box is disabled for this table.
- Edit button: Modifies an existing VPC, Transit Gateway, or Direct Connect attachment (admin only; not available for VPN, AWS TGW Peering, or TGW Connection attachments).
- Detach button: Removes the selected attachment (admin only).
- Show filters button, Select columns button, and Export button: Standard table toolbar controls.
- Save As New View button and More Options button: Appear only after you change the filters, columns, or sort order for a view. Save As New View saves the modified layout as a new view (prompts for a name); More Options > Discard Changes reverts to the previously applied view.
Actions
Manage Attachments
Manage Attachments
Attach VPC
Attach VPC
- Go to Networking > Connectivity > AWS TGW > Attachments.
- In the view dropdown, select VPC Attachments (the default view).
- Click + Attach VPC.
- In the Attach VPC to AWS TGW dialog, select the AWS TGW, VPC, and Network Domain (defaults to Default_Domain). Optionally expand Advanced Settings for additional options.
- Click Save.
Parameter Details
| CoPilot Parameter Name | Description |
|---|---|
| Name | The VPC, VNet, or connection name of the attached resource. |
| Gateway Name | The Aviatrix Transit Gateway attached to the AWS TGW (Transit Gateway Attachments view; hidden by default). |
| AWS TGW | The AWS Transit Gateway the resource is attached to. |
| CIDR | The CIDR block(s) associated with the attachment. |
| Network Domain | The TGW route domain (network domain) the attachment belongs to. |
| Transport Attachment | The underlying AWS TGW attachment type used to carry traffic. |
| Property | Additional attachment-specific properties. |
| Account | The cloud account that owns the attached resource. |
| Attachment ID | The AWS-generated identifier for the attachment. |
Attach Transit Gateway
Attach Transit Gateway
- Go to Networking > Connectivity > AWS TGW > Attachments.
- In the view dropdown, select Transit Gateway Attachments.
- Click + Attach Transit Gateway.
- In the Attach Transit Gateway dialog, select the AWS TGW and Transit Gateway. The AWS TGW can only be attached to a Transit Gateway in the same AWS region; Network Domain is read-only (Aviatrix Edge Domain).
- Click Save.
Attach VPN
Attach VPN
- Go to Networking > Connectivity > AWS TGW > Attachments.
- In the view dropdown, select VPN Attachments.
- Click + Attach VPN.
- In the Create VPN Attachment dialog, configure the connection name, public IP, protocol (BGP or static), route domain, and tunnel settings.
- Click Save.
Attach Direct Connect
Attach Direct Connect
- Go to Networking > Connectivity > AWS TGW > Attachments.
- In the view dropdown, select Direct Connect Attachments.
- Click + Attach Direct Connect.
- In the Create Direct Connect Attachment dialog, select the Direct Connect gateway and configure the allowed prefixes.
- Click Save.
Attach AWS TGW Peering
Attach AWS TGW Peering
- Go to Networking > Connectivity > AWS TGW > Attachments.
- In the view dropdown, select AWS TGW Peering Attachments.
- Click + Attach AWS TGW Peering.
- In the Create AWS TGW Peering dialog, select the first AWS TGW, then the second AWS TGW and its region.
- Click Save.
Attach TGW Connection
Attach TGW Connection
- Go to Networking > Connectivity > AWS TGW > Attachments.
- In the view dropdown, select TGW Connection Attachments.
- Click + Attach TGW Connection.
- In the Create TGW Connection Attachment dialog, select the AWS TGW and configure the connection name, attachment name, and network domain.
- Click Save.
Edit or Detach an Attachment
Edit or Detach an Attachment
- Go to Networking > Connectivity > AWS TGW > Attachments.
- In the view dropdown, select the view containing the attachment.
- To modify an existing VPC, Transit Gateway, or Direct Connect attachment, locate it in the table and click its Edit button (not available for VPN, AWS TGW Peering, or TGW Connection attachments).
- To remove any attachment, click its Detach button and confirm.
Manage Saved Views
Manage Saved Views
Save As New View
Save As New View
- Go to Networking > Connectivity > AWS TGW > Attachments.
- Use Show filters, Select columns, or a column header to change the filters, visible columns, or sort order.
- Click Save As New View.
- Enter a name and click Save.
Discard Changes
Discard Changes
- Go to Networking > Connectivity > AWS TGW > Attachments.
- After changing the filters, columns, or sort order, click More Options (next to Save As New View).
- Select Discard Changes.
Manage Views
Manage Views
- Go to Networking > Connectivity > AWS TGW > Attachments.
- Open the view dropdown and click Manage Views.
- Click Apply next to any of the six views (VPC Attachments, Transit Gateway Attachments, VPN Attachments, Direct Connect Attachments, AWS TGW Peering Attachments, or TGW Connection Attachments) to switch the table to that view.
- Click Close.
Purpose
The Native Peering page manages native cloud VPC or VNet peering connections to enable direct connectivity without using Transit Gateways.Elements

- + Native Peering button: Starts the workflow to create a new native peering connection (admin only).
- Native Peering table: Displays the list of existing native peering connections. The Region 1, Account 1, Region 2, and Account 2 columns are hidden by default; enable them from Select columns.
- Name link: Opens a detail drawer for the peering connection.
- Delete button: Removes an existing native peering connection from the table or from the detail drawer (admin only).
- Show filters button, Select columns button, and Export button: Standard table toolbar controls.
- Default View dropdown: Selects, saves, or manages saved views of the table.
Actions
Create Native Peering
Create Native Peering
- Go to Networking > Connectivity > Native Peering.
- Click + Native Peering.
- Select the Cloud (AWS or Azure). For AWS, also select the partition (Standard, GovCloud, or China).
- Select VPC/VNet 1 and VPC/VNet 2 from the available VPCs or VNets.
- For AWS, optionally turn on Select Route Tables for either VPC to choose specific route tables to propagate the peering route to.
- Click Save.
Parameter Details
| CoPilot Parameter Name | Description |
|---|---|
| Cloud | The cloud provider of the VPCs or VNets to peer (AWS or Azure). |
| VPC/VNet 1 | First VPC or VNet in the peering connection. |
| Select Route Tables (VPC/VNet 1) | AWS only. When on, selects specific route tables on VPC/VNet 1 to update with the peering route. |
| VPC/VNet 2 | Second VPC or VNet in the peering connection. |
| Select Route Tables (VPC/VNet 2) | AWS only. When on, selects specific route tables on VPC/VNet 2 to update with the peering route. |
View Native Peering Details
View Native Peering Details
- Go to Networking > Connectivity > Native Peering.
- Click the Name link for the connection. A detail drawer opens, showing the Name, CIDR, Cloud, Region, and Account (and Route Table, for AWS) for both VPC/VNet 1 and VPC/VNet 2.
- Click Delete in the drawer title to remove the connection.
Parameter Details
| CoPilot Parameter Name | Description |
|---|---|
| Name | Name of the VPC or VNet on each side of the peering connection. |
| CIDR | CIDR block of the VPC or VNet. |
| Cloud | Cloud provider of the peering connection. |
| Region | Cloud region of the VPC or VNet. |
| Account | Cloud account that owns the VPC or VNet. |
| Route Table | AWS only. The route tables selected to propagate the peering route, if any. |
Delete Native Peering
Delete Native Peering
- Go to Networking > Connectivity > Native Peering.
- Locate the connection in the Native Peering table and click the Delete button, or open the connection and click Delete in the detail drawer title.
- Confirm the deletion.
Purpose
The External CA Certificates page manages external certificate authority certificates used to authenticate and secure Aviatrix connections.Elements

- + Certificate button: Starts the workflow to add a new external CA certificate.
- Download Aviatrix CA Certificate button: Downloads the Aviatrix CA certificate for external use.
- External CA Certificates table: Displays the list of existing external CA certificates and their details.
- Delete button: Removes an existing external CA certificate from the table.
Actions
Add External CA Certificate
Add External CA Certificate
- Go to Networking > Connectivity > External CA Certificates.
- Click + Certificate.
- Enter a Name and click Upload to select the CA certificate file.
- Click Save.
Parameter Details
| CoPilot Parameter Name | Description |
|---|---|
| Name | Name assigned to the external CA certificate. |
| Unique Serial | Unique serial number of the certificate. |
| Issuer Name | Certificate authority that issued the certificate. |
| Common Name | Common name defined in the certificate. |
| Expiration | Date and time when the certificate expires. |
Download Aviatrix CA Certificate
Download Aviatrix CA Certificate
- Go to Networking > Connectivity > External CA Certificates.
- Click Download Aviatrix CA Certificate.
Delete External CA Certificate
Delete External CA Certificate
- Go to Networking > Connectivity > External CA Certificates.
- Locate the certificate in the External CA Certificates table and click the Delete button.
- Confirm the deletion.
Purpose
The Settings page manages the internal Certificate Authority (CA) configuration used to secure external connections.Elements

- CA Rotation Guide link: Opens the Aviatrix CA rotation guide documentation in a new tab.
- Rotate Certificate button: Starts the workflow to prepare a new internal Certificate Authority (CA) certificate for the external connection service.
- Download Trust Bundle button: Downloads the trust bundle containing the active and any prepared internal CA certificates.
- Certificate table: Displays the internal CA certificate(s) and their details.
Actions
Rotate Certificate
Rotate Certificate
- Go to Networking > Connectivity > Settings.
- Click Rotate Certificate.
- In the Certificate dropdown, select the CA certificate to prepare.
- Click Prepare.
- Click Download Trust Bundle and provision the trust bundle on all external devices.
- After provisioning, activate the new certificate.
Parameter Details
| CoPilot Parameter Name | Description |
|---|---|
| Name | Name of the internal CA certificate. |
| Subject | The certificate subject (distinguished name), for example organization, location, and email. |
| Expires | The certificate expiration date, with the remaining validity period. |
| Key Type | The cryptographic key type used by the certificate, for example EC or RSA. |
| Key Specification | The specific key curve or size used by the certificate, for example prime256v1. |
| Status | The current status of the certificate, for example Active or Prepared. |
Download Trust Bundle
Download Trust Bundle
- Go to Networking > Connectivity > Settings.
- Click Download Trust Bundle.