> ## Documentation Index
> Fetch the complete documentation index at: https://docs.aviatrix.com/llms.txt
> Use this file to discover all available pages before exploring further.
# Example Configuration for Palo Alto Network VM-Series in OCI
> In this document, we provide an example to set up the VM-Series for you to validate that packets are indeed sent to the VM-Series for VCN to VCN and from VCN to internet traffic inspection.
In this document, we provide an example to set up the VM-Series for you to
validate that packets are indeed sent to the VM-Series for VCN to VCN and from
VCN to internet traffic inspection.
VM-Series in AWS can be set up using Palo Alto
Networks VM-Series AWS Example.
VM-Series in Azure can be set up using the guide Palo Alto
Networks VM-Series Azure Example.
You must first have launched a firewall instance in OCI.
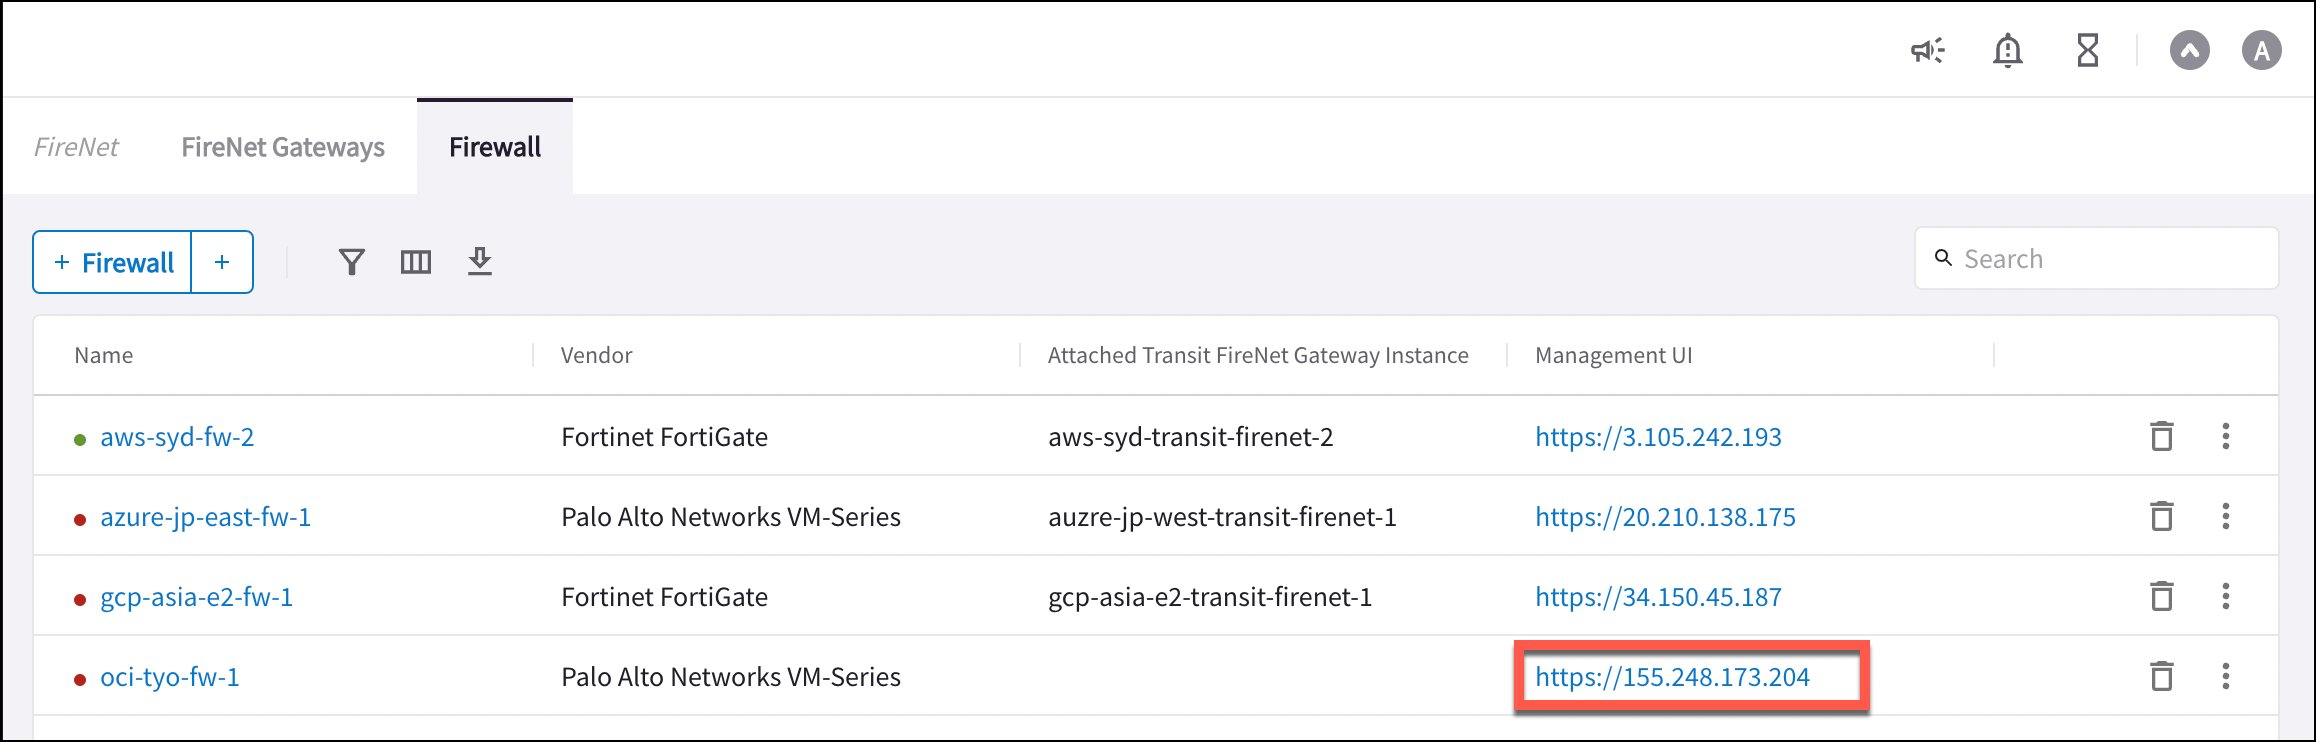
After the firewall is launched, you can access its UI from the Firewall tab.
 ## Downloading VM-Series Access Key
You can download the .pem file for SSH access to the instance by clicking the
vertical ellipsis
## Downloading VM-Series Access Key
You can download the .pem file for SSH access to the instance by clicking the
vertical ellipsis  and selecting **Download Access Key**.
If you get a download error, usually it means the VM-Series is not ready. Wait
until it is ready, refresh the browser and then try again.
## Resetting VM-Series Password
After you download the .pem file, change the file permission to 600. If you
are asked to enter a password during the login, the VM-Series is still not
ready. Wait and try again. It usually takes up to 15 minutes for the VM-Series
to be ready. When the VM-Series is ready, you will no longer be prompted for a
password.
For Metered AMI, open a terminal and run the following command.
```
ssh -i admin@
configure
set mgt-config users admin password
commit
```
For BYOL, open a terminal and run the following command.
```
ssh -i admin@
configure
set mgt-config users admin password
set deviceconfig system dns-setting servers primary
commit
```
Terminate the SSH session.
## Logging in to VM-Series
Navigate to Security > FireNet > Firewall and click the Management UI link. It
takes you to the VM-Series you just launched.
Login with Username "admin." The password is the password you set in the
previous step.
## Dynamic Updates
From Device > Dynamic Updates in the Palo Alto firewall UI, click on **Check
Now** to download and then install the latest versions of Applications and
Threats and Wildfire updates.
Click on **Check Now** again to download and then install the latest version of
Antivirus.
## Configuring VM-Series ethernet1/1 with WAN Zone
After logging in, select the **Network** tab to see a list of ethernet
interfaces. Click ethernet1/1 and configure as per the following screenshot.
1. Select the **Network** tab.
2. Click **ethernet1/1**.
3. Select "layer3" for Interface Type.
4. Select the **Config** tab in the popup Ethernet Interface window.
5. Select the default for Virtual Router at Config tab.
6. Click **New Zone for Security Zone** to create a WAN zone.
7. At the next popup screen, name the new zone "WAN" and click **OK**.
8. Select the **IPV4** tab in the popup Ethernet Interface window.
9. Select **Static**.
10. Add the Private IP of eth1 firewall WAN NIC.
and selecting **Download Access Key**.
If you get a download error, usually it means the VM-Series is not ready. Wait
until it is ready, refresh the browser and then try again.
## Resetting VM-Series Password
After you download the .pem file, change the file permission to 600. If you
are asked to enter a password during the login, the VM-Series is still not
ready. Wait and try again. It usually takes up to 15 minutes for the VM-Series
to be ready. When the VM-Series is ready, you will no longer be prompted for a
password.
For Metered AMI, open a terminal and run the following command.
```
ssh -i admin@
configure
set mgt-config users admin password
commit
```
For BYOL, open a terminal and run the following command.
```
ssh -i admin@
configure
set mgt-config users admin password
set deviceconfig system dns-setting servers primary
commit
```
Terminate the SSH session.
## Logging in to VM-Series
Navigate to Security > FireNet > Firewall and click the Management UI link. It
takes you to the VM-Series you just launched.
Login with Username "admin." The password is the password you set in the
previous step.
## Dynamic Updates
From Device > Dynamic Updates in the Palo Alto firewall UI, click on **Check
Now** to download and then install the latest versions of Applications and
Threats and Wildfire updates.
Click on **Check Now** again to download and then install the latest version of
Antivirus.
## Configuring VM-Series ethernet1/1 with WAN Zone
After logging in, select the **Network** tab to see a list of ethernet
interfaces. Click ethernet1/1 and configure as per the following screenshot.
1. Select the **Network** tab.
2. Click **ethernet1/1**.
3. Select "layer3" for Interface Type.
4. Select the **Config** tab in the popup Ethernet Interface window.
5. Select the default for Virtual Router at Config tab.
6. Click **New Zone for Security Zone** to create a WAN zone.
7. At the next popup screen, name the new zone "WAN" and click **OK**.
8. Select the **IPV4** tab in the popup Ethernet Interface window.
9. Select **Static**.
10. Add the Private IP of eth1 firewall WAN NIC.
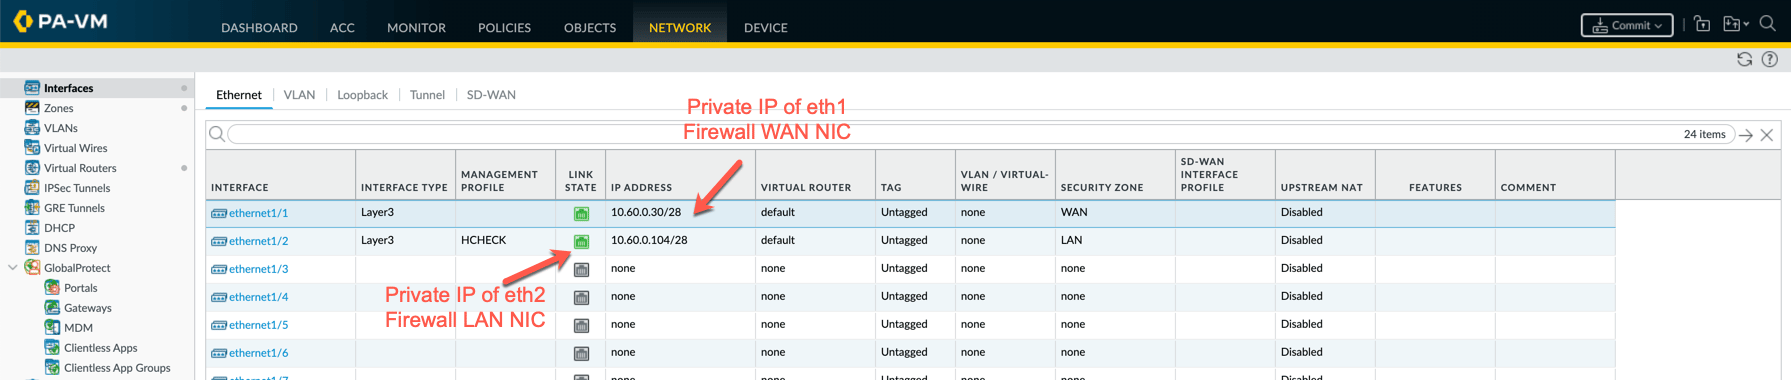 Click **Commit**. Once Commit is complete, you should see the Link State turn
green at the Network page for ethernet1/1.
## Configuring VM-Series ethernet1/2 with LAN Zone
Repeat the steps in the **Configuring VM-Series ethernet1/1 with WAN Zone**
section above for ethernet1/2. Name the new zone LAN. Also, allow ICMP on LAN
interface for health check, as shown below.
1. Go to Network > Interface Mgmt under Network Profiles and click **Add**.
2. Give any name in Interface Management Profile, check Ping or ICMP checkbox
under Administrative Management Service, and click **OK**.
3. Attach Profile with LAN interface: go to Network > Interfaces > Select LAN
Ethernet Interface > Advanced > Management Profile > Select the appropriate
profile.
Click Commit. Once Commit is complete, you should see the Link State turn green
at the Network page for ethernet1/2.
## Configuring Allow All Policies
In the Palo Alto VM=Series firewall, go to Policies > Security.
1. Click **Add**.
2. Name the policy > Allow-All.
3. Source tab > Any.
4. Destination tab > Any.
5. Application tab > Any.
6. Click **OK**.
## Configuring NAT for Egress
If you would also like to enable NAT to test egress, follow these steps.
1. Navigate to Policies > NAT and click **Add**.
2. Select the **General** tab and name the policy.
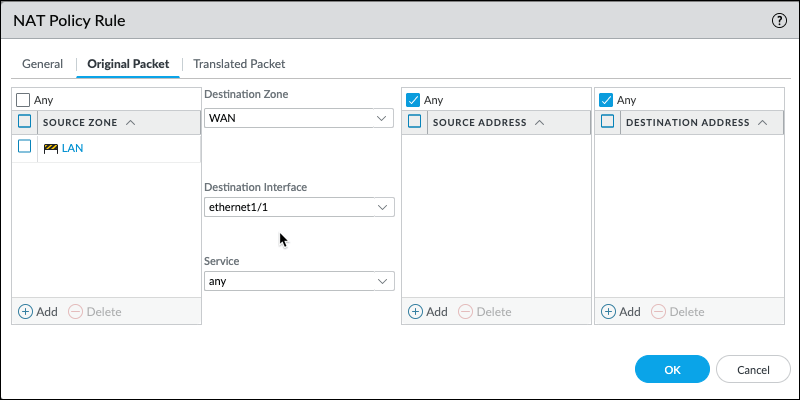
3. Click **Original Packet**.
4. At Source Zone, click **Add** and select **LAN**.
5. At Destination Zone, select **WAN**.
6. At Destination Interface, select **Ethernet1/1**, as shown below.
Click **Commit**. Once Commit is complete, you should see the Link State turn
green at the Network page for ethernet1/1.
## Configuring VM-Series ethernet1/2 with LAN Zone
Repeat the steps in the **Configuring VM-Series ethernet1/1 with WAN Zone**
section above for ethernet1/2. Name the new zone LAN. Also, allow ICMP on LAN
interface for health check, as shown below.
1. Go to Network > Interface Mgmt under Network Profiles and click **Add**.
2. Give any name in Interface Management Profile, check Ping or ICMP checkbox
under Administrative Management Service, and click **OK**.
3. Attach Profile with LAN interface: go to Network > Interfaces > Select LAN
Ethernet Interface > Advanced > Management Profile > Select the appropriate
profile.
Click Commit. Once Commit is complete, you should see the Link State turn green
at the Network page for ethernet1/2.
## Configuring Allow All Policies
In the Palo Alto VM=Series firewall, go to Policies > Security.
1. Click **Add**.
2. Name the policy > Allow-All.
3. Source tab > Any.
4. Destination tab > Any.
5. Application tab > Any.
6. Click **OK**.
## Configuring NAT for Egress
If you would also like to enable NAT to test egress, follow these steps.
1. Navigate to Policies > NAT and click **Add**.
2. Select the **General** tab and name the policy.
3. Click **Original Packet**.
4. At Source Zone, click **Add** and select **LAN**.
5. At Destination Zone, select **WAN**.
6. At Destination Interface, select **Ethernet1/1**, as shown below.
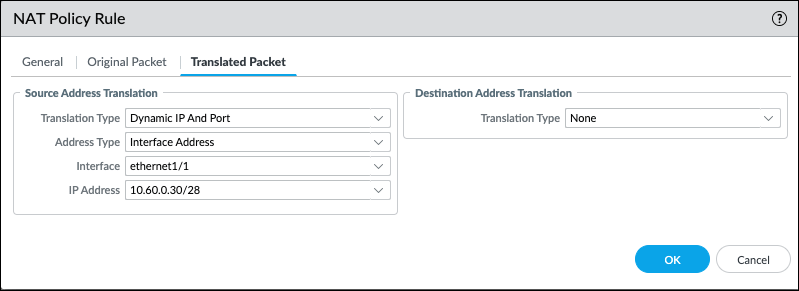
 7. Click **Translated Packet**.
8. At Translation Type, select **Dynamic IP And Port**.
9. At Address Type, select **Interface Address**.
10. At Interface, select **ethernet1/1**, as shown below.
7. Click **Translated Packet**.
8. At Translation Type, select **Dynamic IP And Port**.
9. At Address Type, select **Interface Address**.
10. At Interface, select **ethernet1/1**, as shown below.
 ## Setting up API Access
For the Aviatrix Controller to automatically update firewall instance route
tables, monitor firewall instance health, and manage instance failover, you need
to set up API access permissions.
Follow the
[Setting up API Access instructions](https://legacy.docs.aviatrix.com/documentation/latest/security/paloalto-vmseries-oci/#setting-up-api-access)
to enable API access.
## Validating the Configuration
Now your firewall instance is ready to receive packets.
For example, launch one instance in Spoke-1 VCN and Spoke-2 VCN. From one
instance, ping the other instance. The ping should go through.
## Viewing the Traffic Log
You can view if traffic is forwarded to the firewall instance by logging in to
the VM-Series console.
1. Click **Monitor**.
2. Start pinging packets from one Spoke VCN to another Spoke VCN.
## Setting up API Access
For the Aviatrix Controller to automatically update firewall instance route
tables, monitor firewall instance health, and manage instance failover, you need
to set up API access permissions.
Follow the
[Setting up API Access instructions](https://legacy.docs.aviatrix.com/documentation/latest/security/paloalto-vmseries-oci/#setting-up-api-access)
to enable API access.
## Validating the Configuration
Now your firewall instance is ready to receive packets.
For example, launch one instance in Spoke-1 VCN and Spoke-2 VCN. From one
instance, ping the other instance. The ping should go through.
## Viewing the Traffic Log
You can view if traffic is forwarded to the firewall instance by logging in to
the VM-Series console.
1. Click **Monitor**.
2. Start pinging packets from one Spoke VCN to another Spoke VCN.