> ## Documentation Index
> Fetch the complete documentation index at: https://docs.aviatrix.com/llms.txt
> Use this file to discover all available pages before exploring further.
# Example Configuration for Check Point VM in Azure
> In this document, we provide an example to set up the Check Point Security Gateway instance for you to validate that packets are indeed sent to the Check Point Security Gateway for VNet-to-VNet and from VNet to internet traffic inspection.
In this document, we provide an example to set up the Check Point Security
Gateway instance for you to validate that packets are indeed sent to the Check
Point Security Gateway for VNet-to-VNet and from VNet to internet traffic
inspection.
The terms "firewall" and "Security Gateway" will be used interchangeably in
this document. Both refer to the Check Point Security Gateway product.
## Prerequisites for Check Point in Azure Firewall
Before you start, make sure you understand:
* Basic Check Point Architecture
* Check Point Security Management
Aviatrix supports the following Check Point AMIs and software versions.
| Supported AMI Name | Software Version |
| -------------------------------------------------------------------------- | ---------------- |
| CloudGuard IaaS Single Gateway - BYOL | R80.40, R80.30 |
| CloudGuard IaaS Single Gateway Threat Prevention & SandBlast (NGTX) - PAYG | R80.40, R80.30 |
| CloudGuard IaaS Single Gateway with Thread Prevention (NGTP) - PAYG | R80.40, R80.30 |
| CloudGuard IaaS Standalone (Gateway + Management) - BYOL | R80.40 |
Check Point Standalone does not require Security Management to manage polices.
Gateway NGTP and NGTX both require Security Management to configure Security
Gateway Polices.
## Check Point Reference Architecture (Azure)
Before validating the Check Point traffic in Azure it is important to understand
the basic Check Point architecture (reference diagram below) so that you can
configure Check Point Security Gateway properly.
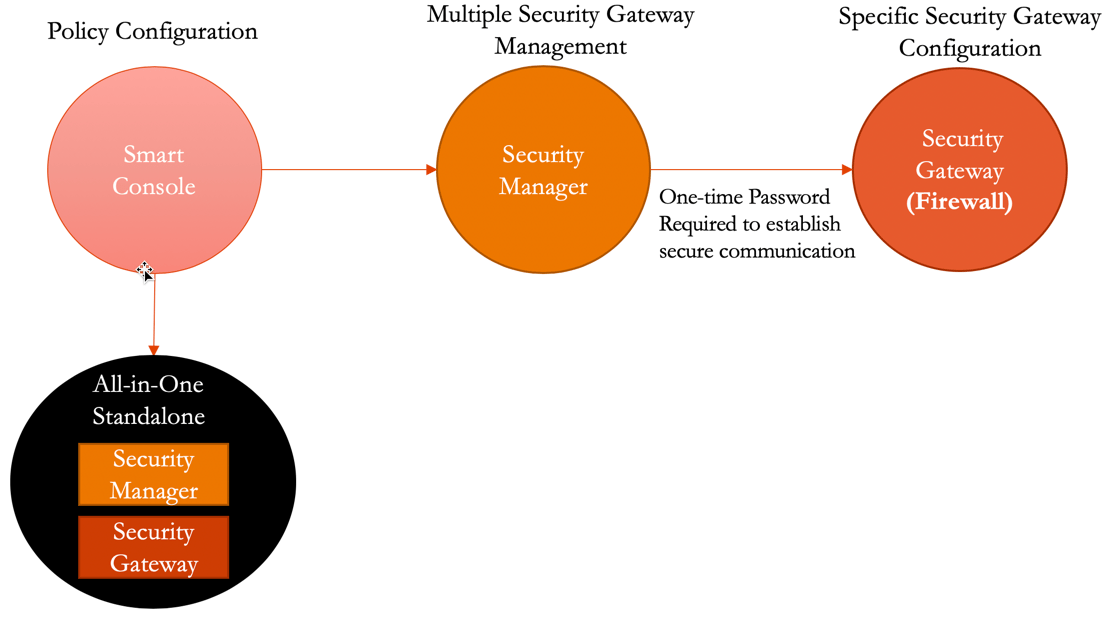 As per above the following steps will be required to configure security polices
successfully:
1. Launch Check Point Security Gateway - Configure Interfaces and Static Routes
and other specific Security Gateway configuration.
2. Download, install, and configure Check Point Security Management (Optional).
3. Download, install, and configure Check Point Smart Console - Launch Smart
Console using Security Manager IP, add/authenticate one or more security
gateways, configure security rules/polices, and push it to security gateways.
Follow the below steps to launch and configure Check Point Security Gateway in
Azure.
If you are looking to deploy Check Point in an AWS environment, your starting
point is
here
.
## Launching Check Point Firewall from Aviatrix CoPilot (Azure)
You must first{" "}
create a Transit FireNet in Azure
, and{" "}
deploy a Check Point firewall{" "}
in that Transit FireNet.
You can use the Security Gateway information in this example for your reference.
Adjust it depending on your requirements.
| Example setting | Example value |
| ----------------------- | ----------------------------------------------------------------- |
| Firewall Image | Check Point CloudGuard IaaS Single Gateway R80.40 - PAYG (NGTP) |
| Firewall Image Version | 8040.900294.0593 |
| Firewall Instance Size | Standard\_D3\_v2 |
| Egress Interface Subnet | Select the subnet whose name contains "Public-FW-ingress-egress". |
| Username | admin (no alternatives) |
| Authentication Method | Password |
| Password | Input a good password of your choice |
| SIC Key | Input a good SIC Key. |
| Attach | Check |
Make note of the SIC (Secure Inter-communication) Key; it is required to add
the Security Gateway inside the Security Manager.
The Check Point Security Gateway instance has only two interfaces as described
below. Additionally, firewall instance eth1 is on the same subnet as the FireNet
gateway eth2 interface.
| Check Point VM instance interfaces | Description | Inbound Security Group Rule |
| ------------------------------------------ | ----------------------------- | --------------------------- |
| eth0 (on subnet -Public-FW-ingress-egress) | Egress or Untrusted interface | Allow ALL |
| eth1 (on subnet -dmz-firewall-lan) | LAN or Trusted interface | Allow ALL (Do not change) |
After the launch is complete, Aviatrix CoPilot automatically initiates the
Security Gateway on-boarding process, configures interfaces and programs RFC
1918 routes in the Check Point Security Gateway.
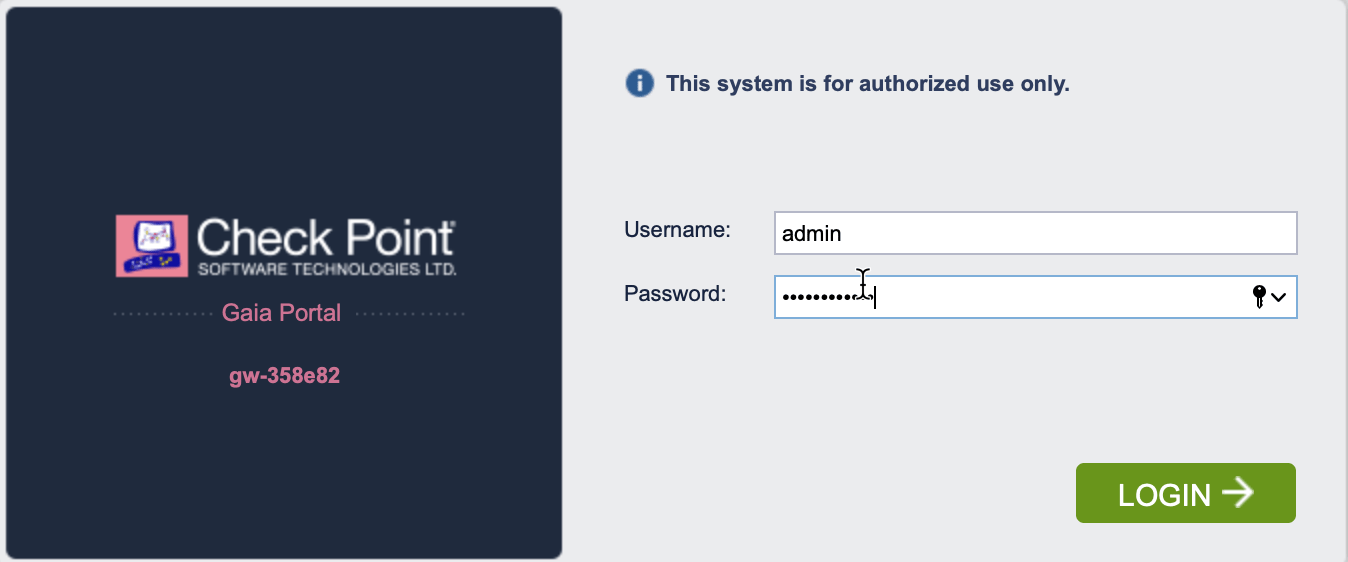
## Logging in to the Check Point Firewall Gaia Portal
After the firewall launch is completed in Aviatrix CoPilot, go to Security >
FireNet > Firewall and click on the firewall link in the Management UI column.
This step applies to AWS and Azure.
The URL takes you to the Check Point Firewall Gaia Portal you just launched.
As per above the following steps will be required to configure security polices
successfully:
1. Launch Check Point Security Gateway - Configure Interfaces and Static Routes
and other specific Security Gateway configuration.
2. Download, install, and configure Check Point Security Management (Optional).
3. Download, install, and configure Check Point Smart Console - Launch Smart
Console using Security Manager IP, add/authenticate one or more security
gateways, configure security rules/polices, and push it to security gateways.
Follow the below steps to launch and configure Check Point Security Gateway in
Azure.
If you are looking to deploy Check Point in an AWS environment, your starting
point is
here
.
## Launching Check Point Firewall from Aviatrix CoPilot (Azure)
You must first{" "}
create a Transit FireNet in Azure
, and{" "}
deploy a Check Point firewall{" "}
in that Transit FireNet.
You can use the Security Gateway information in this example for your reference.
Adjust it depending on your requirements.
| Example setting | Example value |
| ----------------------- | ----------------------------------------------------------------- |
| Firewall Image | Check Point CloudGuard IaaS Single Gateway R80.40 - PAYG (NGTP) |
| Firewall Image Version | 8040.900294.0593 |
| Firewall Instance Size | Standard\_D3\_v2 |
| Egress Interface Subnet | Select the subnet whose name contains "Public-FW-ingress-egress". |
| Username | admin (no alternatives) |
| Authentication Method | Password |
| Password | Input a good password of your choice |
| SIC Key | Input a good SIC Key. |
| Attach | Check |
Make note of the SIC (Secure Inter-communication) Key; it is required to add
the Security Gateway inside the Security Manager.
The Check Point Security Gateway instance has only two interfaces as described
below. Additionally, firewall instance eth1 is on the same subnet as the FireNet
gateway eth2 interface.
| Check Point VM instance interfaces | Description | Inbound Security Group Rule |
| ------------------------------------------ | ----------------------------- | --------------------------- |
| eth0 (on subnet -Public-FW-ingress-egress) | Egress or Untrusted interface | Allow ALL |
| eth1 (on subnet -dmz-firewall-lan) | LAN or Trusted interface | Allow ALL (Do not change) |
After the launch is complete, Aviatrix CoPilot automatically initiates the
Security Gateway on-boarding process, configures interfaces and programs RFC
1918 routes in the Check Point Security Gateway.
## Logging in to the Check Point Firewall Gaia Portal
After the firewall launch is completed in Aviatrix CoPilot, go to Security >
FireNet > Firewall and click on the firewall link in the Management UI column.
This step applies to AWS and Azure.
The URL takes you to the Check Point Firewall Gaia Portal you just launched.
 Launching Check Point firewall instances from Aviatrix CoPilot automatically
initiates its onboarding process.
For initial Check Point login information, go to Credentials for Check Point
Initial Login. You must be registered to access the Aviatrix Customer Support
website. If you are not already registered, you can sign-up at
[https://support.aviatrix.com](https://support.aviatrix.com).
## Vendor Integration
Click here for information
on vendor integration.
## Deploying and Installing Check Point Security Management
The Check Point Security Gateway launched in
[Check Point Reference Architecture (Azure)](#check-point-reference-architecture-azure)
requires a management console (Check Point Security Manager) for managing one or
more Security Gateways.
Deploy and install the Check Point Security Management from Azure Marketplace in
the Azure Console.
Check Point Security Management CloudGuard version should be R80.40.
Check Point Security Manager deployment and installation steps are not part of
this guide, and have to be done manually.
## Downloading and Installing the SmartConsole
The Check Point Single Gateway 'All-In-One' image is used in this example and
does not require Check Point Security Manager. All other Gateway images require
Check Point Security Manager. If you are not using the 'All-In-One' image, skip
this step and follow the
[Deploying and Installing the SmartConsole](#deploying-and-installing-check-point-security-management)
steps.
The SmartConsole must be downloaded on a Windows-based computer.
Log in to the Check Point Gateway and download the SmartConsole on a
Windows-based computer.
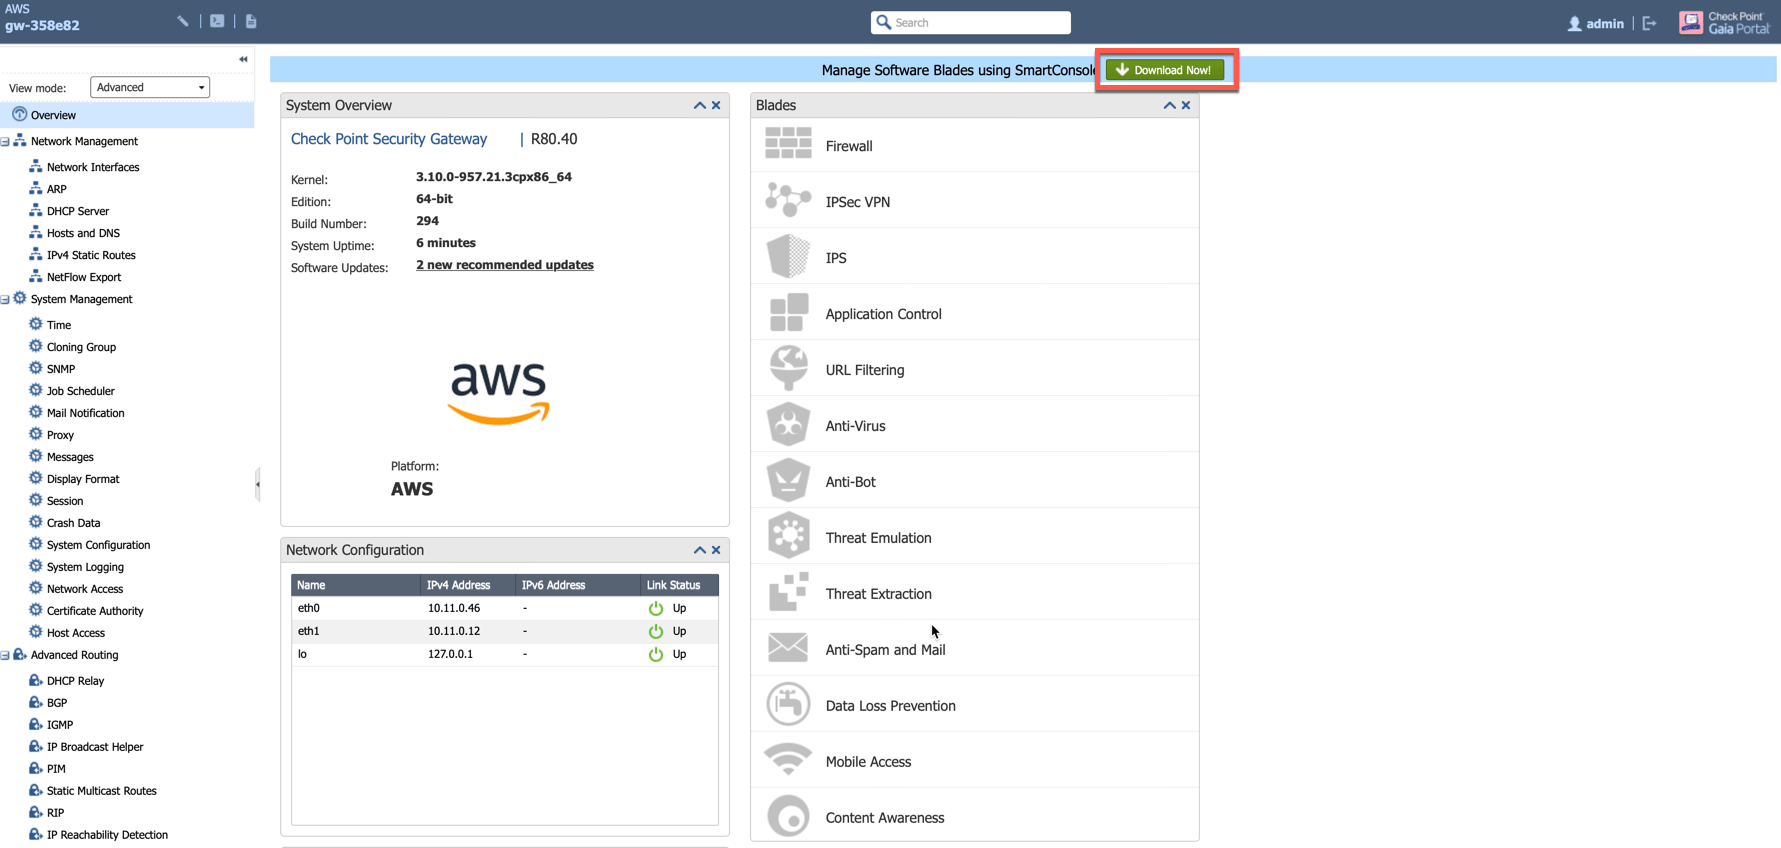
Option 1: click **Download Now!** with the message "Manage Software Blades using
SmartConsole" on the Overview page as shown below.
Launching Check Point firewall instances from Aviatrix CoPilot automatically
initiates its onboarding process.
For initial Check Point login information, go to Credentials for Check Point
Initial Login. You must be registered to access the Aviatrix Customer Support
website. If you are not already registered, you can sign-up at
[https://support.aviatrix.com](https://support.aviatrix.com).
## Vendor Integration
Click here for information
on vendor integration.
## Deploying and Installing Check Point Security Management
The Check Point Security Gateway launched in
[Check Point Reference Architecture (Azure)](#check-point-reference-architecture-azure)
requires a management console (Check Point Security Manager) for managing one or
more Security Gateways.
Deploy and install the Check Point Security Management from Azure Marketplace in
the Azure Console.
Check Point Security Management CloudGuard version should be R80.40.
Check Point Security Manager deployment and installation steps are not part of
this guide, and have to be done manually.
## Downloading and Installing the SmartConsole
The Check Point Single Gateway 'All-In-One' image is used in this example and
does not require Check Point Security Manager. All other Gateway images require
Check Point Security Manager. If you are not using the 'All-In-One' image, skip
this step and follow the
[Deploying and Installing the SmartConsole](#deploying-and-installing-check-point-security-management)
steps.
The SmartConsole must be downloaded on a Windows-based computer.
Log in to the Check Point Gateway and download the SmartConsole on a
Windows-based computer.
Option 1: click **Download Now!** with the message "Manage Software Blades using
SmartConsole" on the Overview page as shown below.
 Option 2: download it by using this link:
[R80.40](https://supportcenter.checkpoint.com/supportcenter/portal?eventSubmit_doGoviewsolutiondetails=\&solutionid=sk141196).
### Installing and Logging into the SmartConsole
The Check Point SmartConsole is a Windows-based application used to configure
and manage polices. These policies can be applied to one or more Security
Gateways.
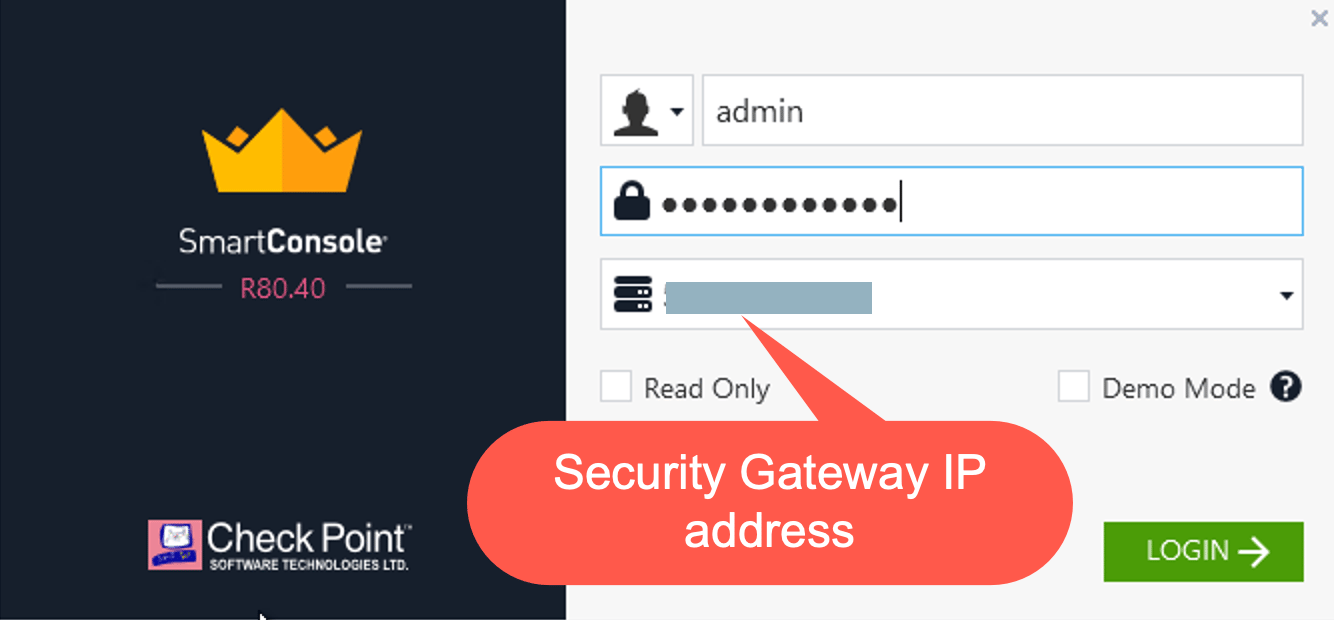
Install the SmartConsole and log in with the Gaia Portal username, password and
IP Address of the Check Point Gateway.
Option 2: download it by using this link:
[R80.40](https://supportcenter.checkpoint.com/supportcenter/portal?eventSubmit_doGoviewsolutiondetails=\&solutionid=sk141196).
### Installing and Logging into the SmartConsole
The Check Point SmartConsole is a Windows-based application used to configure
and manage polices. These policies can be applied to one or more Security
Gateways.
Install the SmartConsole and log in with the Gaia Portal username, password and
IP Address of the Check Point Gateway.
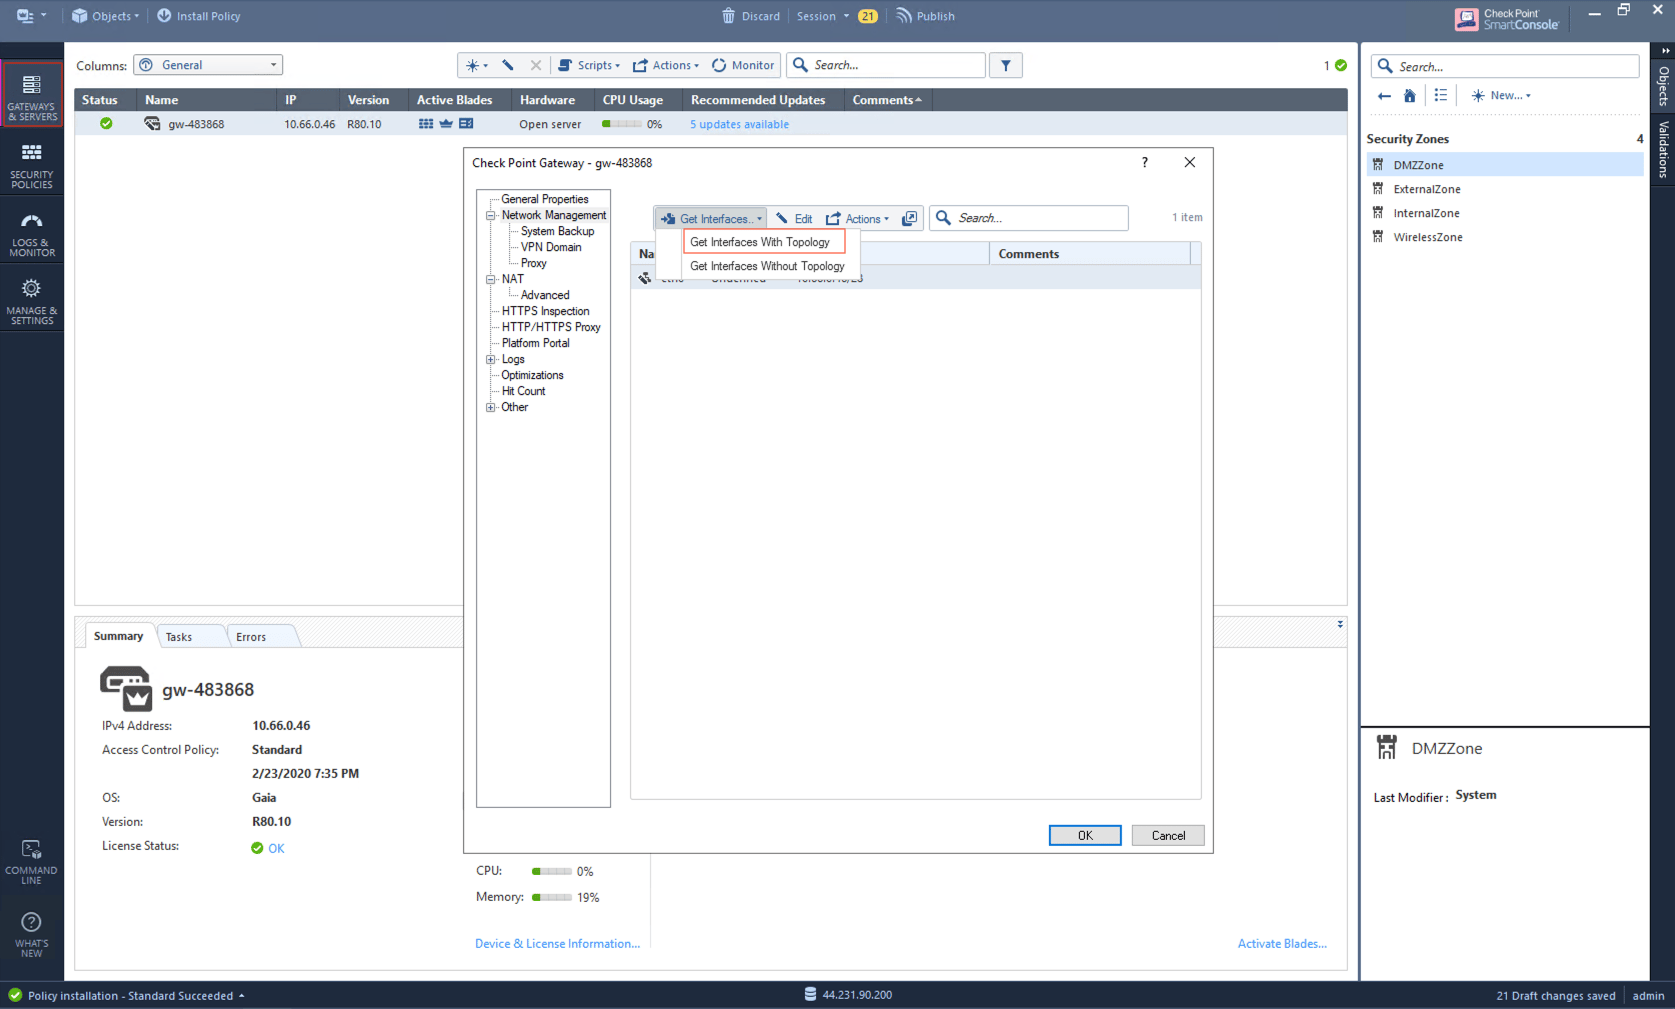
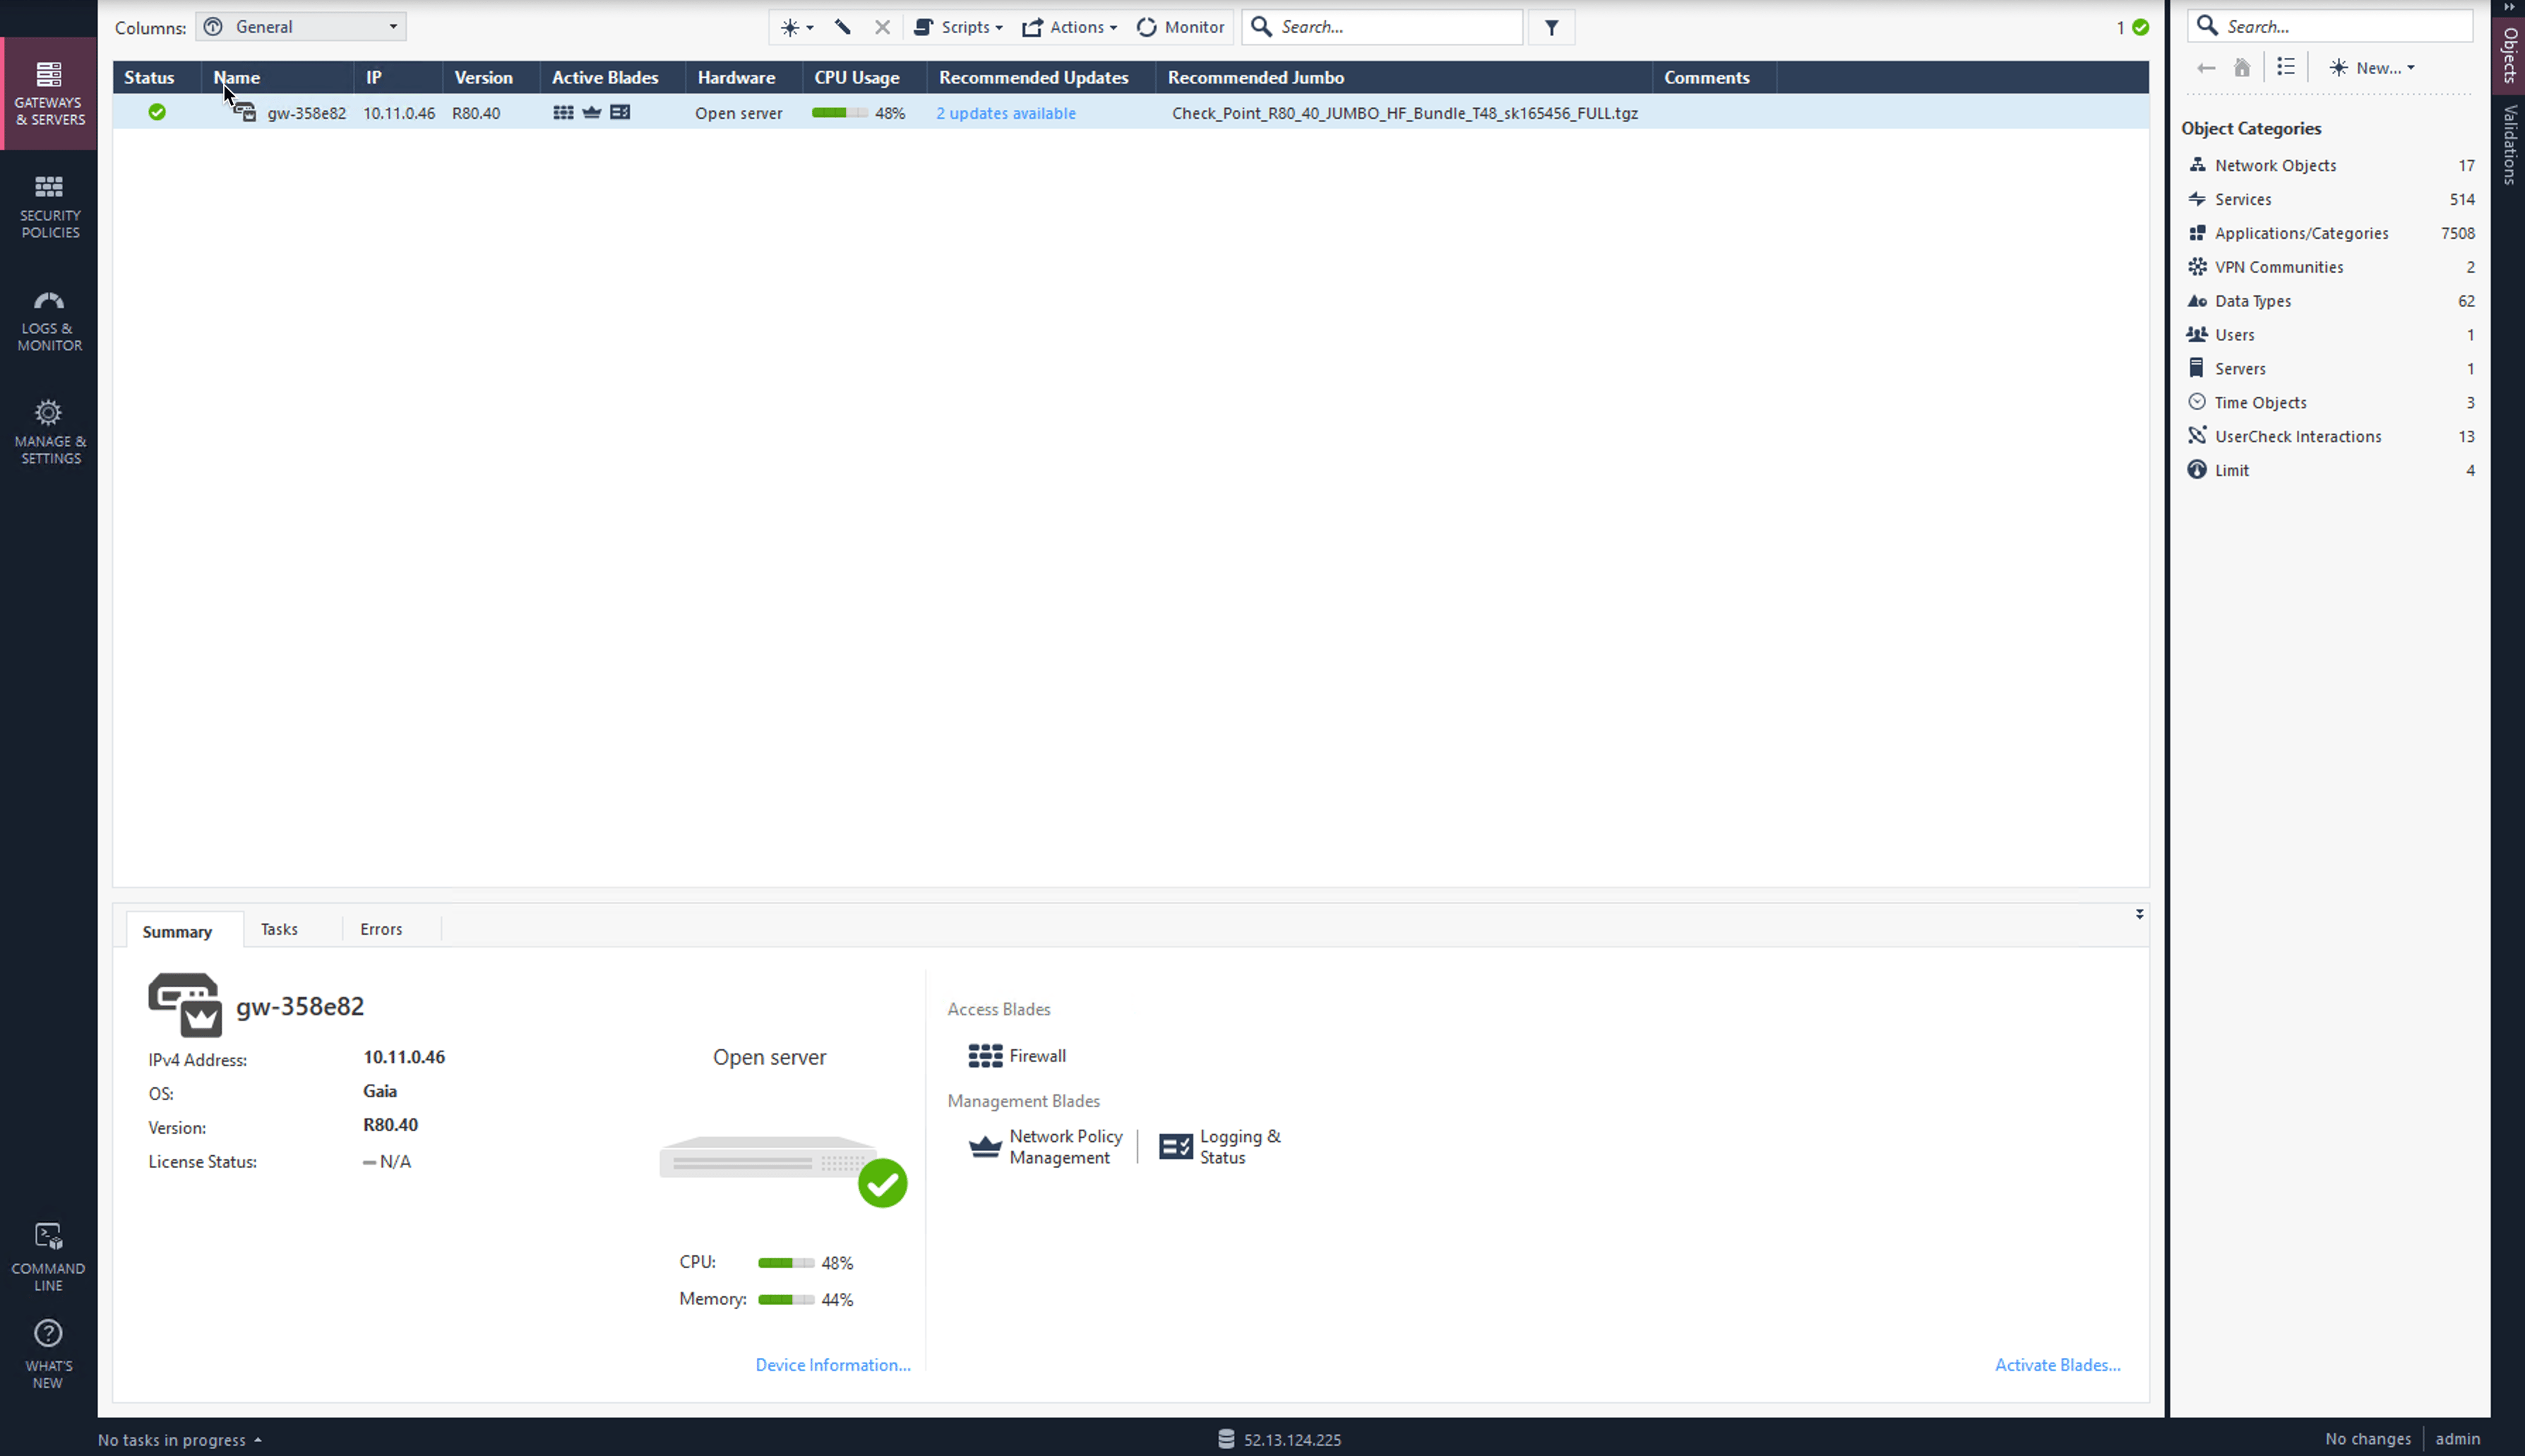 Execute the "Get Interfaces With Topology" function to sync up the settings that
we have configured via the Gaia Portal.
1. Select **Gateways & Servers** on the left.
2. Double-click on the Check Point Firewall.
3. Select **Network Management** on the left.
4. Click **Get Interfaces** to expand options.
5. Click **Get Interfaces With Topology**.
Execute the "Get Interfaces With Topology" function to sync up the settings that
we have configured via the Gaia Portal.
1. Select **Gateways & Servers** on the left.
2. Double-click on the Check Point Firewall.
3. Select **Network Management** on the left.
4. Click **Get Interfaces** to expand options.
5. Click **Get Interfaces With Topology**.
 6. Click **Yes**.
7. Review the Get Topology Results which should match to the settings that we
have configured via Gaia Portal.
6. Click **Yes**.
7. Review the Get Topology Results which should match to the settings that we
have configured via Gaia Portal.
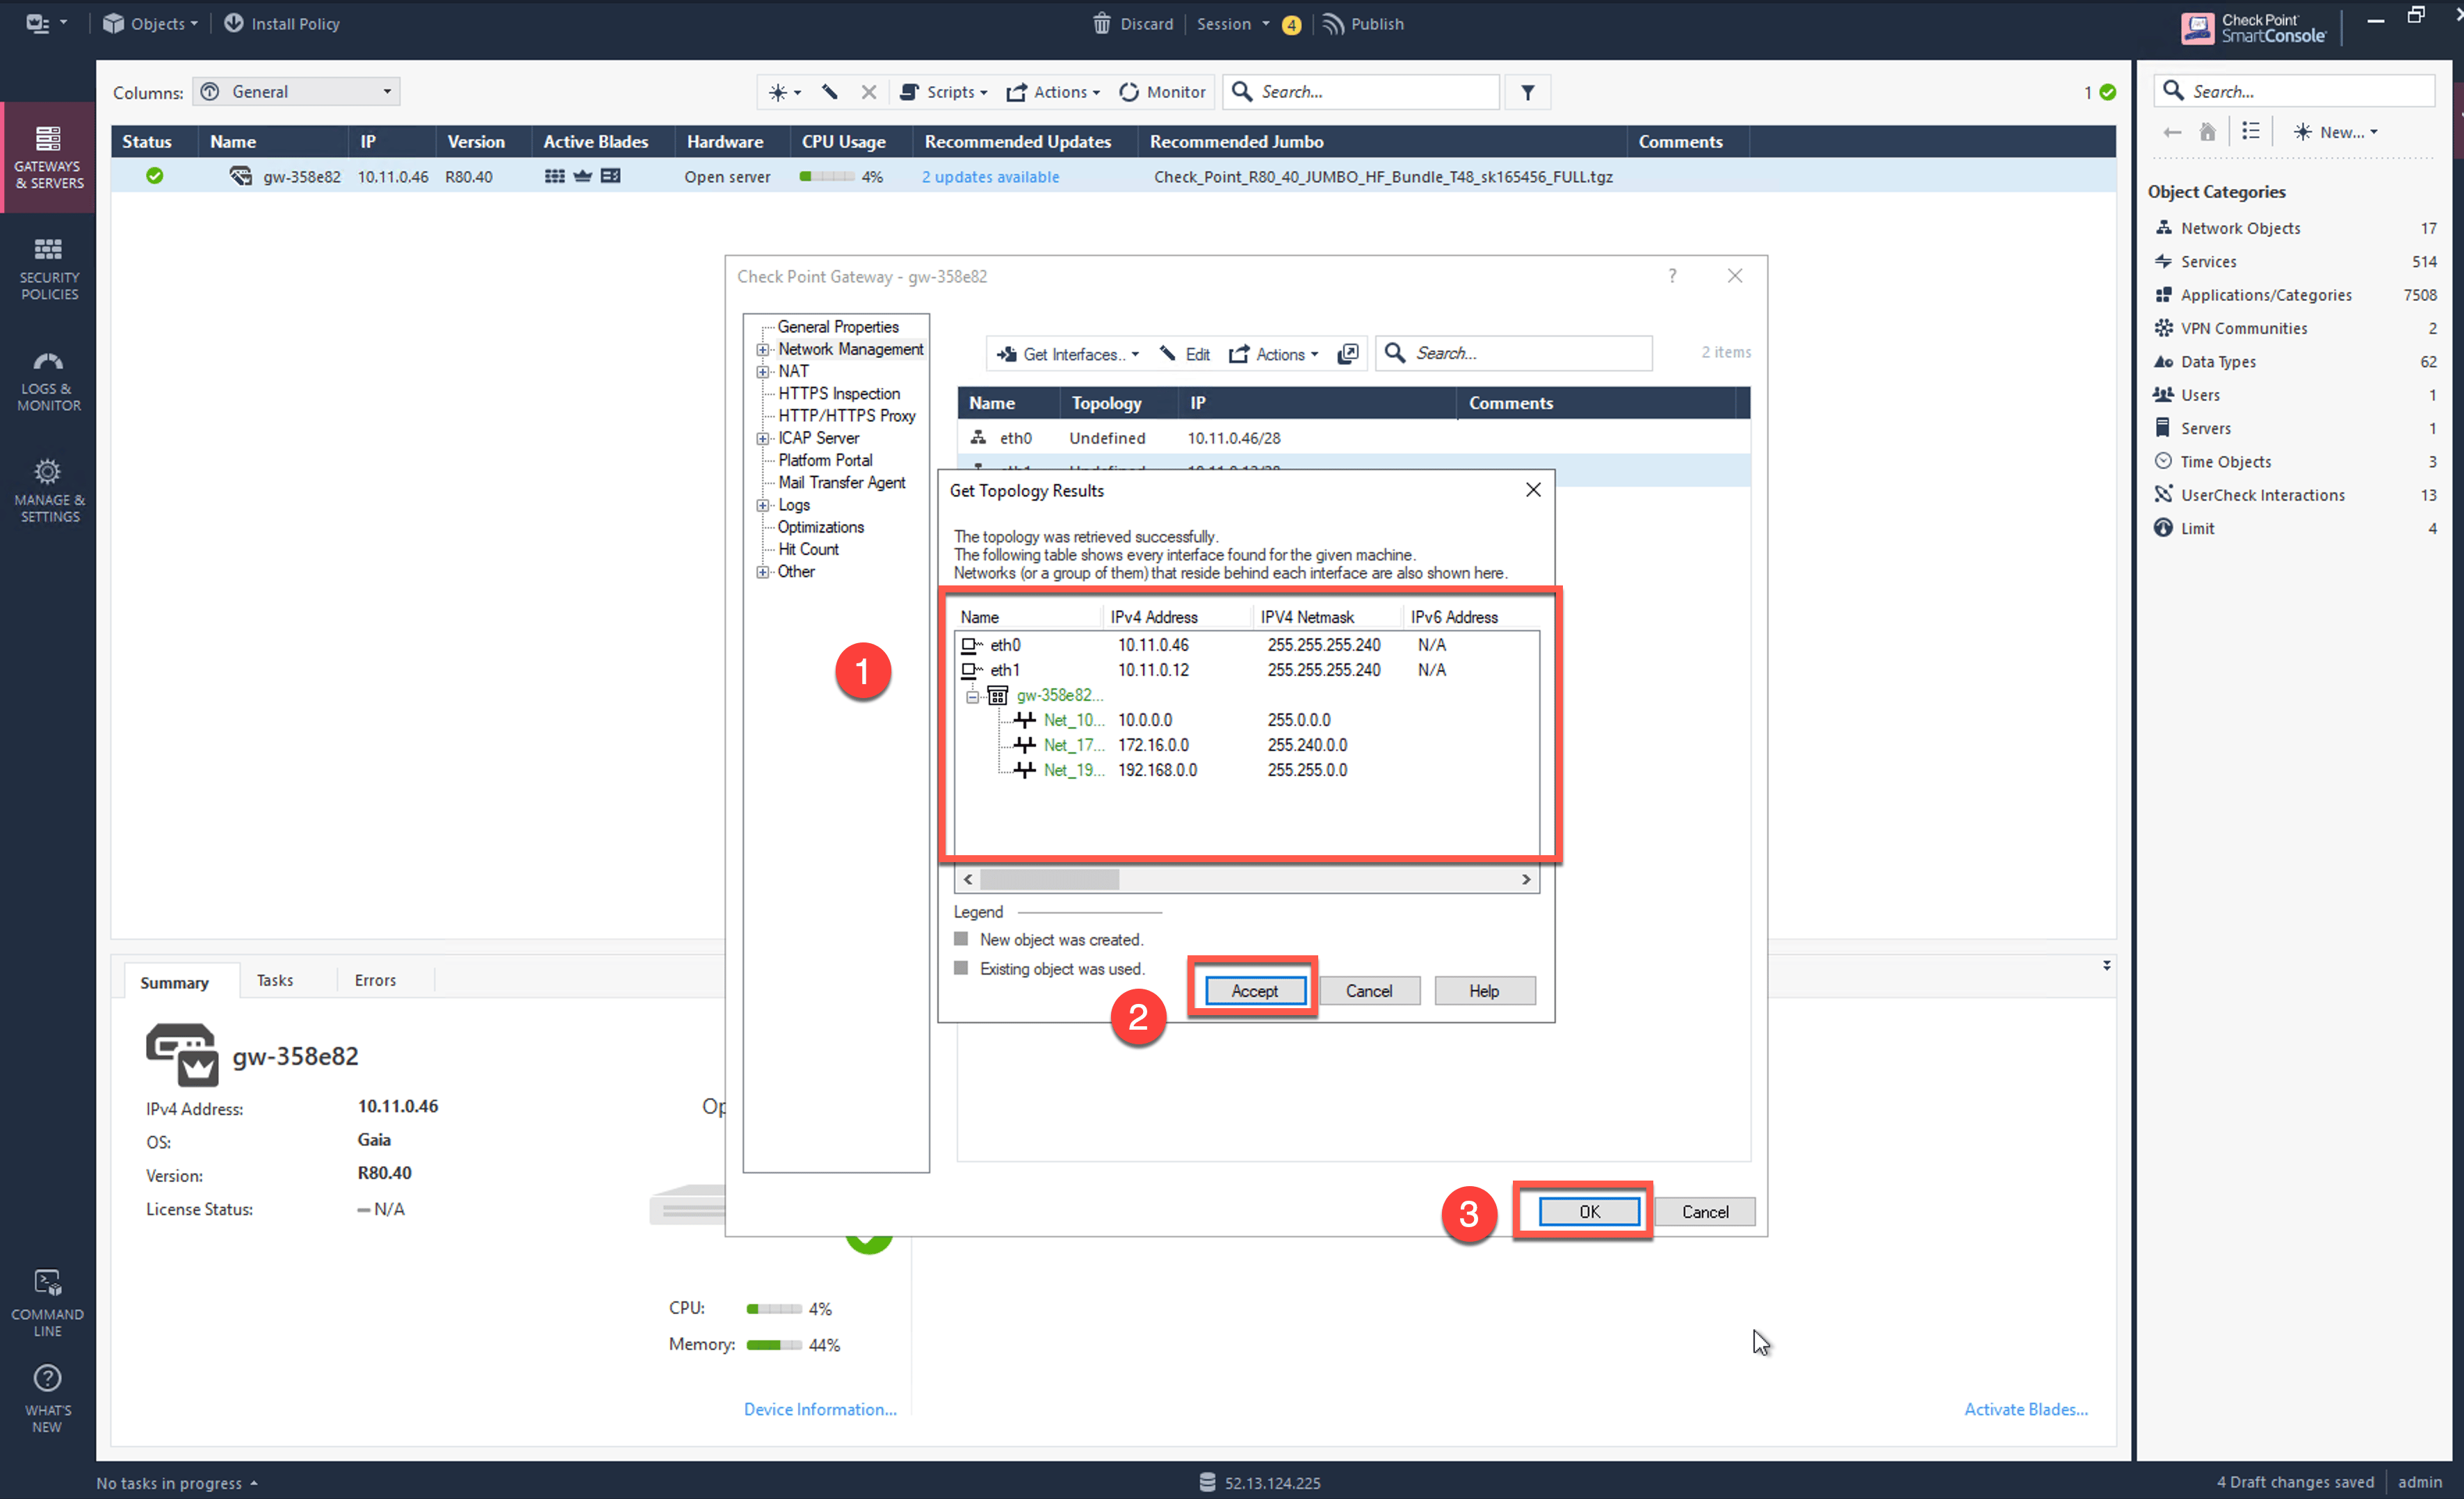 8. Click **Accept**.
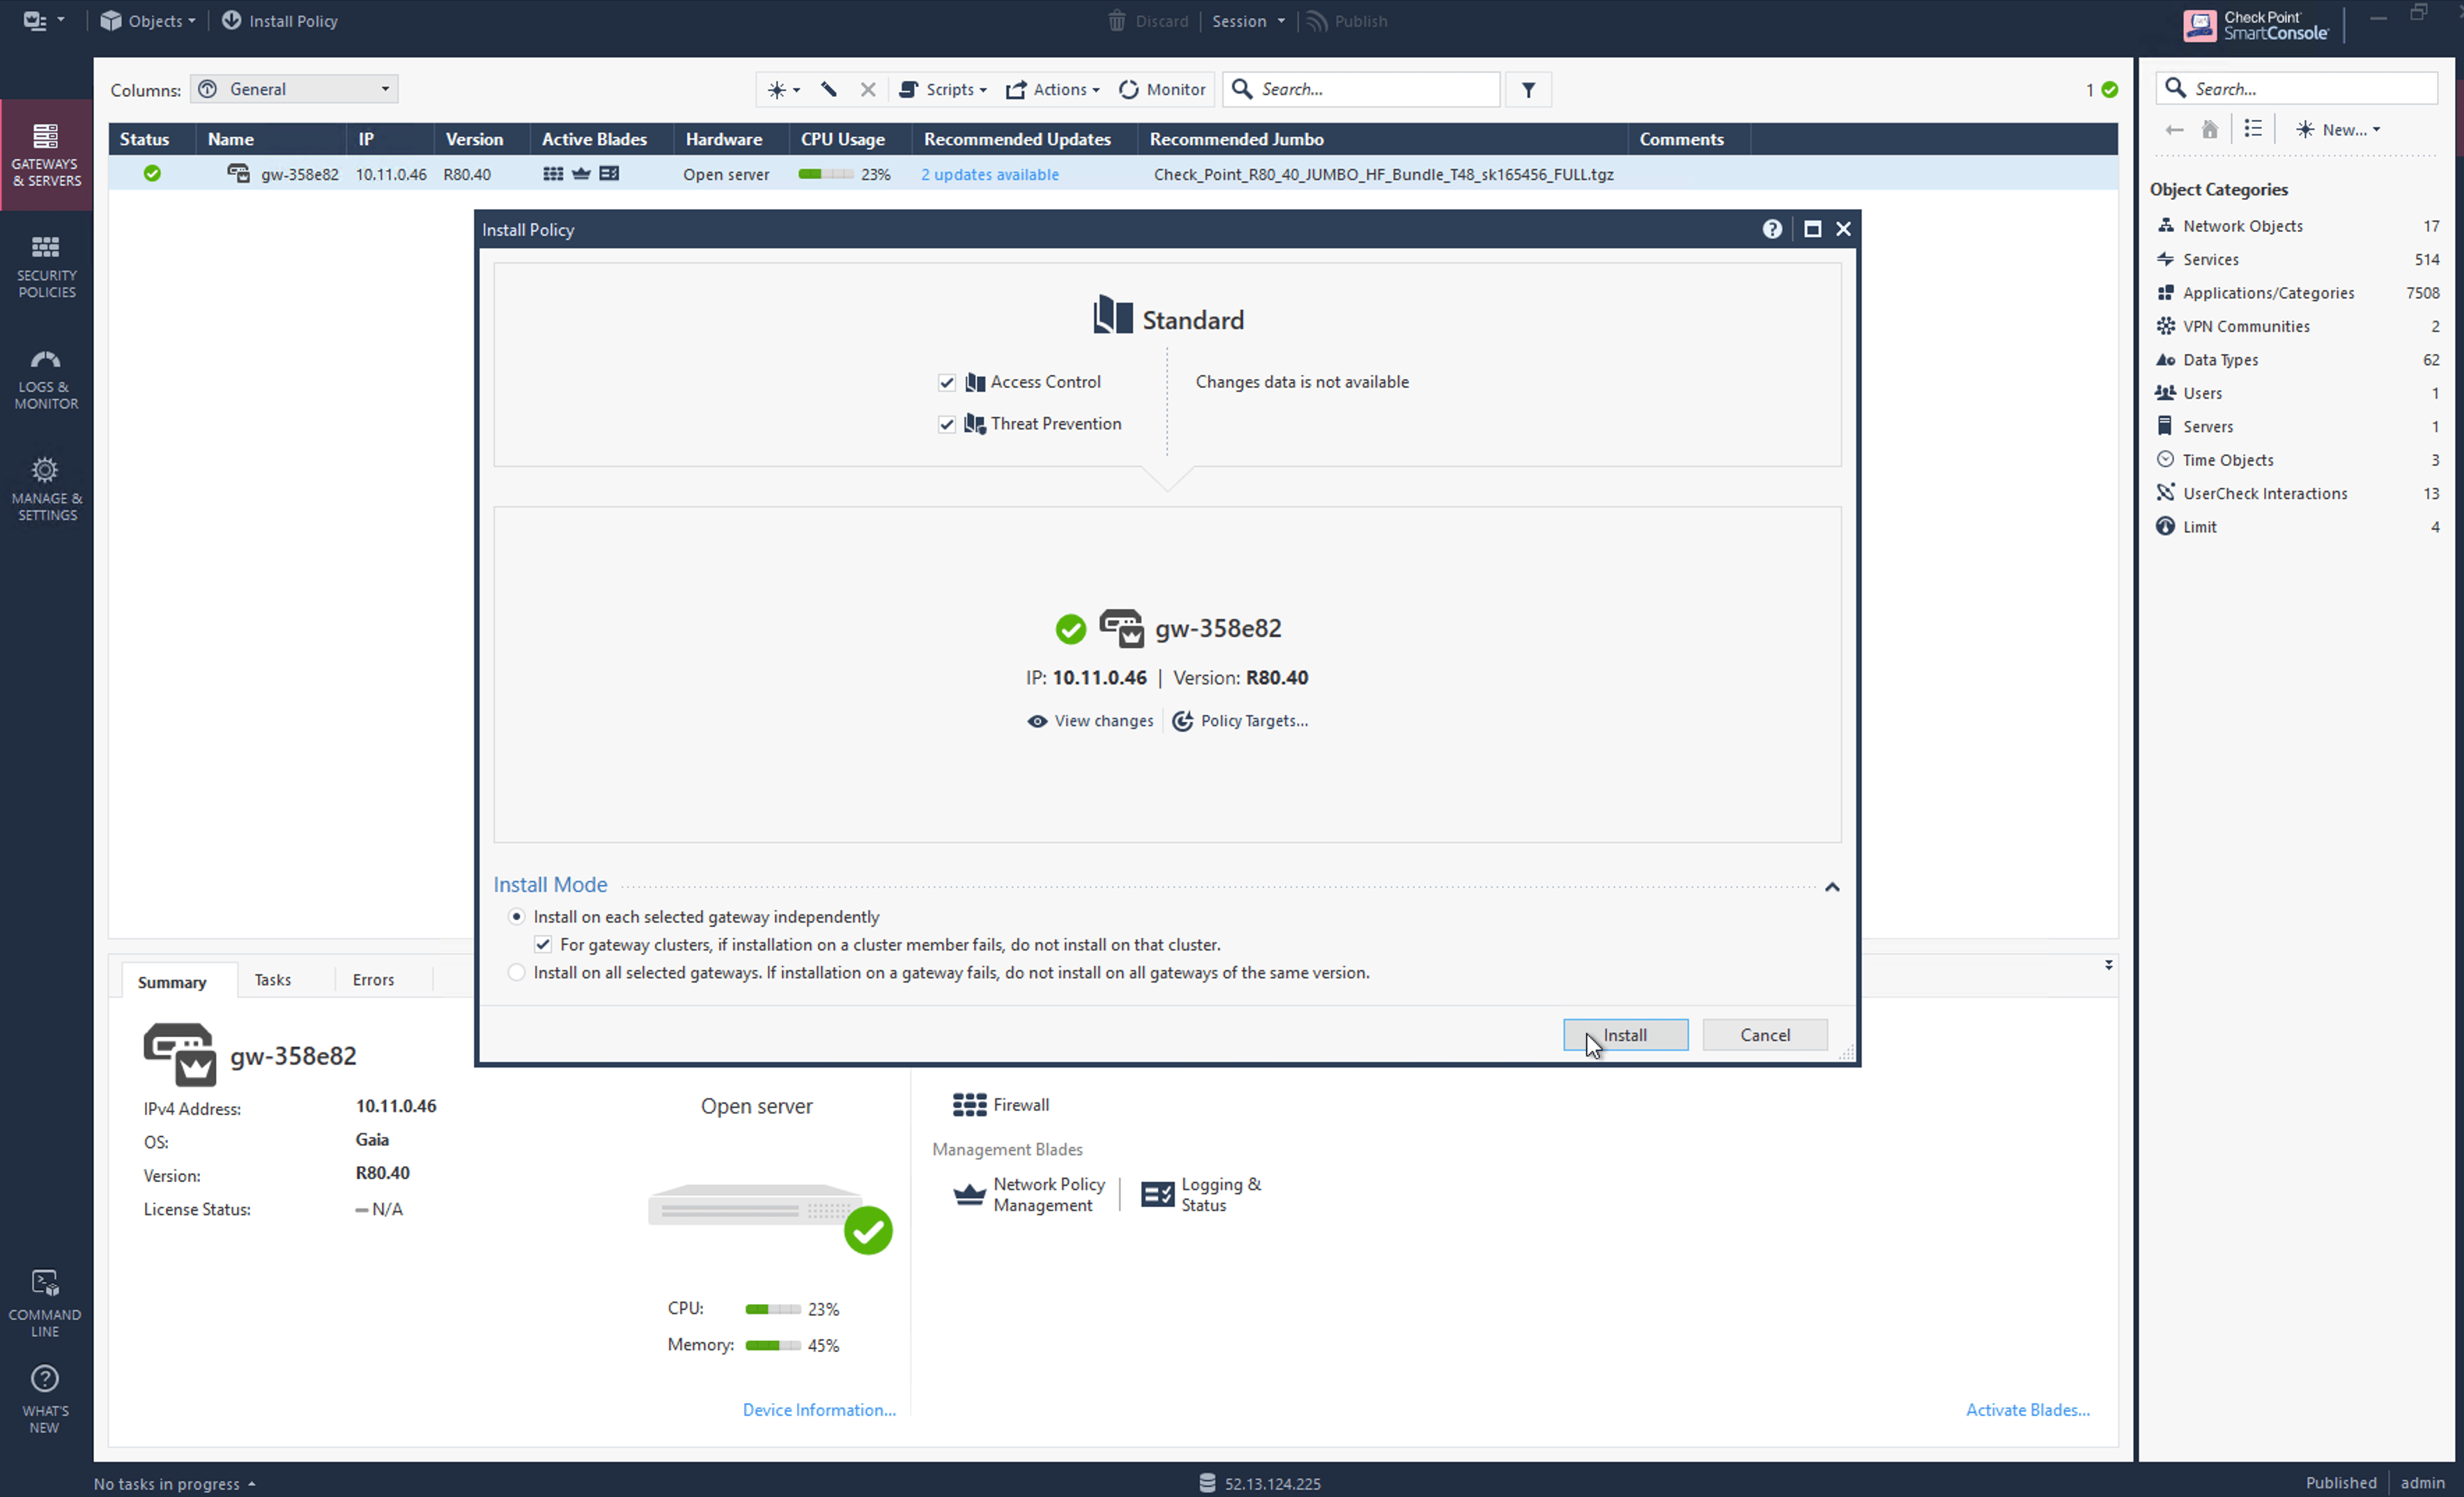
9. Go to Security Policies > Access Control > Policy and click **Install
Policy** and then **Install** to commit the settings.
8. Click **Accept**.
9. Go to Security Policies > Access Control > Policy and click **Install
Policy** and then **Install** to commit the settings.
 ### (Optional) Configure Security Gateway Secure Inter-Communication (SIC) Key
If you do not remember your SIC Key, or you want to generate a new one, you can
follow these steps. Otherwise, you can skip them.
The Check Point Gateway needs to be configured with a one-time secure password
to establish the secure communication with the Check Point Security Management
Portal.
SSH into the Check Point Gateway to configure the One-time Secure Password.
```
%ssh admin@ip-address
The authenticity of host 'ip-address' can't be established.
ECDSA key fingerprint is SHA256:1S6wQF4xI6YtieM1te0lnI2wXoRDiDfa85ctsDHd1N4.
Are you sure you want to continue connecting (yes/no/[fingerprint])? yes
Failed to add the host to the list of known hosts (/Users/ahmednaail/.ssh/known_hosts).
This system is for authorized use only.
Password:
You have logged into the system.
By using this product you agree to the terms and conditions
as specified in https://www.Check Point.com/download_agreement.html
CLINFR0771 Config lock is owned by admin. Use the command 'lock database override' to acquire the lock.
cp-firewall-sc-azure> lock database override
cp-firewall-sc-azure> set expert-password
Enter new expert password:
Enter new expert password (again):
cp-firewall-sc-azure> expert
Enter expert password:
Warning! All configurations should be done through clish
You are in expert mode now.
[Expert@cp-firewall-sc-azure:0]# cpconfig
This program will let you re-configure
your Check Point products configuration.
Configuration Options:
----------------------
(1) Licenses and contracts
(2) SNMP Extension
(3) PKCS#11 Token
(4) Random Pool
(5) Secure Internal Communication
(6) Enable cluster membership for this gateway
(7) Check Point CoreXL
(8) Automatic start of Check Point Products
(9) Exit
Enter your choice (1-9) :5
Configuring Secure Internal Communication...
============================================
The Secure Internal Communication is used for authentication between
Check Point components
Trust State: Initialized but Trust was not established
SWould you like to change the Activation Key? (y/n) [n] ? y
SThis operation will stop all Check Point Services (cpstop).
Are you sure you want to continue? (y/n) [n] ? y
Enter Activation Key:
Retype Activation Key:
initial_module:
Compiled OK.
initial_module:
Compiled OK.
Hardening OS Security: Initial policy will be applied
until the first policy is installed
The Secure Internal Communication was successfully initialized
Configuration Options:
----------------------
(1) Licenses and contracts
(2) SNMP Extension
(3) PKCS#11 Token
(4) Random Pool
(5) Secure Internal Communication
(6) Enable cluster membership for this gateway
(7) Check Point CoreXL
(8) Automatic start of Check Point Products
(9) Exit
Enter your choice (1-9) :9
Thank You...
```
Terminate the SSH session.
## Adding Check Point Security Gateway in SmartConsole
At this point, we have a one-time secure password (SIC Key) which will be used
to add a gateway inside Check Point Security Manager.
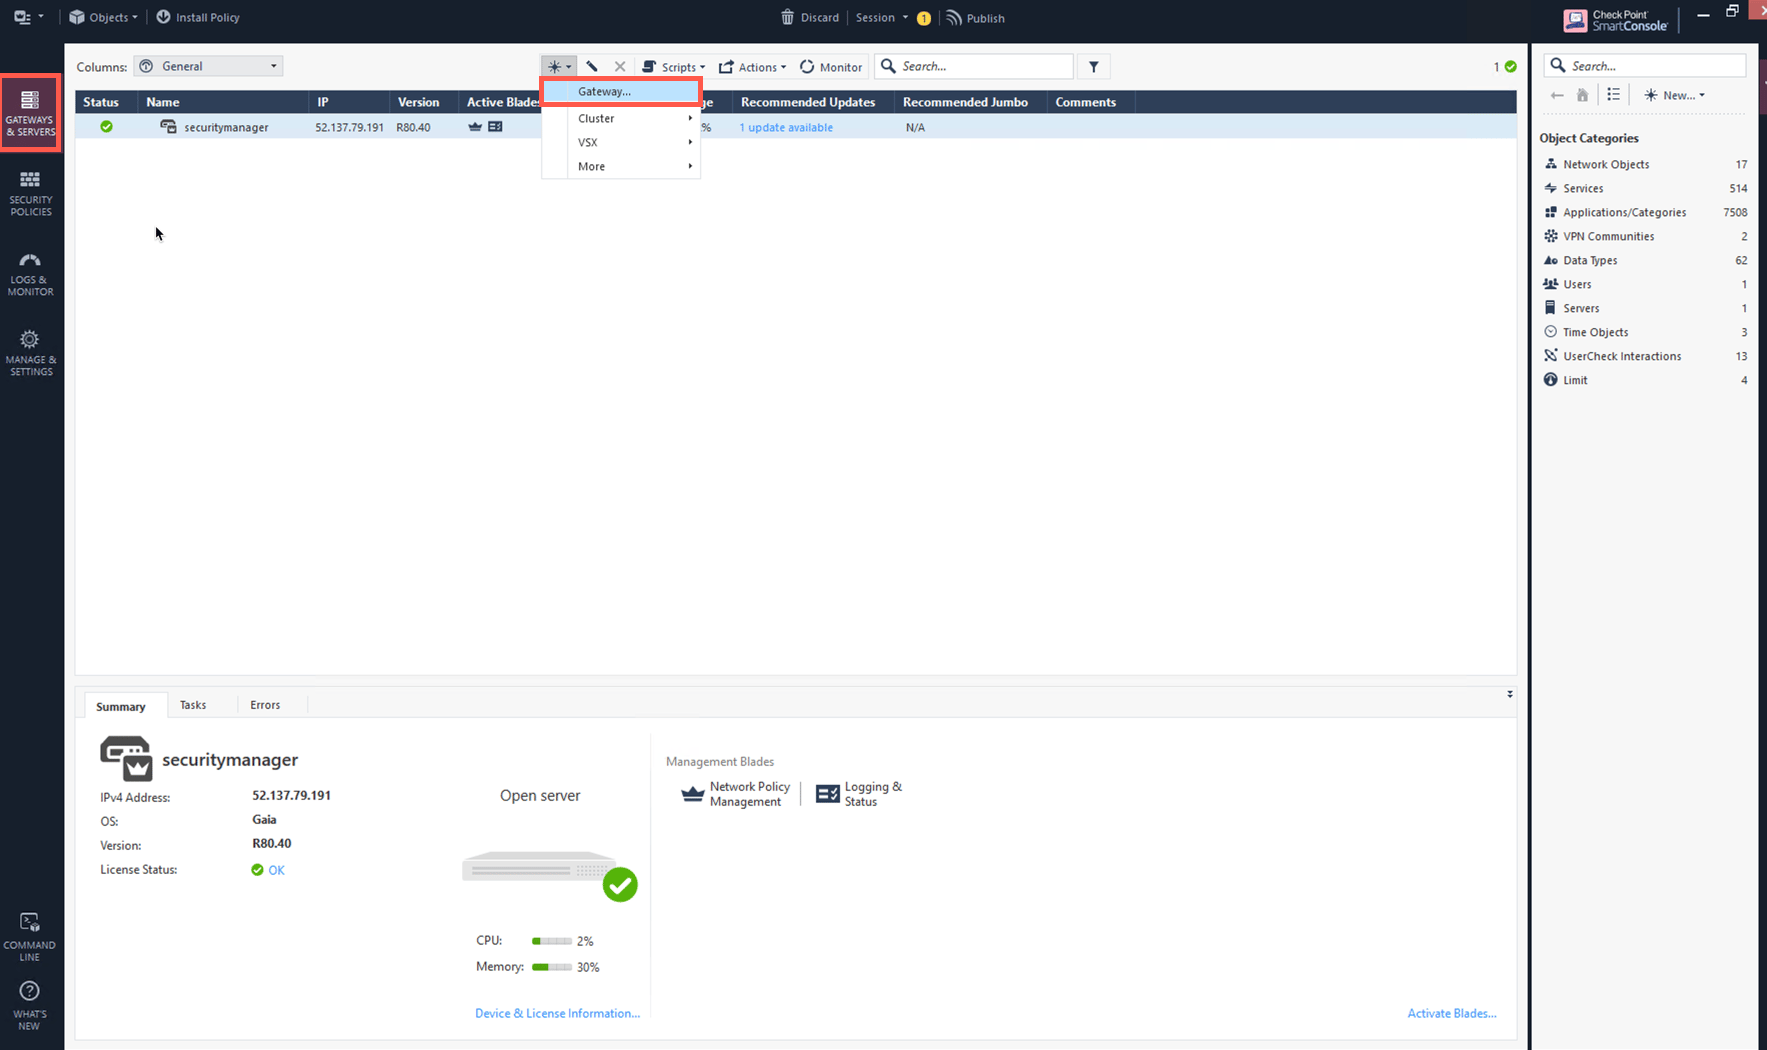
In the SmartConsole add a Gateway as shown below:
### (Optional) Configure Security Gateway Secure Inter-Communication (SIC) Key
If you do not remember your SIC Key, or you want to generate a new one, you can
follow these steps. Otherwise, you can skip them.
The Check Point Gateway needs to be configured with a one-time secure password
to establish the secure communication with the Check Point Security Management
Portal.
SSH into the Check Point Gateway to configure the One-time Secure Password.
```
%ssh admin@ip-address
The authenticity of host 'ip-address' can't be established.
ECDSA key fingerprint is SHA256:1S6wQF4xI6YtieM1te0lnI2wXoRDiDfa85ctsDHd1N4.
Are you sure you want to continue connecting (yes/no/[fingerprint])? yes
Failed to add the host to the list of known hosts (/Users/ahmednaail/.ssh/known_hosts).
This system is for authorized use only.
Password:
You have logged into the system.
By using this product you agree to the terms and conditions
as specified in https://www.Check Point.com/download_agreement.html
CLINFR0771 Config lock is owned by admin. Use the command 'lock database override' to acquire the lock.
cp-firewall-sc-azure> lock database override
cp-firewall-sc-azure> set expert-password
Enter new expert password:
Enter new expert password (again):
cp-firewall-sc-azure> expert
Enter expert password:
Warning! All configurations should be done through clish
You are in expert mode now.
[Expert@cp-firewall-sc-azure:0]# cpconfig
This program will let you re-configure
your Check Point products configuration.
Configuration Options:
----------------------
(1) Licenses and contracts
(2) SNMP Extension
(3) PKCS#11 Token
(4) Random Pool
(5) Secure Internal Communication
(6) Enable cluster membership for this gateway
(7) Check Point CoreXL
(8) Automatic start of Check Point Products
(9) Exit
Enter your choice (1-9) :5
Configuring Secure Internal Communication...
============================================
The Secure Internal Communication is used for authentication between
Check Point components
Trust State: Initialized but Trust was not established
SWould you like to change the Activation Key? (y/n) [n] ? y
SThis operation will stop all Check Point Services (cpstop).
Are you sure you want to continue? (y/n) [n] ? y
Enter Activation Key:
Retype Activation Key:
initial_module:
Compiled OK.
initial_module:
Compiled OK.
Hardening OS Security: Initial policy will be applied
until the first policy is installed
The Secure Internal Communication was successfully initialized
Configuration Options:
----------------------
(1) Licenses and contracts
(2) SNMP Extension
(3) PKCS#11 Token
(4) Random Pool
(5) Secure Internal Communication
(6) Enable cluster membership for this gateway
(7) Check Point CoreXL
(8) Automatic start of Check Point Products
(9) Exit
Enter your choice (1-9) :9
Thank You...
```
Terminate the SSH session.
## Adding Check Point Security Gateway in SmartConsole
At this point, we have a one-time secure password (SIC Key) which will be used
to add a gateway inside Check Point Security Manager.
In the SmartConsole add a Gateway as shown below:
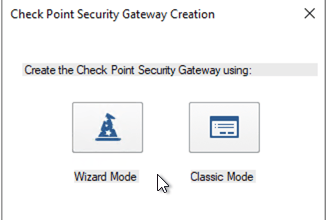
 1. Click on Wizard Mode.
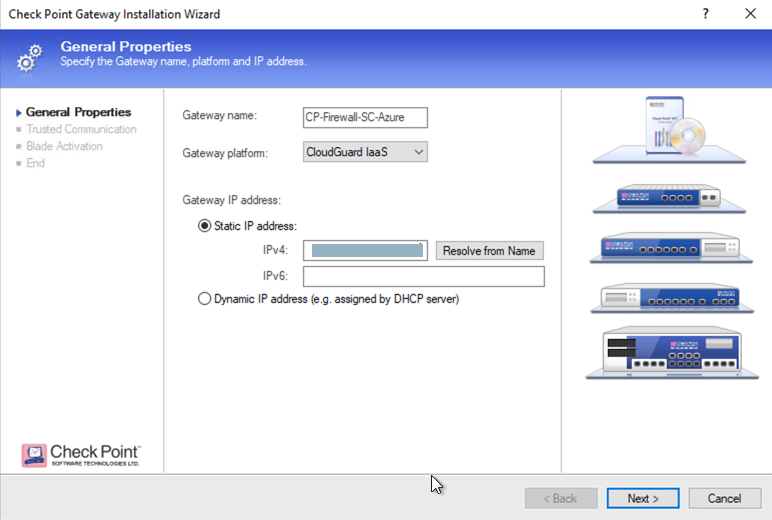
 2. Provide the gateway information as shown in the table:
| Field | Value |
| --------------------------- | -------------------------------------- |
| Gateway Name | Configure any name |
| Gateway Platform Gateway IP | Select CloudGuard IaaS |
| Static IP Address | Provide Check Point Gateway IP address |
2. Provide the gateway information as shown in the table:
| Field | Value |
| --------------------------- | -------------------------------------- |
| Gateway Name | Configure any name |
| Gateway Platform Gateway IP | Select CloudGuard IaaS |
| Static IP Address | Provide Check Point Gateway IP address |
 3. Establish a secure communication with a Gateway.
| Field | Value |
| ----------------- | --------------------------------------------------------------- |
| Gateway' Name | Provide you Gateway Name (Case-Sensitive) |
| One-time Password | Use same Password which you set during SSH session with Gateway |
| Trust State | Default Values |
3. Establish a secure communication with a Gateway.
| Field | Value |
| ----------------- | --------------------------------------------------------------- |
| Gateway' Name | Provide you Gateway Name (Case-Sensitive) |
| One-time Password | Use same Password which you set during SSH session with Gateway |
| Trust State | Default Values |
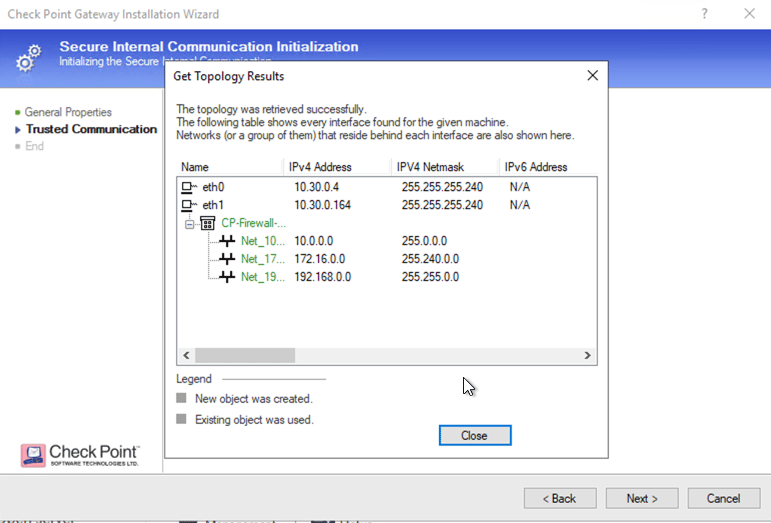
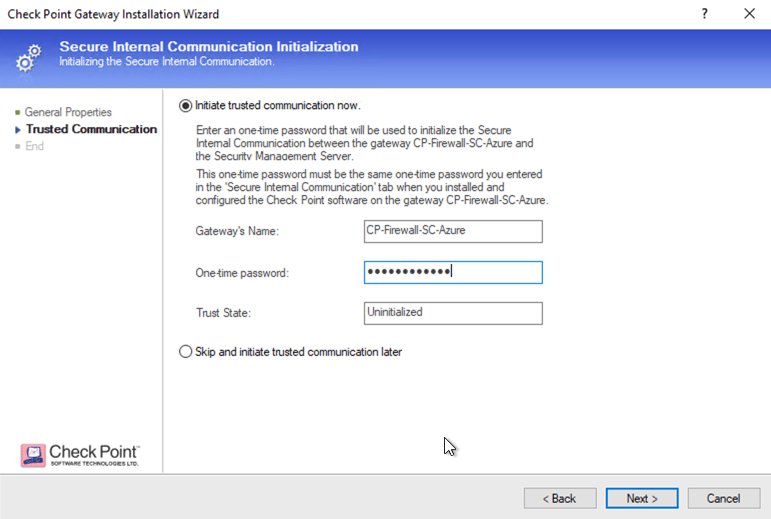 If you see an error during communication establishment process that says,
"Failed to connect to Security Gateway. SIC has not been established …", SSH
to your gateway again and repeat the above process.
4. Click **OK** and **Finish**.
If you see an error during communication establishment process that says,
"Failed to connect to Security Gateway. SIC has not been established …", SSH
to your gateway again and repeat the above process.
4. Click **OK** and **Finish**.
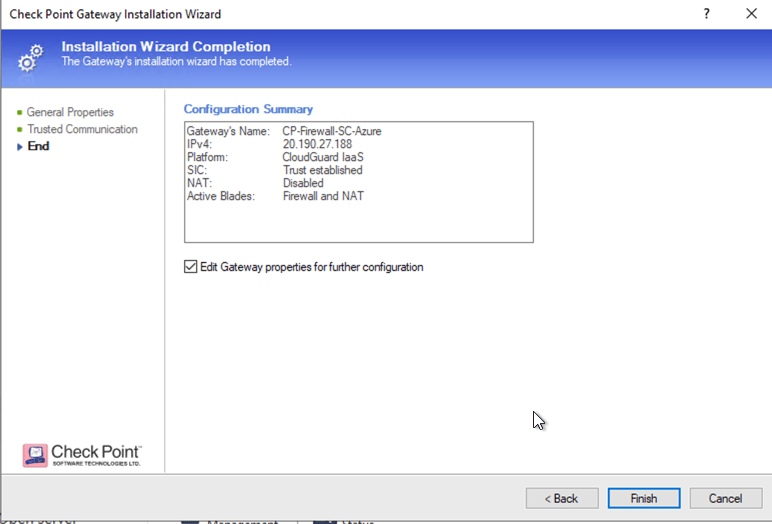
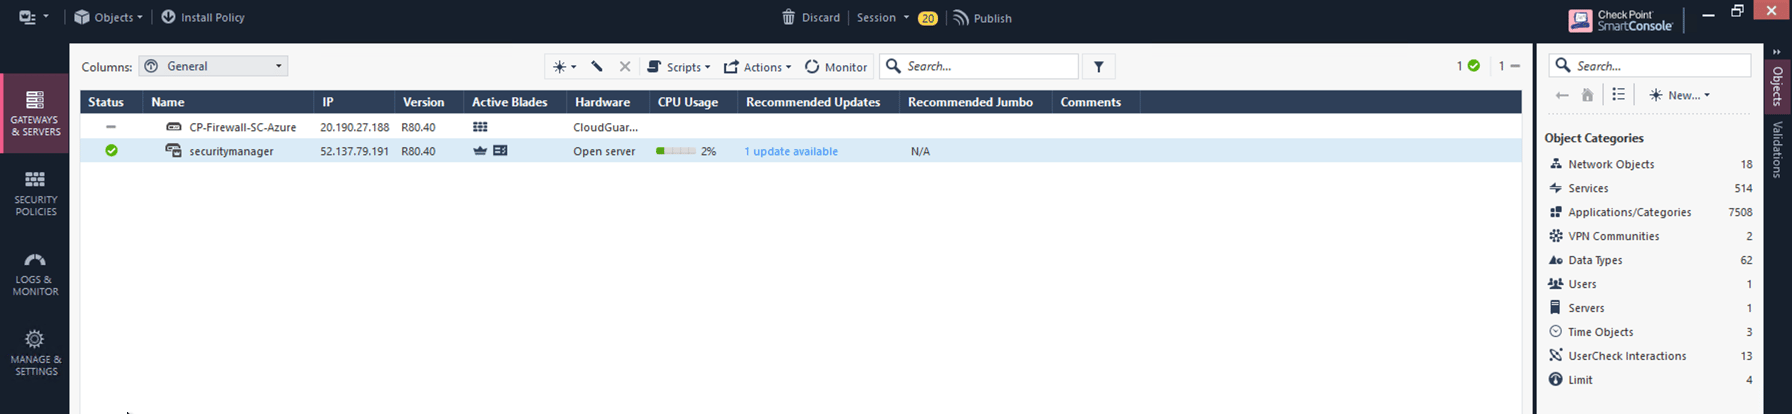
 5. Review the Gateway Summary and click **OK**.
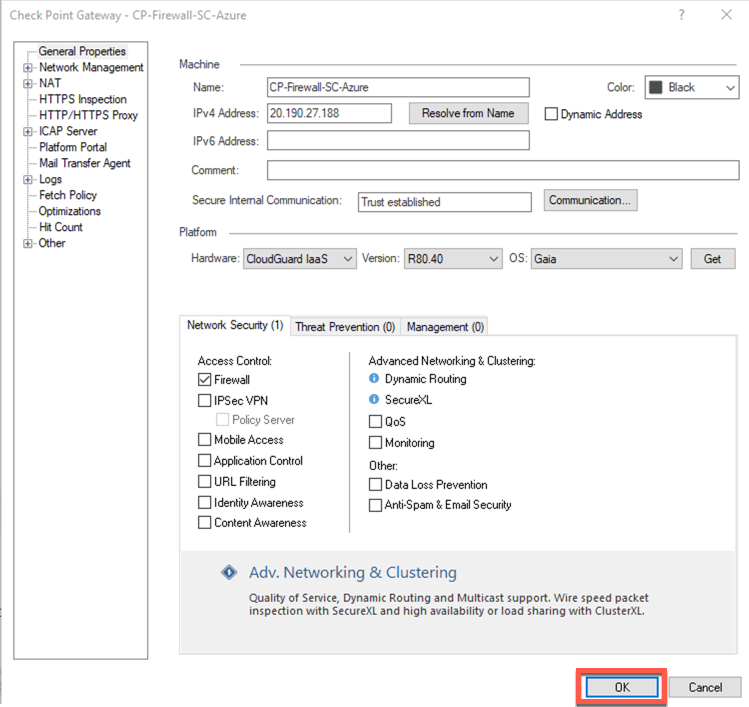 At this point you should see a Gateway under the Gateways & Servers tab.
 ## Configuring Basic traffic Policy to Allow Traffic VNet to VNet
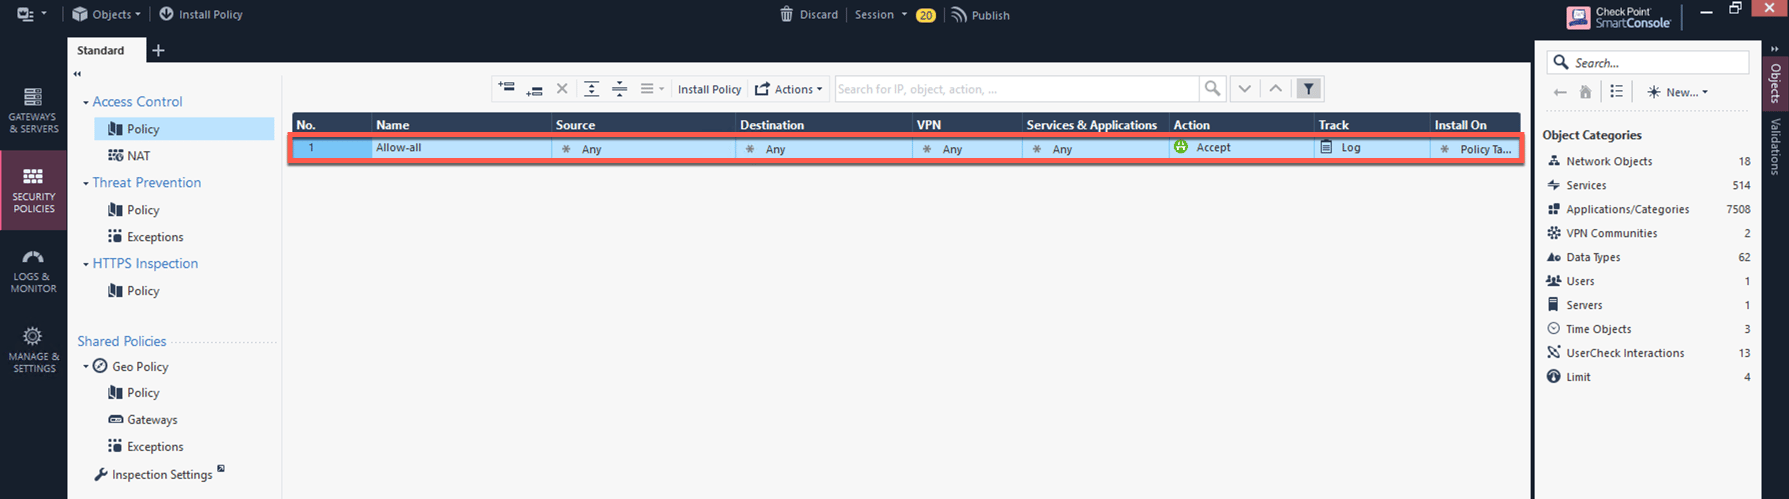
In this step, you will configure a basic traffic security policy that allows
traffic to pass through the Security Gateway.
In the Check Point UI, navigate to Security Policies > Access Control > Policy
and configure a policy by either modifying the default Cleanup rule or adding a
new rule above the default rule.
| Field | Value |
| ---------------------- | --------------------------------------------------- |
| Name | Configure any name for this policy (i.e. allow-all) |
| Source | Any |
| Destination | Any |
| VPN | Any |
| Service & Applications | Any |
| Action | Accept |
| Track | Log |
## Configuring Basic traffic Policy to Allow Traffic VNet to VNet
In this step, you will configure a basic traffic security policy that allows
traffic to pass through the Security Gateway.
In the Check Point UI, navigate to Security Policies > Access Control > Policy
and configure a policy by either modifying the default Cleanup rule or adding a
new rule above the default rule.
| Field | Value |
| ---------------------- | --------------------------------------------------- |
| Name | Configure any name for this policy (i.e. allow-all) |
| Source | Any |
| Destination | Any |
| VPN | Any |
| Service & Applications | Any |
| Action | Accept |
| Track | Log |
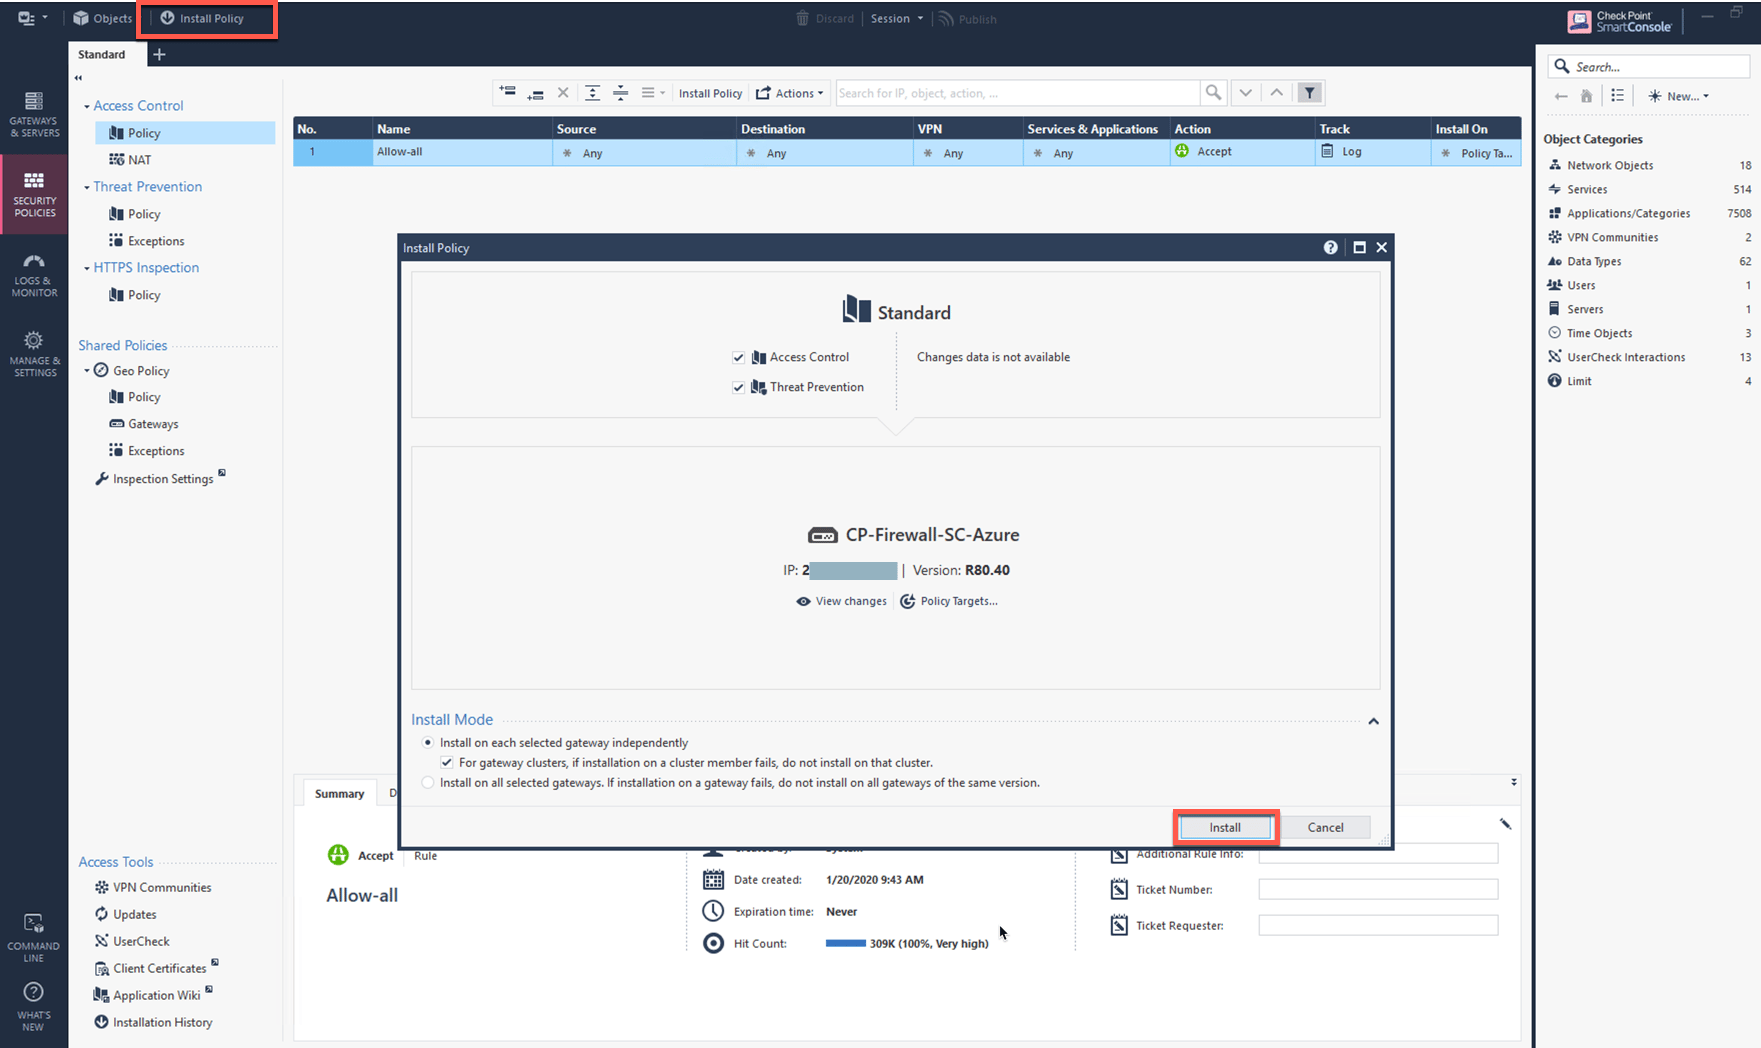
 Click **Install Policy** in Smart Console on top left corner, and then
**Install** to commit the settings.
Click **Install Policy** in Smart Console on top left corner, and then
**Install** to commit the settings.
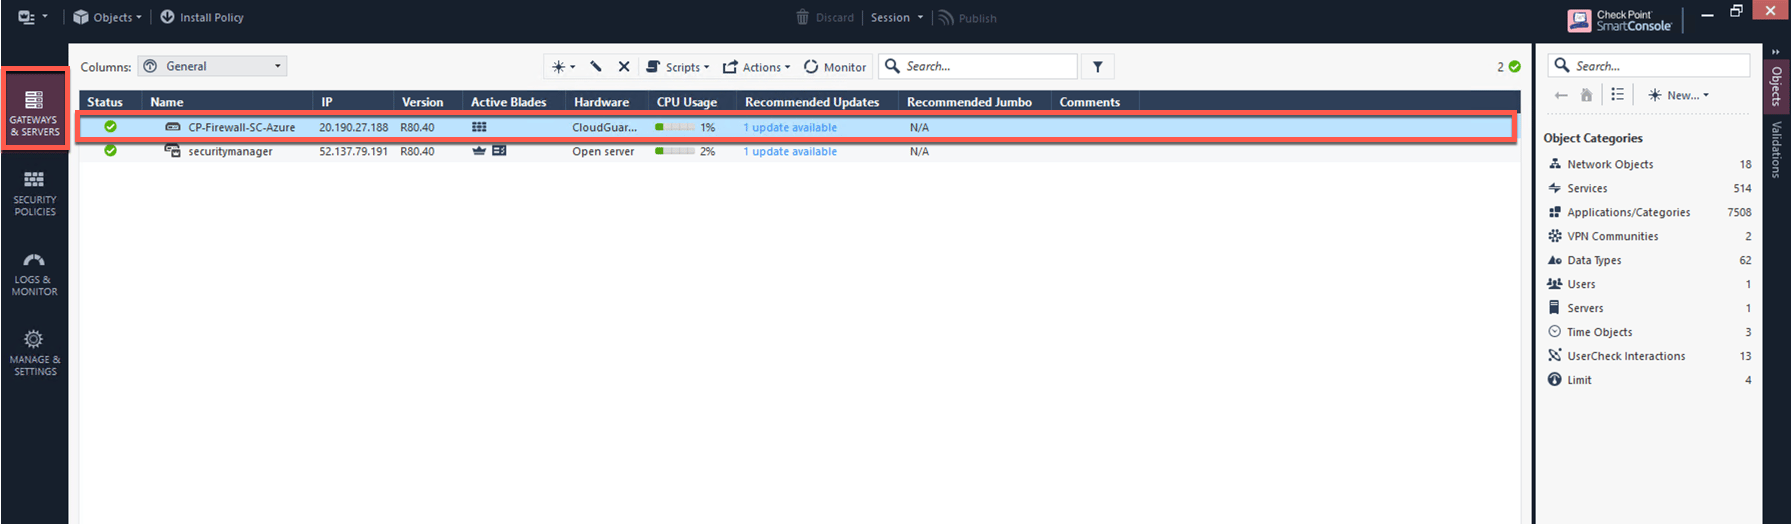 After validating that your traffic is being routed through your Security
Gateway instances, you can customize the security policy to your requirements.
## (Optional) Configuring the Basic Traffic Policy to Allow Traffic VPC to Internet
In this step, you will configure a basic traffic security policy that allows
Internet traffic to pass through the firewall. Given that Aviatrix Gateways will
only forward traffic from the TGW to the LAN port of the firewall, we can just
set our policy condition to match any packet that is going into the LAN
interface and out of the WAN interface.
You must enable the **Egress inspection** feature on FireNet if it is not
already enabled. To enable it:
1. In Aviatrix CoPilot, navigate to Security > FireNet > FireNet Gateways on the
left navigation menu.
2. Click the Edit icon
After validating that your traffic is being routed through your Security
Gateway instances, you can customize the security policy to your requirements.
## (Optional) Configuring the Basic Traffic Policy to Allow Traffic VPC to Internet
In this step, you will configure a basic traffic security policy that allows
Internet traffic to pass through the firewall. Given that Aviatrix Gateways will
only forward traffic from the TGW to the LAN port of the firewall, we can just
set our policy condition to match any packet that is going into the LAN
interface and out of the WAN interface.
You must enable the **Egress inspection** feature on FireNet if it is not
already enabled. To enable it:
1. In Aviatrix CoPilot, navigate to Security > FireNet > FireNet Gateways on the
left navigation menu.
2. Click the Edit icon  next
to a FireNet Gateway.
3. Scroll down to the Egress toggle switch and turn it **On**.
4. Click **Save**.
5. Verify the Egress status on the FireNet Gateways tab.
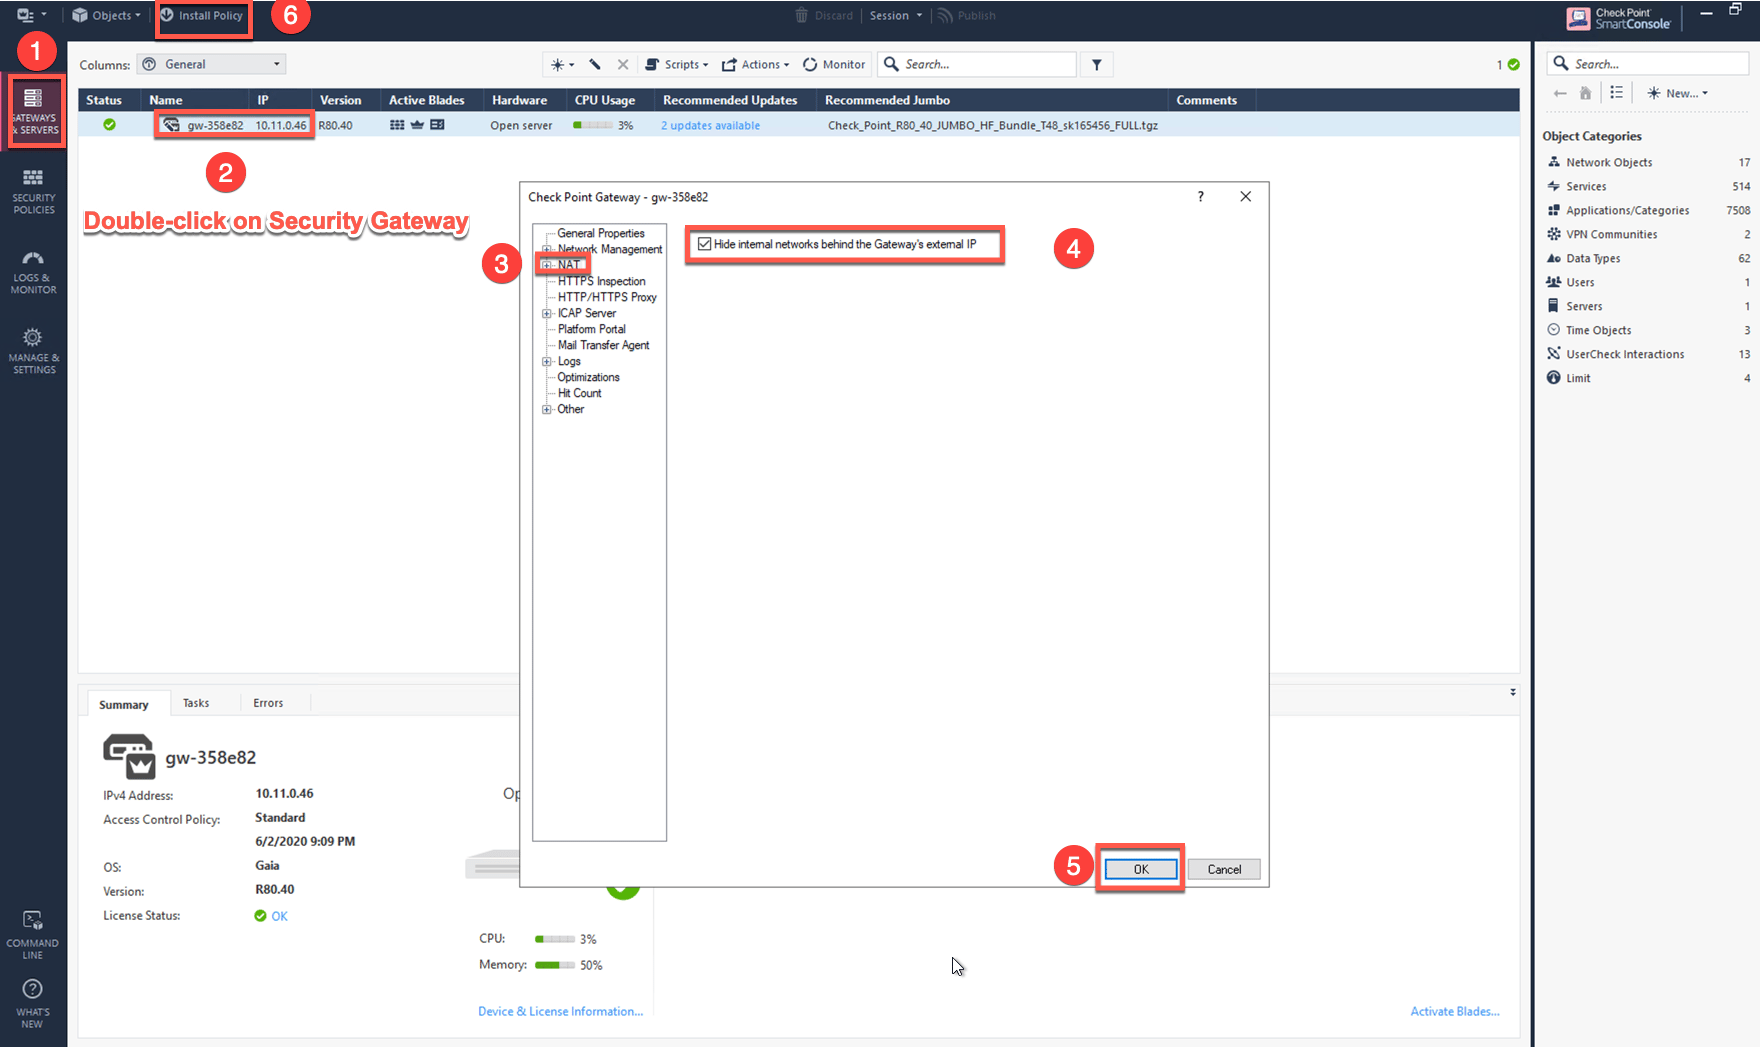
In the Check Point Firewall SmartConsole, navigate to the Gateways & Servers
page and then double-click on the gateway to enable NAT function as per the
following screenshot.
1. Click **NAT**.
2. Select the **Hide internal networks behind the Gateway's external IP**
checkbox.
3. Click **OK**.
4. Click **Install Policy**.
next
to a FireNet Gateway.
3. Scroll down to the Egress toggle switch and turn it **On**.
4. Click **Save**.
5. Verify the Egress status on the FireNet Gateways tab.
In the Check Point Firewall SmartConsole, navigate to the Gateways & Servers
page and then double-click on the gateway to enable NAT function as per the
following screenshot.
1. Click **NAT**.
2. Select the **Hide internal networks behind the Gateway's external IP**
checkbox.
3. Click **OK**.
4. Click **Install Policy**.
 The NAT function needs to be enabled on the Check Point FW interface eth0 for
this VPC to Internet policy. Refer to Check Point's NAT instruction for
details.
(Optional) If you have the default "Cleanup rule", navigate to Security
Policies > Access Control > Policy and inject a new rule for Internet Policy on
top of the default Cleanup rule.
| Field | Value |
| ---------------------- | --------------------------------------------------------- |
| Name | Configure any name for this policy (i.e. Internet-Policy) |
| Source | Any |
| Destination | Select the object with All\_internet |
| VPN | Any |
| Service & Applications | Any |
| Action | Accept |
| Track | Log |
The NAT function needs to be enabled on the Check Point FW interface eth0 for
this VPC to Internet policy. Refer to Check Point's NAT instruction for
details.
(Optional) If you have the default "Cleanup rule", navigate to Security
Policies > Access Control > Policy and inject a new rule for Internet Policy on
top of the default Cleanup rule.
| Field | Value |
| ---------------------- | --------------------------------------------------------- |
| Name | Configure any name for this policy (i.e. Internet-Policy) |
| Source | Any |
| Destination | Select the object with All\_internet |
| VPN | Any |
| Service & Applications | Any |
| Action | Accept |
| Track | Log |
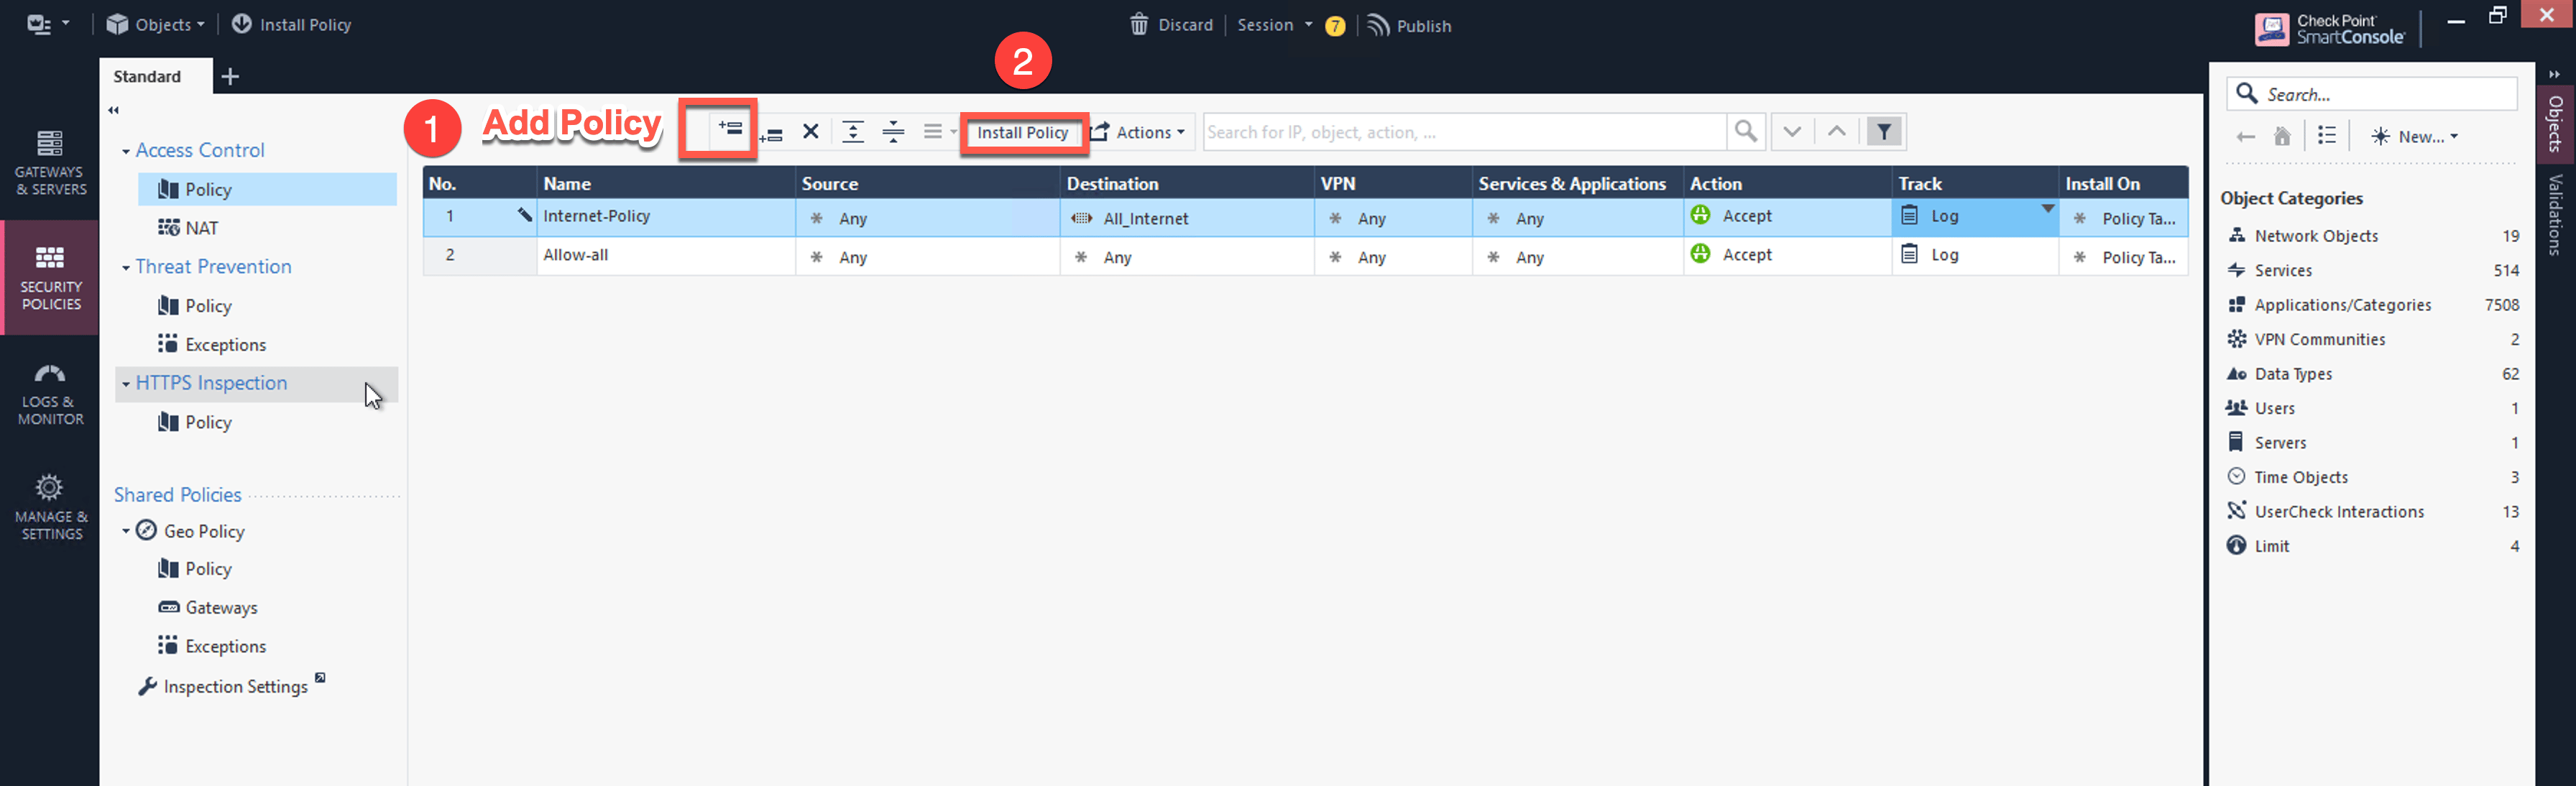 Click **Install Policy** and then **Install** to commit the settings.
After validating that your traffic is being routed through your firewall
instances, you can customize the security policy to your requirements.
## Validate Check Point in Azure Firewall Instance
Now your Security Gateway instance is configured and ready to receive packets.
The next step is to validate your configurations and polices using FlightPath
and Diagnostic Tools (ping, traceroute etc.).
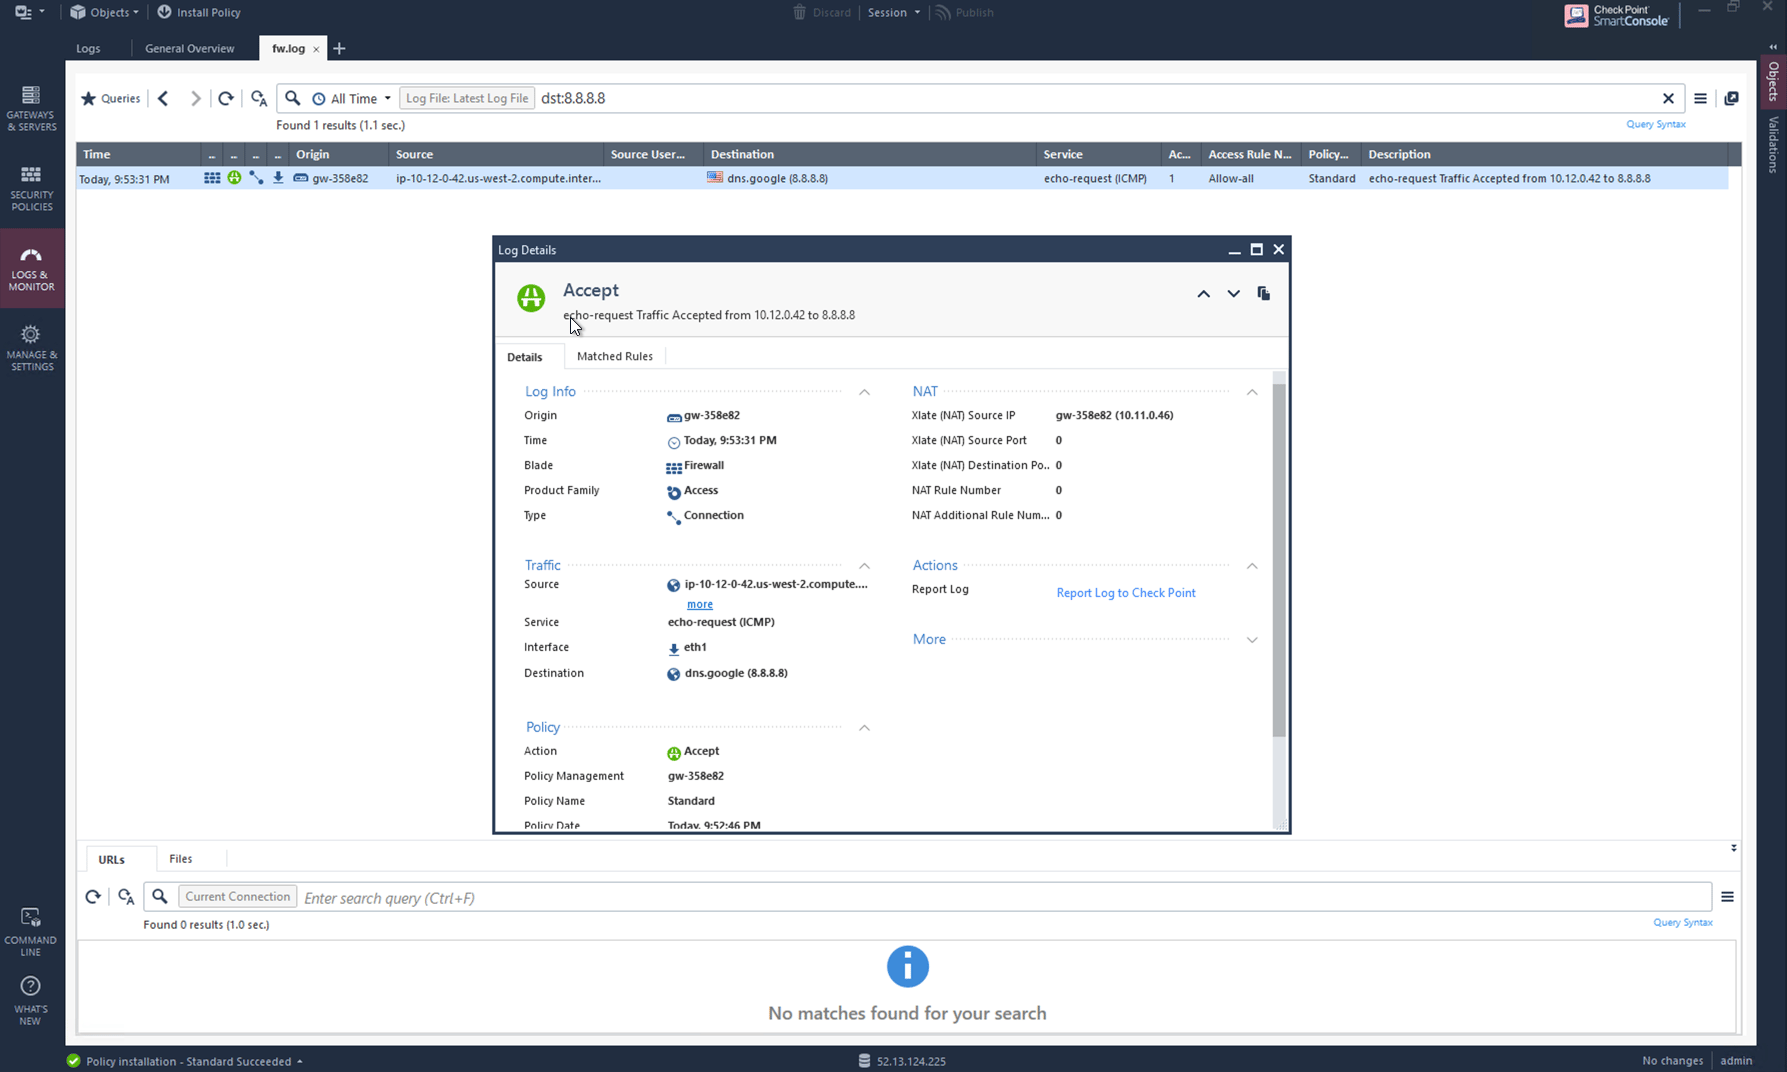
## Viewing Traffic Log for Check Point in AWS/Azure
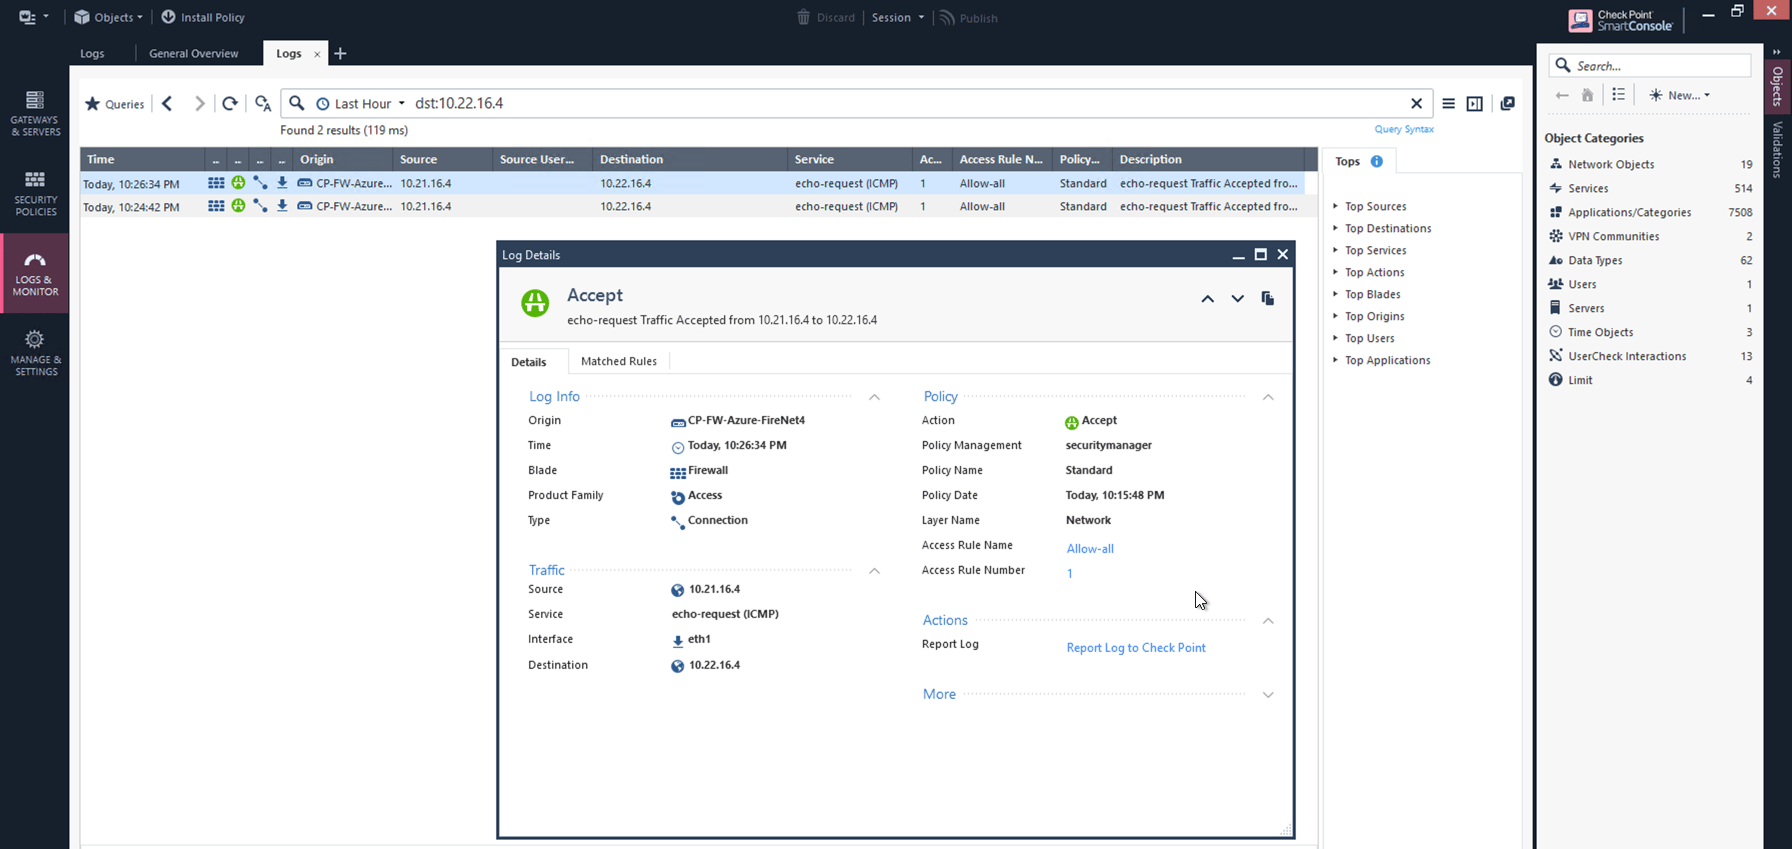
You can view if traffic is forwarded to the firewall instance by logging in to
the Check Point Firewall SmartConsole and navigating to the Logs & Monitor page.
## For VNet to VNet traffic
To check VNet - VNet traffic in your Check Point for Azure firewall, launch one
instance in PROD Spoke VNet and one in DEV Spoke VNet. Start pinging packets
from an instance in DEV Spoke VPC to the IP of another instance in PROD Spoke
VPC. The ICMP traffic should go through and be inspected in the firewall.
Click **Install Policy** and then **Install** to commit the settings.
After validating that your traffic is being routed through your firewall
instances, you can customize the security policy to your requirements.
## Validate Check Point in Azure Firewall Instance
Now your Security Gateway instance is configured and ready to receive packets.
The next step is to validate your configurations and polices using FlightPath
and Diagnostic Tools (ping, traceroute etc.).
## Viewing Traffic Log for Check Point in AWS/Azure
You can view if traffic is forwarded to the firewall instance by logging in to
the Check Point Firewall SmartConsole and navigating to the Logs & Monitor page.
## For VNet to VNet traffic
To check VNet - VNet traffic in your Check Point for Azure firewall, launch one
instance in PROD Spoke VNet and one in DEV Spoke VNet. Start pinging packets
from an instance in DEV Spoke VPC to the IP of another instance in PROD Spoke
VPC. The ICMP traffic should go through and be inspected in the firewall.
 ## (Optional) Verifying VPC to Internet traffic
To verify VPC to internet traffic for your Check Point in AWS firewall, launch a
private instance in the Spoke VPC (i.e. PROD Spoke VPC) and start pinging
packets from the private instance towards Internet (e.g 8.8.8.8) to verify the
egress function. The ICMP traffic should go through, and be inspected on the
firewall.
## (Optional) Verifying VPC to Internet traffic
To verify VPC to internet traffic for your Check Point in AWS firewall, launch a
private instance in the Spoke VPC (i.e. PROD Spoke VPC) and start pinging
packets from the private instance towards Internet (e.g 8.8.8.8) to verify the
egress function. The ICMP traffic should go through, and be inspected on the
firewall.