> ## Documentation Index
> Fetch the complete documentation index at: https://docs.aviatrix.com/llms.txt
> Use this file to discover all available pages before exploring further.
# Aviatrix SAML Authentication on Okta IdP
> Aviatrix allows for centralized management of user access by integrating with your chosen Identity Provider (IdP) (in this case, Okta) via SAML. This allows you to control user access to Controller and CoPilot, as well as user access to the cloud environment using Aviatrix UserVPN (if desired).
## Overview
Aviatrix allows for centralized management of user access by integrating with
your chosen Identity Provider (IdP) (in this case, Okta) via SAML. This allows
you to control user access to Controller and CoPilot, as well as user access to
the cloud environment using Aviatrix UserVPN (if desired).
This guide provides an example on how to configure Aviatrix to authenticate
against Okta. When SAML is configured, your Aviatrix CoPilot acts as the Service
Provider (SP) that redirects the user to the IdP for authentication.
## Pre-Deployment Checklist
Before configuring SAML integration between Aviatrix and Okta, make sure the
following is completed:
1. The Aviatrix Controller is deployed.
2. You have a valid [Okta account](#okta-account) with admin access.
3. You have downloaded and installed the
[Aviatrix SAML VPN client](#aviatrix-vpn-client).
### Okta Account
A valid Okta account with admin access is required to configure the integration.
### Aviatrix VPN Client
All users must use the Aviatrix VPN client to connect to the system. Download
the client for your OS
here
.
### Custom SAML Request Template (Optional)
This can be used in either the Controller/CoPilot or the UserVPN SAML setup.
```xml theme={null}
$Issuer
```
## Configuration Steps
Follow these steps to configure Aviatrix to authenticate against your Okta IDP:
1. Create an [Okta SAML App](#creating-an-okta-saml-app-for-aviatrix) for
Aviatrix.
2. Retrieve [Okta IDP metadata](#retrieving-okta-idp-metadata).
3. Launch an [Aviatrix Gateway](#launching-an-aviatrix-vpn-gateway).
4. Create Aviatrix [SAML SP Endpoint](#creating-aviatrix-saml-endpoint).
5. [Test that the Integration](#testing-the-integration) is set up correctly.
6. Create [Aviatrix VPN User](#creating-a-vpn-user).
7. [Validate](#validate).
### Creating an Okta SAML App for Aviatrix
This step is usually done by the Okta Admin.
1. Log in to the Okta Admin portal.
2. Follow
[Okta documentation](https://developer.okta.com/standards/SAML/setting_up_a_saml_application_in_okta)
to create a new application.
| Field | Value |
| -------------- | -------- |
| Platform | Web |
| Sign on method | SAML 2.0 |
3. General Settings
| Field | Value | Description |
| -------------- | ------------- | --------------------------------------------------------- |
| App name | Aviatrix | This can be any value. It will be displayed in Okta only. |
| App logo | Aviatrix logo | Aviatrix logo (optional) |
| App visibility | N/A | Leave both options unchecked |
4. SAML Settings
**General**
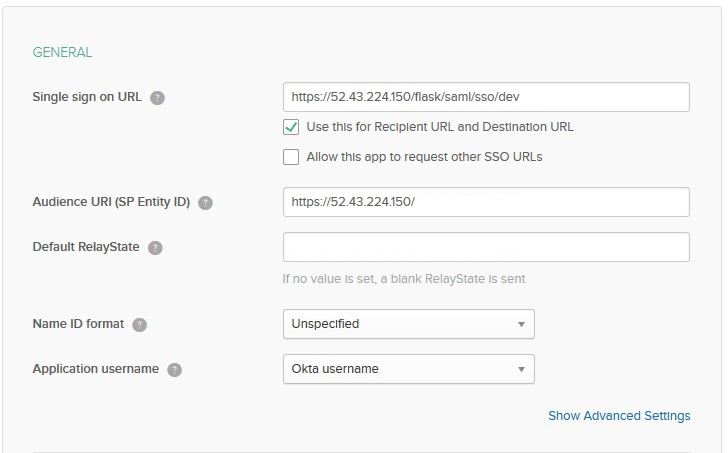 | Field | Value |
| --------------------------- | ---------------------------------------------------------------- |
| Single sign on URL | `https://[host]/flask/saml/sso/[SP Name]` (host = Controller IP) |
| Audience URI (SP Entity ID) | `https://[host]/` (host = Controller IP) |
| Default RelayState | |
| Name ID format | Unspecified |
| Application username | Okta username |
`[host]` is the hostname or IP of your Aviatrix CoPilot. For example,
`https://copilot.demo.aviatrix.live`.
`[SP Name]` is an arbitrary identifier. This same value should be used when
configuring SAML in Aviatrix CoPilot.
**Attribute Statements**
| Field | Value |
| --------------------------- | ---------------------------------------------------------------- |
| Single sign on URL | `https://[host]/flask/saml/sso/[SP Name]` (host = Controller IP) |
| Audience URI (SP Entity ID) | `https://[host]/` (host = Controller IP) |
| Default RelayState | |
| Name ID format | Unspecified |
| Application username | Okta username |
`[host]` is the hostname or IP of your Aviatrix CoPilot. For example,
`https://copilot.demo.aviatrix.live`.
`[SP Name]` is an arbitrary identifier. This same value should be used when
configuring SAML in Aviatrix CoPilot.
**Attribute Statements**
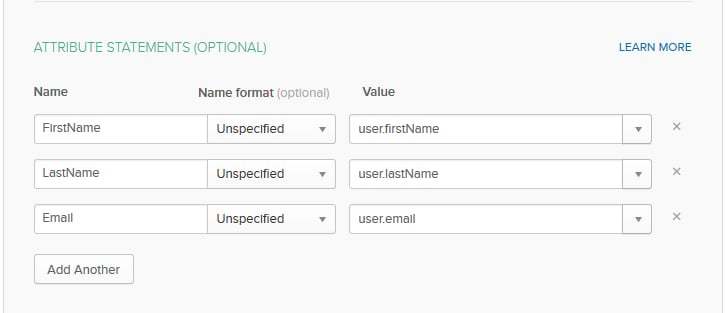 | Name | Name format | Value |
| --------- | ----------- | -------------- |
| FirstName | Unspecified | user.firstName |
| LastName | Unspecified | user.lastName |
| Email | Unspecified | user.email |
#### Retrieving Okta IDP Metadata
This step is usually completed by the Okta admin.
After the application is created in Okta, go to the Sign On tab for the
application. Then, click **View Setup Instructions**.
Look for the section titled "Provide the following IDP metadata to your SP
provider."
| Name | Name format | Value |
| --------- | ----------- | -------------- |
| FirstName | Unspecified | user.firstName |
| LastName | Unspecified | user.lastName |
| Email | Unspecified | user.email |
#### Retrieving Okta IDP Metadata
This step is usually completed by the Okta admin.
After the application is created in Okta, go to the Sign On tab for the
application. Then, click **View Setup Instructions**.
Look for the section titled "Provide the following IDP metadata to your SP
provider."
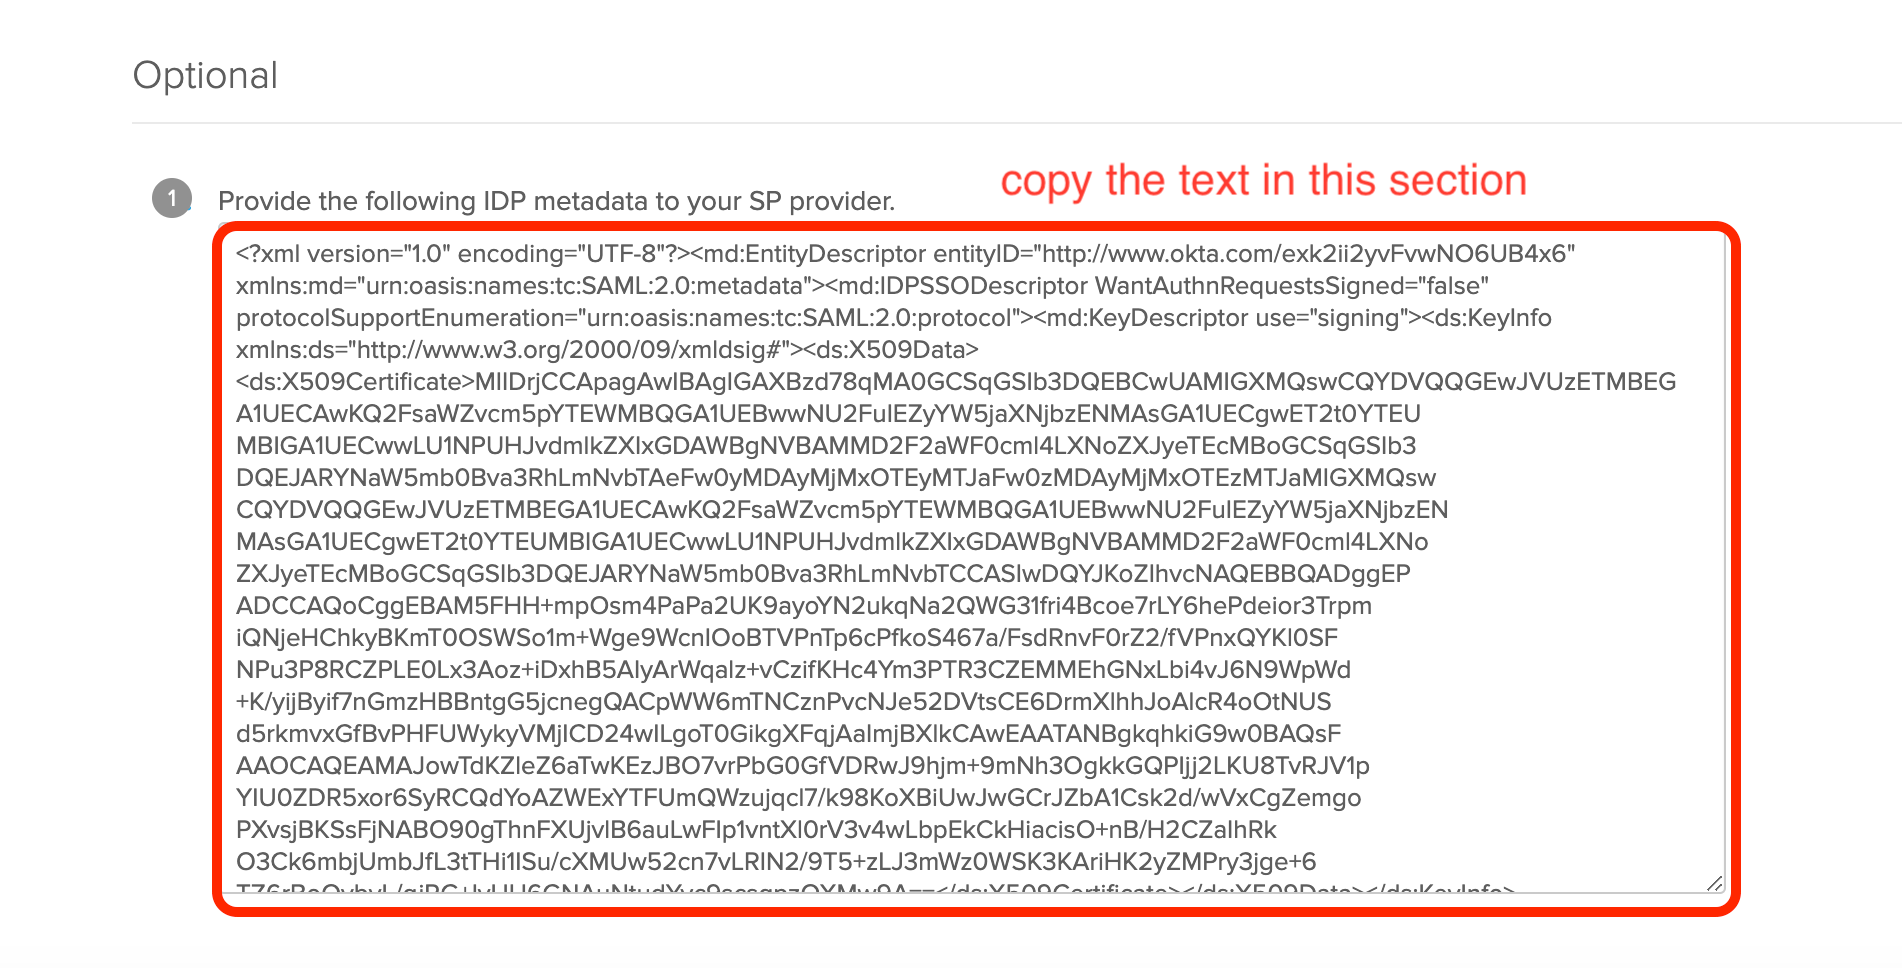 Copy the text displayed. This value will be used to configure the SAML "IDP
Metadata URL" field in Aviatrix CoPilot.
You need to assign the application to your account. Please follow steps 11
through 14 at
[Okta documentation](https://developer.okta.com/standards/SAML/setting_up_a_saml_application_in_okta).
### Launching an Aviatrix VPN Gateway
This step is usually completed by the Aviatrix admin.
See
Create a UserVPN Gateway
.
### Creating Aviatrix SAML Endpoint
This step is usually completed by the Aviatrix admin.
1. Go to **Aviatrix CoPilot > CloudFabric > UserVPN > select the Settings tab**.
2. Under SAML, click **+ SAML Endpoint**.
3. Enter the following information:
| Field | Value |
| ----------------- | ---------------------------------------------------------------------------- |
| Name | SP Name (Use the same name you entered in the Okta Application previously) |
| IDP Metadata Type | Text |
| IDP Metadata Text | Value Copied from Okta (Paste the value copied from Okta SAML configuration) |
| Entity ID | Hostname |
4. Click **OK**.
### Testing the Integration
1. Start the Aviatrix VPN Client.
If you don't start the client, you will receive a warning from the browser in
the last step of this process
2. Log into **Aviatrix CoPilot > Cloud Fabric > UserVPN > select the Settings
tab**.
3. Under SAML, find the SAML endpoint. In the Test column, select the link
provided.
4. You should be redirected to the IdP. Now, you can log in and should be
redirected back to CoPilot.
You will need to assign the new Okta application to a test user's Okta account
before clicking **Test**.
5. Now, you can log in and should be redirected back to CoPilot.
6. If everything is configured correctly, once you have authenticated you will
be redirected back to CoPilot and the window will close.
### Creating a VPN User
Create a new VPN user
. Use the VPN gateway created above.
#### Validate
1. Go to **Aviatrix CoPilot > CloudFabric > UserVPN > select the Users tab**.
2. Download the configuration for your test user created in the previous step.
3. Open the Aviatrix VPN Client application.
4. Click **Load Conf** and select the file downloaded.
5. Click **Connect**.
SAML VPN supports shared certificates. You can share the certificate among VPN
users or create more VPN users.
#### Configuring Okta for Multi Factor Authentication (Optional)
Once you have successfully configured Okta IDP with Aviatrix SP, you can
configure Okta for Multi Factor Authentication.
Please read this
[article](https://support.okta.com/help/s/end-user-adoption-toolkit/setting-up-mfa-for-end-users?language=en_US)
from Okta on Multifactor setup.
See this [article](https://duo.com/docs/okta) if you're interested in using Duo.
Copy the text displayed. This value will be used to configure the SAML "IDP
Metadata URL" field in Aviatrix CoPilot.
You need to assign the application to your account. Please follow steps 11
through 14 at
[Okta documentation](https://developer.okta.com/standards/SAML/setting_up_a_saml_application_in_okta).
### Launching an Aviatrix VPN Gateway
This step is usually completed by the Aviatrix admin.
See
Create a UserVPN Gateway
.
### Creating Aviatrix SAML Endpoint
This step is usually completed by the Aviatrix admin.
1. Go to **Aviatrix CoPilot > CloudFabric > UserVPN > select the Settings tab**.
2. Under SAML, click **+ SAML Endpoint**.
3. Enter the following information:
| Field | Value |
| ----------------- | ---------------------------------------------------------------------------- |
| Name | SP Name (Use the same name you entered in the Okta Application previously) |
| IDP Metadata Type | Text |
| IDP Metadata Text | Value Copied from Okta (Paste the value copied from Okta SAML configuration) |
| Entity ID | Hostname |
4. Click **OK**.
### Testing the Integration
1. Start the Aviatrix VPN Client.
If you don't start the client, you will receive a warning from the browser in
the last step of this process
2. Log into **Aviatrix CoPilot > Cloud Fabric > UserVPN > select the Settings
tab**.
3. Under SAML, find the SAML endpoint. In the Test column, select the link
provided.
4. You should be redirected to the IdP. Now, you can log in and should be
redirected back to CoPilot.
You will need to assign the new Okta application to a test user's Okta account
before clicking **Test**.
5. Now, you can log in and should be redirected back to CoPilot.
6. If everything is configured correctly, once you have authenticated you will
be redirected back to CoPilot and the window will close.
### Creating a VPN User
Create a new VPN user
. Use the VPN gateway created above.
#### Validate
1. Go to **Aviatrix CoPilot > CloudFabric > UserVPN > select the Users tab**.
2. Download the configuration for your test user created in the previous step.
3. Open the Aviatrix VPN Client application.
4. Click **Load Conf** and select the file downloaded.
5. Click **Connect**.
SAML VPN supports shared certificates. You can share the certificate among VPN
users or create more VPN users.
#### Configuring Okta for Multi Factor Authentication (Optional)
Once you have successfully configured Okta IDP with Aviatrix SP, you can
configure Okta for Multi Factor Authentication.
Please read this
[article](https://support.okta.com/help/s/end-user-adoption-toolkit/setting-up-mfa-for-end-users?language=en_US)
from Okta on Multifactor setup.
See this [article](https://duo.com/docs/okta) if you're interested in using Duo.