> ## Documentation Index
> Fetch the complete documentation index at: https://docs.aviatrix.com/llms.txt
> Use this file to discover all available pages before exploring further.
# Transit FireNet Workflow for Egress
> By default, FireNet inspects traffic between North South (on-prem and VPC/VNet) and East West (VPC/VNet to VPC/VNet). You can use this workflow to ensure that a Transit gateway sends trafic to the Internet and does not perform any traffic inspection.
By default, FireNet inspects traffic between North South (on-prem and VPC/VNet)
and East West (VPC/VNet to VPC/VNet). You can use this workflow to ensure that a
Transit gateway sends trafic to the Internet and does not perform any traffic
inspection.
## Transit FireNet Workflow Prerequisites
* Subscribe to the firewall instance (AWS only)
.
* If you want to attach Spokes to your FireNet, you must
create the Spokes beforehand
.
* Any Transit FireNet connections that use BGP over LAN must also have DNAT or
SNAT configured.
* For AWS TGW, ensure that a Firewall Domain is created in the AWS TGW before
adding FireNet functionality.
* If desired, you can
create VPCs/VNets ahead of time
that have the **Transit + FireNet** VPC Function option selected, ensuring
that the necessary subnets and interfaces are already created in those
VPC/VNets in preparation for using the Transit FireNet feature. If when adding
FireNet to a Transit gateway you decide to use a VPC/VNet that does not have
the **Transit + FireNet** function selected, you must subsequently create the
necessary subnets and interfaces in the relevant cloud service provider.
When FireNet is added to a Transit gateway, a firewall can be inserted into the
Aviatrix Transit VPC/VNet. East-west and egress traffic is inspected by these
firewalls, unless traffic inspection is explicitly disabled (by using an Egress
FireNet or disabling the Traffic Inspection option).
## Adding Egress FireNet
Ensure that you have completed any prerequisites before beginning.
See
[Minimum Gateway Instance Sizes for FireNet deployment](https://legacy.docs.aviatrix.com/documentation/latest/security/firenet-gateway-size.html)
for information on the interfaces/NICs created when you add FireNet to a Transit
Gateway.
1. On the Security > FireNet > FireNet Gateways tab, click the down arrow next
to **+Add FireNet** and click **Add Egress Transit FireNet**.
2. In the Add Egress Transit FireNet to Transit Gateway dialog, select if you
want to add FireNet to an existing Transit gateway or on a new Transit
gateway.
If you are adding FireNet to an existing Transit gateway that has the **BGP
over LAN** slider On, that Transit gateway must also have DNAT/SNAT
configured.
Only Transit gateways that have the **Transit Egress Capability** toggle
enabled (selected when you create a Transit gateway from Cloud Fabric >
Gateways > Transit Gateways) are displayed in the Existing Transit Gateway
List.
3. If creating a new Transit gateway, enter a name in the **Name** field.
4. Configure the Egress Transit FireNet using the information in one of these
tables:
* [Egress FireNet for AWS](https://legacy.docs.aviatrix.com/documentation/latest/security/egress-firenet-aws.html)
* [Egress FireNet for Azure](https://legacy.docs.aviatrix.com/documentation/latest/security/egress-firenet-azure.html)
* [Egress FireNet for GCP](https://legacy.docs.aviatrix.com/documentation/latest/security/egress-firenet-gcp.html)
* [Egress FireNet for OCI](https://legacy.docs.aviatrix.com/documentation/latest/security/egress-firenet-oci.html)
5. Click **Add**.
You can check the FireNet creation progress on the Monitor > Notifications >
Tasks tab.
## Attaching a Spoke to a Transit FireNet
After [adding a Transit FireNet](#adding-egress-firenet), you can attach Spoke
gateways. The GCP Spoke gateways can have **Global
VPC** enabled.
### Managing Gateway Attachment
1. Navigate to Cloud Fabric > Gateways > Spoke Gateways.
2. Click the Manage Gateway Attachments icon  next
to a Spoke Gateway.
3. In the Manage Gateway Attachments dialog, click **Attachment** on the Transit
Gateway tab to select the Transit Gateway to which the Spoke Gateway will be
attached.
4. Click **Save**.
To detach a Spoke from a Transit FireNet, you can open the Manage Gateway
Attachment dialog, click the Delete icon
next
to a Spoke Gateway.
3. In the Manage Gateway Attachments dialog, click **Attachment** on the Transit
Gateway tab to select the Transit Gateway to which the Spoke Gateway will be
attached.
4. Click **Save**.
To detach a Spoke from a Transit FireNet, you can open the Manage Gateway
Attachment dialog, click the Delete icon  next to
the Transit gateway in the list, and click **Save**.
### Editing Transit Gateway Attachment for a Spoke Gateway
1. Navigate to Cloud Fabric > Gateways > Spoke Gateways.
2. Click the Edit icon
next to
the Transit gateway in the list, and click **Save**.
### Editing Transit Gateway Attachment for a Spoke Gateway
1. Navigate to Cloud Fabric > Gateways > Spoke Gateways.
2. Click the Edit icon  next
to the Spoke gateway.
3. Select the FireNet-enabled Transit gateway from the **Attach Transit
Gateway** drop-down, or the Egress Transit FireNet from the **Attach to
Egress Transit FireNet** drop-down.
4. Click **Save**.
You can detach a Spoke from a Transit FireNet by editing the Spoke gateway and
removing the Transit gateway from the **Attach Transit Gateway** drop-down.
## Deploying a Firewall
You can also
[associate an existing firewall](https://legacy.docs.aviatrix.com/documentation/latest/security/firewall-associate-existing.html).
Supported firewalls are Check Point CloudGuard, Fortinet FortiGate, and Palo
Alto VM-Series.
Supported firewall managers are Panorama (Palo Alto VM-Series).
After firewalls are launched, you can
configure them to check traffic flow
.
**AWS only**: If you want to launch a firewall, you must first
subscribe to a firewall instance in the AWS Marketplace
.
You can have more than one firewall in a FireNet Transit gateway.
1. On the Security > FireNet > Firewall tab, click **+Firewall** to open the
Deploy Firewall dialog and add a new firewall instance.
From here you can also import a firewall you previously created in your cloud
portal.
2. If deploying a new firewall, fill out the following fields:
| Field | Description |
| --------------------------------------------------------------------- | ----------------------------------------------------------------------------------------------------------------------------------------------------------------------------------------------------------------------- |
| Transit FireNet Gateway Instance | Select the Transit FireNet gateway instance to associate with this firewall. |
| Attach Firewall to FireNet after Launching | Yes/No Select Yes to enable the firewall (the firewall instance is inserted into the data path). If you select No, the firewall is not attached at this time. You can attach it later. |
| Availability Domain (OCI only) | Data center within a region |
| Fault Domain (OCI only) | Fault domain is within Availability Domain; fault domains let you distribute your instances so that they are not on the same physical hardware within a single Availability Domain |
| Zone (GCP) | Availability Zone |
| Name | Your name for the firewall instance |
| Firewall Image | The image for your desired firewall: Palo Alto, Check Point, or Fortinet FortiGate. |
| Firewall Image Version | Select a currently supported firewall image version. You can select a Palo Alto firewall version greater than 9.1.3 for a GCP Transit FireNet if you select one of the available Flex Next-Generation firewall options. |
| Firewall Instance Size | Select an instance size for the firewall. The available sizes vary based on the selected FireNet instance and type of firewall. |
| Egress Interface Subnet | Select the subnet to use for egress. |
| Key Pair Name (Check Point CloudGuard, Fortinet FortiGate) (optional) | Only displays if you enable Boostrap Configuration. Add a Key-Value pair for firewall authentication. |
| Management Interface Subnet (Palo Alto/AWS only) | Subnet of the Palo Alto firewall management interface. |
| Authentication (Azure) | Password or SSH Public Key If you select Password, enter a password of your choice. If you select SSH Public Key, enter the SSH Public Key of the firewall. |
| Username (Azure) | Username of your choice ('admin' is not allowed). |
| Bootstrap Configuration (optional) | Enable/Disable If you have enabled the Bootstrap Configuration to deploy your firewall, configure those fields before clicking **Save**. |
## Firewall Bootstrap Configuration
On the Deploy Firewall dialog, the Bootstrap Configuration option simplifies the
initial configuration setup of a firewall within the selected cloud.
The Bootstrap Configuration toggle is disabled by default if you have not
selected both a firewall instance and a firewall image.
After the Bootstrap Configuration toggle is enabled, you can configure your
bootstrap options. The fields to complete for bootstrap configuration depend on
the selected cloud for the Transit FireNet gateway instance, and the selected
firewall. Use the links in the below table to complete the bootstrap
configuration.
See the
firewall example configuration topics
for specific firewall image versions, instance size, and more.
| Firewall | AWS | Azure | GCP |
| ------------------ | -------------------------------------------------------------------------------------------------------------------------------------------------------------------------------------------------------------------------- | ----------------------------------------------------------------------------------------------------------------------------------------------------------------------------------------------------------------------------------------------------- | ------------------------------------ |
| Check Point | AWS S3 Bucket: IAM Role, S3 Bucket or User Data [Bootstrap Configuration Example for Check Point Security Gateway in AWS/Azure](https://legacy.docs.aviatrix.com/documentation/latest/security/check-point-bootstrap.html) | Azure Storage or User Data [Bootstrap Configuration Example for Check Point Security Gateway in AWS/Azure](https://legacy.docs.aviatrix.com/documentation/latest/security/check-point-bootstrap.html) | Key-Value Pair |
| Fortinet FortiGate | AWS S3 Bucket: IAM Role, S3 Bucket or User Data [Bootstrap Configuration Example for FortiGate Firewall in AWS](https://legacy.docs.aviatrix.com/documentation/latest/security/fortigate-bootstrap-example.html) | Azure Storage: Storage, Container, SAS URL Config, SAS URL License or User Data [Bootstrap Configuration Example for FortiGate Firewall in Azure](https://legacy.docs.aviatrix.com/documentation/latest/security/fortigate-bootstrap-azure.html) | Key-Value Pair |
| Palo Alto | AWS S3 Bucket: IAM Role, S3 Bucket or User Data [Bootstrap Configuration Example for VM-Series in AWS](https://legacy.docs.aviatrix.com/documentation/latest/security/paloalto-bootstrap-aws.html) | Azure Storage: Storage, Storage Access Key, File-Share Folder, Share-Directory or User Data [Bootstrap Configuration Example for VM-Series in Azure](https://legacy.docs.aviatrix.com/documentation/latest/security/pan-bootstrap-example-azure.html) | Bootstrap Bucket Name Key-Value Pair |
Click **Save**. This launches the firewall and also associates it with the
selected Transit FireNet gateway.
## Transit FireNet Vendor Integration
The Vendor Integration function allows you to log into a firewall or firewall
manager and change the route table on the firewall to program the routing for
Transit FireNet, or to change routing if a gateway in Transit FireNet fails.
You can also use Vendor Integration to configure the RFC 1918 and non-RFC 1918
routes between the Aviatrix Gateway and the vendor's firewall instance.
To turn On IPv6 on an existing FireNet, revoke the existing Vendor Integration
settings, enable IPv6 on the FireNet, and then reconfigure Vendor Integration.
The IPv6 Vendor Integration is only for Palo Alto Networks standalone firewalls
(without Panorama).
IPv6 vendor integration in Azure is currently not functional. If you require
vendor-driven IPv6 route programming in Azure, configure IPv6 routes manually
in the firewall.
You can only configure information on this dialog if a
[firewall is already attached](https://legacy.docs.aviatrix.com/documentation/latest/security/firewall-manage-attachments.html)
to the Transit FireNet.
### Configuring Vendor Integration
1. From the Security > FireNet Gateways tab, click the vertical ellipsis icon
next
to the Spoke gateway.
3. Select the FireNet-enabled Transit gateway from the **Attach Transit
Gateway** drop-down, or the Egress Transit FireNet from the **Attach to
Egress Transit FireNet** drop-down.
4. Click **Save**.
You can detach a Spoke from a Transit FireNet by editing the Spoke gateway and
removing the Transit gateway from the **Attach Transit Gateway** drop-down.
## Deploying a Firewall
You can also
[associate an existing firewall](https://legacy.docs.aviatrix.com/documentation/latest/security/firewall-associate-existing.html).
Supported firewalls are Check Point CloudGuard, Fortinet FortiGate, and Palo
Alto VM-Series.
Supported firewall managers are Panorama (Palo Alto VM-Series).
After firewalls are launched, you can
configure them to check traffic flow
.
**AWS only**: If you want to launch a firewall, you must first
subscribe to a firewall instance in the AWS Marketplace
.
You can have more than one firewall in a FireNet Transit gateway.
1. On the Security > FireNet > Firewall tab, click **+Firewall** to open the
Deploy Firewall dialog and add a new firewall instance.
From here you can also import a firewall you previously created in your cloud
portal.
2. If deploying a new firewall, fill out the following fields:
| Field | Description |
| --------------------------------------------------------------------- | ----------------------------------------------------------------------------------------------------------------------------------------------------------------------------------------------------------------------- |
| Transit FireNet Gateway Instance | Select the Transit FireNet gateway instance to associate with this firewall. |
| Attach Firewall to FireNet after Launching | Yes/No Select Yes to enable the firewall (the firewall instance is inserted into the data path). If you select No, the firewall is not attached at this time. You can attach it later. |
| Availability Domain (OCI only) | Data center within a region |
| Fault Domain (OCI only) | Fault domain is within Availability Domain; fault domains let you distribute your instances so that they are not on the same physical hardware within a single Availability Domain |
| Zone (GCP) | Availability Zone |
| Name | Your name for the firewall instance |
| Firewall Image | The image for your desired firewall: Palo Alto, Check Point, or Fortinet FortiGate. |
| Firewall Image Version | Select a currently supported firewall image version. You can select a Palo Alto firewall version greater than 9.1.3 for a GCP Transit FireNet if you select one of the available Flex Next-Generation firewall options. |
| Firewall Instance Size | Select an instance size for the firewall. The available sizes vary based on the selected FireNet instance and type of firewall. |
| Egress Interface Subnet | Select the subnet to use for egress. |
| Key Pair Name (Check Point CloudGuard, Fortinet FortiGate) (optional) | Only displays if you enable Boostrap Configuration. Add a Key-Value pair for firewall authentication. |
| Management Interface Subnet (Palo Alto/AWS only) | Subnet of the Palo Alto firewall management interface. |
| Authentication (Azure) | Password or SSH Public Key If you select Password, enter a password of your choice. If you select SSH Public Key, enter the SSH Public Key of the firewall. |
| Username (Azure) | Username of your choice ('admin' is not allowed). |
| Bootstrap Configuration (optional) | Enable/Disable If you have enabled the Bootstrap Configuration to deploy your firewall, configure those fields before clicking **Save**. |
## Firewall Bootstrap Configuration
On the Deploy Firewall dialog, the Bootstrap Configuration option simplifies the
initial configuration setup of a firewall within the selected cloud.
The Bootstrap Configuration toggle is disabled by default if you have not
selected both a firewall instance and a firewall image.
After the Bootstrap Configuration toggle is enabled, you can configure your
bootstrap options. The fields to complete for bootstrap configuration depend on
the selected cloud for the Transit FireNet gateway instance, and the selected
firewall. Use the links in the below table to complete the bootstrap
configuration.
See the
firewall example configuration topics
for specific firewall image versions, instance size, and more.
| Firewall | AWS | Azure | GCP |
| ------------------ | -------------------------------------------------------------------------------------------------------------------------------------------------------------------------------------------------------------------------- | ----------------------------------------------------------------------------------------------------------------------------------------------------------------------------------------------------------------------------------------------------- | ------------------------------------ |
| Check Point | AWS S3 Bucket: IAM Role, S3 Bucket or User Data [Bootstrap Configuration Example for Check Point Security Gateway in AWS/Azure](https://legacy.docs.aviatrix.com/documentation/latest/security/check-point-bootstrap.html) | Azure Storage or User Data [Bootstrap Configuration Example for Check Point Security Gateway in AWS/Azure](https://legacy.docs.aviatrix.com/documentation/latest/security/check-point-bootstrap.html) | Key-Value Pair |
| Fortinet FortiGate | AWS S3 Bucket: IAM Role, S3 Bucket or User Data [Bootstrap Configuration Example for FortiGate Firewall in AWS](https://legacy.docs.aviatrix.com/documentation/latest/security/fortigate-bootstrap-example.html) | Azure Storage: Storage, Container, SAS URL Config, SAS URL License or User Data [Bootstrap Configuration Example for FortiGate Firewall in Azure](https://legacy.docs.aviatrix.com/documentation/latest/security/fortigate-bootstrap-azure.html) | Key-Value Pair |
| Palo Alto | AWS S3 Bucket: IAM Role, S3 Bucket or User Data [Bootstrap Configuration Example for VM-Series in AWS](https://legacy.docs.aviatrix.com/documentation/latest/security/paloalto-bootstrap-aws.html) | Azure Storage: Storage, Storage Access Key, File-Share Folder, Share-Directory or User Data [Bootstrap Configuration Example for VM-Series in Azure](https://legacy.docs.aviatrix.com/documentation/latest/security/pan-bootstrap-example-azure.html) | Bootstrap Bucket Name Key-Value Pair |
Click **Save**. This launches the firewall and also associates it with the
selected Transit FireNet gateway.
## Transit FireNet Vendor Integration
The Vendor Integration function allows you to log into a firewall or firewall
manager and change the route table on the firewall to program the routing for
Transit FireNet, or to change routing if a gateway in Transit FireNet fails.
You can also use Vendor Integration to configure the RFC 1918 and non-RFC 1918
routes between the Aviatrix Gateway and the vendor's firewall instance.
To turn On IPv6 on an existing FireNet, revoke the existing Vendor Integration
settings, enable IPv6 on the FireNet, and then reconfigure Vendor Integration.
The IPv6 Vendor Integration is only for Palo Alto Networks standalone firewalls
(without Panorama).
IPv6 vendor integration in Azure is currently not functional. If you require
vendor-driven IPv6 route programming in Azure, configure IPv6 routes manually
in the firewall.
You can only configure information on this dialog if a
[firewall is already attached](https://legacy.docs.aviatrix.com/documentation/latest/security/firewall-manage-attachments.html)
to the Transit FireNet.
### Configuring Vendor Integration
1. From the Security > FireNet Gateways tab, click the vertical ellipsis icon
 in a FireNet Gateway row and select **Manage Vendor Integration**.
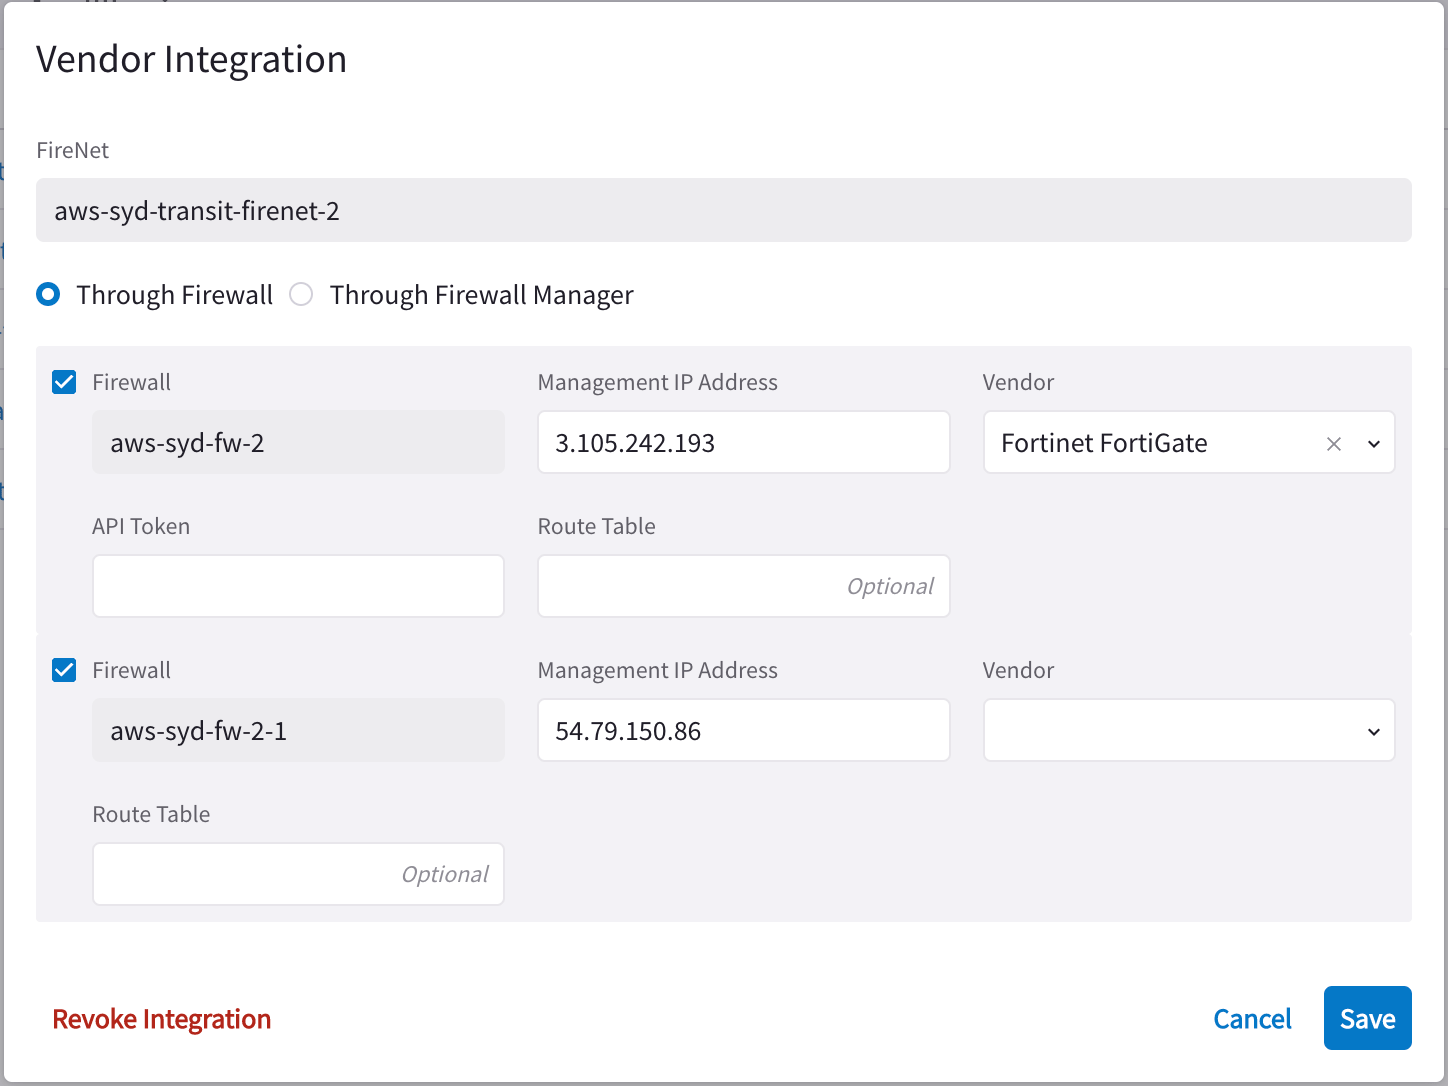 2. In the Vendor Integration dialog, select **Through Firewall** or **Through
Firewall Manager**.
You should only select the latter if the Vendor is a Palo Alto firewall
(managed by Panorama).
3. Configure the following:
| Field | Description |
| -------------------------------------------------------------- | ------------------------------------------------------------------------------------------------------------------------------------------------------------ |
| Firewall | Name of the attached firewall (this is pre-populated with the name of the attached firewall). |
| Firewall Manager Vendor (Through Firewall Manager option only) | Palo Alto Networks Panorama |
| Management IP Address | Management IP address of the firewall. |
| Vendor (Through Firewall option only) | Firewall vendor (Palo Alto Networks VM-Series, Fortinet FortiGate, Check Point CloudGuard). |
| Authentication (Check Point CloudGuard) | Password or Private Key |
| Username (Check Point, Palo Alto) | Username for logging on to the firewall. |
| Password (Check Point, Palo Alto) | Password for logging on to the firewall. |
| Private Key (Check Point) | If you selected Private Key authentication for your Check Point firewall, you must upload the private key here. |
| FireNet Instance | |
| Template Name (Firewall Manager Vendor only) | Name of the [template](https://legacy.docs.aviatrix.com/documentation/latest/security/firewall-panorama-templates.html). |
| Template Stack Name (Firewall Manager Vendor only) | Name of the [Template Stack](https://legacy.docs.aviatrix.com/documentation/latest/security/firewall-panorama-templates.html). |
| Route Table | Optional |
| API Token (Fortinet FortiGate only) | [API token generated from the Fortinet FortiGate instance](https://legacy.docs.aviatrix.com/documentation/latest/security/fortigate-vendor-integration.html) |
4. Click **Save**.
### Revoking Vendor Integration
You cannot revoke vendor integration for FireNet gateways that have the Generic
vendor selected.
To revoke Vendor Integration:
1. Select Vendor Integration as per step 1 above, and then click **Revoke
Integration** on the dialog.
2. When prompted about being sure you want to revoke, click **Revoke**.
### Syncing Routes to Firewall
The Vendor Integration tab only displays for a Transit FireNet if you have
configured a Firewall Manager (Panorama) and attached it to this Transit
FireNet.
You can click **Sync Routes to Firewall** on the FireNet Gateway Vendor
Integration tab (you must configure vendor integration first) or the details
panel for the firewall, to ensure that the FireNet routes are synced to the
selected firewall.
You can also sync routes to the firewall from the Security > FireNet > Firewall
details tab.
Since vendor integration requires that the firewall be pinged periodically, you
should
[configure the 'ping' ability](https://legacy.docs.aviatrix.com/documentation/latest/security/firenet-paloalto-icmp.html)
in the respective firewall UIs.
You can also sync routes to the firewall from the Security > FireNet > Firewall
tab (click a firewall to see its details, and then click **Sync Routes to
Firewall**).
## Related Topics
* [Edit a FireNet](https://legacy.docs.aviatrix.com/documentation/latest/security/transit-firenet-edit.html)
* [Remove a FireNet](https://legacy.docs.aviatrix.com/documentation/latest/security/transit-firenet-remove.html)
* View FireNet route table information
* Detach or delete a firewall instance
* [Manage firewall attachments](https://legacy.docs.aviatrix.com/documentation/latest/security/firewall-manage-attachments.html)
* Configure your firewalls to check FireNet traffic flow
2. In the Vendor Integration dialog, select **Through Firewall** or **Through
Firewall Manager**.
You should only select the latter if the Vendor is a Palo Alto firewall
(managed by Panorama).
3. Configure the following:
| Field | Description |
| -------------------------------------------------------------- | ------------------------------------------------------------------------------------------------------------------------------------------------------------ |
| Firewall | Name of the attached firewall (this is pre-populated with the name of the attached firewall). |
| Firewall Manager Vendor (Through Firewall Manager option only) | Palo Alto Networks Panorama |
| Management IP Address | Management IP address of the firewall. |
| Vendor (Through Firewall option only) | Firewall vendor (Palo Alto Networks VM-Series, Fortinet FortiGate, Check Point CloudGuard). |
| Authentication (Check Point CloudGuard) | Password or Private Key |
| Username (Check Point, Palo Alto) | Username for logging on to the firewall. |
| Password (Check Point, Palo Alto) | Password for logging on to the firewall. |
| Private Key (Check Point) | If you selected Private Key authentication for your Check Point firewall, you must upload the private key here. |
| FireNet Instance | |
| Template Name (Firewall Manager Vendor only) | Name of the [template](https://legacy.docs.aviatrix.com/documentation/latest/security/firewall-panorama-templates.html). |
| Template Stack Name (Firewall Manager Vendor only) | Name of the [Template Stack](https://legacy.docs.aviatrix.com/documentation/latest/security/firewall-panorama-templates.html). |
| Route Table | Optional |
| API Token (Fortinet FortiGate only) | [API token generated from the Fortinet FortiGate instance](https://legacy.docs.aviatrix.com/documentation/latest/security/fortigate-vendor-integration.html) |
4. Click **Save**.
### Revoking Vendor Integration
You cannot revoke vendor integration for FireNet gateways that have the Generic
vendor selected.
To revoke Vendor Integration:
1. Select Vendor Integration as per step 1 above, and then click **Revoke
Integration** on the dialog.
2. When prompted about being sure you want to revoke, click **Revoke**.
### Syncing Routes to Firewall
The Vendor Integration tab only displays for a Transit FireNet if you have
configured a Firewall Manager (Panorama) and attached it to this Transit
FireNet.
You can click **Sync Routes to Firewall** on the FireNet Gateway Vendor
Integration tab (you must configure vendor integration first) or the details
panel for the firewall, to ensure that the FireNet routes are synced to the
selected firewall.
You can also sync routes to the firewall from the Security > FireNet > Firewall
details tab.
Since vendor integration requires that the firewall be pinged periodically, you
should
[configure the 'ping' ability](https://legacy.docs.aviatrix.com/documentation/latest/security/firenet-paloalto-icmp.html)
in the respective firewall UIs.
You can also sync routes to the firewall from the Security > FireNet > Firewall
tab (click a firewall to see its details, and then click **Sync Routes to
Firewall**).
## Related Topics
* [Edit a FireNet](https://legacy.docs.aviatrix.com/documentation/latest/security/transit-firenet-edit.html)
* [Remove a FireNet](https://legacy.docs.aviatrix.com/documentation/latest/security/transit-firenet-remove.html)
* View FireNet route table information
* Detach or delete a firewall instance
* [Manage firewall attachments](https://legacy.docs.aviatrix.com/documentation/latest/security/firewall-manage-attachments.html)
* Configure your firewalls to check FireNet traffic flow