> ## Documentation Index
> Fetch the complete documentation index at: https://docs.aviatrix.com/llms.txt
> Use this file to discover all available pages before exploring further.
# Use Azure IAM Custom Role
> When Aviatrix Controller uses Azure API to manage networking and gateway resources, an application must be first created in Azure AD with an identity of Service Principal.
## Use Azure IAM Custom Role
When Aviatrix Controller uses Azure API to manage networking and gateway
resources, an application must be first created in Azure AD with an identity of
Service Principal. This service principal requires an Azure IAM role assignment
together with a set of permissions required by the Aviatrix Controller to
provide service. By default, we use the Azure built-in "Contributor" role. The
Contributor role has access to all resources of the subscription.
If you wish to limit the Controller access permissions, you can do so by
creating a custom role with a set of permissions required by the Controller as
shown below. This document describes how to accomplish this task through the
Azure portal.
## Apply Azure Role-Based Access Control (RBAC) to an Aviatrix Azure Account
The Aviatrix Controller is viewed as an application running on Azure. Since this
application needs to create or program Azure resources, such as launching a
gateway, modifying route entries in a route table, etc., the application
requires a role with certain permissions. By default, this role is a pre-defined
Azure built-in role called "Contributor."
If you wish not to use the Contributor role and instead creating a custom role
with Aviatrix-provided permission, you can do so via Azure portal or with via
PowerShell. Below is guide on how to accomplish that via PowerShell.
For security purposes, Aviatrix recommends you use a custom role rather than
the default role Aviatrix created. When you use a custom role name it is
important to make sure the AssumeRole policy and Trust policy are correct. The
AssumeRole policy is attached to the Azure Virtual Machine role and the Trust
policy is accessed on the APP role Trust Relationship tab.
For replacing the Contributor role via Azure portal, refer to
[Azure IAM Custom Role](#replacing-the-contributor-role).
### Step 1. Add a Custom Role through Powershell
The custom role must have permission that meets the requirement for Aviatrix
Controller to function. The permission is represented by the json file below.
Remember to replace the subscription "11111111-1111-1111-1111-111111111111" with
your own valid subscription ID.
avx\_rbac\_role.json:
```json theme={null}
{
"Name": "Aviatrix Controller Custom Role",
"IsCustom": true,
"Description": "Custom role for Aviatrix Controller",
"Actions": [
"Microsoft.MarketplaceOrdering/offerTypes/publishers/offers/plans/agreements/*",
"Microsoft.Compute/*/read",
"Microsoft.Compute/availabilitySets/*",
"Microsoft.Compute/virtualMachines/*",
"Microsoft.Compute/disks/*",
"Microsoft.Network/*/read",
"Microsoft.Network/publicIPAddresses/*",
"Microsoft.Network/networkInterfaces/*",
"Microsoft.Network/networkSecurityGroups/*",
"Microsoft.Network/loadBalancers/*",
"Microsoft.Network/routeTables/*",
"Microsoft.Network/virtualNetworks/*",
"Microsoft.Storage/storageAccounts/*",
"Microsoft.Resources/*/read",
"Microsoft.Resourcehealth/events/*",
"Microsoft.Resources/deployments/*",
"Microsoft.Resources/tags/*",
"Microsoft.Resources/marketplace/purchase/action",
"Microsoft.Resources/subscriptions/resourceGroups/*",
"Microsoft.ContainerService/managedClusters/listClusterUserCredential/action",
"Microsoft.ContainerService/managedClusters/read"
],
"NotActions": [],
"AssignableScopes": ["/subscriptions/11111111-1111-1111-1111-111111111111"]
}
```
In Powershell, perform the following:
Edit avx\_rbac\_role.json, copy and paste above Aviatrix RBAC role. Save the file.
```powershell theme={null}
New-AzRoleDefinition -InputFile avx_rbac_role.json
```
The Microsoft.ContainerService lines in the above json file example allow the
Aviatrix Controller to connect to your Kubernetes clusters.
### Step 2. Add a Role Assignment in the Azure Portal
In Azure portal > Subscriptions > Access Control (IAM) > Add > Add role
assignment.
At Role assignment, fill the fields as shown below.
| Field | Value |
| ---------------- | ------------------------------------------------------------------------------ |
| Role | Aviatrix Controller Custom Role (this is the role created from above) |
| Assign access to | User, group, or service principal |
| Select | My-new-controller (this is the registered application name for the Controller) |
Once the above step is complete, you have assigned the My-new-controller (as a
service principal) the custom role called "Aviatrix Controller Custom Role."
For more information on how to PowerShell to create custom role on Azure, refer
to
[this link](https://learn.microsoft.com/en-us/azure/role-based-access-control/custom-roles-powershell).
## Aviatrix Required Custom Role Permissions
```json theme={null}
{
"properties": {
"roleName": "Aviatrix Controller Custom Role",
"description": "Custom role for Aviatrix Controller",
"assignableScopes": [],
"permissions": [
{
"actions": [
"Microsoft.MarketplaceOrdering/offerTypes/publishers/offers/plans/agreements/*",
"Microsoft.Compute/*/read",
"Microsoft.Compute/availabilitySets/*",
"Microsoft.Compute/virtualMachines/*",
"Microsoft.Compute/disks/*",
"Microsoft.Network/*/read",
"Microsoft.Network/publicIPAddresses/*",
"Microsoft.Network/networkInterfaces/*",
"Microsoft.Network/networkSecurityGroups/*",
"Microsoft.Network/loadBalancers/*",
"Microsoft.Network/routeTables/*",
"Microsoft.Network/virtualNetworks/*",
"Microsoft.Storage/storageAccounts/*",
"Microsoft.Resources/*/read",
"Microsoft.Resourcehealth/events/*",
"Microsoft.Resources/deployments/*",
"Microsoft.Resources/tags/*",
"Microsoft.Resources/marketplace/purchase/*",
"Microsoft.Resources/subscriptions/resourceGroups/*",
"Microsoft.ContainerService/managedClusters/listClusterUserCredential/action",
"Microsoft.ContainerService/managedClusters/read"
],
"notActions": [],
"dataActions": [],
"notDataActions": []
}
]
}
}
```
For Azure China, remove
"Microsoft.MarketplaceOrdering/offerTypes/publishers/offers/plans/agreements/"
and "Microsoft.Resources/marketplace/purchase/" from "actions".
The Microsoft.ContainerService lines in the above json file example allow for
the discovery of your AKS clusters.
## Creating a Custom Role
Log in to the Azure portal. Go to Subscriptions. Select the subscription whose
network already managed by Aviatrix Controller.
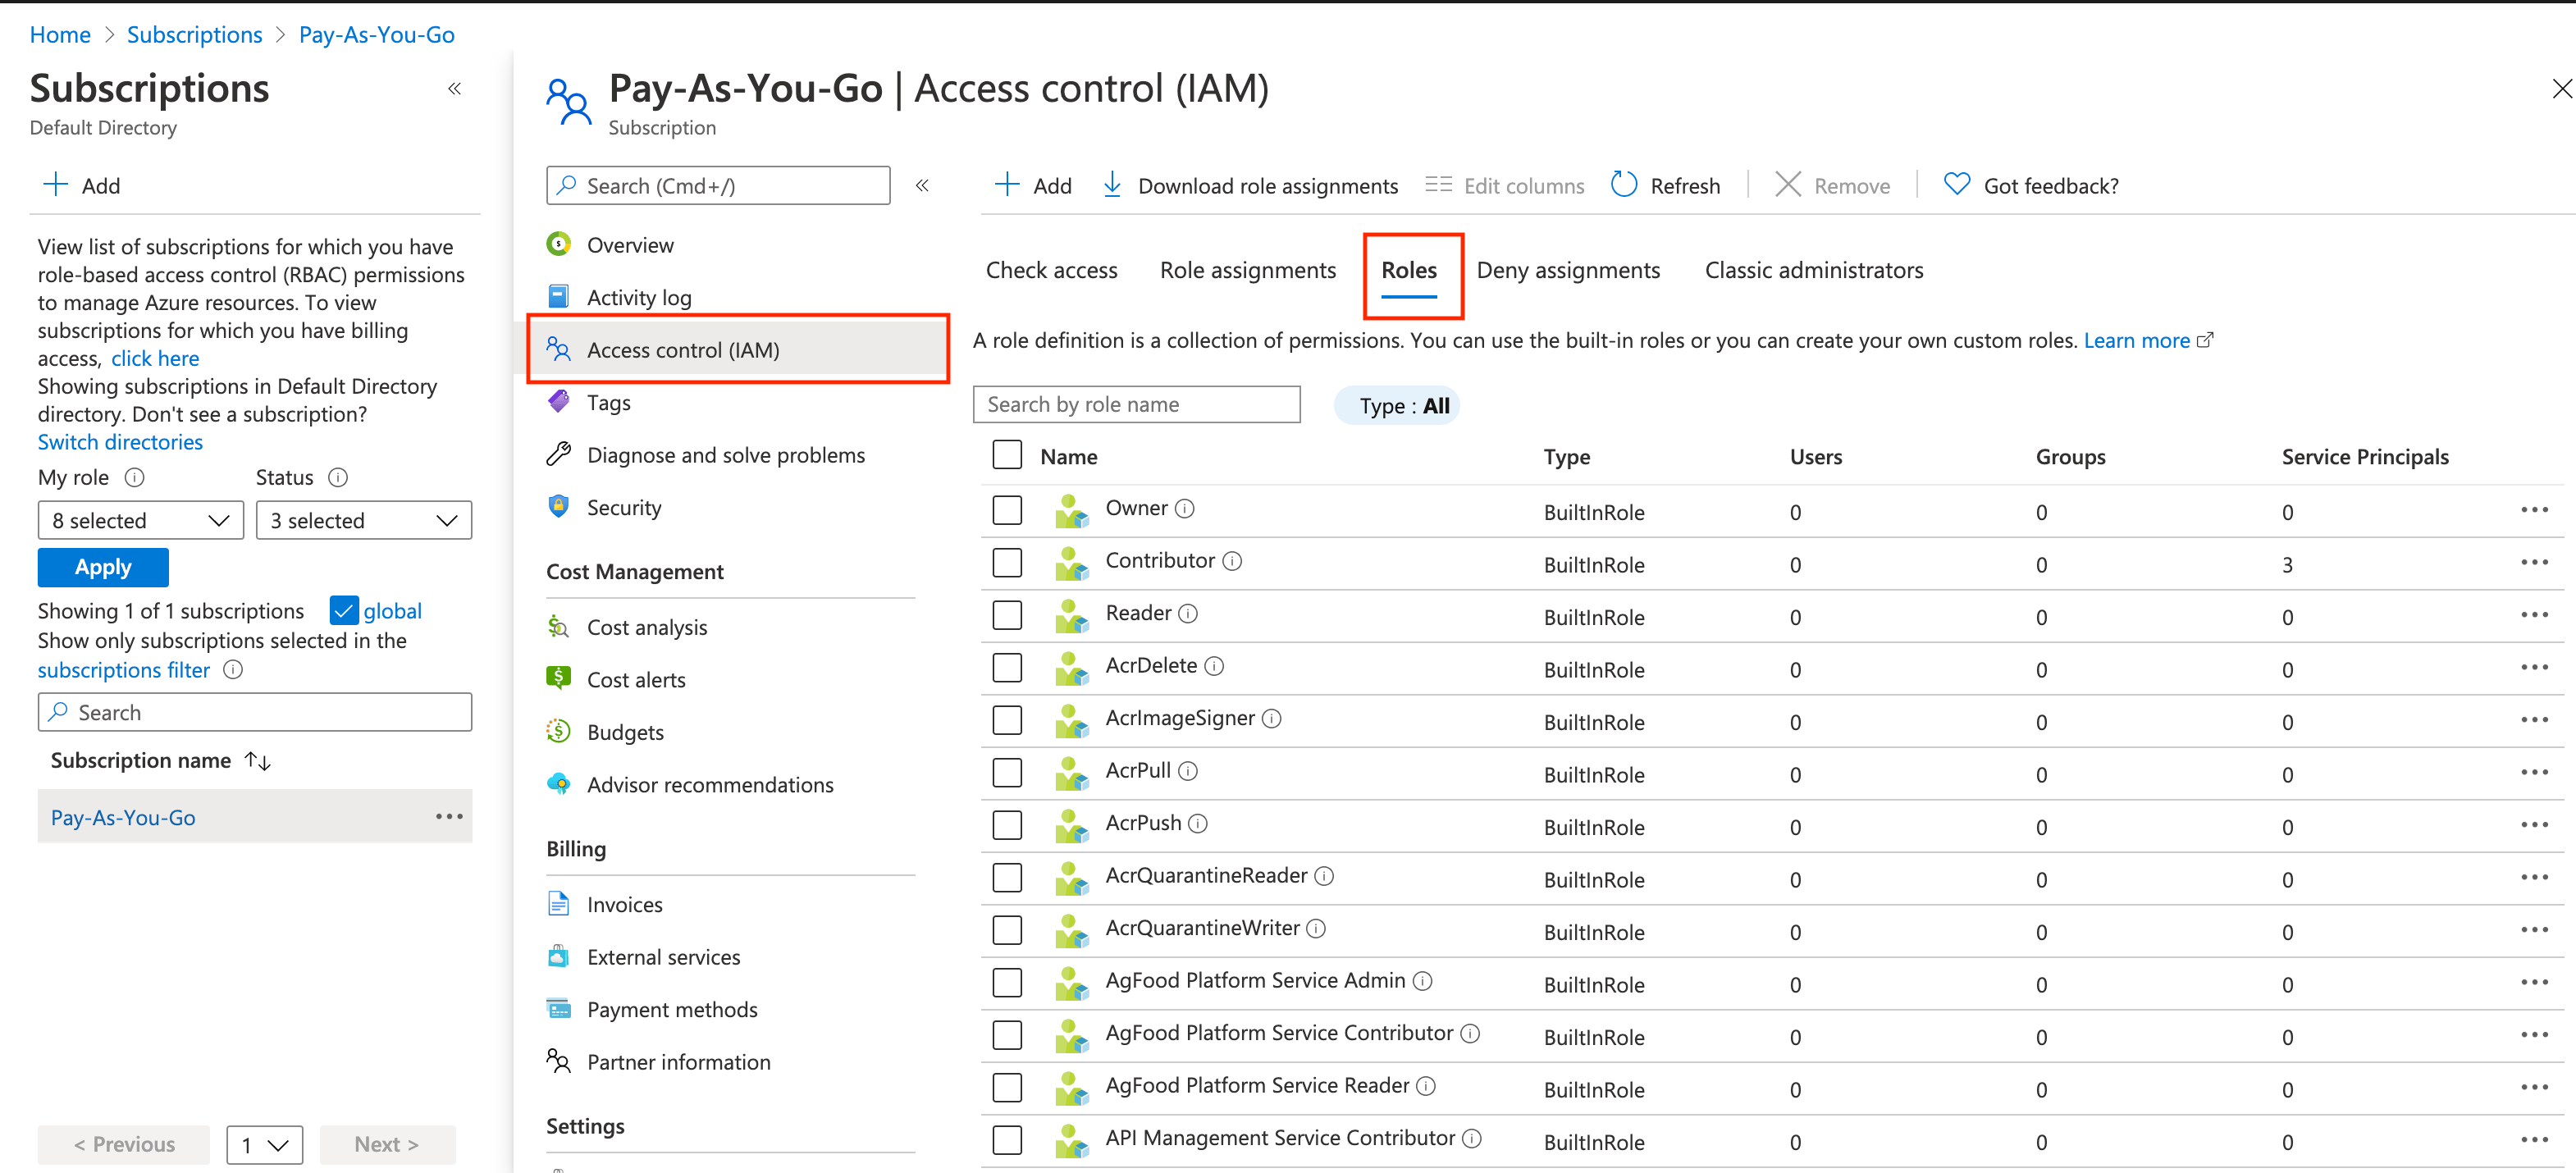
Click **Access control (IAM)**.
Click **Roles**, as shown below.
 Click **+Add** and select **Add custom role**.
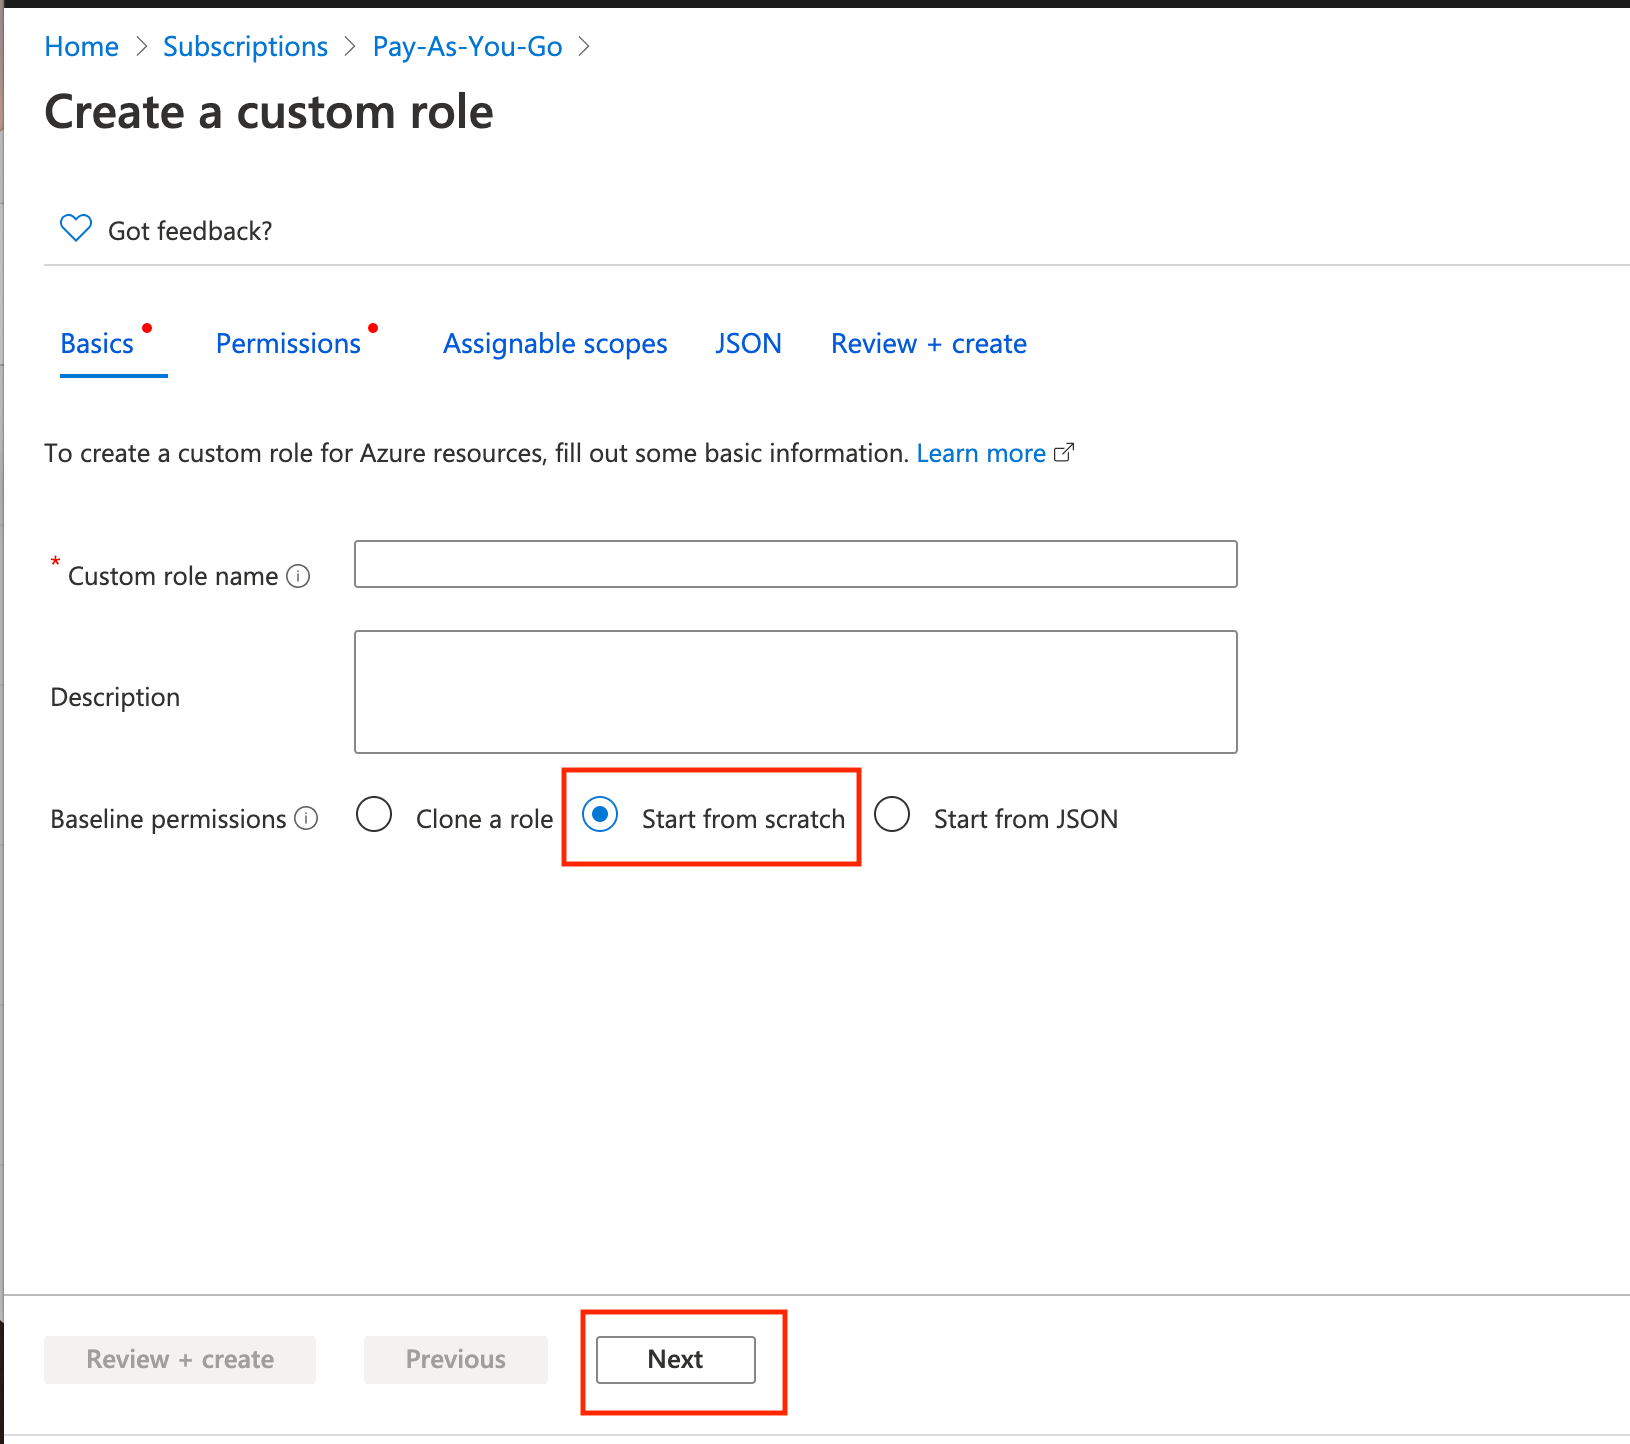
Select **Start from scratch** and click **Next**, as shown below.
Click **+Add** and select **Add custom role**.
Select **Start from scratch** and click **Next**, as shown below.
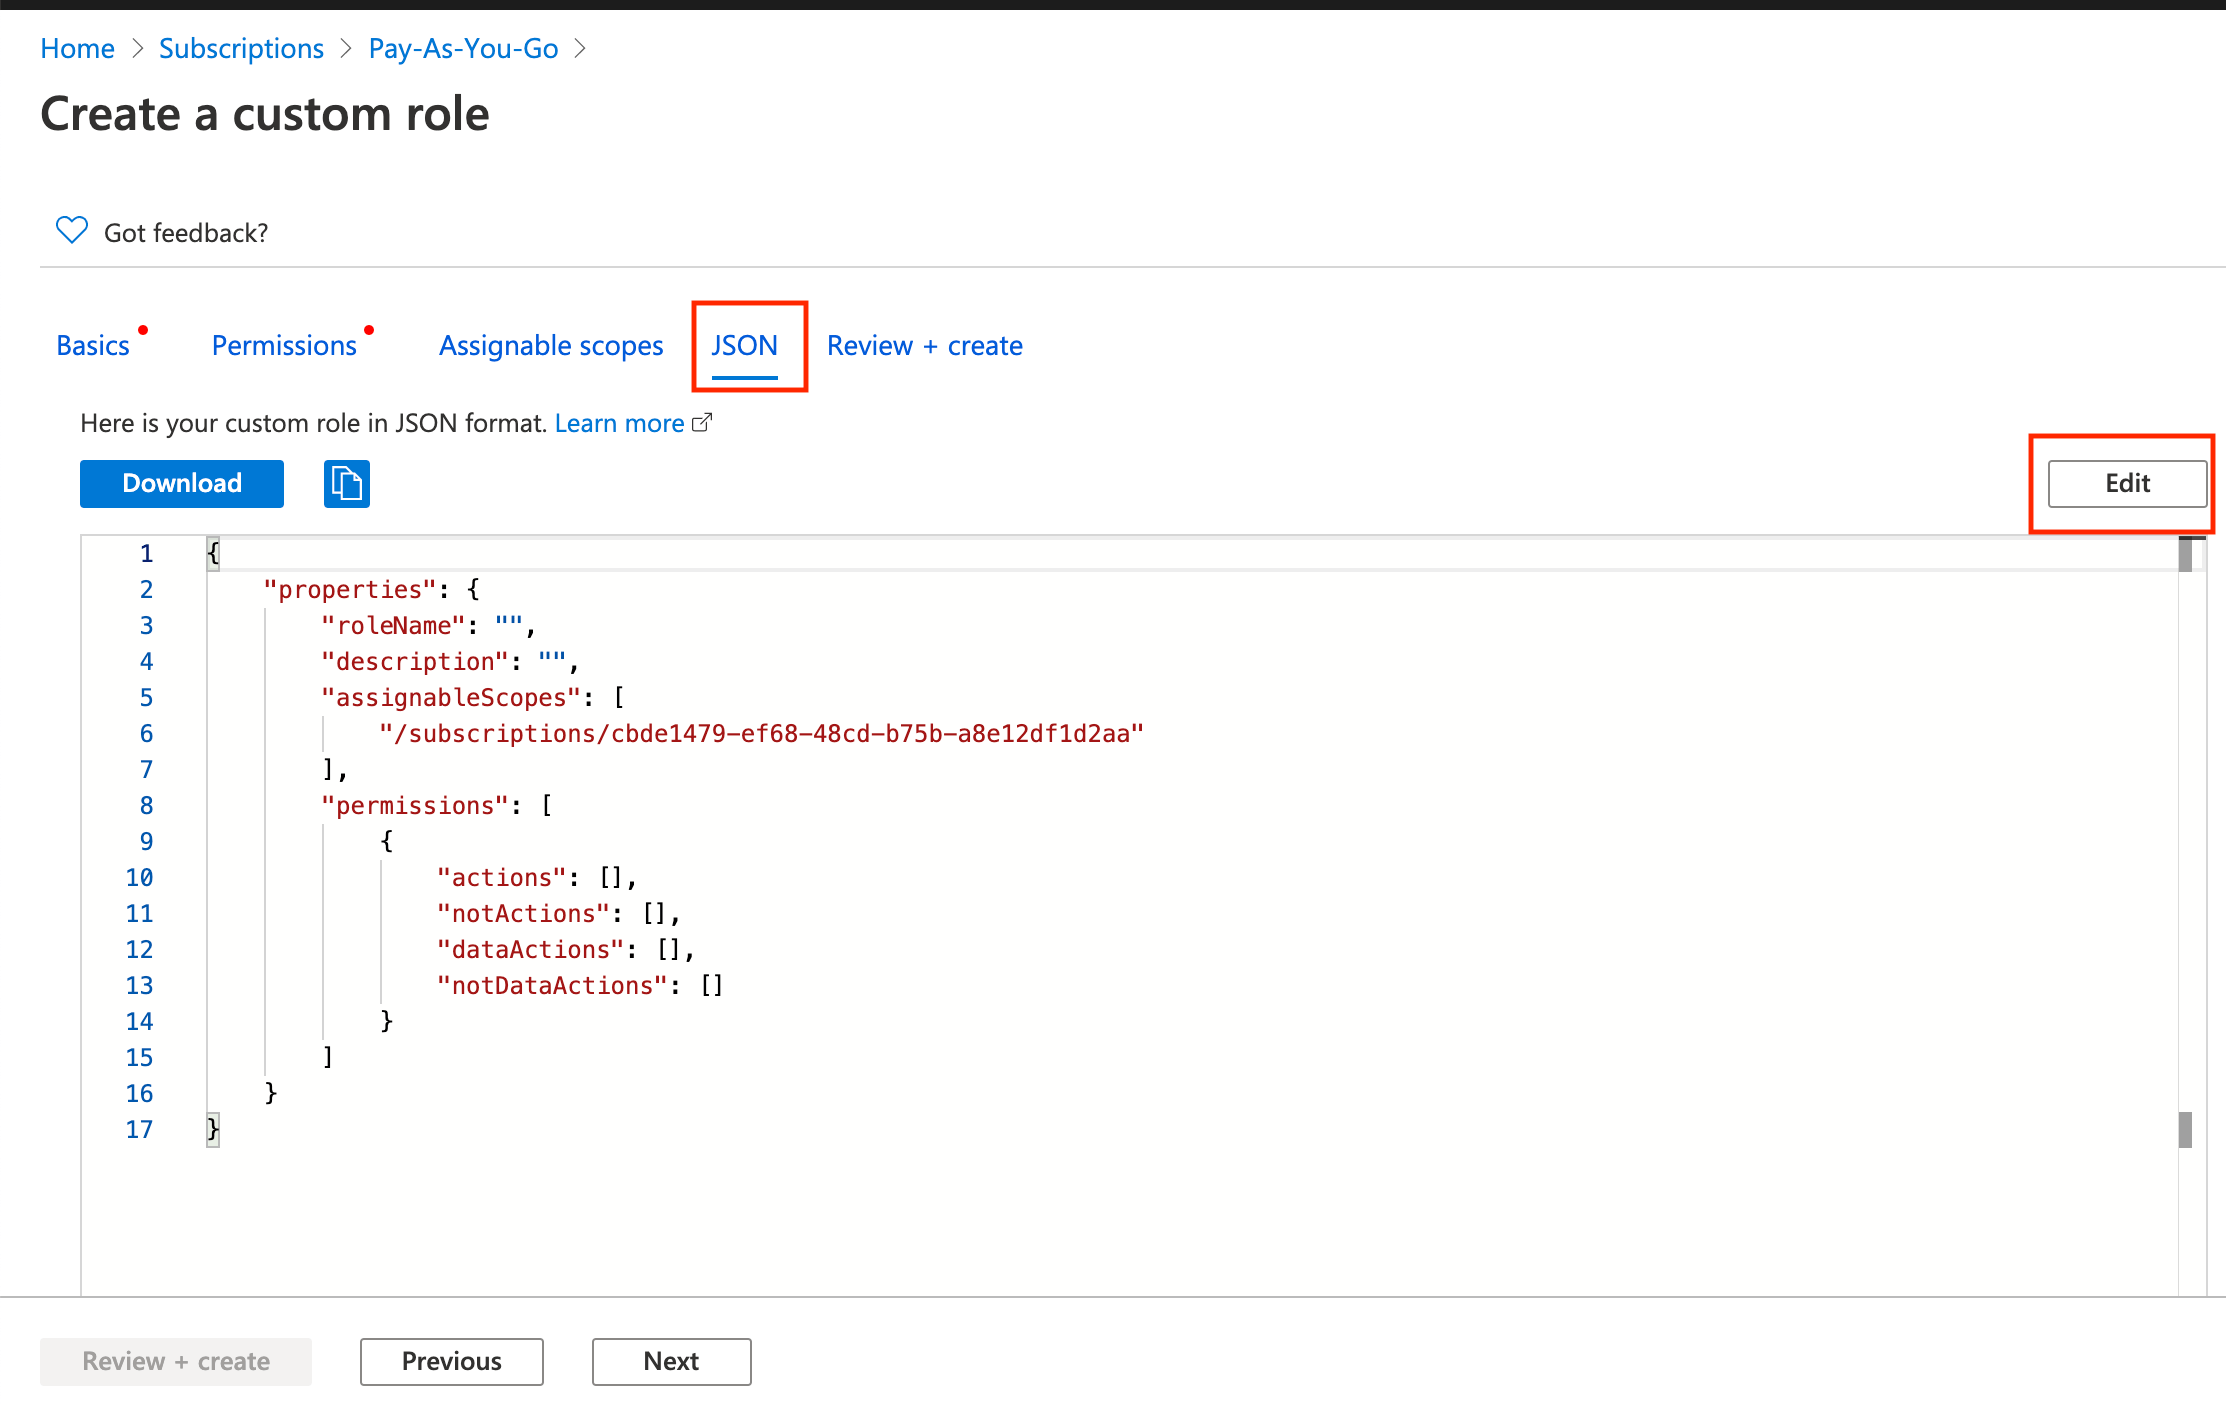
 Click **JSON**, and then click **Edit**.
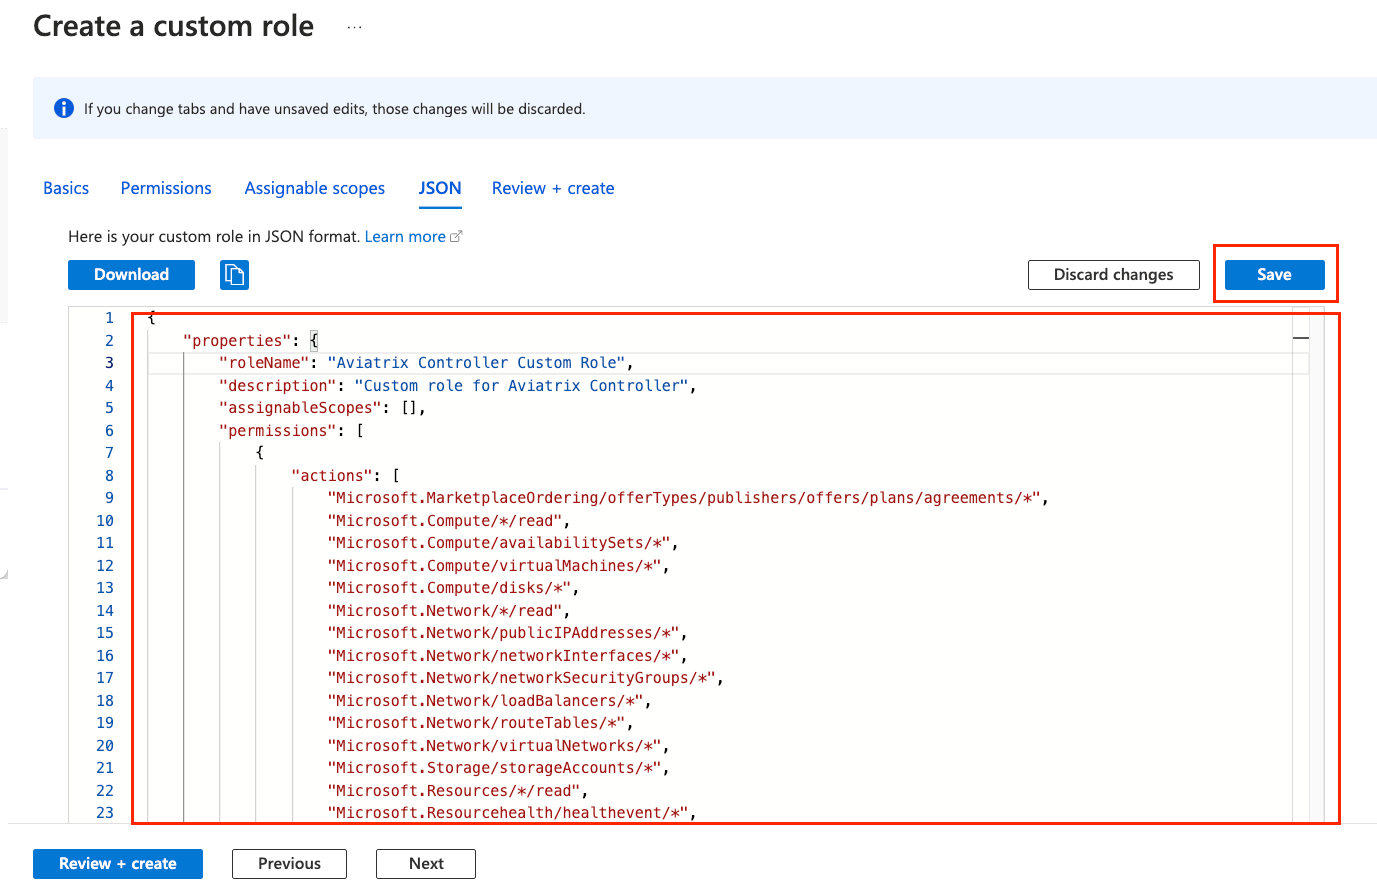
Remove the existing JSON template and copy and paste the above Aviatrix required
permissions JSON into the Editor box, as shown below.
Click **JSON**, and then click **Edit**.
Remove the existing JSON template and copy and paste the above Aviatrix required
permissions JSON into the Editor box, as shown below.
 Click **Save**.
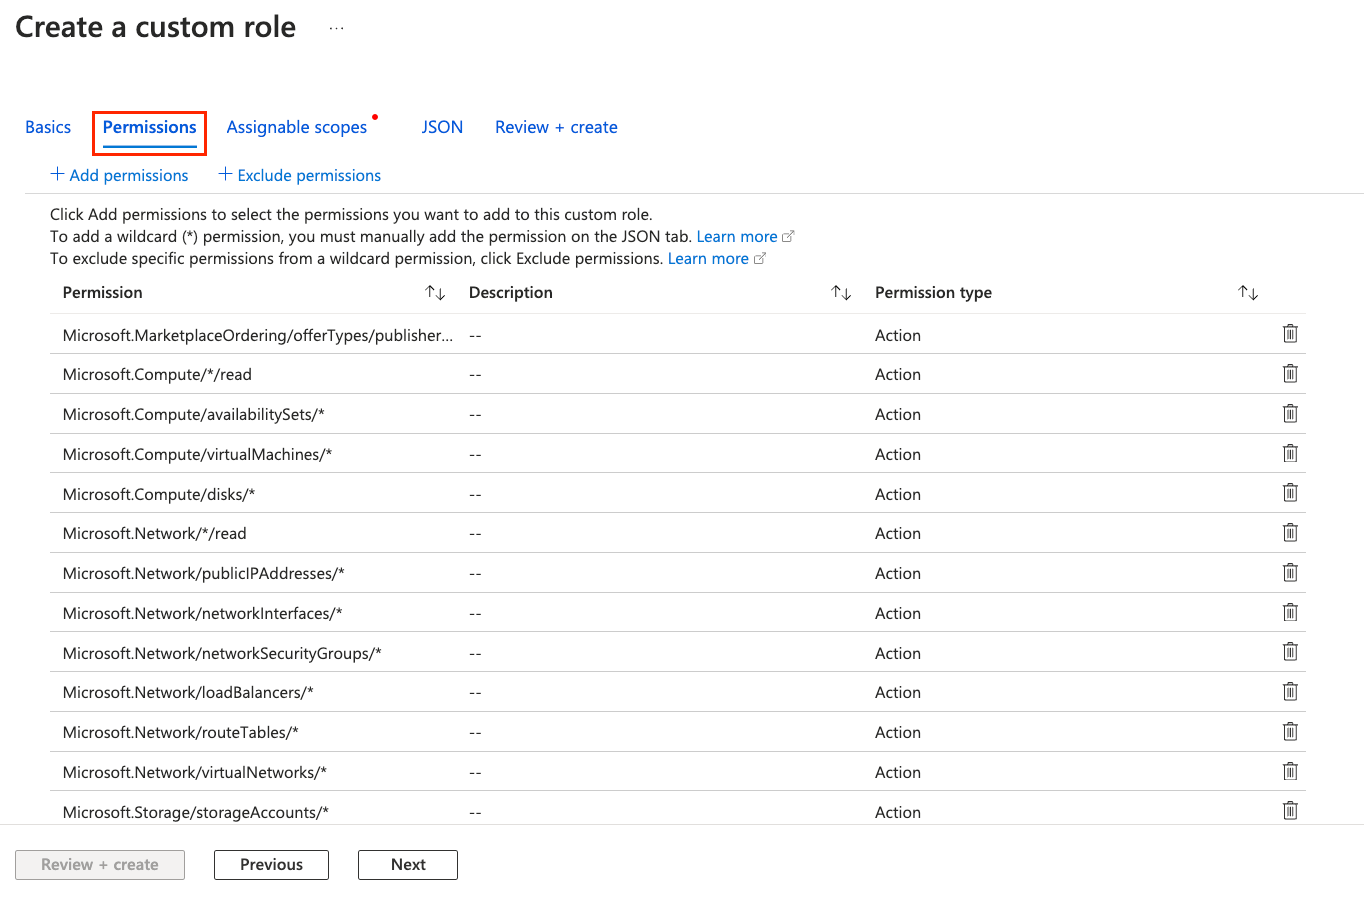
Click **Permissions**. You should see the permissions have been populated, as
shown below.
Click **Save**.
Click **Permissions**. You should see the permissions have been populated, as
shown below.
 Click **Assignable scopes** and then **Add assignable scopes**. Select the
subscription.
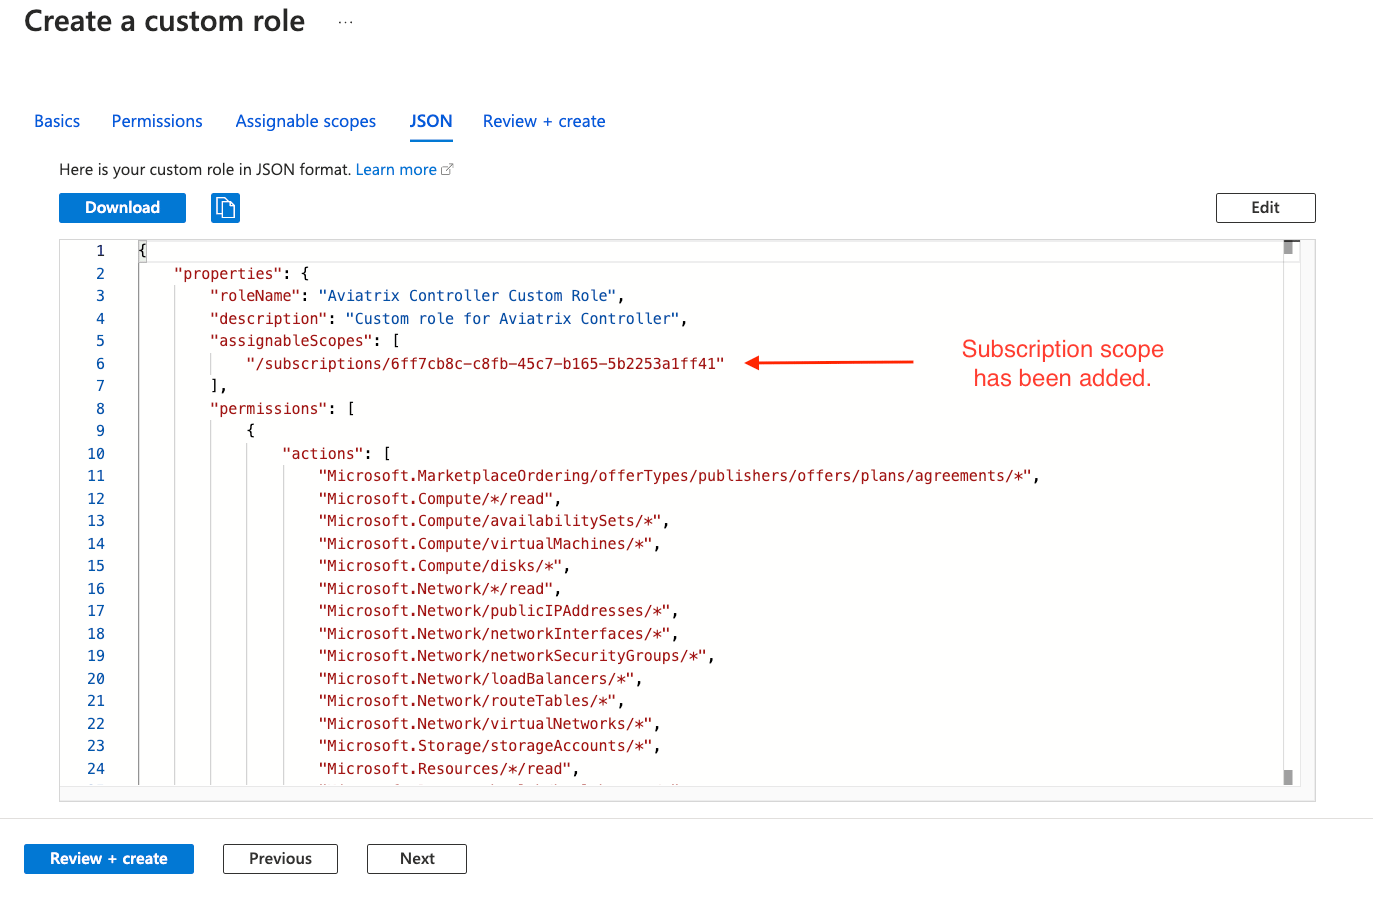
Click **JSON**. You should say the subscription has been added to the assignable
Scopes, as shown below.
Click **Assignable scopes** and then **Add assignable scopes**. Select the
subscription.
Click **JSON**. You should say the subscription has been added to the assignable
Scopes, as shown below.
 Click **Review + create**, and then click **Create**.
## Replacing the Contributor Role
This step is optional. It is only applicable if you have already assigned the
"Contributor" role to the Aviatrix Controller service principal. If not, skip
this step and proceed to the next step.
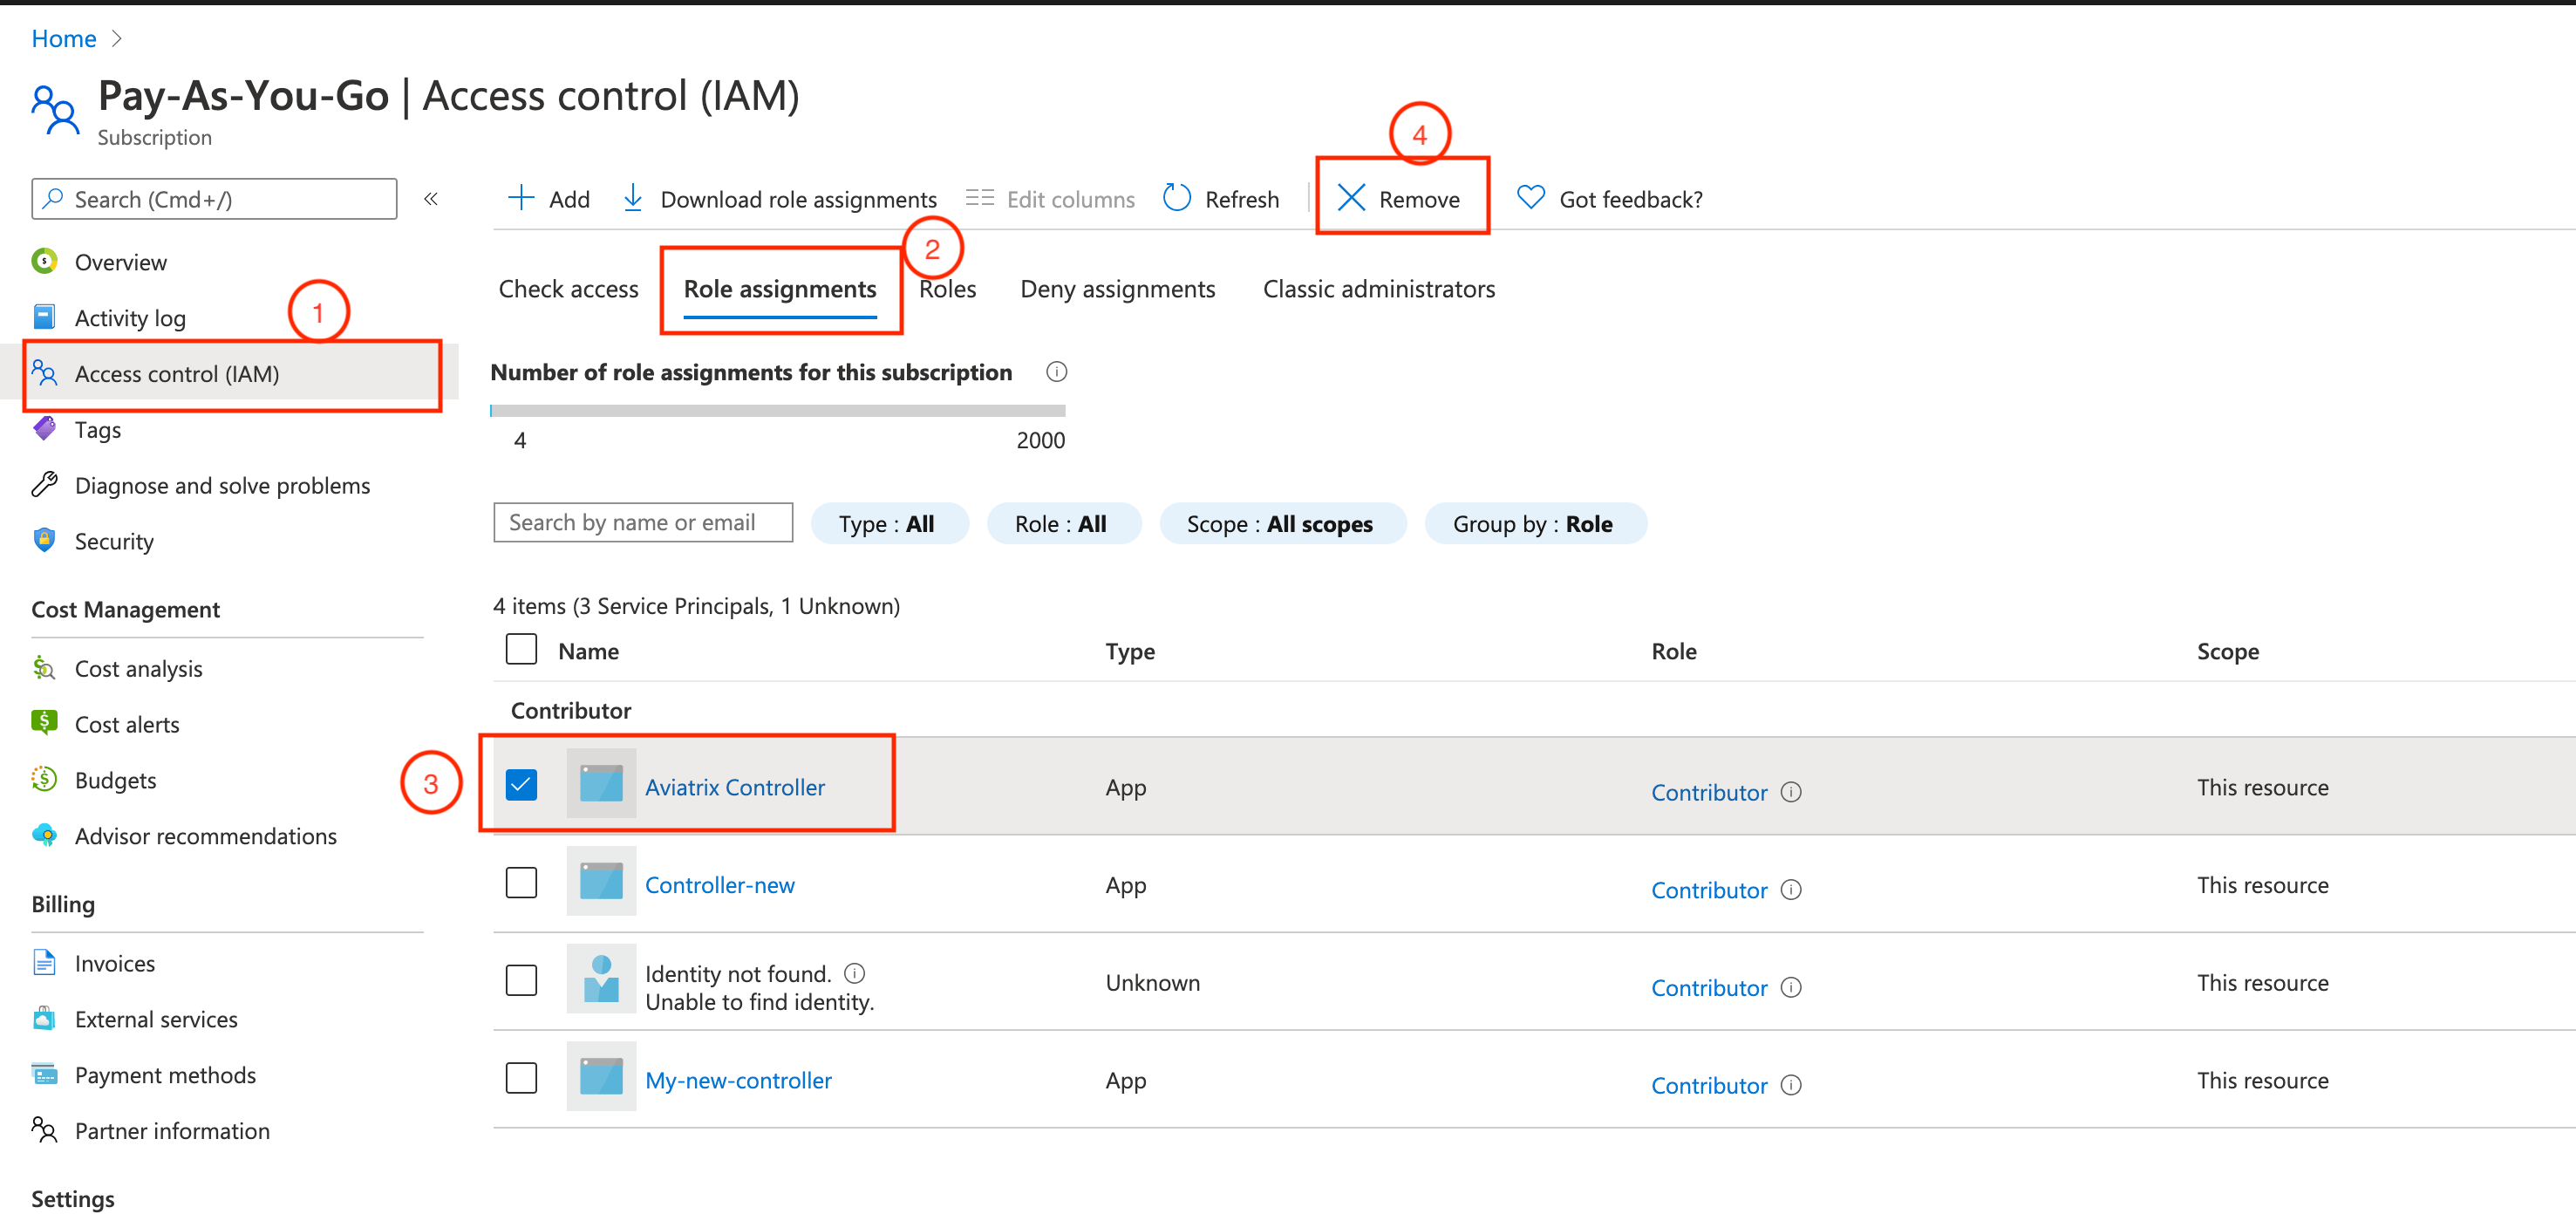
Now that you have created a custom role called Aviatrix Controller Custom Role,
go ahead replace the Contributor role, as shown below.
Click **Review + create**, and then click **Create**.
## Replacing the Contributor Role
This step is optional. It is only applicable if you have already assigned the
"Contributor" role to the Aviatrix Controller service principal. If not, skip
this step and proceed to the next step.
Now that you have created a custom role called Aviatrix Controller Custom Role,
go ahead replace the Contributor role, as shown below.
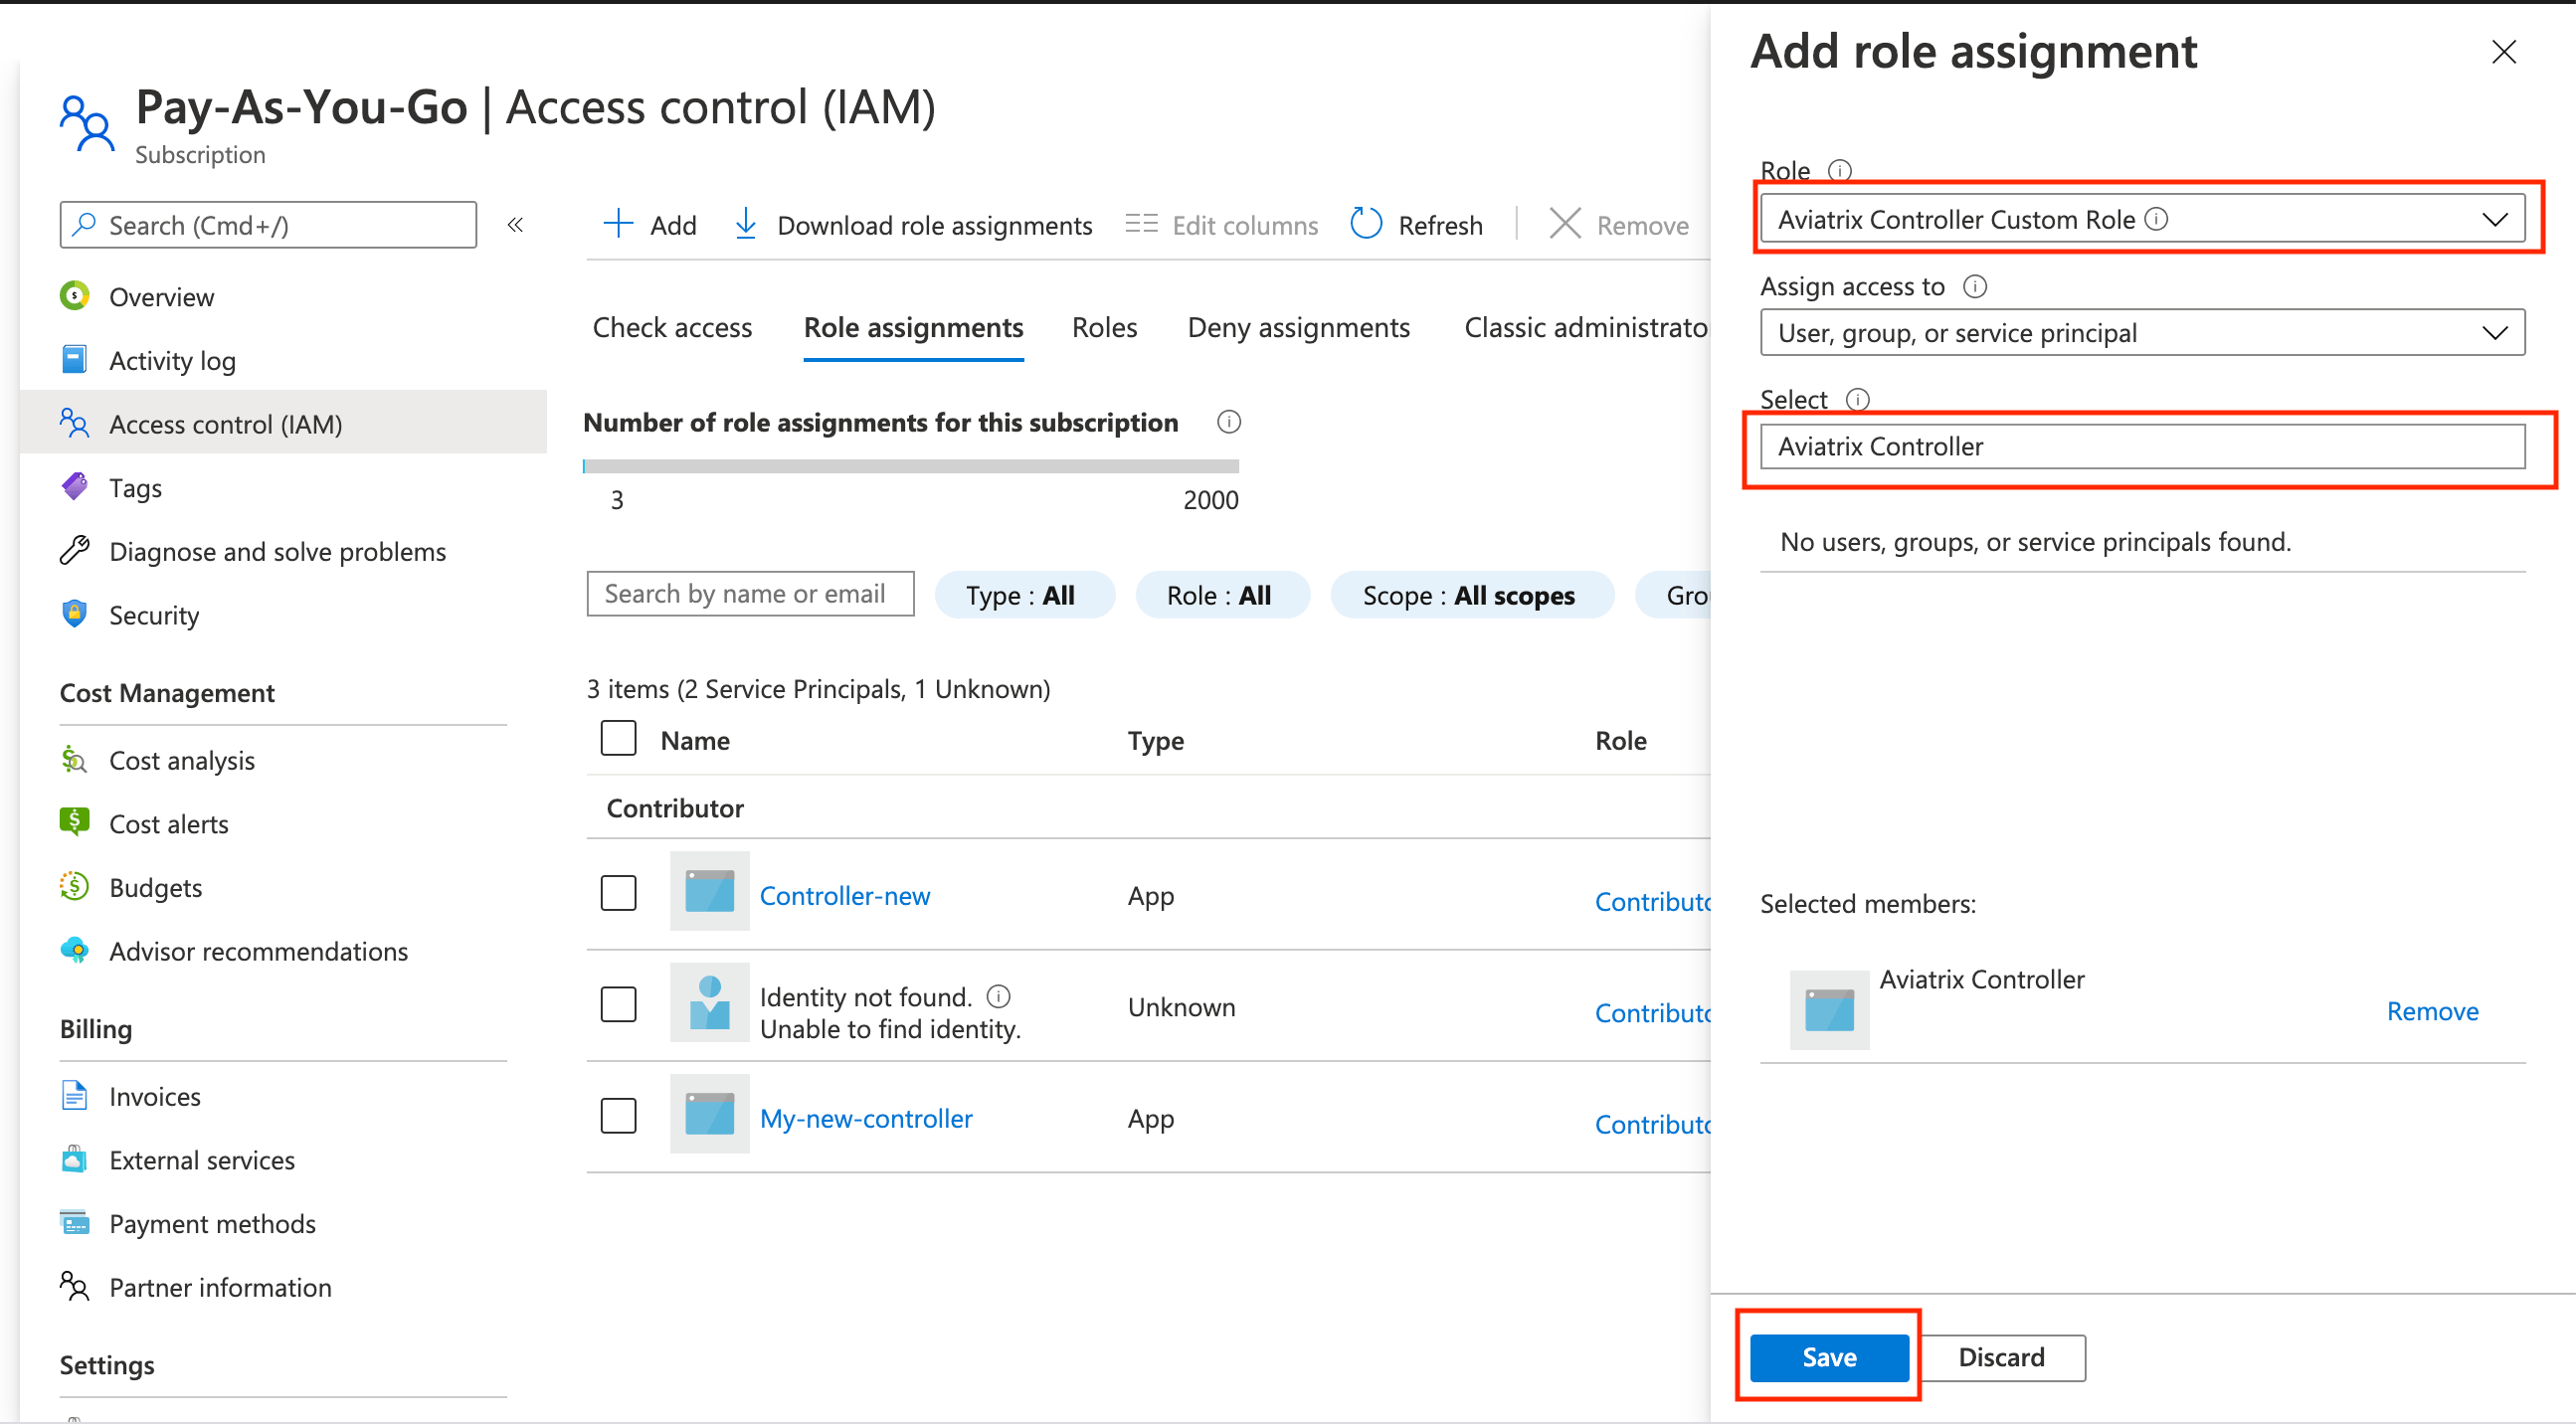
 Click **+Add**, select **Add role assignment**. Fill in the fields as shown
below.
Click **+Add**, select **Add role assignment**. Fill in the fields as shown
below.
 ## Multiple Custom Roles Approach
The Aviatrix role permissions can be split into multiple custom roles each with
a subset of permissions. Subscription permission must be at the subscription
scope. The additional permission may have the scope of one or more Resource
Groups.
Below is an example where the "Aviatrix Custom Role for subscription" has the
scope of subscription and the remaining permissions has the scope of Resource
Group.
### Subscription Scope IAM Custom Role
```json theme={null}
{
"properties": {
"roleName": "Aviatrix Custom Role for subscription",
"description": "Aviatrix Custom role for gateway subscription permission",
"assignableScopes": [],
"permissions": [
{
"actions": [
"Microsoft.MarketplaceOrdering/offerTypes/publishers/offers/plans/agreements/*"
],
"notActions": [],
"dataActions": [],
"notDataActions": []
}
]
}
}
```
## Resource Group Scope IAM Custom role
Note when creating a custom role for a resource group on Azure portal, start at
Subscription > Resource groups, select one resource group, and click **Access
Control (IAM)**. Then, follow the role creation process with the permission
described in the file below to create the role. When configuring Assignable
scopes, select one or more resource groups (it is multi-selectable) for this
role. After the role is created, assign the role to the Service principal of the
Aviatrix Controller application.
It takes a few minutes for the display to appear for the custom role just
created. Once it can be displayed, you can find it by going to Subscription >
Resource groups > select one resource group assigned to the role, then click
**Access Control (IAM)**, then click **Roles**. Then search for the role you
just created.
```json theme={null}
{
"properties": {
"roleName": "Aviatrix Custom Role for services",
"description": "Aviatrix Custom role for the network and gateway services",
"assignableScopes": [],
"permissions": [
{
"actions": [
"Microsoft.Compute/*/read",
"Microsoft.Compute/availabilitySets/*",
"Microsoft.Compute/virtualMachines/*",
"Microsoft.Compute/disks/*",
"Microsoft.Network/*/read",
"Microsoft.Network/publicIPAddresses/*",
"Microsoft.Network/networkInterfaces/*",
"Microsoft.Network/networkSecurityGroups/*",
"Microsoft.Network/loadBalancers/*",
"Microsoft.Network/routeTables/*",
"Microsoft.Network/virtualNetworks/*",
"Microsoft.Storage/storageAccounts/*",
"Microsoft.Resources/*/read",
"Microsoft.Resourcehealth/events/*",
"Microsoft.Resources/deployments/*",
"Microsoft.Resources/tags/*",
"Microsoft.Resources/marketplace/purchase/*",
"Microsoft.Resources/subscriptions/resourceGroups/*"
],
"notActions": [],
"dataActions": [],
"notDataActions": []
}
]
}
}
```
If you wish to use Contributor role for the above part of the permission, ignore
the JSON file listed above. Simply navigate to the Azure portal > Resource
groups > select the resource group. Click **Access Control (IAM)** > **+Add** >
**Add Role assignment**. Then, select **Contributor** as the Role and assign the
Contributor role to the Aviatrix Controller service principal.
## Additional References
To learn more on Azure custom role and how to configure it, see
[Azure Custom Roles](https://learn.microsoft.com/en-us/azure/role-based-access-control/custom-roles).
To view the complete Azure role permissions, refer to
[Azure resource provider operations](https://learn.microsoft.com/en-us/azure/role-based-access-control/resource-provider-operations).
## Multiple Custom Roles Approach
The Aviatrix role permissions can be split into multiple custom roles each with
a subset of permissions. Subscription permission must be at the subscription
scope. The additional permission may have the scope of one or more Resource
Groups.
Below is an example where the "Aviatrix Custom Role for subscription" has the
scope of subscription and the remaining permissions has the scope of Resource
Group.
### Subscription Scope IAM Custom Role
```json theme={null}
{
"properties": {
"roleName": "Aviatrix Custom Role for subscription",
"description": "Aviatrix Custom role for gateway subscription permission",
"assignableScopes": [],
"permissions": [
{
"actions": [
"Microsoft.MarketplaceOrdering/offerTypes/publishers/offers/plans/agreements/*"
],
"notActions": [],
"dataActions": [],
"notDataActions": []
}
]
}
}
```
## Resource Group Scope IAM Custom role
Note when creating a custom role for a resource group on Azure portal, start at
Subscription > Resource groups, select one resource group, and click **Access
Control (IAM)**. Then, follow the role creation process with the permission
described in the file below to create the role. When configuring Assignable
scopes, select one or more resource groups (it is multi-selectable) for this
role. After the role is created, assign the role to the Service principal of the
Aviatrix Controller application.
It takes a few minutes for the display to appear for the custom role just
created. Once it can be displayed, you can find it by going to Subscription >
Resource groups > select one resource group assigned to the role, then click
**Access Control (IAM)**, then click **Roles**. Then search for the role you
just created.
```json theme={null}
{
"properties": {
"roleName": "Aviatrix Custom Role for services",
"description": "Aviatrix Custom role for the network and gateway services",
"assignableScopes": [],
"permissions": [
{
"actions": [
"Microsoft.Compute/*/read",
"Microsoft.Compute/availabilitySets/*",
"Microsoft.Compute/virtualMachines/*",
"Microsoft.Compute/disks/*",
"Microsoft.Network/*/read",
"Microsoft.Network/publicIPAddresses/*",
"Microsoft.Network/networkInterfaces/*",
"Microsoft.Network/networkSecurityGroups/*",
"Microsoft.Network/loadBalancers/*",
"Microsoft.Network/routeTables/*",
"Microsoft.Network/virtualNetworks/*",
"Microsoft.Storage/storageAccounts/*",
"Microsoft.Resources/*/read",
"Microsoft.Resourcehealth/events/*",
"Microsoft.Resources/deployments/*",
"Microsoft.Resources/tags/*",
"Microsoft.Resources/marketplace/purchase/*",
"Microsoft.Resources/subscriptions/resourceGroups/*"
],
"notActions": [],
"dataActions": [],
"notDataActions": []
}
]
}
}
```
If you wish to use Contributor role for the above part of the permission, ignore
the JSON file listed above. Simply navigate to the Azure portal > Resource
groups > select the resource group. Click **Access Control (IAM)** > **+Add** >
**Add Role assignment**. Then, select **Contributor** as the Role and assign the
Contributor role to the Aviatrix Controller service principal.
## Additional References
To learn more on Azure custom role and how to configure it, see
[Azure Custom Roles](https://learn.microsoft.com/en-us/azure/role-based-access-control/custom-roles).
To view the complete Azure role permissions, refer to
[Azure resource provider operations](https://learn.microsoft.com/en-us/azure/role-based-access-control/resource-provider-operations).