> ## Documentation Index
> Fetch the complete documentation index at: https://docs.aviatrix.com/llms.txt
> Use this file to discover all available pages before exploring further.
# Setting Up Azure Account Credentials
> Aviatrix Controller uses Azure APIs extensively to launch Aviatrix gateways and configure features.
## Azure Account Credential Setup
### Overview
Aviatrix Controller uses Azure APIs extensively to launch Aviatrix gateways and
configure features.
In order to use Azure API, you need to first create an Aviatrix
Access Account
on the Aviatrix Controller. This access account corresponds to a valid Azure
subscription with API credentials. You need to create an access account for each
subscription.
This document describes, for a given subscription, how to set up your Azure
account credentials and onboard this Azure account to your Aviatrix Controller.
Then, your Aviatrix Controller can execute APIs on that subscription.
### API and Permission Setup
Setting up Azure permission for Aviatrix involves the following steps.
1. [Registering Aviatrix Controller Application with Microsoft Entra ID](#registering-your-aviatrix-controller-application)
2. [Assigning a role to the Aviatrix Controller Application](#assigning-a-role-to-the-aviatrix-application)
3. [Creating a Secret Identifier (Application Key)](#creating-a-secret-identifier)
4. [Setting API Permissions for the Aviatrix Controller Application](#setting-api-permissions-for-the-aviatrix-controller-application)
5. [Onboarding Your Azure Access Account in the Aviatrix Controller](#onboarding-your-azure-access-account-in-the-aviatrix-controller)
As you complete the first four steps, find and save these four values: your
**Azure Subscription ID**, **Directory ID**, **Application ID**, and
**Application Key value** (from your Client secret) to complete the last step,
onboarding your Azure Access Account in the Aviatrix Controller.
## Registering Your Aviatrix Controller Application
Complete the following steps in order.
1. Log into the [Azure portal](https://portal.azure.com) and go to **All
services**.
2. Search for **Microsoft Entra ID** and click **Microsoft Entra ID** from the
search results.
3. Click **Add** > **App registration**.
4. Enter a unique and memorable name for your Aviatrix Controller application.
5. Select **Supported account types** as **Accounts in this organizational
directory only**.
6. Click **Register**. The page displays details of your Aviatrix Controller
application registration.
7. Copy the **Application ID** and **Directory ID** into a text file and save
the file. You will use the name of your Aviatrix Controller application and
these ID values later to onboard your Azure access account in the Aviatrix
Controller.
## Assigning a Role to the Aviatrix Application
After registering your Aviatrix Controller as an app, assign this app a role to
set up the connection between your Azure account and your Aviatrix Controller.
1. Log in to the Azure portal, go to **All services**, and search for
"Subscriptions."
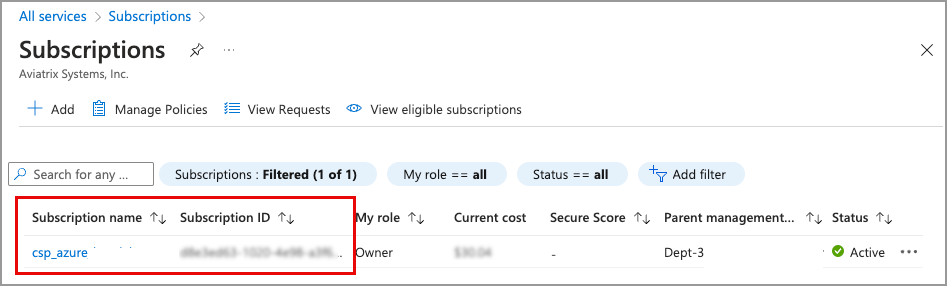 2. Copy the Subscription ID to the text file where you saved the Application ID
and Directory ID.
3. Click the **Subscription ID** to open more details.
4. On the Subscriptions page, select **Access control (IAM)** on the left.
5. On the Access control (IAM) page, click **+ Add > Add role assignment**.
Alternatively, you can click Add role assignment, under Grant access to this
resource.
2. Copy the Subscription ID to the text file where you saved the Application ID
and Directory ID.
3. Click the **Subscription ID** to open more details.
4. On the Subscriptions page, select **Access control (IAM)** on the left.
5. On the Access control (IAM) page, click **+ Add > Add role assignment**.
Alternatively, you can click Add role assignment, under Grant access to this
resource.
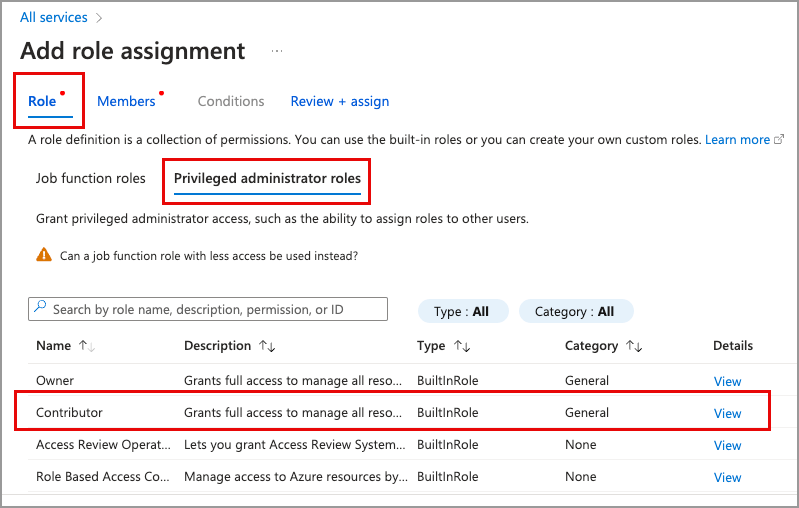 6. On the Role tab, select **Privileged administrator roles**. Select the
**Contributor** role for this app. If the Contributor role is too broad, you
can later replace it with a custom role with specific permissions. Refer to
Use Azure IAM Custom Role
for instructions.
7. On the Members tab, click **Select members**, and in the Select search field,
enter the name of your Aviatrix Controller, that you registered in the
[Registering Your Aviatrix Controller Application](#registering-your-aviatrix-controller-application)
task.
8. Select your Aviatrix Controller app and click **Select**.
9. On the Add role assignment page, click **Review + assign**. Your Aviatrix
Controller app is now assigned a Contributor role for this Azure
subscription.
As an alternative to steps 3-8 above, you can run the following PowerShell
commands from your Azure AZ PowerShell module, or Azure Cloud Shell, to set up
the Contributor role:
```
az ad sp create-for-rbac --name "name you want to use here" --role="Contributor" --scopes=/subscriptions/xxxx-xx-xxxx-xxxx (replace Xs with subscription id)
az ad sp list --show-mine --output table
```
## Creating a Secret Identifier
After registering your Aviatrix Controller as an app and assigning it the
Contributor role, create a Secret identifier. Microsoft Entra ID uses this
Secret identifier to authenticate the Aviatrix Controller application.
When you onboard your Azure account in your Aviatrix Controller, you must
enter this Secret Identifier value in the Application Key field.
1. Navigate to **All services > Microsoft Entra ID > App registrations** and
click the application name.
2. Under Essentials, click **Add a certificate or secret**.
3. On the **Client secrets** tab, click **+New client secret**.
4. On **Add a client secret**, enter:
* **Description** - Aviatrix
* **Expires** - Set the time period to meet your corporate requirements.
Make a note of the expiration date and use an alerting system to send a
reminder before the client secret expires. Azure does not send an alert prior
to invalidating the client secret. If the client secret expires, you can have
issues with your Controller.
5. Click **Add**.
6. On **Certificates & secrets > Client secrets**, copy and save the **Value**,
and identify the Value as the Application Key to be used in Aviatrix
Controller onboarding.
This is the only opportunity to save this Value. You cannot view it again
after you leave the Certificates & secrets window. It is not stored in Azure
or in Aviatrix Controller.
You should save this Value ID (Application Key) with the Account ID, Directory
ID, and Subscription ID that you previously saved. These four values are
necessary to onboard this Azure account in the Aviatrix Controller.
## Setting API Permissions for the Aviatrix Controller Application
The API permission provides the Aviatrix Controller application permission to
access Azure APIs.
1. Navigate to **All services > Microsoft Entra ID > App registrations**.
2. Click on the Aviatrix Controller application link.
3. From the left sidebar under **Manage**, select **API permissions**.
4. Under Configured Permissions, click **+ Add a permission**.
5. On Request API permissions, scroll down and click **Azure Service
Management**.
6. On the Request API permissions for Azure Service Management page, under
Permissions, select **user\_impersonation** and then click **Add
permissions**.
You can now use the four values you saved to onboard your Azure account in your
Aviatrix Controller.
## Onboarding Your Azure Access Account in the Aviatrix Controller
1. Open your Aviatrix Controller and in the left sidebar, select **Onboarding**.
2. Select Microsoft Azure from the list of Cloud Service Providers (CSPs).
Make sure to select **Microsoft Azure**, not Azure Government.
3. Under Create Primary Access Account, enter an Account Name, or use the
default, for this Azure subscription. This name is only used in the Aviatrix
Controller to identify the account and does not need to be a specific value
from your Azure account.
4. In the fields provided, enter the four values you previously saved from
Azure:
| Access Account Setup Input Field | Value |
| ------------------------------------- | ---------------------------------------------------------------------------------------------------------------------- |
| Subscription ID | From the [Assigning a Role to the Aviatrix Application](#assigning-a-role-to-the-aviatrix-application) section |
| Directory ID | From the [Registering Your Aviatrix Controller Application](#registering-your-aviatrix-controller-application) section |
| Application ID | From the [Registering Your Aviatrix Controller Application](#registering-your-aviatrix-controller-application) section |
| Client Secret Value (Application Key) | From the [Creating a Secret Identifier](#creating-a-secret-identifier) section |
For the Application Key, use the Client Secret value you saved from your Azure
account.
5. Click **Create**.
Your Primary Access Account for Azure should be successfully onboarded.
To troubleshoot onboarding issues, see the
[Aviatrix Support website](https://support.aviatrix.com).
### Additional References
If you need additional information about how to access resources, refer to the
Azure documentation
[Register a Microsoft Entra app and create a service principal](https://learn.microsoft.com/en-us/entra/identity-platform/howto-create-service-principal-portal).
## Azure China notes
### Deploying the Aviatrix Gateway in the Azure China Cloud
Prerequisites:
You must already have a Microsoft Azure China account and Aviatrix Controller in
AWS China to deploy an Aviatrix Gateway in the Azure China Cloud.
1. Create the Aviatrix Controller in your AWS China Cloud. Go to Onboarding and
select Azure China.
2. Enter the Aviatrix Customer ID.
3. Enter the Certificate Domain.
4. Create the Primary Access Account.
5. Deploy Aviatrix Gateway from the Gateway page in the Aviatrix Controller or
the Multi-Cloud Transit Solution page.
For more information, see
Acquiring a China ICP License
.
6. On the Role tab, select **Privileged administrator roles**. Select the
**Contributor** role for this app. If the Contributor role is too broad, you
can later replace it with a custom role with specific permissions. Refer to
Use Azure IAM Custom Role
for instructions.
7. On the Members tab, click **Select members**, and in the Select search field,
enter the name of your Aviatrix Controller, that you registered in the
[Registering Your Aviatrix Controller Application](#registering-your-aviatrix-controller-application)
task.
8. Select your Aviatrix Controller app and click **Select**.
9. On the Add role assignment page, click **Review + assign**. Your Aviatrix
Controller app is now assigned a Contributor role for this Azure
subscription.
As an alternative to steps 3-8 above, you can run the following PowerShell
commands from your Azure AZ PowerShell module, or Azure Cloud Shell, to set up
the Contributor role:
```
az ad sp create-for-rbac --name "name you want to use here" --role="Contributor" --scopes=/subscriptions/xxxx-xx-xxxx-xxxx (replace Xs with subscription id)
az ad sp list --show-mine --output table
```
## Creating a Secret Identifier
After registering your Aviatrix Controller as an app and assigning it the
Contributor role, create a Secret identifier. Microsoft Entra ID uses this
Secret identifier to authenticate the Aviatrix Controller application.
When you onboard your Azure account in your Aviatrix Controller, you must
enter this Secret Identifier value in the Application Key field.
1. Navigate to **All services > Microsoft Entra ID > App registrations** and
click the application name.
2. Under Essentials, click **Add a certificate or secret**.
3. On the **Client secrets** tab, click **+New client secret**.
4. On **Add a client secret**, enter:
* **Description** - Aviatrix
* **Expires** - Set the time period to meet your corporate requirements.
Make a note of the expiration date and use an alerting system to send a
reminder before the client secret expires. Azure does not send an alert prior
to invalidating the client secret. If the client secret expires, you can have
issues with your Controller.
5. Click **Add**.
6. On **Certificates & secrets > Client secrets**, copy and save the **Value**,
and identify the Value as the Application Key to be used in Aviatrix
Controller onboarding.
This is the only opportunity to save this Value. You cannot view it again
after you leave the Certificates & secrets window. It is not stored in Azure
or in Aviatrix Controller.
You should save this Value ID (Application Key) with the Account ID, Directory
ID, and Subscription ID that you previously saved. These four values are
necessary to onboard this Azure account in the Aviatrix Controller.
## Setting API Permissions for the Aviatrix Controller Application
The API permission provides the Aviatrix Controller application permission to
access Azure APIs.
1. Navigate to **All services > Microsoft Entra ID > App registrations**.
2. Click on the Aviatrix Controller application link.
3. From the left sidebar under **Manage**, select **API permissions**.
4. Under Configured Permissions, click **+ Add a permission**.
5. On Request API permissions, scroll down and click **Azure Service
Management**.
6. On the Request API permissions for Azure Service Management page, under
Permissions, select **user\_impersonation** and then click **Add
permissions**.
You can now use the four values you saved to onboard your Azure account in your
Aviatrix Controller.
## Onboarding Your Azure Access Account in the Aviatrix Controller
1. Open your Aviatrix Controller and in the left sidebar, select **Onboarding**.
2. Select Microsoft Azure from the list of Cloud Service Providers (CSPs).
Make sure to select **Microsoft Azure**, not Azure Government.
3. Under Create Primary Access Account, enter an Account Name, or use the
default, for this Azure subscription. This name is only used in the Aviatrix
Controller to identify the account and does not need to be a specific value
from your Azure account.
4. In the fields provided, enter the four values you previously saved from
Azure:
| Access Account Setup Input Field | Value |
| ------------------------------------- | ---------------------------------------------------------------------------------------------------------------------- |
| Subscription ID | From the [Assigning a Role to the Aviatrix Application](#assigning-a-role-to-the-aviatrix-application) section |
| Directory ID | From the [Registering Your Aviatrix Controller Application](#registering-your-aviatrix-controller-application) section |
| Application ID | From the [Registering Your Aviatrix Controller Application](#registering-your-aviatrix-controller-application) section |
| Client Secret Value (Application Key) | From the [Creating a Secret Identifier](#creating-a-secret-identifier) section |
For the Application Key, use the Client Secret value you saved from your Azure
account.
5. Click **Create**.
Your Primary Access Account for Azure should be successfully onboarded.
To troubleshoot onboarding issues, see the
[Aviatrix Support website](https://support.aviatrix.com).
### Additional References
If you need additional information about how to access resources, refer to the
Azure documentation
[Register a Microsoft Entra app and create a service principal](https://learn.microsoft.com/en-us/entra/identity-platform/howto-create-service-principal-portal).
## Azure China notes
### Deploying the Aviatrix Gateway in the Azure China Cloud
Prerequisites:
You must already have a Microsoft Azure China account and Aviatrix Controller in
AWS China to deploy an Aviatrix Gateway in the Azure China Cloud.
1. Create the Aviatrix Controller in your AWS China Cloud. Go to Onboarding and
select Azure China.
2. Enter the Aviatrix Customer ID.
3. Enter the Certificate Domain.
4. Create the Primary Access Account.
5. Deploy Aviatrix Gateway from the Gateway page in the Aviatrix Controller or
the Multi-Cloud Transit Solution page.
For more information, see
Acquiring a China ICP License
.