> ## Documentation Index
> Fetch the complete documentation index at: https://docs.aviatrix.com/llms.txt
> Use this file to discover all available pages before exploring further.
# Back Up and Restore Your Controller
> The Aviatrix Controller is not in the data path, as packet processing and encryption is done by the Aviatrix gateways.
## Overview
The Aviatrix Controller is not in the data path, as packet processing and
encryption is done by the Aviatrix gateways.
When the Controller is down or out of service, your network will continue to be
operational and encrypted tunnels and OpenVPN® users stay connected and are not
affected. Since most of the data logs are forwarded from the gateways directly,
the loss of log information from the Controller is minimal. The only impact is
that you cannot build new tunnels or add new OpenVPN® users.
This loosely coupled relationship between the Controller and gateways reduces
the impact of the availability of the Controller and simplifies your
infrastructure. Since the Controller stores configuration data, it should be
periodically backed up to the appropriate AWS/Azure/Google account. If a
replacement Controller is launched, you can restore the configuration data from
your backup.
Before stopping your existing Controller:
* Delete your Controller HA configuration
to avoid complications.
* Go to *CoPilot UI > Settings > Configuration > General > Associated Aviatrix
Controller*, click *Reset Association* to reset the IP
address of your newly launched Controller in CoPilot. If you fail to do so,
you may be locked out of your CoPilot after restoring your backup.
Creating regular backups of your Aviatrix Controller is essential to ensure the
security and integrity of your network configurations.
This section discusses how to back up Controller Configuration and restore the
backups on CoPilot UI.
Starting from CoPilot version 3.14, you have the option to back up and restore
your Aviatrix Controller directly from the CoPilot UI. If you are using CoPilot
version 3.13 or earlier, you can perform the Aviatrix Controller backup and
restore directly from the Controller UI. See the [Controller UI](#controller-ui)
tab for more details.
## Check Your Controller Version Compatibility
Starting from Controller v7.0, you can back up and restore Controller from
CoPilot UI.
Refer to the controller and CoPilot version compatibility matrix below for more
details.
## Configure External Storage
You must configure external storage before you back up and restore Controller
Configuration.
1. Log in to your CoPilot UI.
2. From *Settings > Maintenance > Back Up & Restore > Manage Backups > External
Storage*, click *Configure*.
3. Select the appropriate *Cloud Type* for the *Location*.
* Select the *Account* name. \* Populate the *Bucket Name*.
* Select the *Account* name. \* Populate the *Bucket Name*.
* Select the *Account* name. \* Select a region. \* Populate the *Bucket
Name*.
* Select the *Account* name. \* Select a *Region*, *Storage Name*, and
*Container Name*.
* Select the *Account* name. \* Select a *Region*, *Storage Name*, and
*Container Name*.
* Select the *Account* name. \* Select a *Region*, *Storage Name*, and
*Container Name*.
* Select the *Account* name. \* Select a *Region*, *Storage Name*, and
*Container Name*.
* Select the *Account* name. \* Select a *Region*, *Storage Name*, and
*Container Name*.
4. Click *Save* to create an association with an external storage.
## Back Up Your Controller Configuration on CoPilot UI
To back up your Aviatrix Controller Configuration on CoPilot UI, perform the
following steps:
1. Log in to your CoPilot UI.
2. From *Settings > Maintenance > Back Up & Restore > Back Up Controller*, click
*Back Up Now* to initiate the backup process.
3. (Optional) Click the caret (^) next to the *Backup Now* button and select
*Edit Configuration* to modify the automatic Backup schedule. See
[Modify Automatic Backup Schedule for Controller](#modify-automatic-backup-schedule-for-controller)
for more details
CoPilot will create a backup file containing all your Controller configurations,
including network settings, gateways, and security policies. It is recommended
to store the backup file in a secure location for future use.
### Modify Automatic Backup Schedule for Controller
The Aviatrix CoPilot UI allows you to customize the automatic backup schedule
for your Aviatrix Controller. Once you have modified the automatic backup
schedule, the CoPilot UI will update the backup settings accordingly. This
allows you to customize the backup frequency and timing to align with your
specific requirements.
To modify the automatic backup schedule for Controller, perform the following
steps:
1. Log in to your CoPilot UI.
2. From *Settings > Maintenance > Back Up & Restore > Back Up Controller*, click
the caret (^) next to *Backup Now* and select *Edit Configuration* to modify
the backup schedule.
3. In the *Modify Automatic Backup Schedule for Controller dialog*, choose the
desired frequency for the backups. You can select either daily or weekly
backups.
4. Specify the time when you want the backups to be performed. Note that the
time is in UTC format.
5. Enter the maximum number of backups that to be saved to the external storage.
The default value is set to 1.
6. Click *Save* to save your changes.
## Restore Your Controller Configuration on CoPilot UI
Restoring your Aviatrix Controller configuration from a backup is a crucial step
in recovering your network settings in the event of a failure or when migrating
to a new Controller.
1. Go to *Settings > Maintenance > Back Up & Restore > Restore Controller*,
click *Restore*.
2. Select the appropriate *Cloud Type* for the *Location*.
3. Enter the access key, secret key, and bucket name that used for the CoPilot
backup.
4. Select the file name of the backup file.
5. Click *Save*.
Note that restoring your Controller configuration will overwrite the existing
configuration on your Controller. Therefore, ensure that you have selected the
correct backup and have a backup of any recent changes or configurations made
after the backup.
### Restore Notes
* Make sure your Controller backup and Controller restore take place in the same
CSP (Cloud Service Provider): AWS, Azure, or GCP and share the same basic
configuration. For example, an AWS backup can only restore to another AWS
Controller.
* Note that in the case of AWS backups, an AWS Controller set up with IAM roles
cannot backup and restore to an AWS Controller set up with a secret key, or
vice versa.
* You can only restore a Controller backup to a brand new Aviatrix Controller.
### Initialize a New Controller
If you are starting from a new Controller, follow these steps to get started:
1. Log in to the Controller with the *admin* username and the default password.
2. Follow the initial steps to get the Controller up and running:
1. Shut down the older Controller.
2. Transfer the IP address to the new Controller.
3. Proceed to configure the new Controller by entering an email address.
4. Change your admin password.
5. Enter or skip the proxy configuration.
6. Allow the upgrade to run.
### Restore Controller Configurations on CoPilot UI
Follow the steps below to restore your Controller configuration on CoPilot UI:
1. Log in to your CoPilot UI.
2. From *Settings > Maintenance > Back Up & Restore > Restore Controller*, click
*Restore*.
3. On the "Restore Controller" page:
Select a *Cloud Type* for the *Location*:
* If you would like to use an existing account, make sure you create one Access Account only with the *exact* Access Account Name that was used in your previous Controller. Toggle the *Use Cloud Account Name* button to on and select the account. Otherwise, enter an *Access Key* and *Secret Key*.
* Enter the *Bucket* and *File Name* of the file to restore. The file name can be obtained from the external storage that is configured to store your backups. It may display as `CloudN__save-cloudx-config.enc`.
* Enter the *Subscription ID* and *Directory ID*.
* Enter the *Application Client ID* and *Application Client Secret*.
* Enter the *Storage Name*, *Container Name,* and *File Name* of the file to restore. The file name can be obtained from the external storage that is configured to store your backups. It may display as `CloudN__save-cloudx-config.enc`.
* Enter the *Bucket Name.*
* Upload the *GCP Project Credentials*.
* Enter the *File Name* of the file to restore. The file name can be obtained from the external storage that is configured to store your backups.
* Enter the *Subscription ID* and *Directory ID*.
* Enter the *Application Client ID* and *Application Client Secret*.
* Enter the *Storage Name*, *Container Name,* and *File Name* of the file to restore. The file name can be obtained from the external storage that is configured to store your backups. It may display as `CloudN__save-cloudx-config.enc`.
* If you would like to use an existing account, make sure you create one Access Account only with the *exact* Access Account Name that was used in your previous Controller. Toggle the *Use Cloud Account Name* button to on and select the account. Otherwise, enter a *Tenancy OCID*, *User OCID*, *Compartment OCID*. And upload an *OCI Private Key*.
* Enter the *Bucket*, *Region* and *File Name* of the file to restore. The file name can be obtained from the external storage that is configured to store your backups. It may display as `CloudN__save-cloudx-config.enc`.
4. Click *Save* to initiate the restoration process.
5. The restoration process will begin, and you will see a message indicating
that successfully downloaded a backup file.
Once the restoration is completed, you will receive a confirmation message
indicating the successful restoration of your Controller configuration.
Verify that your network settings and configurations have been restored
correctly by checking the functionality of your Aviatrix Controller.
## AWS Encrypted Backups
AWS S3 allows uploaded backup files to be encrypted in the server side for more
secure storage. The encryption is all done in the AWS S3 server side. This
server side secure storage is in addition to the already encrypted Aviatrix
Controller backups.
Follow the steps below to enable AWS Encrypted backups:
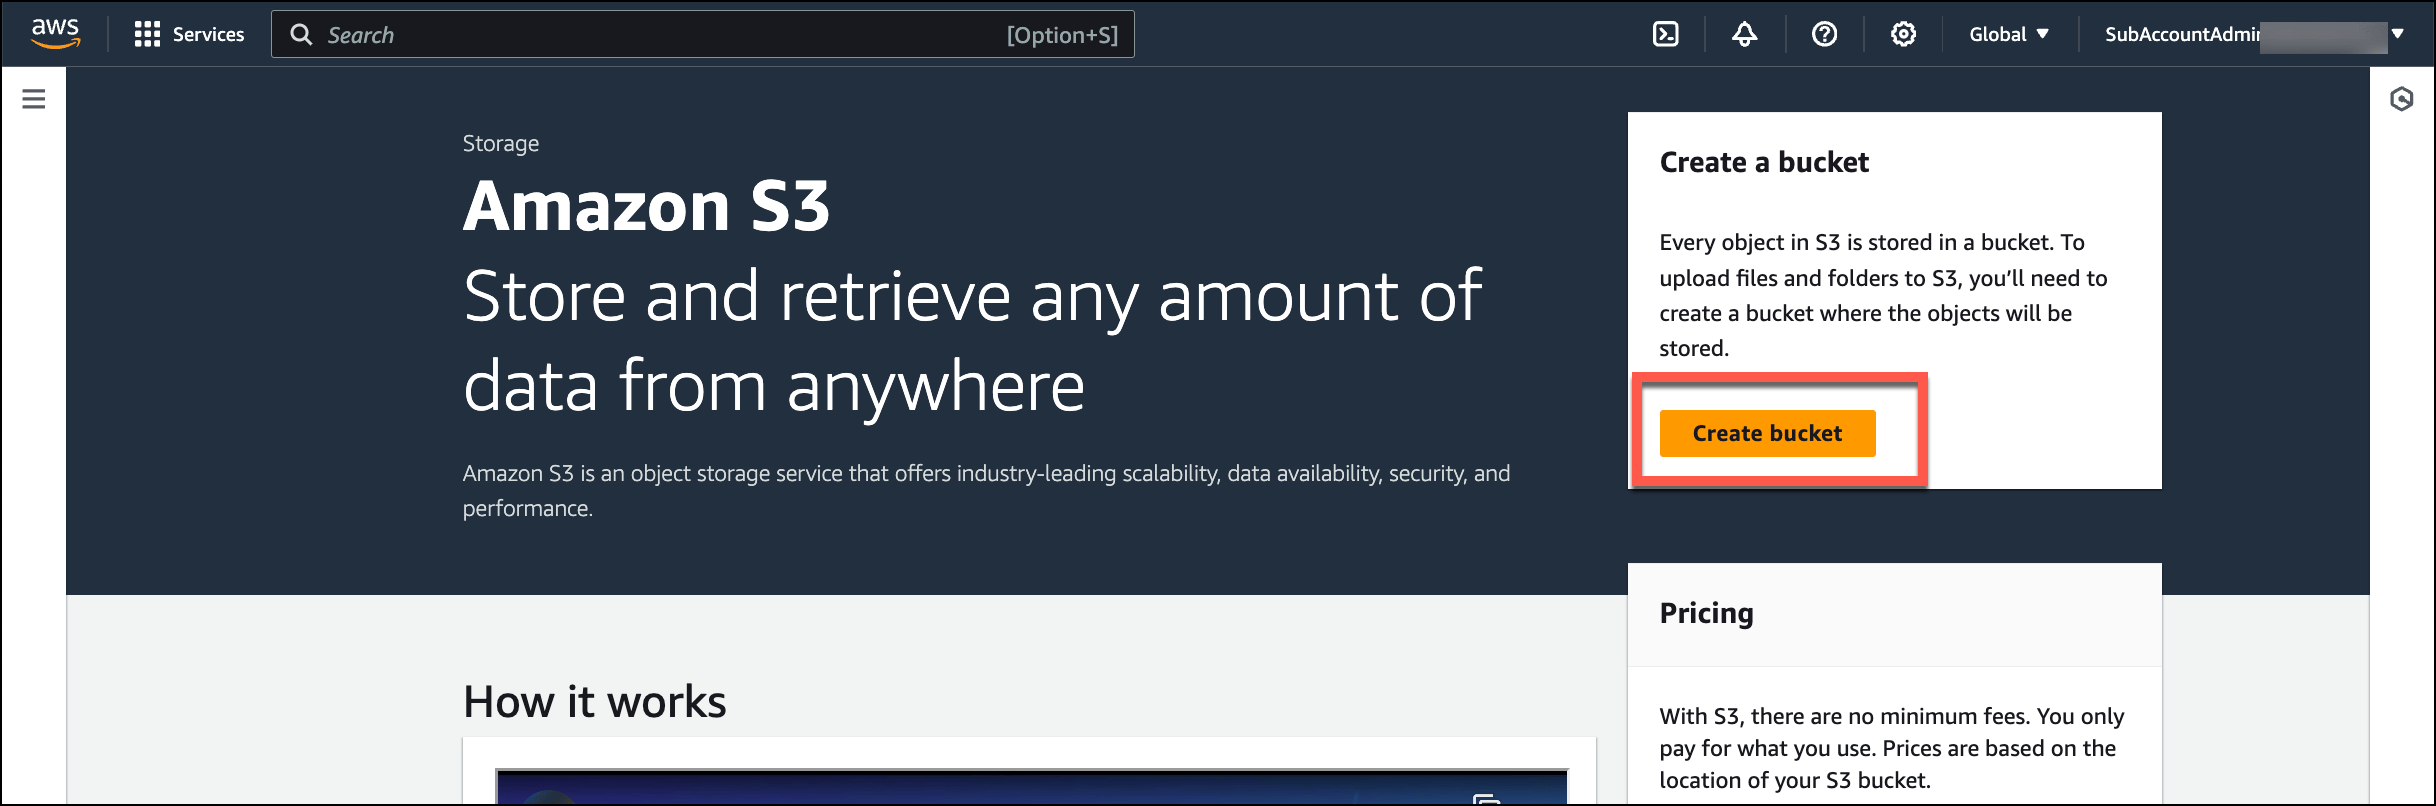
1. Create AWS S3 bucket.
 2. After configuring other bucket properties, configure bucket server side
encryption by selecting either *Server-side encryption with AWS Key
Management Service keys (SSE-KMS)* or *Dual-layer server-side encryption with
AWS Key Management Service keys (DSSE-KMS)*.
2. After configuring other bucket properties, configure bucket server side
encryption by selecting either *Server-side encryption with AWS Key
Management Service keys (SSE-KMS)* or *Dual-layer server-side encryption with
AWS Key Management Service keys (DSSE-KMS)*.
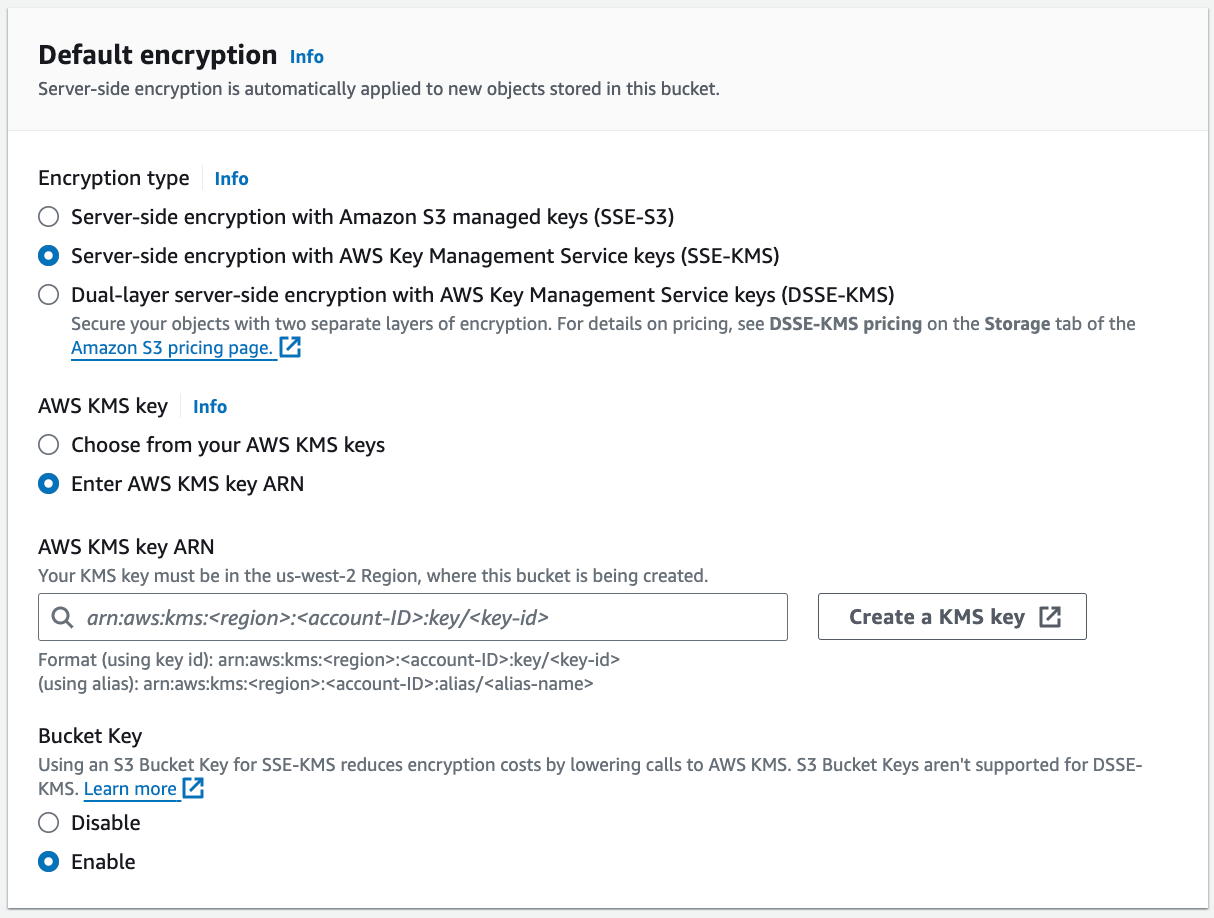 3. Click *Create a KMS key* to create a new key. A separate tab opens where you
can configure and save the key.
4. After the key is saved, go back to the Create bucket tab and enter the key in
the *AWS KMS key ARN* field.
3. Click *Create a KMS key* to create a new key. A separate tab opens where you
can configure and save the key.
4. After the key is saved, go back to the Create bucket tab and enter the key in
the *AWS KMS key ARN* field.
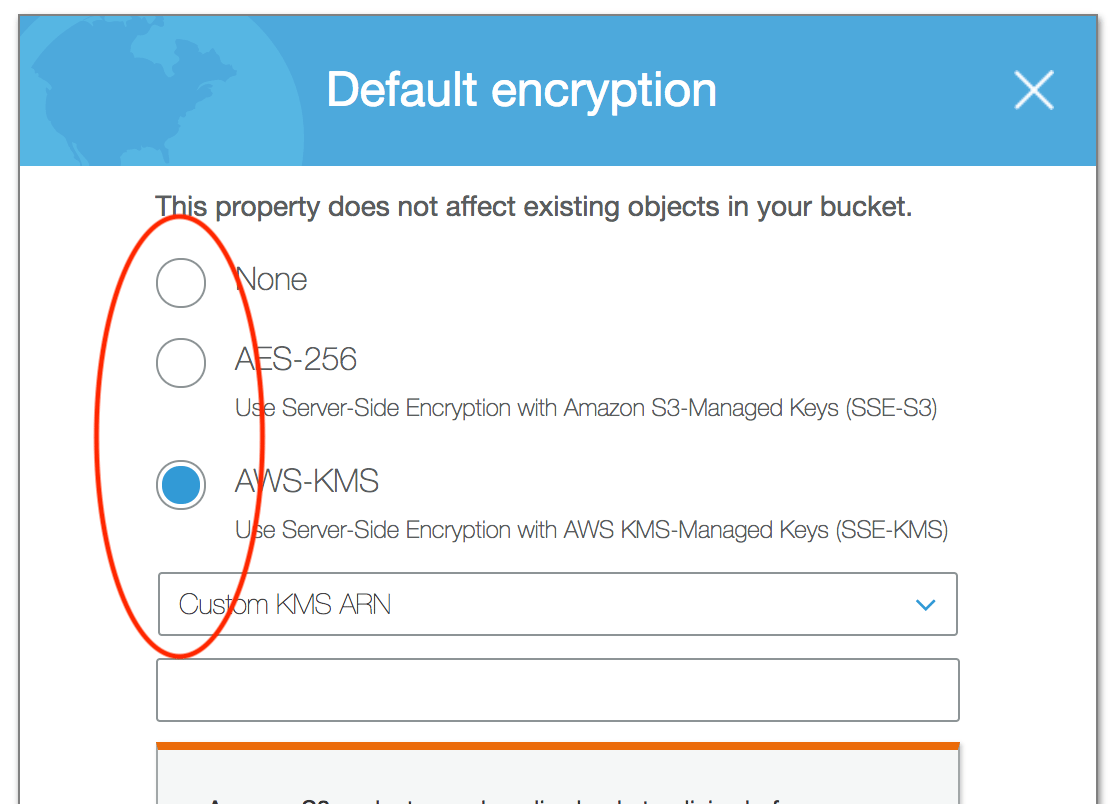 5. Click *Create bucket*.
## Azure Private Link Backups
Azure Private Link enables you to access Azure Platform-as-a-Service (PaaS)
Services (for example, Azure Storage and SQL Database) and Azure hosted
customer-owned/partner services over a private endpoint in your virtual network.
Traffic between your virtual network and the service travels the Microsoft
backbone network. Exposing your service to the public internet is no longer
necessary.
Using the Azure private link, the Controller backups happen privately from your
VNet so that your blob storage account does not need to be exposed to the
outside world.
1. Create an Azure Storage Account.
2. Set up the Storage Account for Private Link:
* On the Networking tab for the storage account creation, select Private
endpoint for the connectivity method.
* Add a new private endpoint with the target of the blob storage resource and
enable DNS Integration.
If you currently have existing private endpoints deployed, you may need to use
an existing private zone in another subscription. This must be completed through
the dedicated private endpoint creation workflow. For additional assistance with
this setup, reach out to an Aviatrix Solution Engineer.
3. Verify Backup through Controller.
Once successful, backing up traffic from the Controller will be performed
privately across private link so that associated storage account does not need
to be accessible publicly.
This section discusses how to back up Controller Configuration and restore the
backups on Controller UI.
* [Backing Up Your Controller Configuration on Controller](#backing-up-your-controller-configuration-on-controller)
* [Restoring Your Controller Configuration on Controller UI](#restoring-your-controller-configuration-on-controller-ui)
Starting from CoPilot version 3.14, you have the option to back up and restore
your Aviatrix Controller directly from the CoPilot UI. See the
[CoPilot](#copilot) tab for more details.
## Backing Up Your Controller Configuration on Controller
Aviatrix stores the Controller backup in an AWS S3 bucket or an Azure Container.
Before you begin, determine where you would like to store the backup and create
either the S3 bucket or Azure Container.
Creating regular backups of your Aviatrix Controller is essential to ensure the
security and integrity of your network configurations. In the event of a failure
or the need to migrate to a new Controller, having a backup allows you to
quickly restore your settings and minimize downtime.
Make sure your Controller backup and Controller restore take place in the same
CSP (Cloud Service Provider): AWS, Azure, or GCP and share the same basic
configuration. For example, an AWS backup can only restore to another AWS
Controller. Note that in the case of AWS backups, an AWS Controller set up with
IAM roles cannot back up and restore to an AWS Controller set up with a secret
key, or vice versa. (AWS) The S3 bucket you use or create for Controller HA and
Backups does not need to have public access enabled and should be configured to
restrict general public access.
1. Log in to the Controller.
2. Go to ***SETTINGS* > *Maintenance*** > select the ***Backup & Restore*** tab.
3. Under the *Backup* section, select the appropriate *Cloud Type* and *Account Name*.
Populate the *S3 Bucket Name*.
Populate the Region, Storage Name, and Container Name.
Populate the Bucket Name, Gcloud Project Credentials, and File Name.
Populate the Tenancy OCID, User OCID, Compartment OCID, API Private Key
File, Bucket Name, Region, and File Name.
4. (Optional) You can click *Multiple Backup* to enable multiple backups. See
[Multiple Backup](#multiple-backup) for more details.
By default, only the latest configuration data is stored. Each time the
configuration is backed up, it overwrites the previous one. If you would like to
keep every copy, check the box *Multiple Backup*.
5. Click ***Enable***.
The first time you enable this feature, the configuration will backed up to your
specified location. After this, the configuration data is automatically backed
up daily at 12 am.
### Multiple Backup
Selecting the *Multiple Backup* checkbox enables the Controller to backup a
maximum of 3 rotating backups. Each backup filename will contain the date and
time of when the backup is made. Additionally, the backup without any date and
time in the filename contains a copy of the latest backup.
If you want to force an immediate backup (e.g. for a configuration change) you
can accomplish this by clicking *Backup Now*. If multiple backups are not
enabled, each time the configuration is backed up, the backup up file will be
overwritten. Otherwise, the oldest backed up file will be overwritten.
Selecting the *Multiple Backup* option is recommended. If the backup is already
Enabled, go ahead and Disable it, turn on the Multiple Backup option and then
Enable the backup again.
You should enable cross-region replication in AWS when creating your S3 buckets.
This ensures that an S3 bucket remains accessible if there is a regional CSP
failure. The replacement Controller can retrieve and restore its backup file.
## Restoring Your Controller Configuration on Controller UI
Make sure your Controller backup and Controller restore take place in the same
CSP (Cloud Service Provider): AWS, Azure, or GCP and share the same basic
configuration. For example, an AWS backup can only restore to another AWS
Controller. Note that in the case of AWS backups, an AWS Controller set up with
IAM roles cannot backup and restore to an AWS Controller set up with a secret
key, or vice versa.
### Initialize a New Controller
If you are starting from a new Controller, follow these steps to get started:
1. Log in to the Controller with the *admin* username and the default password.
2. Follow the initial steps to get the Controller up and running:
1. Shut down the older Controller.
2. Transfer the IP address to the new Controller.
3. Proceed to configure the new Controller by entering an email address.
4. Change your admin password.
5. Enter or skip the proxy configuration.
6. Allow the upgrade to run.
### Restore Controller Configurations on Controller UI
Once you are past the initial configuration steps:
1. Log in to the Controller.
2. Go to *Settings > Maintenance* > select the *Backup & Restore* tab.
3. Under the *Restore* section, select the appropriate *Cloud Type* for the
*Location*.
* If you would like to use an existing account, make sure you create one
Access Account only with the *exact* Access Account Name that was used in
your previous Controller. Mark the *Use Cloud Account Name* checkbox and
select the account. Otherwise, enter an *Access Key* and *Secret Key*. \*
Enter the *Bucket Name* and *File Name* of the file to restore. The file
name can be obtained from the external storage that you configured to store
your backups. It may display as `CloudN_<Controller Private
IP>_save-cloudx-config.enc`.
* Enter the *Subscription ID* and *Directory ID*. \* Enter the *Application
Client ID* and *Application Client Secret*. \* Enter the *Storage Name*,
*Container Name*, and *File Name* of the file to restore. The file name can
be obtained from the external storage that is configured to store your
backups. It may display as `CloudN_<Controller Private
IP>_save-cloudx-config.enc`.
* Enter the *Bucket Name*. \* Upload the GCP Project Credentials. \* Enter the
*File Name* of the file to restore. The file name can be obtained from the
external storage that is configured to store your backups. It may display as
`CloudN_<Controller Private IP>_save-cloudx-config.enc`.
* If you would like to use an existing account, make sure you create one
Access Account only with the *exact* Access Account Name that was used in
your previous Controller. Mark the *Use Cloud Account Name* checkbox and
select the account. Otherwise, enter a *Tenancy OCID*, *User OCID*,
*Compartment OCID*. Upload an *OCI Private Key*. \* Enter the *Bucket Name*,
*Region* and *File Name* of the file to restore. The file name can be
obtained from the external storage that is configured to store your backups.
It may display as `CloudN_<Controller Private
IP>_save-cloudx-config.enc`.
4. Click *Restore*.
## AWS Encrypted Backups
AWS S3 allows uploaded backup files to be encrypted in the server side for more
secure storage. The encryption is all done in the AWS S3 server side. This
server side secure storage is in addition to the already encrypted Aviatrix
Controller backups.
Follow the steps below to enable AWS Encrypted backups:
1. Create AWS S3 bucket.
2. After configuring other bucket properties, configure bucket server side
encryption by selecting either *Server-side encryption with AWS Key
Management Service keys (SSE-KMS)* or *Dual-layer server-side encryption with
AWS Key Management Service keys (DSSE-KMS)*.
3. Click *Create a KMS key* to create a new key. A separate tab opens where you
can configure and save the key.
4. After the key is saved, go back to the Create bucket tab and enter the key in
the *AWS KMS key ARN* field.
5. Click *Create bucket*.
## Azure Private Link Backups
Azure Private Link enables you to access Azure Platform-as-a-Service (PaaS)
Services (for example, Azure Storage and SQL Database) and Azure hosted
customer-owned/partner services over a private endpoint in your virtual network.
Traffic between your virtual network and the service travels the Microsoft
backbone network. Exposing your service to the public internet is no longer
necessary.
Using the Azure private link, the Controller backups happen privately from your
VNet so that your blob storage account does not need to be exposed to the
outside world.
1. Create an Azure Storage Account.
2. Set up the Storage Account for Private Link:
1. On the Networking tab for the storage account creation, select Private
endpoint for the connectivity method.
2. Add a new private endpoint with the target of the blob storage resource
and enable DNS Integration.
If you currently have existing private endpoints deployed, you may need to use
an existing private zone in another subscription. This must be completed through
the dedicated private endpoint creation workflow. For additional assistance with
this setup, reach out to an Aviatrix Solution Engineer.
3. Verify Backup through Controller.
Once successful, backing up traffic from the Controller will be performed
privately across private link so that associated storage account does not need
to be accessible publicly.
5. Click *Create bucket*.
## Azure Private Link Backups
Azure Private Link enables you to access Azure Platform-as-a-Service (PaaS)
Services (for example, Azure Storage and SQL Database) and Azure hosted
customer-owned/partner services over a private endpoint in your virtual network.
Traffic between your virtual network and the service travels the Microsoft
backbone network. Exposing your service to the public internet is no longer
necessary.
Using the Azure private link, the Controller backups happen privately from your
VNet so that your blob storage account does not need to be exposed to the
outside world.
1. Create an Azure Storage Account.
2. Set up the Storage Account for Private Link:
* On the Networking tab for the storage account creation, select Private
endpoint for the connectivity method.
* Add a new private endpoint with the target of the blob storage resource and
enable DNS Integration.
If you currently have existing private endpoints deployed, you may need to use
an existing private zone in another subscription. This must be completed through
the dedicated private endpoint creation workflow. For additional assistance with
this setup, reach out to an Aviatrix Solution Engineer.
3. Verify Backup through Controller.
Once successful, backing up traffic from the Controller will be performed
privately across private link so that associated storage account does not need
to be accessible publicly.
This section discusses how to back up Controller Configuration and restore the
backups on Controller UI.
* [Backing Up Your Controller Configuration on Controller](#backing-up-your-controller-configuration-on-controller)
* [Restoring Your Controller Configuration on Controller UI](#restoring-your-controller-configuration-on-controller-ui)
Starting from CoPilot version 3.14, you have the option to back up and restore
your Aviatrix Controller directly from the CoPilot UI. See the
[CoPilot](#copilot) tab for more details.
## Backing Up Your Controller Configuration on Controller
Aviatrix stores the Controller backup in an AWS S3 bucket or an Azure Container.
Before you begin, determine where you would like to store the backup and create
either the S3 bucket or Azure Container.
Creating regular backups of your Aviatrix Controller is essential to ensure the
security and integrity of your network configurations. In the event of a failure
or the need to migrate to a new Controller, having a backup allows you to
quickly restore your settings and minimize downtime.
Make sure your Controller backup and Controller restore take place in the same
CSP (Cloud Service Provider): AWS, Azure, or GCP and share the same basic
configuration. For example, an AWS backup can only restore to another AWS
Controller. Note that in the case of AWS backups, an AWS Controller set up with
IAM roles cannot back up and restore to an AWS Controller set up with a secret
key, or vice versa. (AWS) The S3 bucket you use or create for Controller HA and
Backups does not need to have public access enabled and should be configured to
restrict general public access.
1. Log in to the Controller.
2. Go to ***SETTINGS* > *Maintenance*** > select the ***Backup & Restore*** tab.
3. Under the *Backup* section, select the appropriate *Cloud Type* and *Account Name*.
Populate the *S3 Bucket Name*.
Populate the Region, Storage Name, and Container Name.
Populate the Bucket Name, Gcloud Project Credentials, and File Name.
Populate the Tenancy OCID, User OCID, Compartment OCID, API Private Key
File, Bucket Name, Region, and File Name.
4. (Optional) You can click *Multiple Backup* to enable multiple backups. See
[Multiple Backup](#multiple-backup) for more details.
By default, only the latest configuration data is stored. Each time the
configuration is backed up, it overwrites the previous one. If you would like to
keep every copy, check the box *Multiple Backup*.
5. Click ***Enable***.
The first time you enable this feature, the configuration will backed up to your
specified location. After this, the configuration data is automatically backed
up daily at 12 am.
### Multiple Backup
Selecting the *Multiple Backup* checkbox enables the Controller to backup a
maximum of 3 rotating backups. Each backup filename will contain the date and
time of when the backup is made. Additionally, the backup without any date and
time in the filename contains a copy of the latest backup.
If you want to force an immediate backup (e.g. for a configuration change) you
can accomplish this by clicking *Backup Now*. If multiple backups are not
enabled, each time the configuration is backed up, the backup up file will be
overwritten. Otherwise, the oldest backed up file will be overwritten.
Selecting the *Multiple Backup* option is recommended. If the backup is already
Enabled, go ahead and Disable it, turn on the Multiple Backup option and then
Enable the backup again.
You should enable cross-region replication in AWS when creating your S3 buckets.
This ensures that an S3 bucket remains accessible if there is a regional CSP
failure. The replacement Controller can retrieve and restore its backup file.
## Restoring Your Controller Configuration on Controller UI
Make sure your Controller backup and Controller restore take place in the same
CSP (Cloud Service Provider): AWS, Azure, or GCP and share the same basic
configuration. For example, an AWS backup can only restore to another AWS
Controller. Note that in the case of AWS backups, an AWS Controller set up with
IAM roles cannot backup and restore to an AWS Controller set up with a secret
key, or vice versa.
### Initialize a New Controller
If you are starting from a new Controller, follow these steps to get started:
1. Log in to the Controller with the *admin* username and the default password.
2. Follow the initial steps to get the Controller up and running:
1. Shut down the older Controller.
2. Transfer the IP address to the new Controller.
3. Proceed to configure the new Controller by entering an email address.
4. Change your admin password.
5. Enter or skip the proxy configuration.
6. Allow the upgrade to run.
### Restore Controller Configurations on Controller UI
Once you are past the initial configuration steps:
1. Log in to the Controller.
2. Go to *Settings > Maintenance* > select the *Backup & Restore* tab.
3. Under the *Restore* section, select the appropriate *Cloud Type* for the
*Location*.
* If you would like to use an existing account, make sure you create one
Access Account only with the *exact* Access Account Name that was used in
your previous Controller. Mark the *Use Cloud Account Name* checkbox and
select the account. Otherwise, enter an *Access Key* and *Secret Key*. \*
Enter the *Bucket Name* and *File Name* of the file to restore. The file
name can be obtained from the external storage that you configured to store
your backups. It may display as `CloudN_<Controller Private
IP>_save-cloudx-config.enc`.
* Enter the *Subscription ID* and *Directory ID*. \* Enter the *Application
Client ID* and *Application Client Secret*. \* Enter the *Storage Name*,
*Container Name*, and *File Name* of the file to restore. The file name can
be obtained from the external storage that is configured to store your
backups. It may display as `CloudN_<Controller Private
IP>_save-cloudx-config.enc`.
* Enter the *Bucket Name*. \* Upload the GCP Project Credentials. \* Enter the
*File Name* of the file to restore. The file name can be obtained from the
external storage that is configured to store your backups. It may display as
`CloudN_<Controller Private IP>_save-cloudx-config.enc`.
* If you would like to use an existing account, make sure you create one
Access Account only with the *exact* Access Account Name that was used in
your previous Controller. Mark the *Use Cloud Account Name* checkbox and
select the account. Otherwise, enter a *Tenancy OCID*, *User OCID*,
*Compartment OCID*. Upload an *OCI Private Key*. \* Enter the *Bucket Name*,
*Region* and *File Name* of the file to restore. The file name can be
obtained from the external storage that is configured to store your backups.
It may display as `CloudN_<Controller Private
IP>_save-cloudx-config.enc`.
4. Click *Restore*.
## AWS Encrypted Backups
AWS S3 allows uploaded backup files to be encrypted in the server side for more
secure storage. The encryption is all done in the AWS S3 server side. This
server side secure storage is in addition to the already encrypted Aviatrix
Controller backups.
Follow the steps below to enable AWS Encrypted backups:
1. Create AWS S3 bucket.
2. After configuring other bucket properties, configure bucket server side
encryption by selecting either *Server-side encryption with AWS Key
Management Service keys (SSE-KMS)* or *Dual-layer server-side encryption with
AWS Key Management Service keys (DSSE-KMS)*.
3. Click *Create a KMS key* to create a new key. A separate tab opens where you
can configure and save the key.
4. After the key is saved, go back to the Create bucket tab and enter the key in
the *AWS KMS key ARN* field.
5. Click *Create bucket*.
## Azure Private Link Backups
Azure Private Link enables you to access Azure Platform-as-a-Service (PaaS)
Services (for example, Azure Storage and SQL Database) and Azure hosted
customer-owned/partner services over a private endpoint in your virtual network.
Traffic between your virtual network and the service travels the Microsoft
backbone network. Exposing your service to the public internet is no longer
necessary.
Using the Azure private link, the Controller backups happen privately from your
VNet so that your blob storage account does not need to be exposed to the
outside world.
1. Create an Azure Storage Account.
2. Set up the Storage Account for Private Link:
1. On the Networking tab for the storage account creation, select Private
endpoint for the connectivity method.
2. Add a new private endpoint with the target of the blob storage resource
and enable DNS Integration.
If you currently have existing private endpoints deployed, you may need to use
an existing private zone in another subscription. This must be completed through
the dedicated private endpoint creation workflow. For additional assistance with
this setup, reach out to an Aviatrix Solution Engineer.
3. Verify Backup through Controller.
Once successful, backing up traffic from the Controller will be performed
privately across private link so that associated storage account does not need
to be accessible publicly.