> ## Documentation Index
> Fetch the complete documentation index at: https://docs.aviatrix.com/llms.txt
> Use this file to discover all available pages before exploring further.
# AWS Getting Started Guide
> Aviatrix provides a product launch experience with automation and a simple UI guided flow to make it easy for you to begin using the product.
Aviatrix provides a product launch experience with automation and a simple UI
guided flow to make it easy for you to begin using the product.
## Prerequisites
Ensure you have enough VPCs, gateways, and elastic IPs available for deployment
in your AWS region.
See Preparing for Your AWS
Deployment for pre-deployment considerations.
## AWS Simple Product Launch Overview
The launch experience is currently available for AWS at
[launch.aviatrix.com](https://launch.aviatrix.com). The launch experience
automates the following:
* Creation of a VPC for Controller and CoPilot (or you can select an existing
VPC)
* Deployment and configuration of IAM
* Deployment of Controller and CoPilot into the newly created VPC
* Creation of security groups securing platform access to only your IP
* Initialization of Controller and CoPilot to current version
* Configuration and integration between Controller and CoPilot
The entire process completes in about 15 minutes when orchestrated with
CloudFormation.
The guided flow involves four simple steps. The details for each step are
outlined in [Launch Step Details](#launch-step-details).
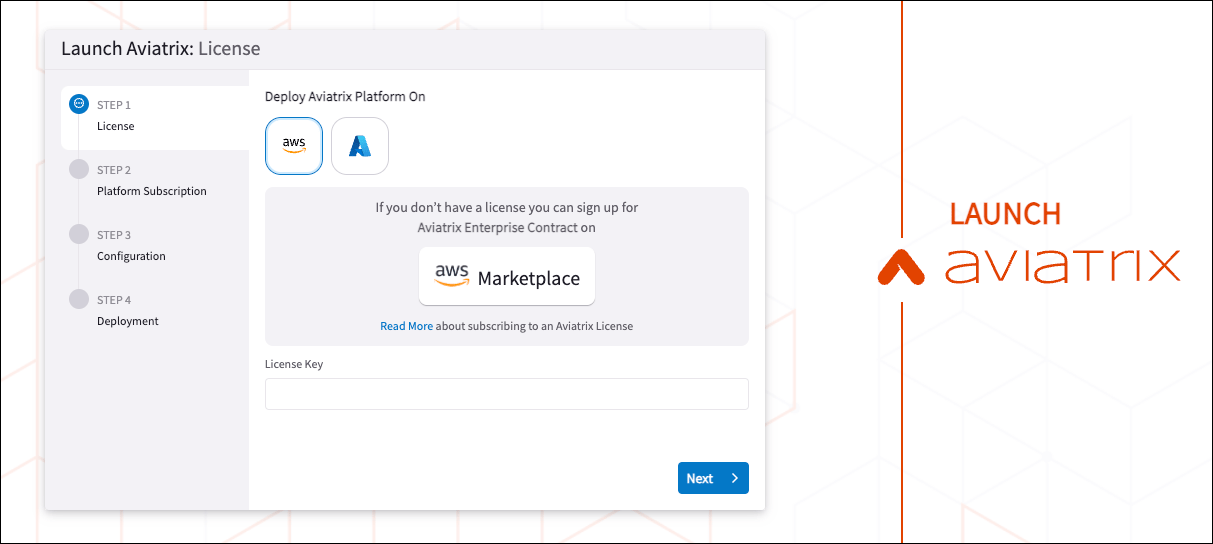
**Step 1: Aviatrix License**
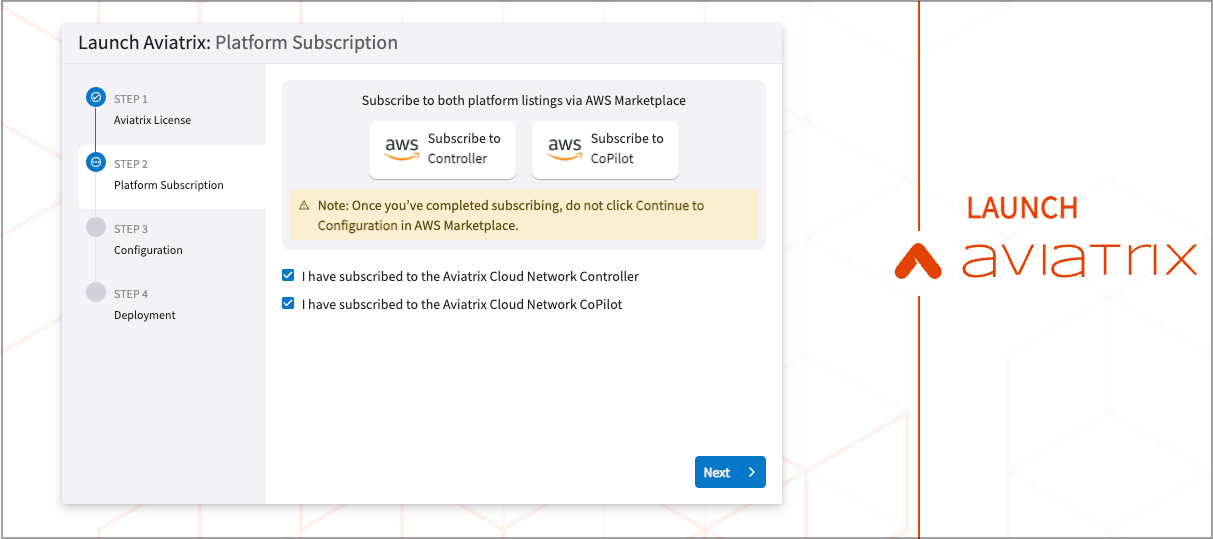
 **Step 2: Platform Subscription**
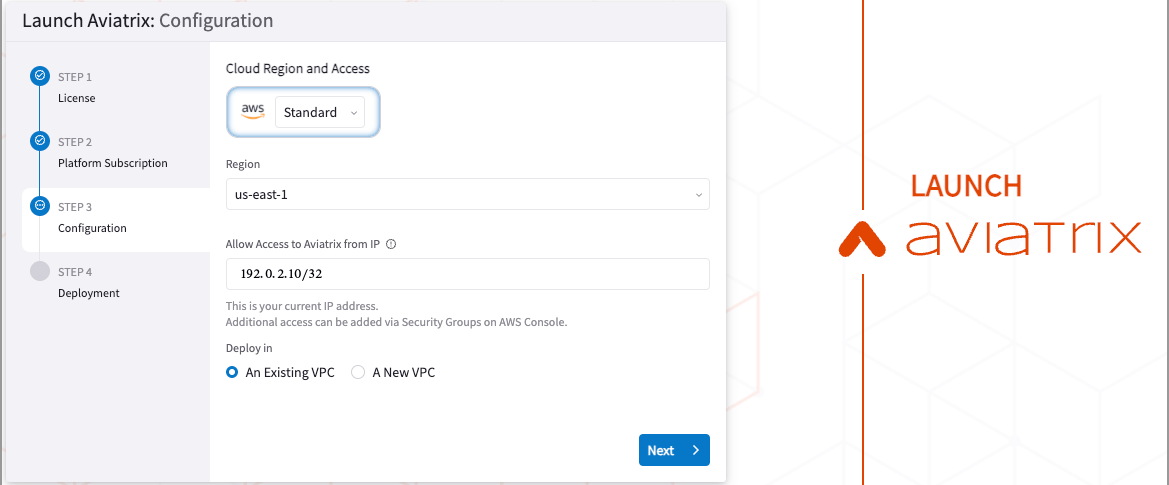
 **Step 3: Configuration**
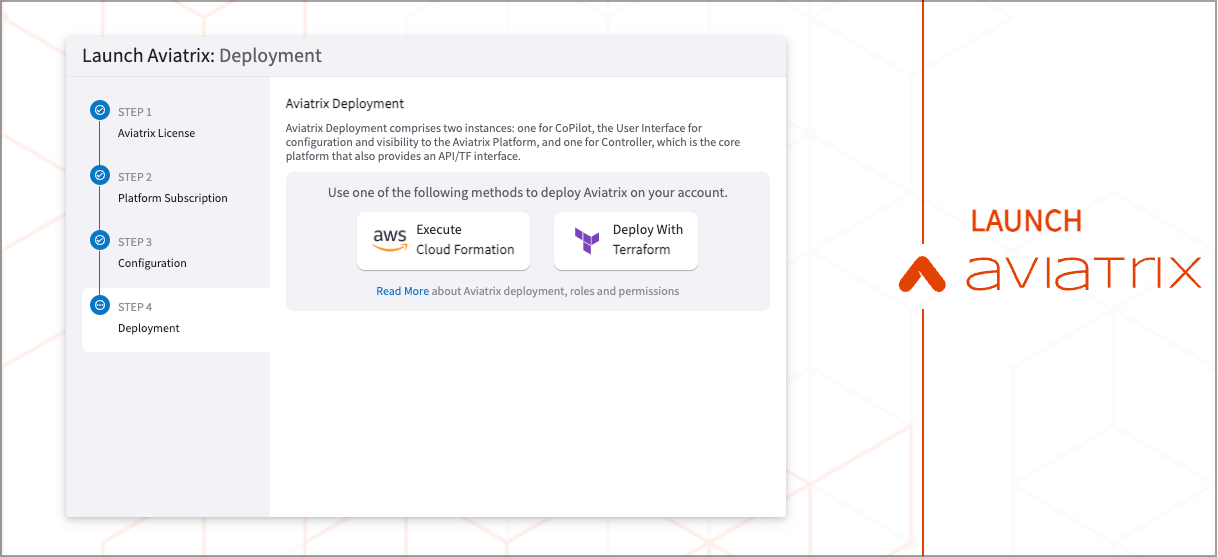
 **Step 4: Deployment**
 **Log in to CoPilot**
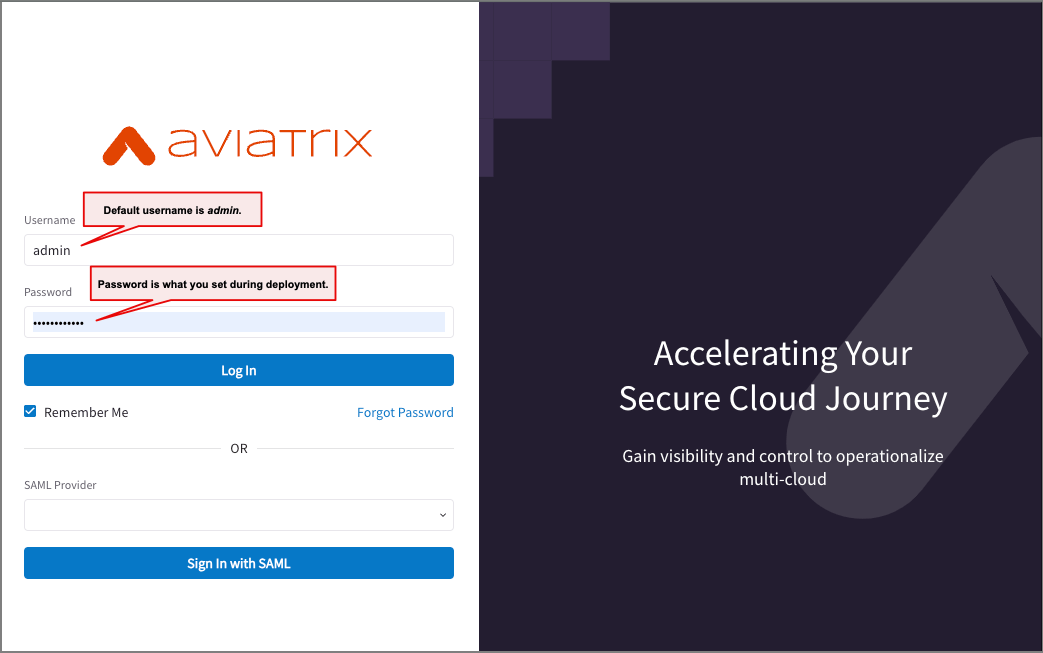 The default username is *admin*, and the password is what you entered in the
CloudFormation template.
## Required Aviatrix License and Marketplace Offers
Three Marketplace subscriptions are required to deploy the Aviatrix platform.
You will subscribe to these offerings by accessing the
[Launch Aviatrix guided experience](https://launch.aviatrix.com).
| **License or Offer** | **Description** |
| --------------------------------- | ------------------------------------------------------------------------------------------------------------------------------------------------------------------------------------------------------------------------------------------------------------------------------------------------------------------------- |
| Aviatrix Enterprise Contract | The Aviatrix Enterprise Contract listing provides the license (customer-id) required to active the Aviatrix Cloud Network Controller and Aviatrix Cloud Network CoPilot. A free trial is available with this AWS offer. When the free trial expires, the customer must upgrade to one of the paid options in the listing. |
| Aviatrix Cloud Network Controller | This Bring Your Own License (BYOL) offer integrates with the Aviatrix license. |
| Aviatrix Cloud Network CoPilot | This Bring Your Own License (BYOL) offer integrates with the Aviatrix license. |
If you subscribe to the free trial license, you receive notification emails 14,
7, and 1 day before the free trial expires and billing begins.
## Launch Step Details
The Aviatrix launch experience guides you through a quick configuration process
to get the Aviatrix Cloud Networking Platform up and running in your AWS
environment.
You can access the Aviatrix launch experience from
[launch.aviatrix.com](https://launch.aviatrix.com).
Do not click the browser refresh or back buttons while using Launch Aviatrix.
To go back to a previous page, click on a Step in the Launch navigation.
### Step 1: Register an Aviatrix License
1. In the Launch Aviatrix licensing window, do one of the following:
* If you need a license, click **AWS Marketplace** to open the Marketplace
listing in a separate tab and continue to the next step.
* If you already have a license, enter the key in the **License Key** field
and skip to [Platform Subscription](#step-2-platform-subscription).
You received the key in an email when you originally registered. The key is
not retained anywhere else. If you do not have the key, contact your
account manager.
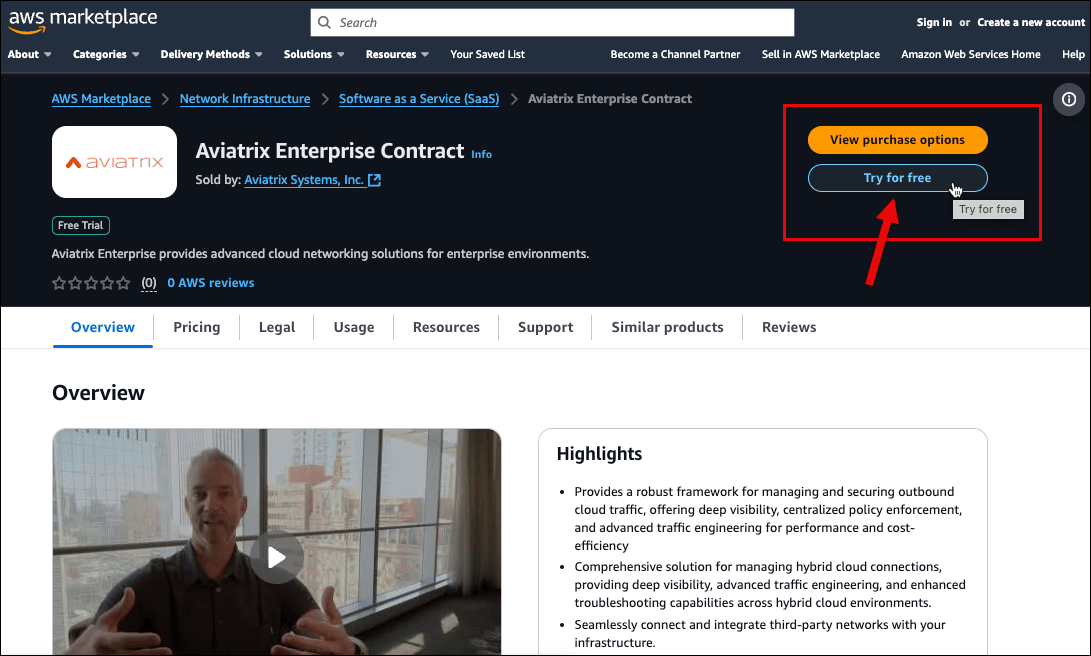
2. On the Marketplace page, click **Try for free**.
The default username is *admin*, and the password is what you entered in the
CloudFormation template.
## Required Aviatrix License and Marketplace Offers
Three Marketplace subscriptions are required to deploy the Aviatrix platform.
You will subscribe to these offerings by accessing the
[Launch Aviatrix guided experience](https://launch.aviatrix.com).
| **License or Offer** | **Description** |
| --------------------------------- | ------------------------------------------------------------------------------------------------------------------------------------------------------------------------------------------------------------------------------------------------------------------------------------------------------------------------- |
| Aviatrix Enterprise Contract | The Aviatrix Enterprise Contract listing provides the license (customer-id) required to active the Aviatrix Cloud Network Controller and Aviatrix Cloud Network CoPilot. A free trial is available with this AWS offer. When the free trial expires, the customer must upgrade to one of the paid options in the listing. |
| Aviatrix Cloud Network Controller | This Bring Your Own License (BYOL) offer integrates with the Aviatrix license. |
| Aviatrix Cloud Network CoPilot | This Bring Your Own License (BYOL) offer integrates with the Aviatrix license. |
If you subscribe to the free trial license, you receive notification emails 14,
7, and 1 day before the free trial expires and billing begins.
## Launch Step Details
The Aviatrix launch experience guides you through a quick configuration process
to get the Aviatrix Cloud Networking Platform up and running in your AWS
environment.
You can access the Aviatrix launch experience from
[launch.aviatrix.com](https://launch.aviatrix.com).
Do not click the browser refresh or back buttons while using Launch Aviatrix.
To go back to a previous page, click on a Step in the Launch navigation.
### Step 1: Register an Aviatrix License
1. In the Launch Aviatrix licensing window, do one of the following:
* If you need a license, click **AWS Marketplace** to open the Marketplace
listing in a separate tab and continue to the next step.
* If you already have a license, enter the key in the **License Key** field
and skip to [Platform Subscription](#step-2-platform-subscription).
You received the key in an email when you originally registered. The key is
not retained anywhere else. If you do not have the key, contact your
account manager.
2. On the Marketplace page, click **Try for free**.
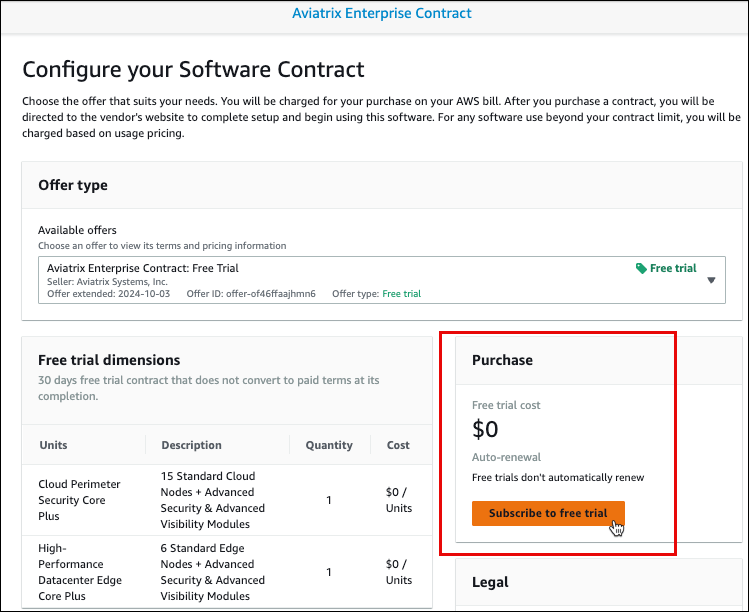
 3. On **Configure your Software Contract**, under Purchase click **Subscribe to
free trial**, and then click **Set up your account**.
3. On **Configure your Software Contract**, under Purchase click **Subscribe to
free trial**, and then click **Set up your account**.
 You will be redirected back to the Launch Aviatrix window.
4. Enter your business email address and click **Verify Email**.
An email is sent to you from [launch@email.aviatrix.com](mailto:launch@email.aviatrix.com) with the subject line
"Verify Your Identity," that contains a verification code.
5. Copy the code from the email, enter it in the field in Launch Aviatrix, and
then click **Next**.
A success page displays and shows your unique license key. This key and
subscription ID are also emailed to you.
This license key is not available anywhere else. Save the key and
subscription ID in a safe place. You need them in the future.
6. Click **Next**.
### Step 2: Platform Subscription
Subscribe to Aviatrix Cloud Network Controller and Aviatrix Cloud Network
CoPilot.
1. Click **Subscribe to Controller**.
The AWS Marketplace listing opens on a separate tab.
2. On the Marketplace page, click **Continue to Subscribe**.
3. On the subscription page, click **Accept Terms**.
Your subscription is submitted and *Pending* displays in the table on this
page. You can continue to the next step while the subscription process
completes, which takes about a minute.
**Do *not* click** Continue to Configuration in AWS Marketplace.
4. Return to Launch Aviatrix and click **Subscribe to CoPilot**.
5. On the Marketplace page, click **Continue to Subscribe**.
6. On the subscription page, click **Accept Terms**.
Your subscription is submitted and *Pending* displays in the table on this
page. You can continue to the next step while the subscription process
completes, which takes about a minute.
**Do *not* click** Continue to Configuration.
7. Return to Launch Aviatrix and check both boxes indicating you subscribed to
Controller and CoPilot.
8. Click **Next**.
### Step 3: Configuration
1. Select the AWS region for deployment.
2. Select whether an existing VPC or a new VPC should be used for deployment.
If you choose an existing VPC, then during deployment you will be able to
select which VPC to use.
If you choose a new VPC, the VPC is automatically created for you during
deployment.
3. Click **Next**.
An IP address populates automatically based on your client IP. The **/32** is appended to the address to ensure that only the IP that initiated provisioning can initially access the Controller and CoPilot UIs.
You can change the IP address after provisioning is complete, by modifying AWS
Security Groups.
### Step 4: Deployment
1. Select the configuration method for the deployment, either
[CloudFormation](#launch-the-stack-with-cloudformation) or
[Terraform](#deploy-with-terraform).
The automated CloudFormation method is recommended over the manual Terraform
method.
#### Launch the Stack with CloudFormation
You can subscribe to the Aviatrix platform and launch the Aviatrix stack
directly from the Aviatrix launch experience at
[launch.aviatrix.com](https://launch.aviatrix.com).
It is recommended you use the default settings in the CloudFormation template.
You can modify other settings after deployment. Only the following input is
required:
* VPC CIDR, if you are using an existing VPC
* Subnet Availability Zone and CIDR, if you are using an existing VPC
* Administrator password
Ensure you have at least 1 VPC, 1 gateway, and two elastic IPs (EIPs)
available in the AWS region you are deploying to. If these are not available,
the deployment will fail.
The IP address pre-populated in the IPv4 CIDR field, under Connection
Configuration, is the IP you are currently using. The **/32** is appended to
the address to ensure that only this user can initially access the Controller.
You can add more users later in CoPilot.
To deploy by using CloudFormation, perform the following steps in Launch
Aviatrix.
1. In **Step 4: Deployment** in Launch Aviatrix, click **Execute
CloudFormation** to open the AWS **Quick create stack** template.
2. If you chose to use an existing VPC for deployment, do the following:
1. Scroll to the **VPC CIDR** field and enter a VPC name.
You can get this information from your AWS VPC dashboard.
2. Choose a **Subnet Availability Zone** and enter a **Subnet CIDR** within
the selected VPC.
3. Scroll to **Administrator Password** and **Confirm Administrator Password**
fields and enter a password.
You will be redirected back to the Launch Aviatrix window.
4. Enter your business email address and click **Verify Email**.
An email is sent to you from [launch@email.aviatrix.com](mailto:launch@email.aviatrix.com) with the subject line
"Verify Your Identity," that contains a verification code.
5. Copy the code from the email, enter it in the field in Launch Aviatrix, and
then click **Next**.
A success page displays and shows your unique license key. This key and
subscription ID are also emailed to you.
This license key is not available anywhere else. Save the key and
subscription ID in a safe place. You need them in the future.
6. Click **Next**.
### Step 2: Platform Subscription
Subscribe to Aviatrix Cloud Network Controller and Aviatrix Cloud Network
CoPilot.
1. Click **Subscribe to Controller**.
The AWS Marketplace listing opens on a separate tab.
2. On the Marketplace page, click **Continue to Subscribe**.
3. On the subscription page, click **Accept Terms**.
Your subscription is submitted and *Pending* displays in the table on this
page. You can continue to the next step while the subscription process
completes, which takes about a minute.
**Do *not* click** Continue to Configuration in AWS Marketplace.
4. Return to Launch Aviatrix and click **Subscribe to CoPilot**.
5. On the Marketplace page, click **Continue to Subscribe**.
6. On the subscription page, click **Accept Terms**.
Your subscription is submitted and *Pending* displays in the table on this
page. You can continue to the next step while the subscription process
completes, which takes about a minute.
**Do *not* click** Continue to Configuration.
7. Return to Launch Aviatrix and check both boxes indicating you subscribed to
Controller and CoPilot.
8. Click **Next**.
### Step 3: Configuration
1. Select the AWS region for deployment.
2. Select whether an existing VPC or a new VPC should be used for deployment.
If you choose an existing VPC, then during deployment you will be able to
select which VPC to use.
If you choose a new VPC, the VPC is automatically created for you during
deployment.
3. Click **Next**.
An IP address populates automatically based on your client IP. The **/32** is appended to the address to ensure that only the IP that initiated provisioning can initially access the Controller and CoPilot UIs.
You can change the IP address after provisioning is complete, by modifying AWS
Security Groups.
### Step 4: Deployment
1. Select the configuration method for the deployment, either
[CloudFormation](#launch-the-stack-with-cloudformation) or
[Terraform](#deploy-with-terraform).
The automated CloudFormation method is recommended over the manual Terraform
method.
#### Launch the Stack with CloudFormation
You can subscribe to the Aviatrix platform and launch the Aviatrix stack
directly from the Aviatrix launch experience at
[launch.aviatrix.com](https://launch.aviatrix.com).
It is recommended you use the default settings in the CloudFormation template.
You can modify other settings after deployment. Only the following input is
required:
* VPC CIDR, if you are using an existing VPC
* Subnet Availability Zone and CIDR, if you are using an existing VPC
* Administrator password
Ensure you have at least 1 VPC, 1 gateway, and two elastic IPs (EIPs)
available in the AWS region you are deploying to. If these are not available,
the deployment will fail.
The IP address pre-populated in the IPv4 CIDR field, under Connection
Configuration, is the IP you are currently using. The **/32** is appended to
the address to ensure that only this user can initially access the Controller.
You can add more users later in CoPilot.
To deploy by using CloudFormation, perform the following steps in Launch
Aviatrix.
1. In **Step 4: Deployment** in Launch Aviatrix, click **Execute
CloudFormation** to open the AWS **Quick create stack** template.
2. If you chose to use an existing VPC for deployment, do the following:
1. Scroll to the **VPC CIDR** field and enter a VPC name.
You can get this information from your AWS VPC dashboard.
2. Choose a **Subnet Availability Zone** and enter a **Subnet CIDR** within
the selected VPC.
3. Scroll to **Administrator Password** and **Confirm Administrator Password**
fields and enter a password.
 **Password requirements**: minimum 8 characters with at least 1 upper case, 1
lower case, 1 special character, and 1 number.
This is the password you will use to log in to the CoPilot and Controller
UIs. The default username is *admin*.
4. Scroll to the **Capabilities** section at the bottom of the Template and
check the box, "I acknowledge that AWS CloudFormation might create IAM
resources."
5. Click **Create Stack** to run CloudFormation.
A browser tab opens to the AWS **CloudFormation > Stacks** page for your
stack.
If nothing happens when you click Create Stack, scroll through the AWS
CloudFormation template to check for error messages.
6. To monitor the progress of the stack creation in AWS, see
[Monitor the CloudFormation Stack](#monitor-the-cloudformation-stack).
**Password requirements**: minimum 8 characters with at least 1 upper case, 1
lower case, 1 special character, and 1 number.
This is the password you will use to log in to the CoPilot and Controller
UIs. The default username is *admin*.
4. Scroll to the **Capabilities** section at the bottom of the Template and
check the box, "I acknowledge that AWS CloudFormation might create IAM
resources."
5. Click **Create Stack** to run CloudFormation.
A browser tab opens to the AWS **CloudFormation > Stacks** page for your
stack.
If nothing happens when you click Create Stack, scroll through the AWS
CloudFormation template to check for error messages.
6. To monitor the progress of the stack creation in AWS, see
[Monitor the CloudFormation Stack](#monitor-the-cloudformation-stack).
 It takes about 15 minutes for the stack creation to complete.
After the CloudFormation stack is created, you can
[access your CoPilot instance](#access-the-copilot-ui).
#### Deploy with Terraform
You can deploy Aviatrix by using Terraform, directly from the Aviatrix launch
experience at [launch.aviatrix.com](https://launch.aviatrix.com).
Ensure you have at least 1 VPC, 1 gateway, and two elastic IPs (EIPs)
available in the AWS region you are deploying to. If these are not available,
the deployment will fail.
You should be familiar with Terraform modules to use this method. If you choose
to deploy with Terraform, you must meet the following prerequisites:
* Install
[Boto3](https://boto3.amazonaws.com/v1/documentation/api/latest/index.html).
* Configure
[authentication for AWS](https://docs.aws.amazon.com/cli/v1/userguide/cli-authentication-user.html).
* Install a minimum version of [Terraform 0.13](https://www.terraform.io/) and
[Python3](https://www.python.org/).
To deploy by using Terraform, perform the following steps in Launch Aviatrix.
1. In **Step 4: Deployment** of Launch Aviatrix, click **Deploy with
Terraform**.
2. Ensure you have met all the prerequisites.
3. Click **Download Terraform Configuration File** and save the file to an
appropriate directory.
A Terraform file named *avx-launch.tf* downloads.
It is recommended that you install the Terraform modules in a separate
directory from the rest of your Terraform pipeline.
4. In the directory where you saved the TF file, run the following commands:
```bash theme={null}
terraform init
terraform plan
terraform apply
```
Enter a vpc\_id from an existing or new VPC.
Enter a public subnet\_id within the selected VPC. You can get this
information from your AWS VPC dashboard.
5. To monitor the progress of the stack creation, see
[Monitor the CloudFormation Stack](#monitor-the-cloudformation-stack).
After the CloudFormation stack is created, you can
[access your CoPilot instance](#access-the-copilot-ui).
Advanced Terraform configurations can be implemented using the examples provided
in the
[GitHub repository](https://github.com/AviatrixSystems/terraform-aviatrix-aws-controlplane).
#### Monitor the CloudFormation Stack
You can monitor CloudFormation progress from the AWS CloudFormation console.
The CloudFormation page in AWS should automatically launch after you submit the
CloudFormation or Terraform templates.
1. If not logged into AWS, log into your account in the target region and go to
**CloudFormation > Stacks**.
2. Select the name of the stack being created and then click the **Resources**
tab.
The default stack name is **AviatrixControlplane**.
Use the Refresh button to show more frequent updates to the table.
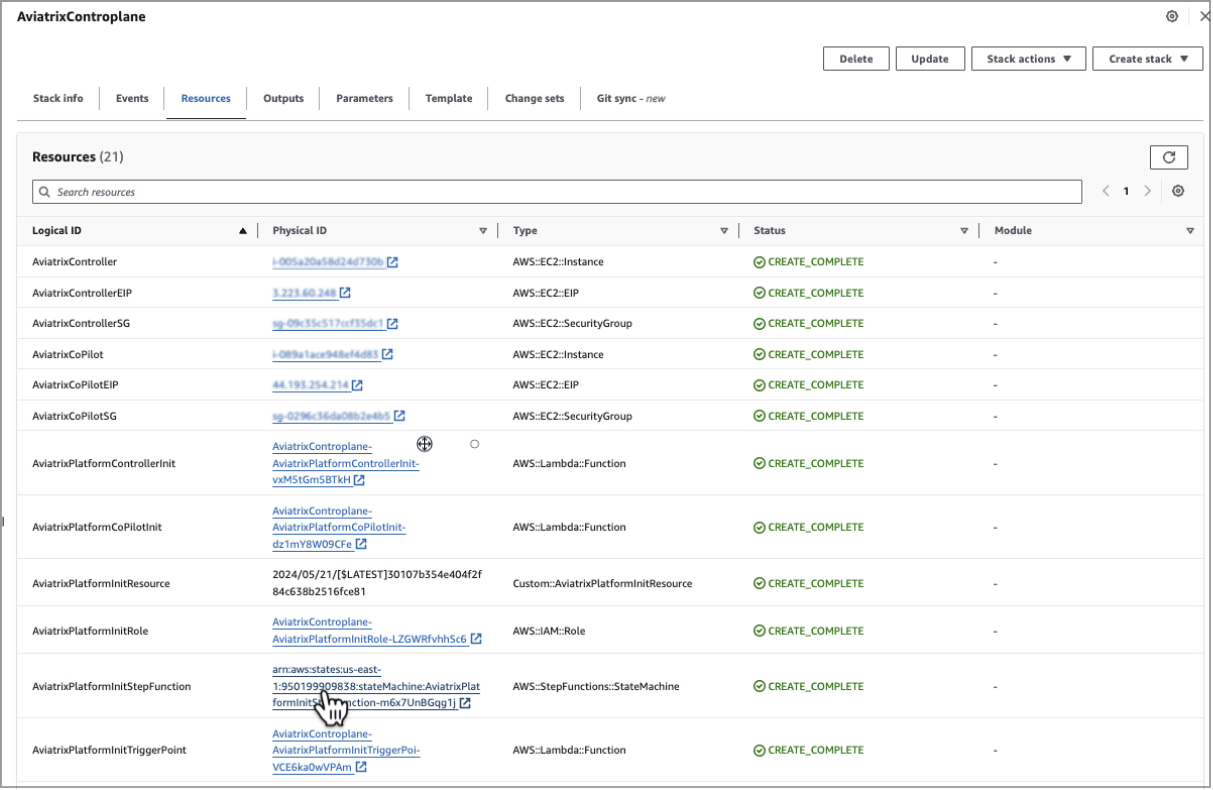
3. Scroll through the Resources table to locate the
**AviatrixPlatformInitStepFunction** entry and click on the associated
Physical ID link.
It takes about two minutes for the step function entry to display in the
table.
It takes about 15 minutes for the stack creation to complete.
After the CloudFormation stack is created, you can
[access your CoPilot instance](#access-the-copilot-ui).
#### Deploy with Terraform
You can deploy Aviatrix by using Terraform, directly from the Aviatrix launch
experience at [launch.aviatrix.com](https://launch.aviatrix.com).
Ensure you have at least 1 VPC, 1 gateway, and two elastic IPs (EIPs)
available in the AWS region you are deploying to. If these are not available,
the deployment will fail.
You should be familiar with Terraform modules to use this method. If you choose
to deploy with Terraform, you must meet the following prerequisites:
* Install
[Boto3](https://boto3.amazonaws.com/v1/documentation/api/latest/index.html).
* Configure
[authentication for AWS](https://docs.aws.amazon.com/cli/v1/userguide/cli-authentication-user.html).
* Install a minimum version of [Terraform 0.13](https://www.terraform.io/) and
[Python3](https://www.python.org/).
To deploy by using Terraform, perform the following steps in Launch Aviatrix.
1. In **Step 4: Deployment** of Launch Aviatrix, click **Deploy with
Terraform**.
2. Ensure you have met all the prerequisites.
3. Click **Download Terraform Configuration File** and save the file to an
appropriate directory.
A Terraform file named *avx-launch.tf* downloads.
It is recommended that you install the Terraform modules in a separate
directory from the rest of your Terraform pipeline.
4. In the directory where you saved the TF file, run the following commands:
```bash theme={null}
terraform init
terraform plan
terraform apply
```
Enter a vpc\_id from an existing or new VPC.
Enter a public subnet\_id within the selected VPC. You can get this
information from your AWS VPC dashboard.
5. To monitor the progress of the stack creation, see
[Monitor the CloudFormation Stack](#monitor-the-cloudformation-stack).
After the CloudFormation stack is created, you can
[access your CoPilot instance](#access-the-copilot-ui).
Advanced Terraform configurations can be implemented using the examples provided
in the
[GitHub repository](https://github.com/AviatrixSystems/terraform-aviatrix-aws-controlplane).
#### Monitor the CloudFormation Stack
You can monitor CloudFormation progress from the AWS CloudFormation console.
The CloudFormation page in AWS should automatically launch after you submit the
CloudFormation or Terraform templates.
1. If not logged into AWS, log into your account in the target region and go to
**CloudFormation > Stacks**.
2. Select the name of the stack being created and then click the **Resources**
tab.
The default stack name is **AviatrixControlplane**.
Use the Refresh button to show more frequent updates to the table.
3. Scroll through the Resources table to locate the
**AviatrixPlatformInitStepFunction** entry and click on the associated
Physical ID link.
It takes about two minutes for the step function entry to display in the
table.
 4. On the step functions page, click the **Executions** tab, and then click the
link in the table for the running task.
5. Under **Graph View**, you can watch the progress of each step. **Wait until
all steps turn green.**
4. On the step functions page, click the **Executions** tab, and then click the
link in the table for the running task.
5. Under **Graph View**, you can watch the progress of each step. **Wait until
all steps turn green.**
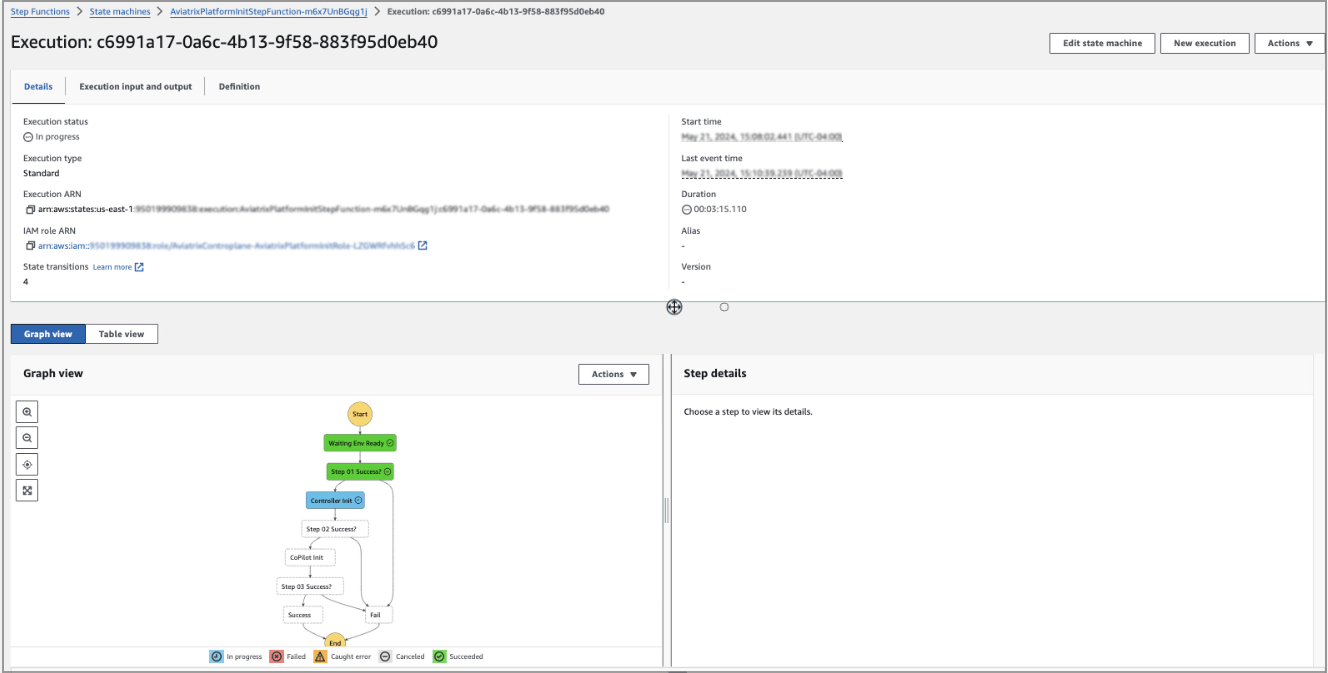
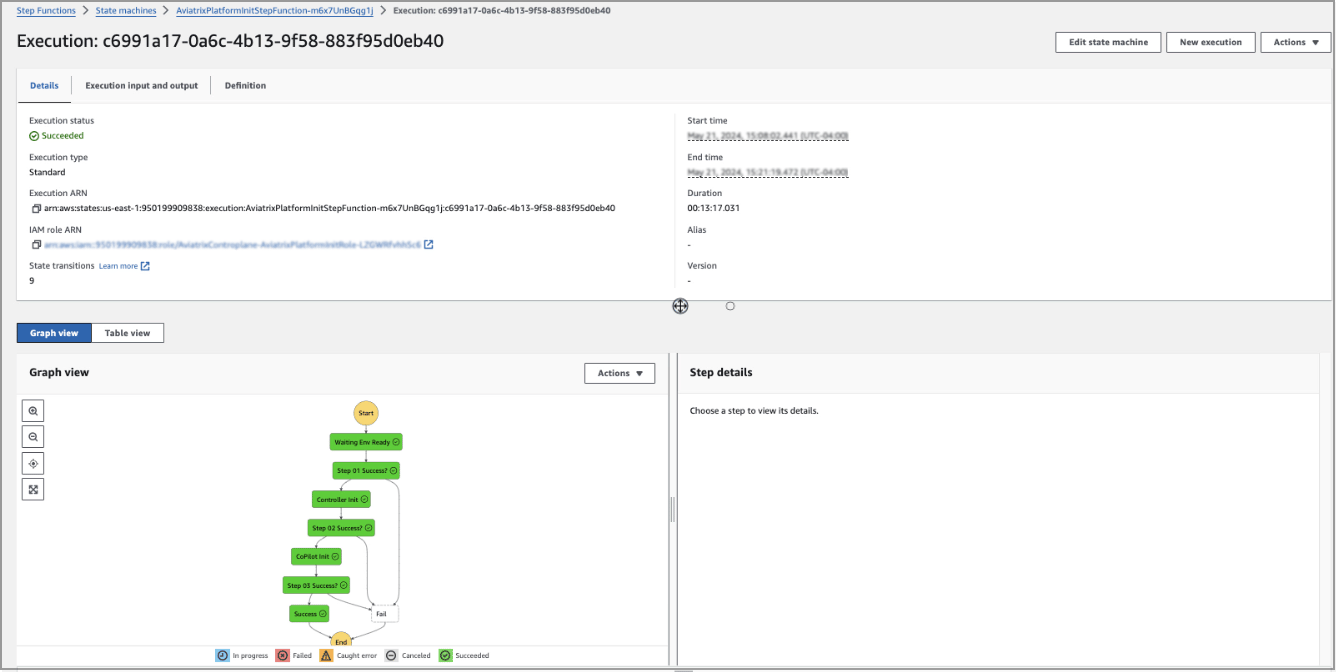 When all steps are **green**, the process is complete. This typically takes
about 15 minutes.
You can now [access your CoPilot instance](#access-the-copilot-ui).
## Access the CoPilot UI
**Congratulations!** You have successfully launched your Aviatrix platform.
You can obtain the CoPilot UI URL in AWS.
1. Go to **CloudFormation > Stacks >** *\* and click the
**Outputs** tab.
The default stack name is *AviatrixControlplane*.
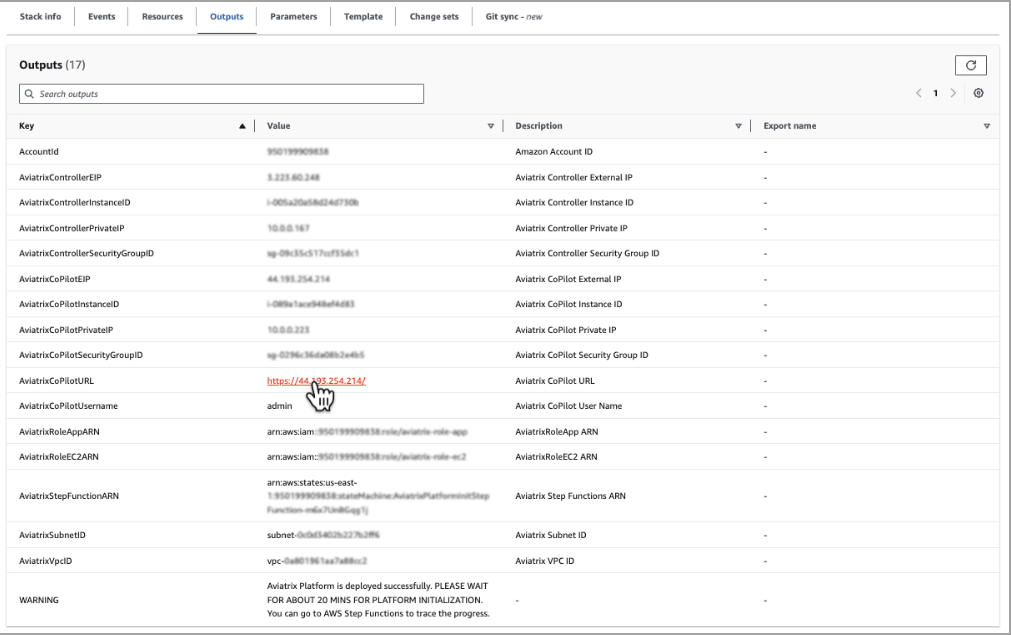
2. Scroll down to locate **AviatrixCoPilotURL** in the Key column and click the
associated link under **Value**.
The address displayed in the table is the one you will use to access CoPilot.
When all steps are **green**, the process is complete. This typically takes
about 15 minutes.
You can now [access your CoPilot instance](#access-the-copilot-ui).
## Access the CoPilot UI
**Congratulations!** You have successfully launched your Aviatrix platform.
You can obtain the CoPilot UI URL in AWS.
1. Go to **CloudFormation > Stacks >** *\* and click the
**Outputs** tab.
The default stack name is *AviatrixControlplane*.
2. Scroll down to locate **AviatrixCoPilotURL** in the Key column and click the
associated link under **Value**.
The address displayed in the table is the one you will use to access CoPilot.
 If the browser displays a *Your connection is not private* message, click
**Advanced** and **Proceed**.
3. Enter the username and the password you defined in CloudFormation and click
**Log In** to open the CoPilot UI.
The default username for the UI is *admin*, and the password is what you
entered in the CloudFormation Quick Create template.
4. In CoPilot, you can access Controller by clicking the **Application
Information** icon at the top right and selecting **Aviatrix Controller**.
You can use the CoPilot credentials to log in to Controller.
## Access the Controller UI
You can access Aviatrix Controller from the CoPilot UI.
By default, the credentials are the same for CoPilot and Controller.
1. Log into your Aviatrix CoPilot account.
2. Click the **Application Information** icon in the top right.
3. Select the **Aviatrix Controller** IP address.
4. Enter your username and password to log into the Controller.
## Troubleshooting if Stack Creation Fails
* In AWS CloudFormation > Stacks, select the stack, select the Events tab, and
examine the *Status reason* column for a possible cause.
* Ensure that you are subscribed to
[required marketplace subscriptions](#required-aviatrix-license-and-marketplace-offers).
* If you have run the stack more than once, ensure that a unique new name is
provided for the stack name. The default is AviatrixControlplane.
* Ensure your AWS region has at least 1 VPC, 1 gateway, and 2 elastic IPs (EIPs)
available for deployment.
## Optional Post-Deployment Steps
Complete the following optional post-deployment steps if they meet your
requirements.
### Modifying Accidental Termination for AWS Instances
You can enable or disable the AWS option to protect against accidental
termination of your EC2 instances. You cannot terminate an instance if
termination protection is enabled.
1. In your AWS account, go to the **EC2 > Instances** page.
2. Locate and mark the checkbox for your Aviatrix Controller or CoPilot
instance.
You can only modify the Instance Settings for one instance at a time. If you
select multiple instances, the menu items under Instance Settings are not
available.
3. Go to **Actions > Instance Settings > Change termination protection**.
4. Check **Enable** or **Disable** and click **Save**.
5. Repeat these steps for other instances.
### Disabling Security Group Management Access
Security Group Management is enabled by default. This feature ensures that newly
created gateways can access the Controller. You can disable Security Group
Management access for your Controller, if needed.
When this feature is enabled, keep each Controller Security Group's outbound
rules at their default, open to Internet or All. This allows your Controller's
IP address to access the Internet.
1. In Aviatrix CoPilot, go to **Settings > Configuration**.
2. Under **Security**, locate the **Controller Security Group Management** card.
3. Select the Controller **Account**.
4. Set the toggle to **Off**.
If the browser displays a *Your connection is not private* message, click
**Advanced** and **Proceed**.
3. Enter the username and the password you defined in CloudFormation and click
**Log In** to open the CoPilot UI.
The default username for the UI is *admin*, and the password is what you
entered in the CloudFormation Quick Create template.
4. In CoPilot, you can access Controller by clicking the **Application
Information** icon at the top right and selecting **Aviatrix Controller**.
You can use the CoPilot credentials to log in to Controller.
## Access the Controller UI
You can access Aviatrix Controller from the CoPilot UI.
By default, the credentials are the same for CoPilot and Controller.
1. Log into your Aviatrix CoPilot account.
2. Click the **Application Information** icon in the top right.
3. Select the **Aviatrix Controller** IP address.
4. Enter your username and password to log into the Controller.
## Troubleshooting if Stack Creation Fails
* In AWS CloudFormation > Stacks, select the stack, select the Events tab, and
examine the *Status reason* column for a possible cause.
* Ensure that you are subscribed to
[required marketplace subscriptions](#required-aviatrix-license-and-marketplace-offers).
* If you have run the stack more than once, ensure that a unique new name is
provided for the stack name. The default is AviatrixControlplane.
* Ensure your AWS region has at least 1 VPC, 1 gateway, and 2 elastic IPs (EIPs)
available for deployment.
## Optional Post-Deployment Steps
Complete the following optional post-deployment steps if they meet your
requirements.
### Modifying Accidental Termination for AWS Instances
You can enable or disable the AWS option to protect against accidental
termination of your EC2 instances. You cannot terminate an instance if
termination protection is enabled.
1. In your AWS account, go to the **EC2 > Instances** page.
2. Locate and mark the checkbox for your Aviatrix Controller or CoPilot
instance.
You can only modify the Instance Settings for one instance at a time. If you
select multiple instances, the menu items under Instance Settings are not
available.
3. Go to **Actions > Instance Settings > Change termination protection**.
4. Check **Enable** or **Disable** and click **Save**.
5. Repeat these steps for other instances.
### Disabling Security Group Management Access
Security Group Management is enabled by default. This feature ensures that newly
created gateways can access the Controller. You can disable Security Group
Management access for your Controller, if needed.
When this feature is enabled, keep each Controller Security Group's outbound
rules at their default, open to Internet or All. This allows your Controller's
IP address to access the Internet.
1. In Aviatrix CoPilot, go to **Settings > Configuration**.
2. Under **Security**, locate the **Controller Security Group Management** card.
3. Select the Controller **Account**.
4. Set the toggle to **Off**.