> ## Documentation Index
> Fetch the complete documentation index at: https://docs.aviatrix.com/llms.txt
> Use this file to discover all available pages before exploring further.
# Site2Cloud with NAT to fix Overlapping VPC Subnets
> This document describes how to reach VMs in two overlapping subnets within three different VPCs.
This document describes how to reach VMs in two overlapping subnets within three
different VPCs.
## Environment Description
There are three VPCs as illustrated in the diagram below.
* **VPC1**: VPC CIDR - 10.3.0.0/16
* **VPC2**: VPC CIDR - 172.29.0.0/16
* **VPC3**: VPC CIDR - 10.3.0.0/16
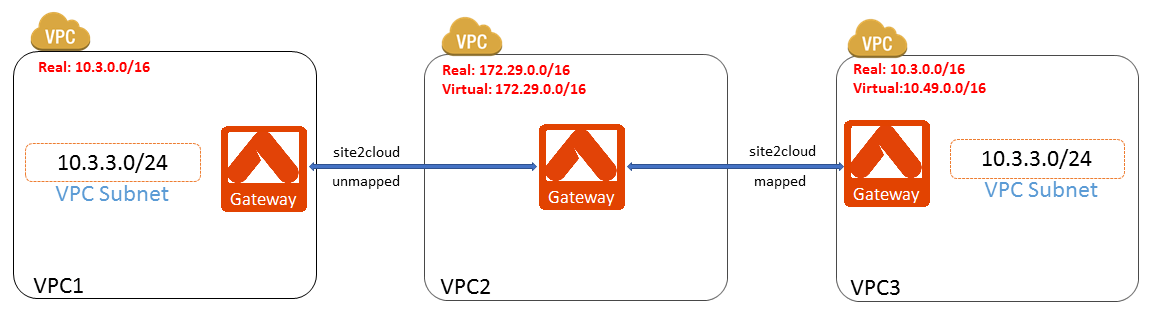 * Both VPC1 and VPC3 have a subnet with the same CIDR (10.3.3.0/24).
* VPC2 VMs need to access both VPC1 and VPC3 VMs in their 10.3.3.0/24 subnets.
* Since VPC1 VMs may change their private IP addresses after some unplanned
reboots, VPC2 VMs have to access them through DNS.
* VPC2 VMs need to access VPC3 VMs through their private IP addresses.
To solve this overlapping subnet issue, you create four Site2Cloud (S2C)
connections:
* Unmapped S2C connection between VPC1 and VPC2
* Unmapped S2C connection between VPC2 and VPC1
* Mapped S2C connection between VPC2 and VPC3
* Mapped S2C connection between VPC3 and VPC2
Detailed configuration steps are illustrated below.
## Configuring Site2Cloud Connections
First, install Aviatrix gateways in VPC1, VPC2, and VPC3. Follow
[these instructions](https://legacy.docs.aviatrix.com/documentation/latest/network/spoke-gateway-about.html?expand=true).
Do not enable SNAT for the new gateways in these VPCs.
### Configuring Connections Between VPC1 and VPC2
Follow these steps to create the Unmapped S2C connections between VPC1 and VPC2:
1. Create a
[Static Route-Based (Unmapped)](https://legacy.docs.aviatrix.com/documentation/latest/network/external-connection-create-static-route-based-unmapped.html)
or
[Static Policy-Based (Unmapped)](https://legacy.docs.aviatrix.com/documentation/latest/network/external-connection-create-static-policy-based-unmapped.html)
connection between VPC1 and VPC2 by using the values below (other settings
are Off by default).
* Local Gateway: Select the Aviatrix Gateway in VPC2
* Remote Device Type: Aviatrix
* Remote Device IP: Enter the public IP of the Aviatrix Gateway in VPC1
* Remote Subnet CIDR(s): Enter VPC1 CIDR (10.3.0.0/16 in this case)
* Leave Pre-Shared Key blank; this value will be auto-generated
2. Create a second
[Static Route-Based (Unmapped)](https://legacy.docs.aviatrix.com/documentation/latest/network/external-connection-create-static-route-based-unmapped.html)
or
[Static Policy-Based (Unmapped)](https://legacy.docs.aviatrix.com/documentation/latest/network/external-connection-create-static-policy-based-unmapped.html)
connection between VPC2 and VPC1 by using the values below.
* Local Gateway: Select the Aviatrix Gateway in VPC1
* Remote Device Type: Aviatrix
* Remote Device IP: Enter the public IP of the Aviatrix Gateway in VPC2
* Remote Subnet CIDR(s): Enter VPC2 CIDR (172.29.0.0/16 in this case)
* Leave Pre-Shared Key blank
### Configuring Connections Between VPC2 and VPC3
Follow these steps to create the Mapped S2C connections between VPC2 and VCP3:
1. Create a
[Static Route Mapped connection](https://legacy.docs.aviatrix.com/documentation/latest/network/external-connection-create-static-route-based-mapped.html)
between VPC2 to VPC3 by using the values below (other settings are Off by
default):
* Local Gateway: Select the Aviatrix Gateway in VPC2
* Remote Device Type: Aviatrix
* Remote Device IP: Enter the public IP of the Aviatrix Gateway in VPC3
* Real Local Subnet CIDR(s): Enter VPC2 CIDR (172.29.0.0/16 in this case)
* Virtual Local Subnet CIDR(s): Enter VPC2 CIDR again (172.29.0.0/16 in this
case)
* Real Remote Subnet CIDR(s): Enter VPC3 CIDR (10.3.0.0/16 in this case)
* Virtual Remote Subnet CIDR(s): Enter the virtual CIDR (10.49.0.0/16 in this
example)
* Leave Pre-Shared Key blank; this value will be auto-generated
For Remote Subnet, you map the real subnet CIDR (10.3.0.0/16) to the virtual subnet CIDR (10.49.0.0/16). The masks of both real and virtual subnets have to be the same (/16 in this case).
The IP addresses in real and virtual subnets are a one-to-one mapping by
translating 10.3.x.y to 10.49.x.y. For example, for VPC2 VM to reach 10.3.1.100
in VPC3, the VPC2 VM needs to use IP address 10.49.1.100.
For Local Subnet, you don't need to map the real subnet CIDR (172.29.0.0/16) to
a different virtual subnet CIDR because 172.29.0.0/16 in VPC2 doesn't conflict
with any subnet in VPC1 or VPC3. 172.29.0.0/16 is used for both Real Local
Subnet and Virtual Local Subnet.
2. Create a second
[Static Route Mapped connection](https://legacy.docs.aviatrix.com/documentation/latest/network/external-connection-create-static-route-based-mapped.html)
between VPC2 to VPC3 by using the values below:
* Local Gateway: select the Aviatrix Gateway in VPC3
* Remote Device Type: Aviatrix
* Remote Device IP: Enter the public IP of the Aviatrix Gateway in VPC2
* Real Local Subnet CIDR(s): Enter VPC3 CIDR
* Virtual Local Subnet CIDR(s): Enter VPC3 CIDR again
* Real Remote Subnet CIDR(s): Enter VPC2 CIDR
* Virtual Remote Subnet CIDR(s): Enter VPC2 CIDR
### Testing the Site2Cloud Connection
You can verify the status of the Site2Cloud connections is *Up* from
*Diagnostics > Cloud Routes > External Connections*.
You can troubleshoot the connections from *Diagnostics > Diagnostic Tools*.
* Both VPC1 and VPC3 have a subnet with the same CIDR (10.3.3.0/24).
* VPC2 VMs need to access both VPC1 and VPC3 VMs in their 10.3.3.0/24 subnets.
* Since VPC1 VMs may change their private IP addresses after some unplanned
reboots, VPC2 VMs have to access them through DNS.
* VPC2 VMs need to access VPC3 VMs through their private IP addresses.
To solve this overlapping subnet issue, you create four Site2Cloud (S2C)
connections:
* Unmapped S2C connection between VPC1 and VPC2
* Unmapped S2C connection between VPC2 and VPC1
* Mapped S2C connection between VPC2 and VPC3
* Mapped S2C connection between VPC3 and VPC2
Detailed configuration steps are illustrated below.
## Configuring Site2Cloud Connections
First, install Aviatrix gateways in VPC1, VPC2, and VPC3. Follow
[these instructions](https://legacy.docs.aviatrix.com/documentation/latest/network/spoke-gateway-about.html?expand=true).
Do not enable SNAT for the new gateways in these VPCs.
### Configuring Connections Between VPC1 and VPC2
Follow these steps to create the Unmapped S2C connections between VPC1 and VPC2:
1. Create a
[Static Route-Based (Unmapped)](https://legacy.docs.aviatrix.com/documentation/latest/network/external-connection-create-static-route-based-unmapped.html)
or
[Static Policy-Based (Unmapped)](https://legacy.docs.aviatrix.com/documentation/latest/network/external-connection-create-static-policy-based-unmapped.html)
connection between VPC1 and VPC2 by using the values below (other settings
are Off by default).
* Local Gateway: Select the Aviatrix Gateway in VPC2
* Remote Device Type: Aviatrix
* Remote Device IP: Enter the public IP of the Aviatrix Gateway in VPC1
* Remote Subnet CIDR(s): Enter VPC1 CIDR (10.3.0.0/16 in this case)
* Leave Pre-Shared Key blank; this value will be auto-generated
2. Create a second
[Static Route-Based (Unmapped)](https://legacy.docs.aviatrix.com/documentation/latest/network/external-connection-create-static-route-based-unmapped.html)
or
[Static Policy-Based (Unmapped)](https://legacy.docs.aviatrix.com/documentation/latest/network/external-connection-create-static-policy-based-unmapped.html)
connection between VPC2 and VPC1 by using the values below.
* Local Gateway: Select the Aviatrix Gateway in VPC1
* Remote Device Type: Aviatrix
* Remote Device IP: Enter the public IP of the Aviatrix Gateway in VPC2
* Remote Subnet CIDR(s): Enter VPC2 CIDR (172.29.0.0/16 in this case)
* Leave Pre-Shared Key blank
### Configuring Connections Between VPC2 and VPC3
Follow these steps to create the Mapped S2C connections between VPC2 and VCP3:
1. Create a
[Static Route Mapped connection](https://legacy.docs.aviatrix.com/documentation/latest/network/external-connection-create-static-route-based-mapped.html)
between VPC2 to VPC3 by using the values below (other settings are Off by
default):
* Local Gateway: Select the Aviatrix Gateway in VPC2
* Remote Device Type: Aviatrix
* Remote Device IP: Enter the public IP of the Aviatrix Gateway in VPC3
* Real Local Subnet CIDR(s): Enter VPC2 CIDR (172.29.0.0/16 in this case)
* Virtual Local Subnet CIDR(s): Enter VPC2 CIDR again (172.29.0.0/16 in this
case)
* Real Remote Subnet CIDR(s): Enter VPC3 CIDR (10.3.0.0/16 in this case)
* Virtual Remote Subnet CIDR(s): Enter the virtual CIDR (10.49.0.0/16 in this
example)
* Leave Pre-Shared Key blank; this value will be auto-generated
For Remote Subnet, you map the real subnet CIDR (10.3.0.0/16) to the virtual subnet CIDR (10.49.0.0/16). The masks of both real and virtual subnets have to be the same (/16 in this case).
The IP addresses in real and virtual subnets are a one-to-one mapping by
translating 10.3.x.y to 10.49.x.y. For example, for VPC2 VM to reach 10.3.1.100
in VPC3, the VPC2 VM needs to use IP address 10.49.1.100.
For Local Subnet, you don't need to map the real subnet CIDR (172.29.0.0/16) to
a different virtual subnet CIDR because 172.29.0.0/16 in VPC2 doesn't conflict
with any subnet in VPC1 or VPC3. 172.29.0.0/16 is used for both Real Local
Subnet and Virtual Local Subnet.
2. Create a second
[Static Route Mapped connection](https://legacy.docs.aviatrix.com/documentation/latest/network/external-connection-create-static-route-based-mapped.html)
between VPC2 to VPC3 by using the values below:
* Local Gateway: select the Aviatrix Gateway in VPC3
* Remote Device Type: Aviatrix
* Remote Device IP: Enter the public IP of the Aviatrix Gateway in VPC2
* Real Local Subnet CIDR(s): Enter VPC3 CIDR
* Virtual Local Subnet CIDR(s): Enter VPC3 CIDR again
* Real Remote Subnet CIDR(s): Enter VPC2 CIDR
* Virtual Remote Subnet CIDR(s): Enter VPC2 CIDR
### Testing the Site2Cloud Connection
You can verify the status of the Site2Cloud connections is *Up* from
*Diagnostics > Cloud Routes > External Connections*.
You can troubleshoot the connections from *Diagnostics > Diagnostic Tools*.