> ## Documentation Index
> Fetch the complete documentation index at: https://docs.aviatrix.com/llms.txt
> Use this file to discover all available pages before exploring further.
# Aviatrix Gateway to Sonicwall
> This document describes how to build an IPsec tunnel based Site2Cloud connection between Aviatrix Gateway and Sonicwall.
This document describes how to build an IPsec tunnel based Site2Cloud connection
between Aviatrix Gateway and Sonicwall.
The network setup is as follows:
**VPC/VNet-AVX (with Aviatrix Gateway)**
*VPC/VNet CIDR: 10.0.0.0/16*
**On-Prem (with Sonicwall)**
*On-Prem Network CIDR: 10.16.100.0/24*
## Creating a Site2Cloud Connection
1. Launch a
Spoke
or
Transit Gateway
in the subnet of VPC/VNet-AVX (public subnet in AWS, GCP, or OCI).
Make note of the Gateway's public IP address (35.161.77.0 in this example).
2. Navigate to Networking > Connectivity > External Connections (S2C) and click
**Add New** to create a Site2Cloud connection using the values for one of the
below options (for either you can select either PSK or certificate-based
authentication).
* [Static Route-Based](https://legacy.docs.aviatrix.com/documentation/latest/network/external-connection-create-static-route-based-unmapped.html)
* [Static Policy-Based](https://legacy.docs.aviatrix.com/documentation/latest/network/external-connection-create-static-policy-based-unmapped.html)
3. Substitute the following values:
* Local Gateway: select the Aviatrix Gateway created above
* Remote Device Type: Generic (or **Sonicwall** if your version of Controller
is lower than Controller version 6.7. If using a higher Controller version,
only select **Generic** or **Aviatrix**).
* Remote Device IP: Public IP of Sonicwall (66.7.242.225 in this example)
* Remote Subnet CIDR(s): 10.16.100.0/24 (on-prem network CIDR)
* Local Subnet CIDR(s): 10.0.0.0/16
* Pre-Shared Key is optional; it is auto-generated if not entered
## Creating Address Objects for the VPN subnets
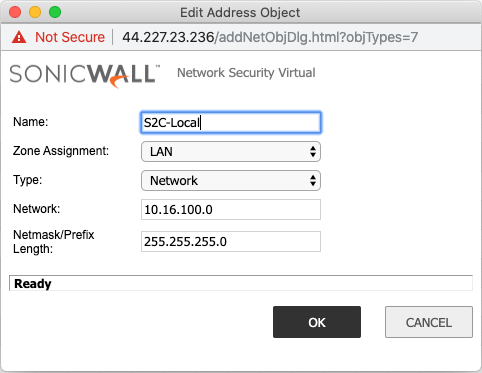
In the Sonicwall UI, go to Network > Address Objects > click **Add**.
### Creating an Address Object for the Local Network
| **Field** | **Value** |
| ------------------- | ------------------------------- |
| Name | Arbitrary e.g. Site2Cloud-local |
| Zone | LAN |
| Type | Network |
| Network | The LAN network range |
| Network Mask/Prefix | e.g. 255.255.255.0 |
 ### Creating an Address Object for the Cloud Network
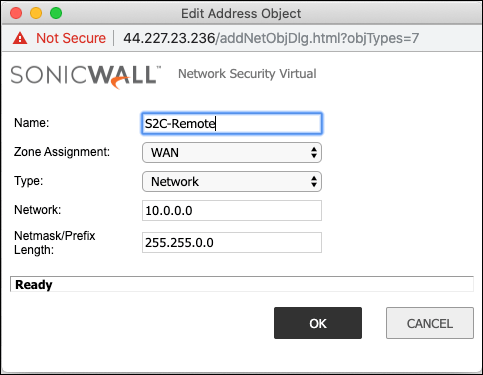
| **Field** | **Value** |
| ------------------- | ------------------------------- |
| Name | Arbitrary e.g. site2cloud-cloud |
| Zone | WAN |
| Type | Network |
| Network | The Cloud network range |
| Network Mask/Prefix | e.g. 255.255.0.0 |
### Creating an Address Object for the Cloud Network
| **Field** | **Value** |
| ------------------- | ------------------------------- |
| Name | Arbitrary e.g. site2cloud-cloud |
| Zone | WAN |
| Type | Network |
| Network | The Cloud network range |
| Network Mask/Prefix | e.g. 255.255.0.0 |
 #### Configuring the VPN Tunnel
1. Navigate to VPN > Settings > click **Add**.
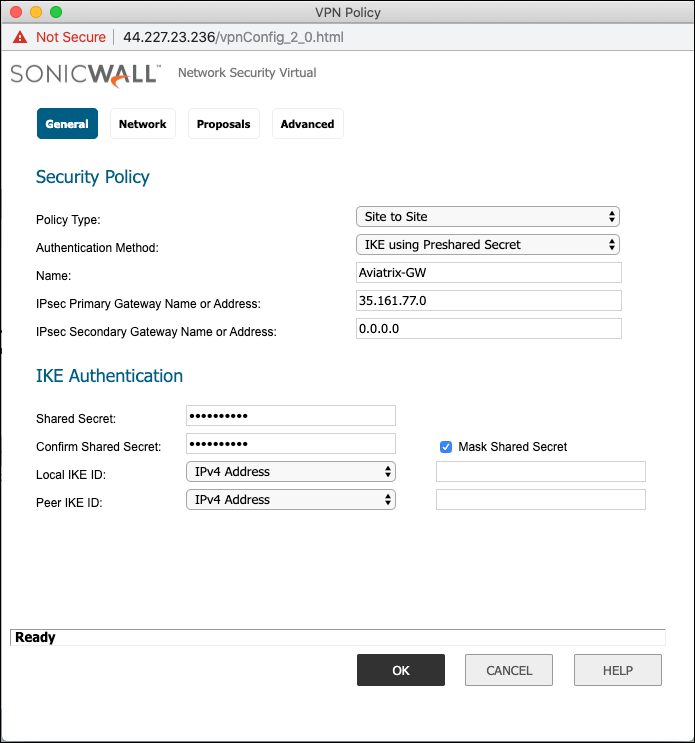
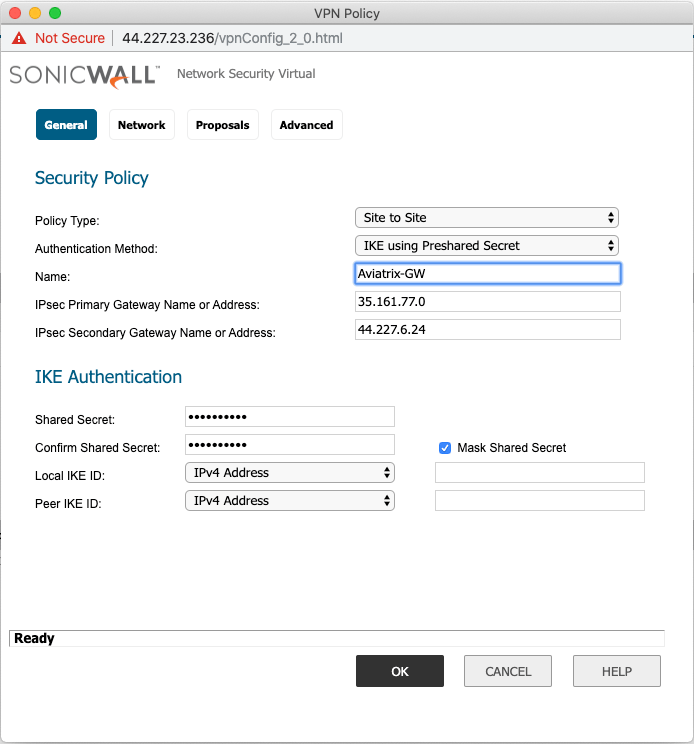
2. On the **General** tab fill in the following fields:
| **Field** | **Value** |
| ------------------------------- | ------------------------------------------------------ |
| Policy Type | Site to site |
| Authentication Method | IKE using Preshared Secret |
| Name | Arbitrary (e.g. Aviatrix-GW) |
| IPsec Primary Gateway Address | The public IP of the Aviatrix Gateway |
| IPsec Secondary Gateway Address | The public IP of the Aviatrix HA Gateway if configured |
| Shared Secret | Arbitrary |
| Confirm Shared Secret | Re-enter Shared Secret |
| Local IKE ID | Leave blank |
| Peer IKE ID | Leave blank |
#### Configuring the VPN Tunnel
1. Navigate to VPN > Settings > click **Add**.
2. On the **General** tab fill in the following fields:
| **Field** | **Value** |
| ------------------------------- | ------------------------------------------------------ |
| Policy Type | Site to site |
| Authentication Method | IKE using Preshared Secret |
| Name | Arbitrary (e.g. Aviatrix-GW) |
| IPsec Primary Gateway Address | The public IP of the Aviatrix Gateway |
| IPsec Secondary Gateway Address | The public IP of the Aviatrix HA Gateway if configured |
| Shared Secret | Arbitrary |
| Confirm Shared Secret | Re-enter Shared Secret |
| Local IKE ID | Leave blank |
| Peer IKE ID | Leave blank |
 ### Assigning the Local and Remote Address Objects to the Tunnel
1. Select the **Network** tab and select the Address objects created above.
2. Choose local network from list: e.g. Site2Cloud-local.
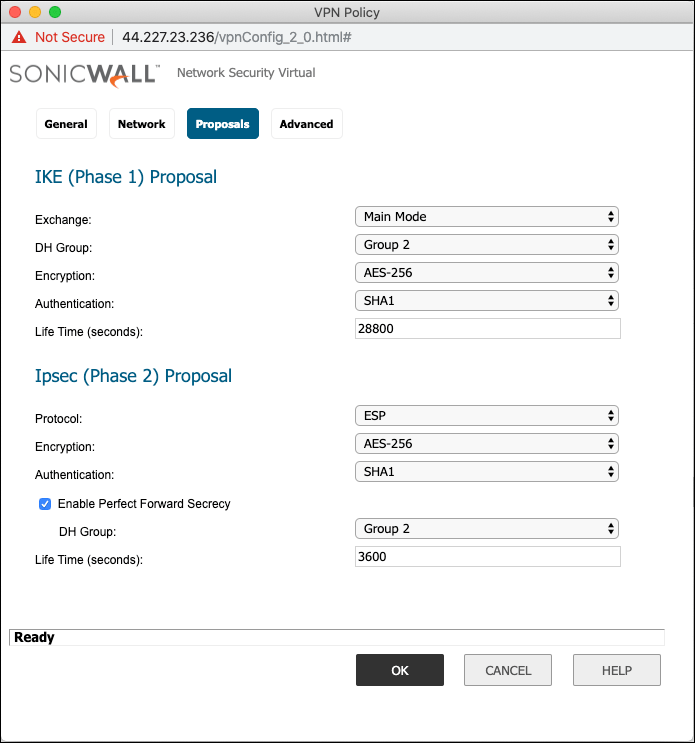
3. Select the **Proposals** tab and set the IKE and IPsec values.
| **Field** | **Value** |
| ------------------- | --------- |
| Exchange | Main Mode |
| DH Group | Group2 |
| Encryption | AES-256 |
| Authentication | SHA1 |
| Life Time (seconds) | 28800 |
IPsec (Phase 2) Proposals
| **Field** | **Value** |
| ------------------------------ | ------------------ |
| Protocol | ESP |
| Encryption | AES-256 |
| Authentication | SHA1 |
| Enable Perfect Forward Secrecy | Mark this checkbox |
| DH Group | Group 2 |
| Life Time (seconds) | 3600 |
### Assigning the Local and Remote Address Objects to the Tunnel
1. Select the **Network** tab and select the Address objects created above.
2. Choose local network from list: e.g. Site2Cloud-local.
3. Select the **Proposals** tab and set the IKE and IPsec values.
| **Field** | **Value** |
| ------------------- | --------- |
| Exchange | Main Mode |
| DH Group | Group2 |
| Encryption | AES-256 |
| Authentication | SHA1 |
| Life Time (seconds) | 28800 |
IPsec (Phase 2) Proposals
| **Field** | **Value** |
| ------------------------------ | ------------------ |
| Protocol | ESP |
| Encryption | AES-256 |
| Authentication | SHA1 |
| Enable Perfect Forward Secrecy | Mark this checkbox |
| DH Group | Group 2 |
| Life Time (seconds) | 3600 |
 If the Secondary Peer IP is configured, then Peer IKE ID must be left blank or
else failover will not work properly.
If the Secondary Peer IP is configured, then Peer IKE ID must be left blank or
else failover will not work properly.
 ## Advanced Settings
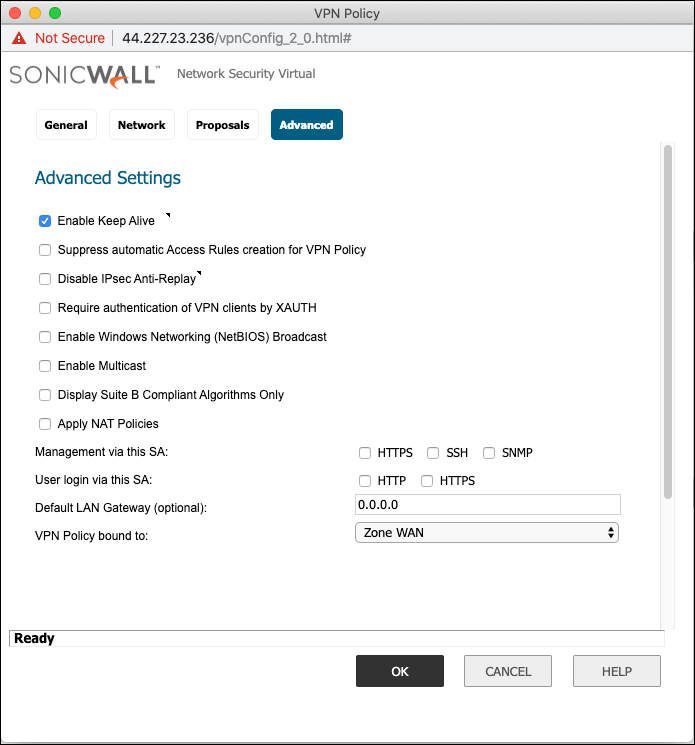
1. Click the **Advance** tab.
2. Mark the **Enable Keep Alive** checkbox.
3. Click **OK** to save.
## Advanced Settings
1. Click the **Advance** tab.
2. Mark the **Enable Keep Alive** checkbox.
3. Click **OK** to save.
 ## Related Topics
* [About External Connection Settings](https://legacy.docs.aviatrix.com/documentation/latest/network/externaldevice-settings.html)
## Related Topics
* [About External Connection Settings](https://legacy.docs.aviatrix.com/documentation/latest/network/externaldevice-settings.html)