> ## Documentation Index
> Fetch the complete documentation index at: https://docs.aviatrix.com/llms.txt
> Use this file to discover all available pages before exploring further.
# Aviatrix Gateway to Palo Alto Firewall
> This document describes how to build an IPsec tunnel-based Site2Cloud connection between an Aviatrix Gateway and a Palo Alto Networks Firewall. To simulate an on-prem Firewall, we use a VM-Series in an AWS VPC.
This document describes how to build an IPsec tunnel-based Site2Cloud
connection between an Aviatrix Gateway and a Palo Alto Networks
Firewall. To simulate an on-prem Firewall, we use a VM-Series in an AWS
VPC.
If you do not have access to AWS, you can simulate an on-prem Firewall
by deploying the Palo Alto Firewall in any other cloud (such as
Microsoft Azure, Google Cloud Platform, or Oracle Cloud Infrastructure).
The network setup is as follows:
**VPC1 (with Aviatrix Gateway)**
*VPC1 CIDR: 10.0.0.0/16*
*VPC1 Public Subnet CIDR: 10.0.1.0/24*
*VPC1 Private Subnet CIDR: 10.0.2.0/24*
**VPC2 (with Palo Alto Networks VM-series)**
*VPC2 CIDR: 10.13.0.0/16*
*VPC2 Public Subnet CIDR: 10.13.0.0/24*
*VPC2 Private Subnet CIDR: 10.13.1.0/24*
## Certificate-Based Authentication
If you want to use certificate-based authentication when establishing a Site2Cloud connection with your Palo Alto VM-Series firewall, you must do the following:
1. Generate a certificate from your Palo Alto VM-Series firewall.
2. Export your certificate in PEM format.
3. In Aviatrix CoPilot, upload the CA certificate generated from your Palo Alto VM-Series firewall under Networking > Connectivity > Certificates.
4. Create your Site2Cloud connection.
5. After creating the Site2Cloud connection, download the resulting configuration.
6. Download the Aviatrix CA certificate from Networking > Connectivity > Certificates.
7. Upload the Aviatrix CA certificate to your on-prem Palo Alto VM-Series firewall.
8. In the Palo Alto VM-Series UI, use the information from the downloaded configuration file to configure your tunnels/interfaces.
9. In the Palo Alto VM-Series UI, configure the IKE Gateway depending on if you are using PSK or certificate-based authentication.
## Configuration Workflow
If you are not using certificate-based authentication in your Site2Cloud connection with your Palo Alto firewall you can skip these sections:
* Creating and Generating a Self-Signed Root Certificate
* Importing the Aviatrix CA Certificate
### Creating and Generating a Self-Signed Root Certificate
If you are creating a Site2Cloud connection between your Palo Alto VM-Series firewall and your Aviatrix gateway in the cloud and want to use certificate-based authentication, you must generate a CA certificate in the firewall UI that you will upload to Aviatrix CoPilot under Networking > Connectivity > Certificates.
See [Create a Self-Signed Root CA Certificate](https://docs.paloaltonetworks.com/pan-os/9-1/pan-os-admin/certificate-management/obtain-certificates/create-a-self-signed-root-ca-certificate) for more information on certificates in Palo Alto.
1. In the Palo Alto VM-Series firewall UI, navigate to Device > Certificate Management > Certificates > Device Certificates.
2. Click **Generate** at the bottom of the window. The Generate Certificate dialog displays.
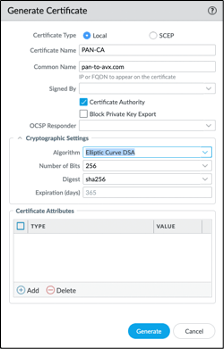 3. Fill out the following information:
* Certificate Name: a name that makes sense to you, such as PAN-CA
* Common Name: a descriptor that makes sense to you, such as pan-to-avx.com
* Signed By: select Certificate Authority
* Cryptographic Settings:
* Select Elliptic Curve DSA (ECDSA); this is currently the only algorithm supported by Site2Cloud cert-based authentication.
* Select 256 bits
* Select sha256 digest
4. Click **Generate**. This creates the root CA certificate that will be used to sign the PAN to Aviatrix certificate you will create in the next step.
5. Under Device > Certificate Management > Certificates > Device Certificates, generate another certificate (signed by the PAN-CA root you created) and populate as follows:
* Certificate Name: a name that makes sense to you, such as pan-to-avx-cert
* Common Name: a name that makes sense to you, such as pan-device.com
* Signed by: PAN-CA (created in above steps)
* Cryptographic Settings: Elliptic Curve DSA algorithm; 256 bits; sha256 digest
* Certificate Attributes: refer to the aforementioned Palo Alto Networks URL for information on attributes to use for device certificate creation
6. Click **Generate**.
7. Export the PAN-CA certificate for uploading to the Networking > Connectivity > Certificates page in CoPilot.
8. See the CA Certificate page for details on uploading this certificate.
### Setting up External (S2C) Connection
1. Launch a Palo Alto Networks VM-series with at least two network
interfaces. One interface serves as a WAN port and is in VPC2's public
subnet. The other interface serves as a LAN port and is in VPC2's
private subnet. Collect the public IP address of the WAN port.
2. In Aviatrix CoPilot, launch an [Aviatrix Transit Gateway](https://legacy.docs.aviatrix.com/documentation/latest/network/transit-gateway-about.html?expand=true) in VPC1's public subnet. Collect both the public and
private IP address of the Gateway.
3. Create a Site2Cloud connection using one of the below options (for PSK or certificate-based authentication).
* [Static Route-Based](https://legacy.docs.aviatrix.com/documentation/latest/network/external-connection-create-static-route-based-unmapped.html)
* [Static Policy-Based](https://legacy.docs.aviatrix.com/documentation/latest/network/external-connection-create-static-policy-based-unmapped.html)
Substitute the following values:
* Remote Device Type: Generic
* Algorithms: turn Off
* Remote Device IP: Public IP of Palo Alto Networks VM Series WAN port
* Remote Subnet CIDR(s): 10.13.1.0/24 (VPC2 private subnet)
* Local Subnet CIDR(s): 10.0.2.0/24 (VPC1 private subnet)
4. After the connection is created, select the vertical ellipsis
3. Fill out the following information:
* Certificate Name: a name that makes sense to you, such as PAN-CA
* Common Name: a descriptor that makes sense to you, such as pan-to-avx.com
* Signed By: select Certificate Authority
* Cryptographic Settings:
* Select Elliptic Curve DSA (ECDSA); this is currently the only algorithm supported by Site2Cloud cert-based authentication.
* Select 256 bits
* Select sha256 digest
4. Click **Generate**. This creates the root CA certificate that will be used to sign the PAN to Aviatrix certificate you will create in the next step.
5. Under Device > Certificate Management > Certificates > Device Certificates, generate another certificate (signed by the PAN-CA root you created) and populate as follows:
* Certificate Name: a name that makes sense to you, such as pan-to-avx-cert
* Common Name: a name that makes sense to you, such as pan-device.com
* Signed by: PAN-CA (created in above steps)
* Cryptographic Settings: Elliptic Curve DSA algorithm; 256 bits; sha256 digest
* Certificate Attributes: refer to the aforementioned Palo Alto Networks URL for information on attributes to use for device certificate creation
6. Click **Generate**.
7. Export the PAN-CA certificate for uploading to the Networking > Connectivity > Certificates page in CoPilot.
8. See the CA Certificate page for details on uploading this certificate.
### Setting up External (S2C) Connection
1. Launch a Palo Alto Networks VM-series with at least two network
interfaces. One interface serves as a WAN port and is in VPC2's public
subnet. The other interface serves as a LAN port and is in VPC2's
private subnet. Collect the public IP address of the WAN port.
2. In Aviatrix CoPilot, launch an [Aviatrix Transit Gateway](https://legacy.docs.aviatrix.com/documentation/latest/network/transit-gateway-about.html?expand=true) in VPC1's public subnet. Collect both the public and
private IP address of the Gateway.
3. Create a Site2Cloud connection using one of the below options (for PSK or certificate-based authentication).
* [Static Route-Based](https://legacy.docs.aviatrix.com/documentation/latest/network/external-connection-create-static-route-based-unmapped.html)
* [Static Policy-Based](https://legacy.docs.aviatrix.com/documentation/latest/network/external-connection-create-static-policy-based-unmapped.html)
Substitute the following values:
* Remote Device Type: Generic
* Algorithms: turn Off
* Remote Device IP: Public IP of Palo Alto Networks VM Series WAN port
* Remote Subnet CIDR(s): 10.13.1.0/24 (VPC2 private subnet)
* Local Subnet CIDR(s): 10.0.2.0/24 (VPC1 private subnet)
4. After the connection is created, select the vertical ellipsis  menu for that connection and select **Download Configuration**.
5. Select **Generic** from the **Vendor** dropdown list and click
the **Download** to download the external (S2C)
configuration. Use this configuration file to configure the tunnels and interfaces in your Palo Alto Network VM-Series firewall.
### Importing the Aviatrix CA Certificate
If you are creating an external (S2C) connection between your Palo Alto VM-Series firewall and your Aviatrix gateway, you must download the Aviatrix CA certificate as per the instructions on the CA Certificate page, and then upload it to your Palo Alto VM-Series UI as follows:
1. In the Palo Alto VM-Series UI, navigate to Device > Certificate Management > Certificates > Device Certificates.
2. At the bottom of the window, click **Import**.
3. In the Import Certificate dialog, enter the following information:
* Certificate Name: a name that makes sense to you
* Certificate File: click Browse to navigate to the location of the Aviatrix CA certificate
* File Format: select Base64 Encoded Certificate (PEM).
4. Click **OK**.
5. Navigate to Device > Certificate Management > Certificate Profile. In the Certificate Profile dialog enter the following:
* Name: enter a name for the profile (such as AVX-CA).
* CA Certificates: click **Add** and select AVX-CERT (or whatever name you gave to the imported Aviatrix CA certificate) from the CA Certificate list.
6. Click **OK**.
7. Click **OK** again on the main Certificate Profile dialog.
### Adding a Tunnel Interface
1. Log into the Palo Alto Networks VM Series UI.
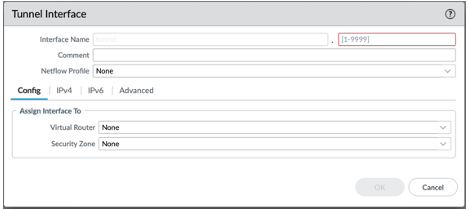
2. Navigate to Network > Interface > Tunnel and click **Add** to create a new
tunnel interface and assign the following parameters.
| **Field** | **Value** |
| -------------- | -------------------------------------------------------------- |
| Interface Name | tunnel.1 |
| Virtual Router | Select the existing **default** virtual router |
| Security Zone | Select the layer 3 internal zone from which traffic originates |
menu for that connection and select **Download Configuration**.
5. Select **Generic** from the **Vendor** dropdown list and click
the **Download** to download the external (S2C)
configuration. Use this configuration file to configure the tunnels and interfaces in your Palo Alto Network VM-Series firewall.
### Importing the Aviatrix CA Certificate
If you are creating an external (S2C) connection between your Palo Alto VM-Series firewall and your Aviatrix gateway, you must download the Aviatrix CA certificate as per the instructions on the CA Certificate page, and then upload it to your Palo Alto VM-Series UI as follows:
1. In the Palo Alto VM-Series UI, navigate to Device > Certificate Management > Certificates > Device Certificates.
2. At the bottom of the window, click **Import**.
3. In the Import Certificate dialog, enter the following information:
* Certificate Name: a name that makes sense to you
* Certificate File: click Browse to navigate to the location of the Aviatrix CA certificate
* File Format: select Base64 Encoded Certificate (PEM).
4. Click **OK**.
5. Navigate to Device > Certificate Management > Certificate Profile. In the Certificate Profile dialog enter the following:
* Name: enter a name for the profile (such as AVX-CA).
* CA Certificates: click **Add** and select AVX-CERT (or whatever name you gave to the imported Aviatrix CA certificate) from the CA Certificate list.
6. Click **OK**.
7. Click **OK** again on the main Certificate Profile dialog.
### Adding a Tunnel Interface
1. Log into the Palo Alto Networks VM Series UI.
2. Navigate to Network > Interface > Tunnel and click **Add** to create a new
tunnel interface and assign the following parameters.
| **Field** | **Value** |
| -------------- | -------------------------------------------------------------- |
| Interface Name | tunnel.1 |
| Virtual Router | Select the existing **default** virtual router |
| Security Zone | Select the layer 3 internal zone from which traffic originates |
 If the tunnel interface is in a zone different from the one where the
traffic will originate, a policy needs to be created to allow the
traffic to flow from the source zone to the zone containing the tunnel
interface.
### Setting up IKE Crypto Profile and IKE Gateways
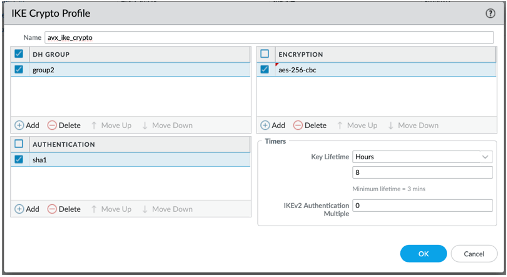
1. In the Palo ALTO VM-Series UI, navigate to Network > Network Profiles > IKE Crypto, click **Add** and define
the IKE Crypto profile (IKEv1 Phase-1) parameters.
If the tunnel interface is in a zone different from the one where the
traffic will originate, a policy needs to be created to allow the
traffic to flow from the source zone to the zone containing the tunnel
interface.
### Setting up IKE Crypto Profile and IKE Gateways
1. In the Palo ALTO VM-Series UI, navigate to Network > Network Profiles > IKE Crypto, click **Add** and define
the IKE Crypto profile (IKEv1 Phase-1) parameters.
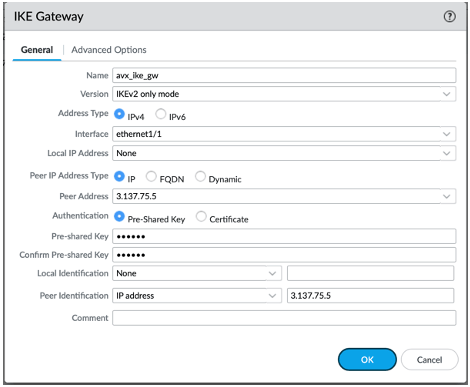
 2. If using PSK (Pre-shared Key) for authentication with Site2Cloud, navigate to Network > Network Profiles > IKE Gateways to configure
the IKE Phase-1 Gateway. These parameters should match the Site2Cloud configuration downloaded under [Setting up External (S2C) Connection](#setting-up-external-s2c-connection).
According to the Palo Alto Networks official documents, it is not necessary to add the Peer Identification. However, Aviatrix recommends adding it, to make sure the tunnel is working. In the event
that the IPsec tunnel is up but traffic is not passing between the Cloud and
on-premises, you may want to enable NAT-T in Palo Alto Networks
Firewall.
| Field | Value |
| ------------------- | --------------------------------------------------------------------------------------------------------------------------- |
| Interface | Palo Alto Networks WAN port |
| Peer IP Address | Aviatrix Gateway public IP |
| Pre-shared Key | Key from Site2Cloud configuration downloaded in [Setting up External (S2C) Connection](#setting-up-external-s2c-connection) |
| Peer Identification | Peer public IP address (if the Controller version is below 5.0, it should be the peer private IP) |
2. If using PSK (Pre-shared Key) for authentication with Site2Cloud, navigate to Network > Network Profiles > IKE Gateways to configure
the IKE Phase-1 Gateway. These parameters should match the Site2Cloud configuration downloaded under [Setting up External (S2C) Connection](#setting-up-external-s2c-connection).
According to the Palo Alto Networks official documents, it is not necessary to add the Peer Identification. However, Aviatrix recommends adding it, to make sure the tunnel is working. In the event
that the IPsec tunnel is up but traffic is not passing between the Cloud and
on-premises, you may want to enable NAT-T in Palo Alto Networks
Firewall.
| Field | Value |
| ------------------- | --------------------------------------------------------------------------------------------------------------------------- |
| Interface | Palo Alto Networks WAN port |
| Peer IP Address | Aviatrix Gateway public IP |
| Pre-shared Key | Key from Site2Cloud configuration downloaded in [Setting up External (S2C) Connection](#setting-up-external-s2c-connection) |
| Peer Identification | Peer public IP address (if the Controller version is below 5.0, it should be the peer private IP) |
 3. Under Advanced Options, select the IKE Crypto profile created in step 1 of this procedure.
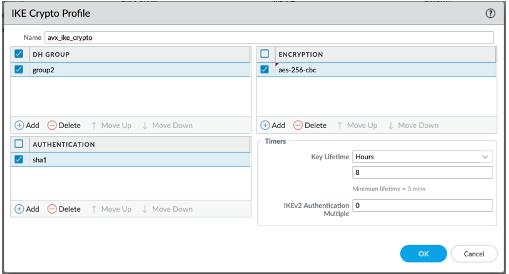
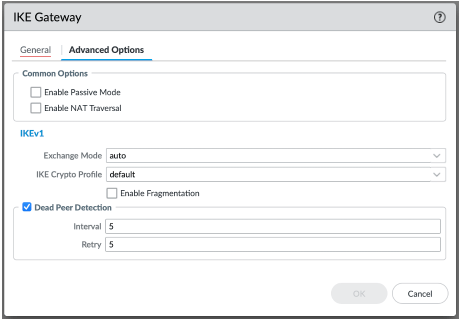 4. Under Network > Network Profiles > IPsec Crypto, click **Add** to
create a new profile. Define the IPsec crypto profile (IKEv1 Phase-2).
These parameters should match the Site2Cloud configuration downloaded during [Setting up External (S2C) Connection](#setting-up-external-s2c-connection).
4. Under Network > Network Profiles > IPsec Crypto, click **Add** to
create a new profile. Define the IPsec crypto profile (IKEv1 Phase-2).
These parameters should match the Site2Cloud configuration downloaded during [Setting up External (S2C) Connection](#setting-up-external-s2c-connection).
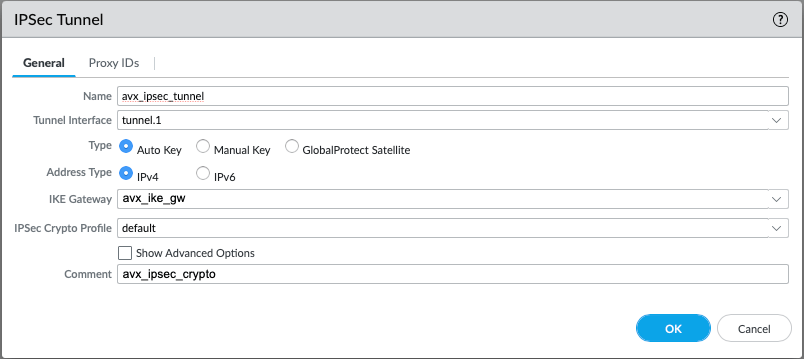
 ### Adding a New IPSec Tunnel
1. Under Network > IPsec Tunnels, click **Add** to create a new IPsec
Tunnel. At the **General** window:
| **Field** | **Value** |
| -------------------- | ------------------------------------ |
| Tunnel Interface | Tunnel interface created earlier |
| IKE Gateway | IKE gateway created earlier |
| IPsec Crypto Profile | IPsec crypto profile created earlier |
### Adding a New IPSec Tunnel
1. Under Network > IPsec Tunnels, click **Add** to create a new IPsec
Tunnel. At the **General** window:
| **Field** | **Value** |
| -------------------- | ------------------------------------ |
| Tunnel Interface | Tunnel interface created earlier |
| IKE Gateway | IKE gateway created earlier |
| IPsec Crypto Profile | IPsec crypto profile created earlier |
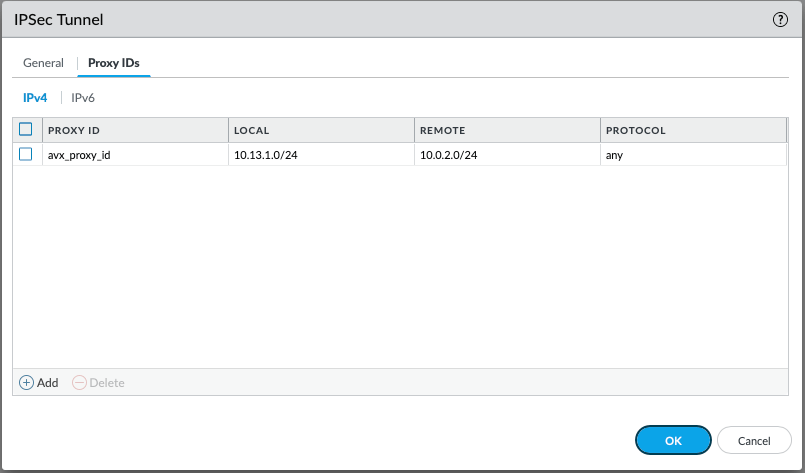
 2. At **Proxy IDs** window:
| **Field** | **Value** |
| --------- | ------------------------ |
| Local | VPC2 private subnet CIDR |
| Remote | VPC1 private subnet CIDR |
| Protocol | Any |
2. At **Proxy IDs** window:
| **Field** | **Value** |
| --------- | ------------------------ |
| Local | VPC2 private subnet CIDR |
| Remote | VPC1 private subnet CIDR |
| Protocol | Any |
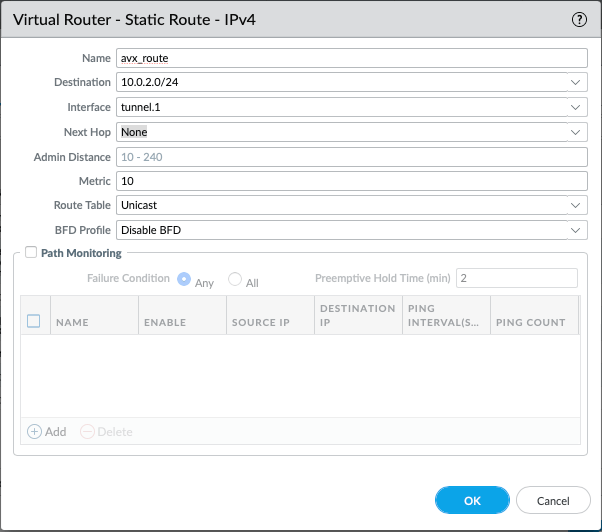
 3. Under Network > Virtual Routers, click on the virtual router profile,
then click Static Routes > default, and add a new route with the VPC1
private subnet as the destination.
| **Field** | **Value** |
| ----------- | ------------------------------------ |
| Destination | VPC1 private subnet CIDR |
| Interface | Tunnel interface created at Step 5.1 |
3. Under Network > Virtual Routers, click on the virtual router profile,
then click Static Routes > default, and add a new route with the VPC1
private subnet as the destination.
| **Field** | **Value** |
| ----------- | ------------------------------------ |
| Destination | VPC1 private subnet CIDR |
| Interface | Tunnel interface created at Step 5.1 |
 4. Commit the configuration. The IPsec tunnel status
turns green.
4. Commit the configuration. The IPsec tunnel status
turns green.
 5. If using certificate-based authentication with Site2Cloud:
1. Go to Network > Network Profiles > IKE Gateways. These parameters should match the SIte2Cloud configuration downloaded under [Setting up External (S2C) Connection](#setting-up-external-s2c-connection).
2. In the IKE Gateway dialog enter the following:
| Field | Value |
| -------------------- | ------------------------------------------------------------------ |
| Name | A name of your choosing |
| Version | IKEv2 only mode |
| Interface | ethernet 1/1 |
| Local IP Address | IP address of on-prem |
| Peer IP Address Type | IP |
| Peer Address | IP address of cloud gateway |
| Authentication | Certificate |
| Local Certificate | The device certificate you created earlier |
| Local Identification | FQDN (hostname) such as pan-device.com |
| Peer Identification | FQDN (hostname) such as gw-spoke.aviatrix.network.com |
| Peer ID Check | Exact |
| Certificate Profile | Select the certificate profile you created in the previous section |
6. Click **OK**.
7. Navigate to Device > Certificate Management > Device Certificates > PAN-CA and export this certificate as a PEM file.
8. You must now import this certificate on the Networking > Connectivity > Certificates page in CoPilot, to use when setting up the external (Site2Cloud) connection between CoPilot and the Palo Alto VM-Series firewall.
### Finishing the Configuration
1. In the AWS portal, configure the VPC Route Table associated with the
private subnet of VPC2. Add a route with a destination of VPC1's private subnet with the Palo Alto Networks VM LAN port as the gateway.
2. Send traffic between VPC1's and VPC2's private subnets.
3. In Aviatrix CoPilot, go to the Diagnostics > Cloud Routes > External Connections tab to confirm the Status and Tunnel Status of the external connection.
To troubleshoot, in CoPilot go to Diagnostics > Diagnostic Tools.
## Related Topics
* [External Device Settings](https://legacy.docs.aviatrix.com/documentation/latest/network/externaldevice-settings.html)
5. If using certificate-based authentication with Site2Cloud:
1. Go to Network > Network Profiles > IKE Gateways. These parameters should match the SIte2Cloud configuration downloaded under [Setting up External (S2C) Connection](#setting-up-external-s2c-connection).
2. In the IKE Gateway dialog enter the following:
| Field | Value |
| -------------------- | ------------------------------------------------------------------ |
| Name | A name of your choosing |
| Version | IKEv2 only mode |
| Interface | ethernet 1/1 |
| Local IP Address | IP address of on-prem |
| Peer IP Address Type | IP |
| Peer Address | IP address of cloud gateway |
| Authentication | Certificate |
| Local Certificate | The device certificate you created earlier |
| Local Identification | FQDN (hostname) such as pan-device.com |
| Peer Identification | FQDN (hostname) such as gw-spoke.aviatrix.network.com |
| Peer ID Check | Exact |
| Certificate Profile | Select the certificate profile you created in the previous section |
6. Click **OK**.
7. Navigate to Device > Certificate Management > Device Certificates > PAN-CA and export this certificate as a PEM file.
8. You must now import this certificate on the Networking > Connectivity > Certificates page in CoPilot, to use when setting up the external (Site2Cloud) connection between CoPilot and the Palo Alto VM-Series firewall.
### Finishing the Configuration
1. In the AWS portal, configure the VPC Route Table associated with the
private subnet of VPC2. Add a route with a destination of VPC1's private subnet with the Palo Alto Networks VM LAN port as the gateway.
2. Send traffic between VPC1's and VPC2's private subnets.
3. In Aviatrix CoPilot, go to the Diagnostics > Cloud Routes > External Connections tab to confirm the Status and Tunnel Status of the external connection.
To troubleshoot, in CoPilot go to Diagnostics > Diagnostic Tools.
## Related Topics
* [External Device Settings](https://legacy.docs.aviatrix.com/documentation/latest/network/externaldevice-settings.html)