> ## Documentation Index
> Fetch the complete documentation index at: https://docs.aviatrix.com/llms.txt
> Use this file to discover all available pages before exploring further.
# Aviatrix Gateway to Check Point (R80.10)
> This document describes how to build an IPsec tunnel based Site2Cloud connection between Aviatrix Gateway and Check Point Firewall. To simulate an on-prem Check Point Firewall, we use a Check Point CloudGuard IaaS firewall VM at AWS VPC.
This document describes how to build an IPsec tunnel based Site2Cloud connection
between Aviatrix Gateway and Check Point Firewall. To simulate an on-prem Check
Point Firewall, we use a Check Point CloudGuard IaaS firewall VM at AWS VPC.
If you do not have access to AWS, you can simulate an on-prem Firewall by
deploying the Palo Alto Firewall in any other cloud (such as Microsoft Azure,
Google Cloud Platform, or Oracle Cloud Infrastructure).
The network setup is as follows:
**VPC1 (with Aviatrix Gateway)**
*VPC1 CIDR: 10.12.0.0/16*
*VPC1 Public Subnet CIDR: 10.12.0.0/23*
*VPC1 Private Subnet CIDR: 10.12.2.0/23*
**VPC2 (with Check Point Security Gateway)**
*VPC2 CIDR: 10.24.0.0/16*
*VPC2 Public Subnet CIDR: 10.24.0.0/23*
*VPC2 Private Subnet CIDR: 10.24.2.0/23*
## Launching Check Point Security Gateway VM
Launch a CheckPoint VM with at least two network interfaces. One interface
serves as a WAN port and is in VPC2's public subnet. The other interface serves
as a LAN port and is in VPC2's private subnet. Collect the public IP address of
the WAN port.
## Creating an External Connection
1. In Aviatrix CoPilot, launch an
Aviatrix Transit Gateway
in VPC1's public subnet. Collect both the public and private IP address of
the Gateway.
2. Navigate to Networking > Connectivity > External Connections (S2C) and click
**Add New** to create a Site2Cloud connection (selecting Pre-Shared Key)
using the values for one of the below options:
* [Static Route-Based](https://legacy.docs.aviatrix.com/documentation/latest/network/external-connection-create-static-route-based-unmapped.html)
* [Static Policy-Based](https://legacy.docs.aviatrix.com/documentation/latest/network/external-connection-create-static-policy-based-unmapped.html)
3. Substitute the following values:
* Remote Device Type: Generic
* Algorithms: turn Off
* Remote Device IP: Public IP of the Check Point VM WAN port
* Remote Subnet CIDR(s): 10.24.2.0/23 (VPC2 private subnet)
* Local Subnet CIDR(s): 10.12.2.0/23 (VPC1 private subnet)
4. After the connection is created, select the vertical ellipsis
 menu for that connection and select **Download Configuration**.
5. Select **Generic** from the **Vendor** dropdown list and click the
**Download** to download the external (S2C) configuration. Use this
configuration file to configure the tunnels and interfaces in your Check
Point VM firewall.
## Downloading and Installing SmartConsole
1. Using a browser, connect to the Gaia Portal of the CheckPoint-VM at
`https:/CheckPoint-VM_Public-IP:`
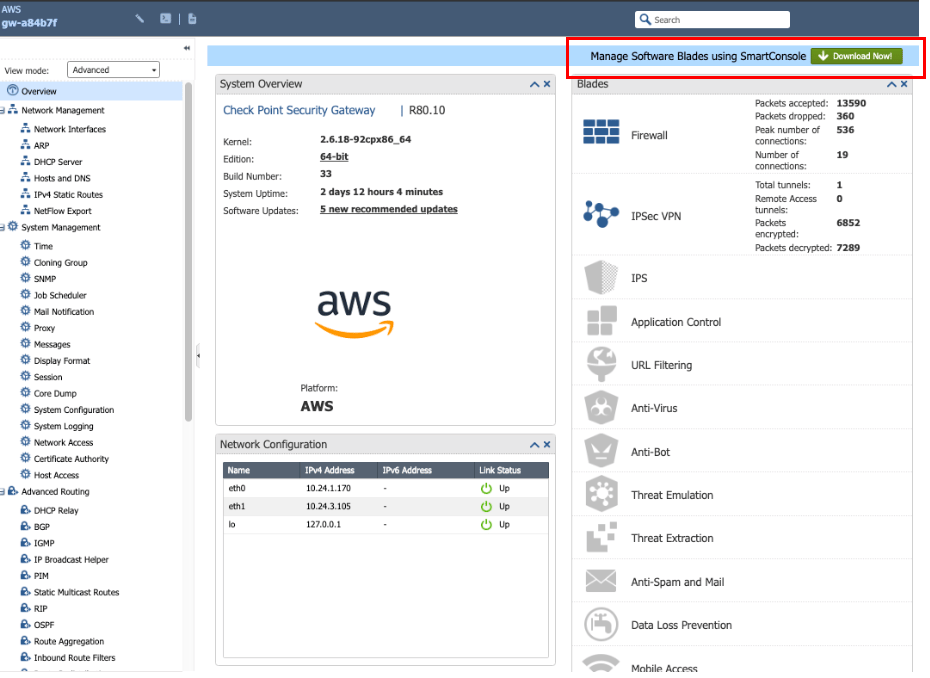
2. Click **Download Now!** as shown below to download SmartConsole.
menu for that connection and select **Download Configuration**.
5. Select **Generic** from the **Vendor** dropdown list and click the
**Download** to download the external (S2C) configuration. Use this
configuration file to configure the tunnels and interfaces in your Check
Point VM firewall.
## Downloading and Installing SmartConsole
1. Using a browser, connect to the Gaia Portal of the CheckPoint-VM at
`https:/CheckPoint-VM_Public-IP:`
2. Click **Download Now!** as shown below to download SmartConsole.
 3. Install SmartConsole at your local machine and launch SmartDashboard.
### Creating Network Objects at SmartConsole
1. At the Check Point SmartDashboard window, go to New > Network and create two
objects.
3. Install SmartConsole at your local machine and launch SmartDashboard.
### Creating Network Objects at SmartConsole
1. At the Check Point SmartDashboard window, go to New > Network and create two
objects.
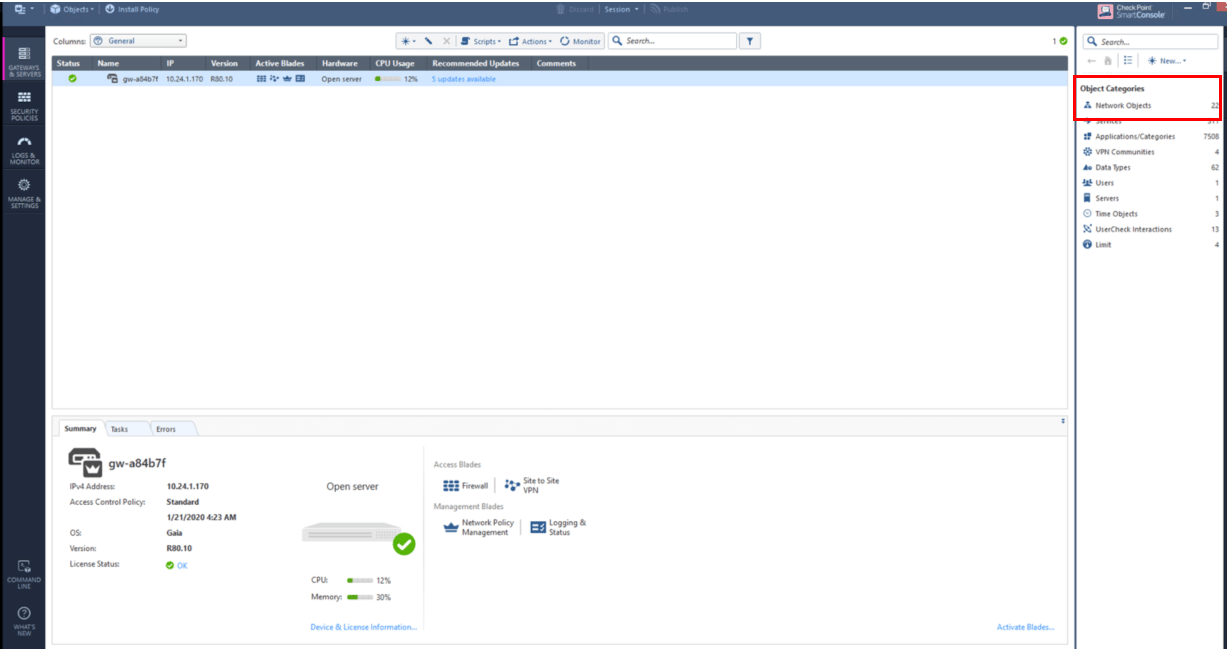 2. Create one network for private subnet of VPC2 (Check Point VPC).
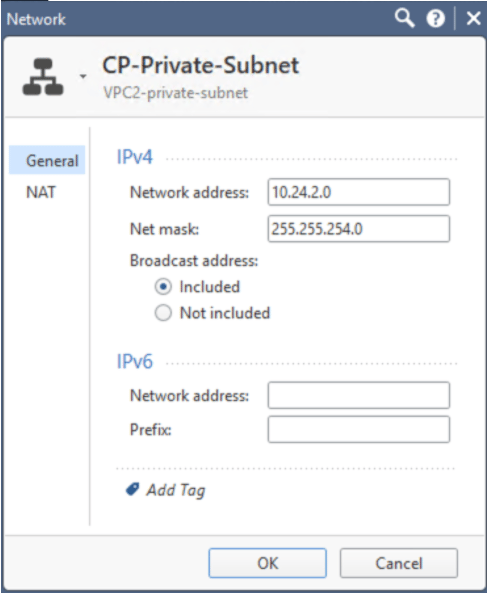 | **Field** | **Value** |
| -------------------- | ---------------------------------- |
| Name | Arbitrary (e.g. CP-Private-Subnet) |
| IPv4 Network Address | VPC2 private subnet CIDR |
| IPv4 Net mask | VPC2 private subnet mask |
3. Create one network for private subnet of VPC1 (Aviatrix Gateway VPC).
| **Field** | **Value** |
| -------------------- | ---------------------------------- |
| Name | Arbitrary (e.g. CP-Private-Subnet) |
| IPv4 Network Address | VPC2 private subnet CIDR |
| IPv4 Net mask | VPC2 private subnet mask |
3. Create one network for private subnet of VPC1 (Aviatrix Gateway VPC).
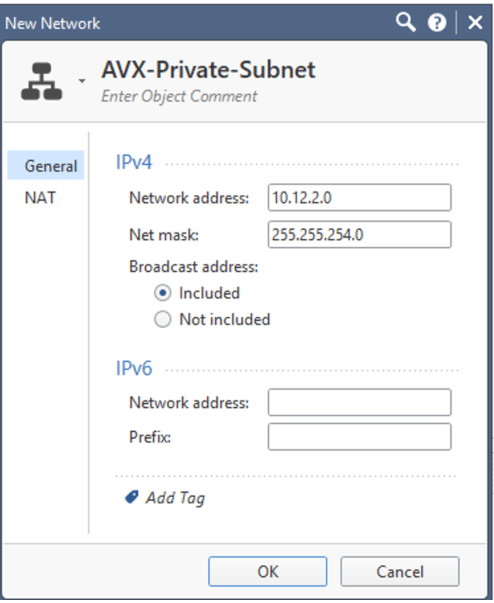 | **Field** | **Value** |
| -------------------- | ----------------------------------- |
| Name | Arbitrary (e.g. AVX-Private-Subnet) |
| IPv4 Network Address | VPC1 private subnet CIDR |
| IPv4 Net mask | VPC1 private subnet mask |
### Configuring Check Point Security Gateway with VPN
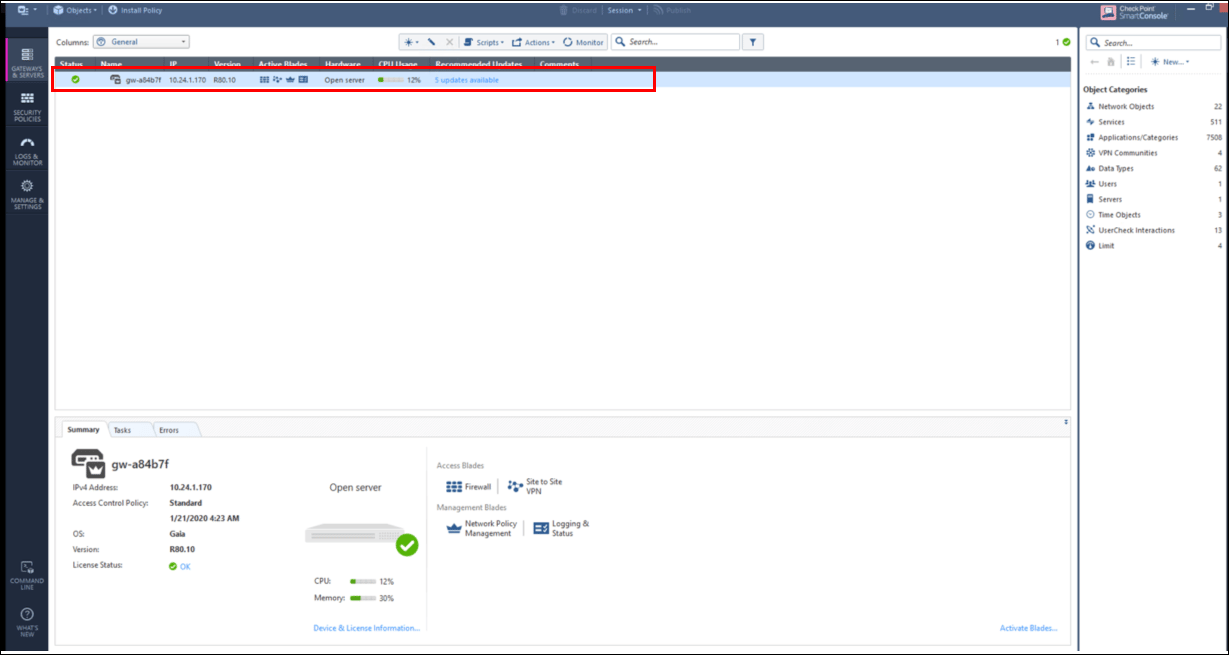
1. At the SmartDashboard window, go to **Gateways and services** > double-click
on the gateway.
| **Field** | **Value** |
| -------------------- | ----------------------------------- |
| Name | Arbitrary (e.g. AVX-Private-Subnet) |
| IPv4 Network Address | VPC1 private subnet CIDR |
| IPv4 Net mask | VPC1 private subnet mask |
### Configuring Check Point Security Gateway with VPN
1. At the SmartDashboard window, go to **Gateways and services** > double-click
on the gateway.
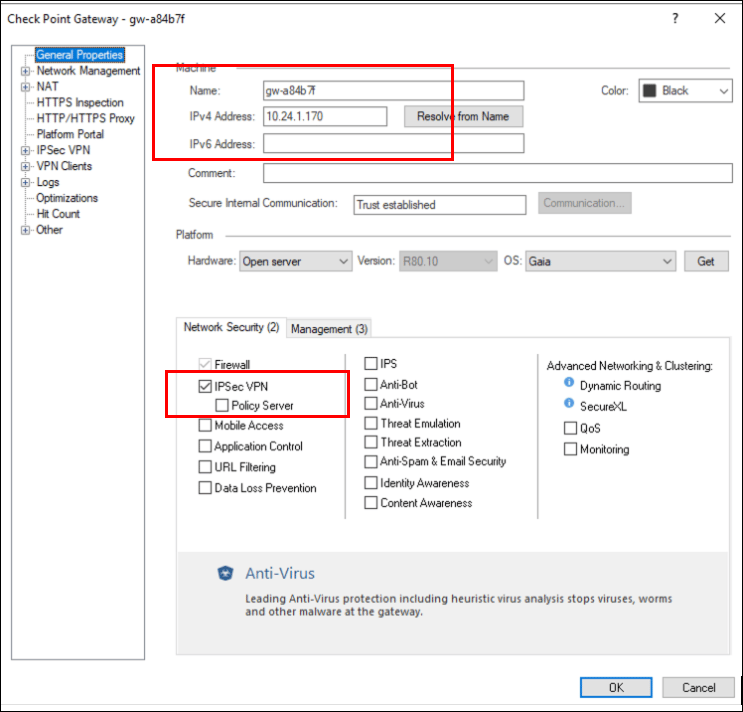
 2. Enter the private IP of the Check Point VM WAN port in the IPv4 address
field.
3. Under Network Security, select **IPsec VPN**.
2. Enter the private IP of the Check Point VM WAN port in the IPv4 address
field.
3. Under Network Security, select **IPsec VPN**.
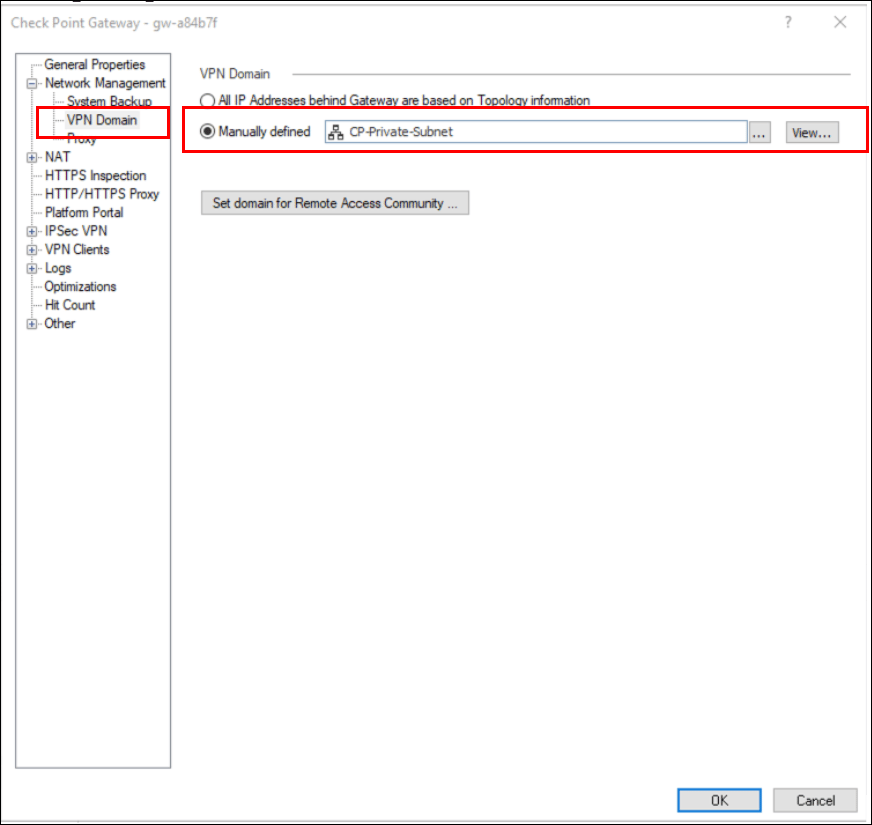
 4. Go to Network management > **VPN domain** > click **Manually defined** and
select the network created previously (see
[Creating Network Objects at SmartConsole](#creating-network-objects-at-smartconsole)
above).
4. Go to Network management > **VPN domain** > click **Manually defined** and
select the network created previously (see
[Creating Network Objects at SmartConsole](#creating-network-objects-at-smartconsole)
above).
 5. Go to Network management and double-click "eth0" (Check Point WAN port).
6. Select **External (leads out to the Internet)** and click **OK**.
7. Go to Network management and double-click "eth1" (Check Point LAN port).
8. Click on modify.
9. Select the following:
* **Override**
* **This network (internal)**
* **Specific**, and select the network created previously (see
[Creating Network Objects at SmartConsole](#creating-network-objects-at-smartconsole)
above).
10. Click **OK**.
11. Double-click on gateway as shown in step 1 above.
12. Select IPsec VPN in the left menu and then select the **Statically NATed
IP** radio button.
13. Next to this radio button, enter the public IP of the Check Point WAN port.
14. Double-click on the gateway as shown in step 1 above.
15. Select VPN Advanced in the left menu and ensure that **Use the community
settings** is selected.
16. Ensure that the **Support NAT traversal** checkbox is selected.
17. Click **OK**.
### Configuring an Interoperable Device to Represent Aviatrix Gateway
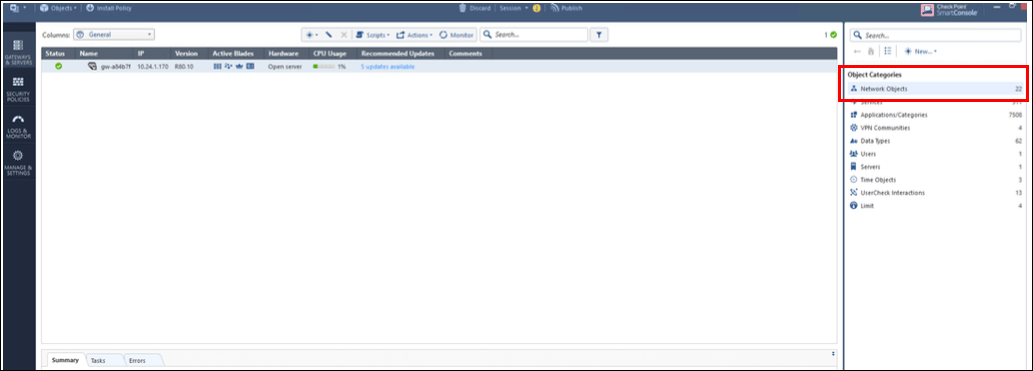
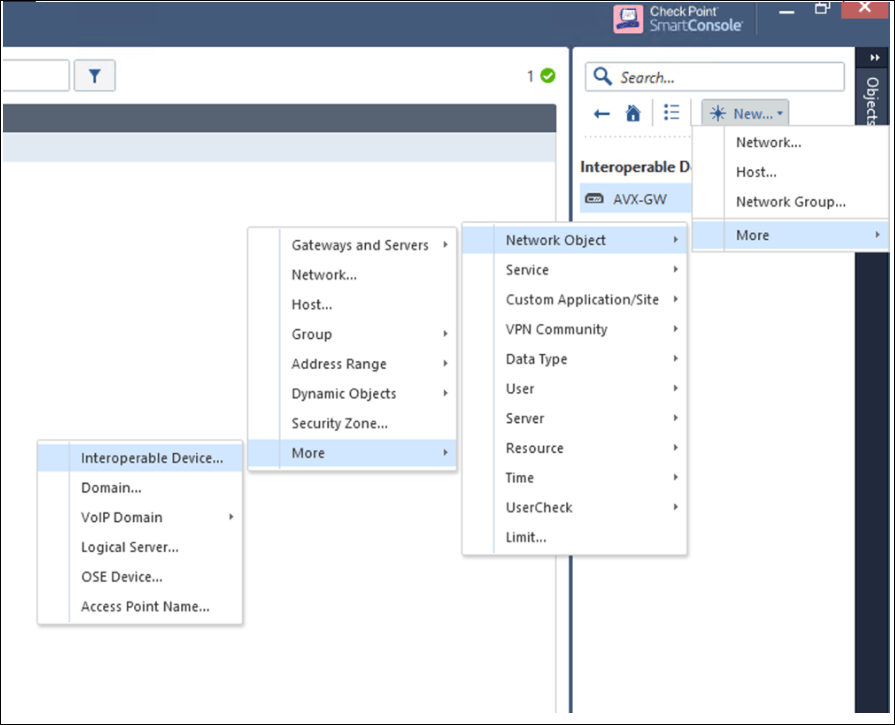
1. Go to Gateways and services > New network objects > Interoperable devices.
2. Click **Add new** and then use the image below to create a new interoperable
device to represent Aviatrix Gateway.
5. Go to Network management and double-click "eth0" (Check Point WAN port).
6. Select **External (leads out to the Internet)** and click **OK**.
7. Go to Network management and double-click "eth1" (Check Point LAN port).
8. Click on modify.
9. Select the following:
* **Override**
* **This network (internal)**
* **Specific**, and select the network created previously (see
[Creating Network Objects at SmartConsole](#creating-network-objects-at-smartconsole)
above).
10. Click **OK**.
11. Double-click on gateway as shown in step 1 above.
12. Select IPsec VPN in the left menu and then select the **Statically NATed
IP** radio button.
13. Next to this radio button, enter the public IP of the Check Point WAN port.
14. Double-click on the gateway as shown in step 1 above.
15. Select VPN Advanced in the left menu and ensure that **Use the community
settings** is selected.
16. Ensure that the **Support NAT traversal** checkbox is selected.
17. Click **OK**.
### Configuring an Interoperable Device to Represent Aviatrix Gateway
1. Go to Gateways and services > New network objects > Interoperable devices.
2. Click **Add new** and then use the image below to create a new interoperable
device to represent Aviatrix Gateway.
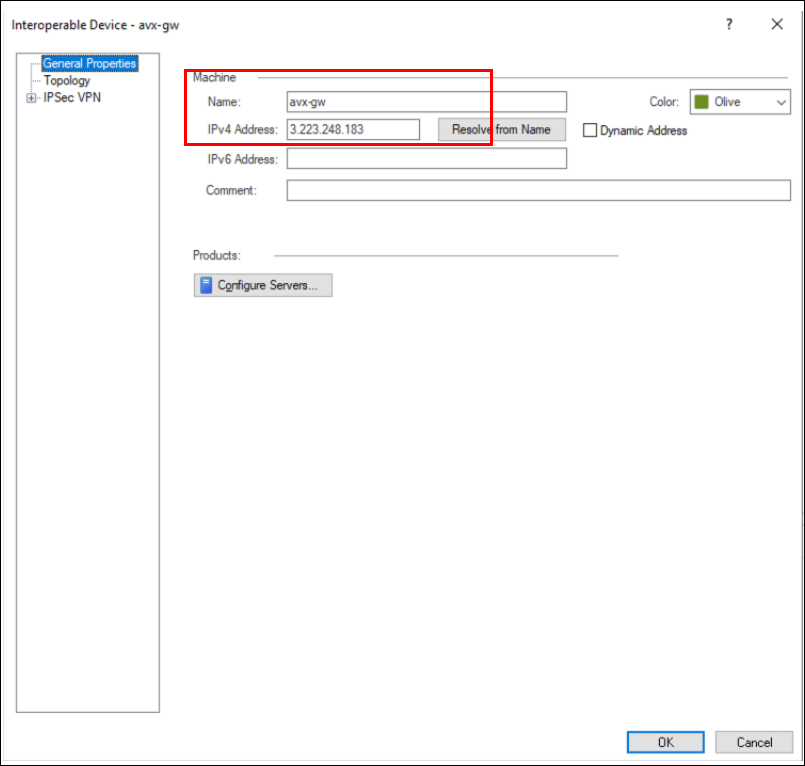
 3. Double-click on Interoperable device > avx-gwv (created in step 1 of this
section) > General properties. The IPv4 address will be the public IP of the
Aviatrix Gateway.
3. Double-click on Interoperable device > avx-gwv (created in step 1 of this
section) > General properties. The IPv4 address will be the public IP of the
Aviatrix Gateway.
 4. Double-click on Interoperable device > avx-gwv (created in step 1 in this
section).
5. Select Topology in the left menu and select the **Manually defined** radio
button.
6. In the field next to the radio button, select the network for the private
subnet of the VPC1 (Aviatrix Gateway VPC) network created above.
7. Click **OK**.
8. Double-click on Interoperable device > avx-gwv (created in step 1 of this
section.
9. Click Link Selection under IPsec VPN in the left menu and then select the
**Always use this IP address** and **Main address** radio buttons.
10. Click **OK**.
11. Double-click on Interoperable device > avx-gwv (created in step 1 of this
section).
12. Select VPN Advanced under IPsec VPN in the left menu.
13. Select **Use the community settings** and click **OK**.
### Creating a VPN Community
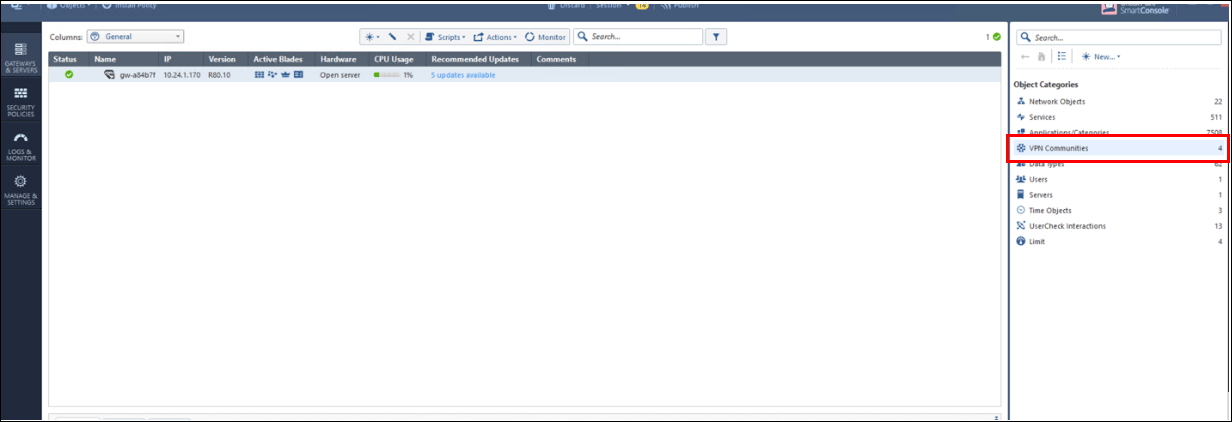
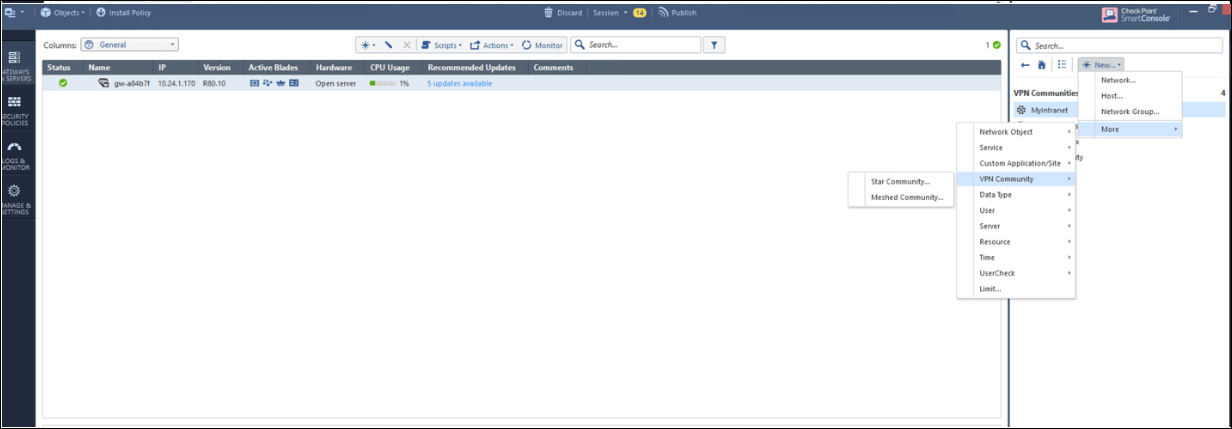
1. Click on VPN communities on the smart console. Then, create a Star Community
as shown below.
4. Double-click on Interoperable device > avx-gwv (created in step 1 in this
section).
5. Select Topology in the left menu and select the **Manually defined** radio
button.
6. In the field next to the radio button, select the network for the private
subnet of the VPC1 (Aviatrix Gateway VPC) network created above.
7. Click **OK**.
8. Double-click on Interoperable device > avx-gwv (created in step 1 of this
section.
9. Click Link Selection under IPsec VPN in the left menu and then select the
**Always use this IP address** and **Main address** radio buttons.
10. Click **OK**.
11. Double-click on Interoperable device > avx-gwv (created in step 1 of this
section).
12. Select VPN Advanced under IPsec VPN in the left menu.
13. Select **Use the community settings** and click **OK**.
### Creating a VPN Community
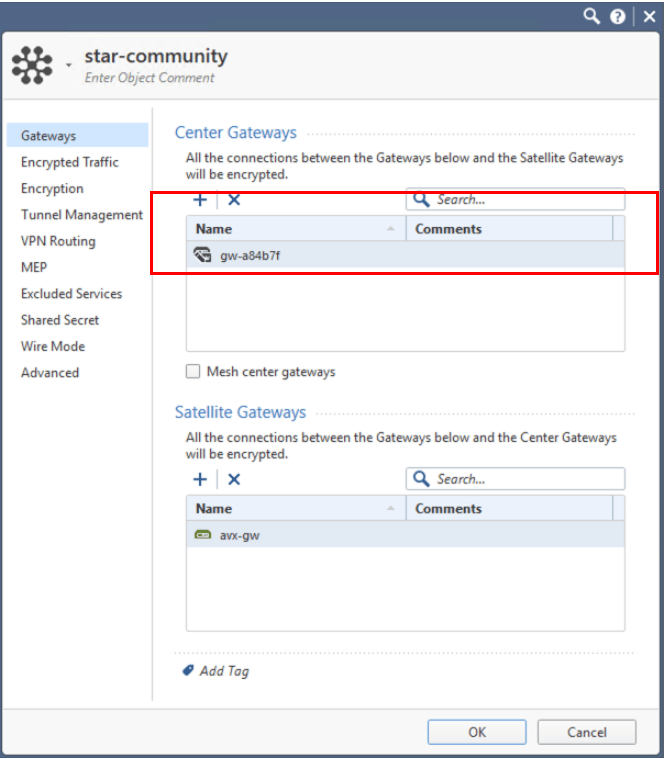
1. Click on VPN communities on the smart console. Then, create a Star Community
as shown below.
 2. After creating the VPN community, double-click on the created VPN
community > Gateway tab.
3. In the star-community dialog, select the gateway created above (see
[Configuring Check Point Security Gateway with VPN](#configuring-check-point-security-gateway-with-vpn)).
2. After creating the VPN community, double-click on the created VPN
community > Gateway tab.
3. In the star-community dialog, select the gateway created above (see
[Configuring Check Point Security Gateway with VPN](#configuring-check-point-security-gateway-with-vpn)).
 4. Click **OK**.
5. Double-click on the created VPN community and then select Encryption in the
left menu.
6. Select the options according to the Site2Cloud configuration downloaded
previously (see
[Creating an External Connection](#creating-an-external-connection) above).
7. Click **OK**.
8. Double-click on the created VPN community and then select Tunnel management
in the left menu.
9. Select **Set Permanent Tunnels** / **On all tunnels in the community**.
10. Select the **One VPN tunnel per Gateway pair** radio button.
11. Click **OK**.
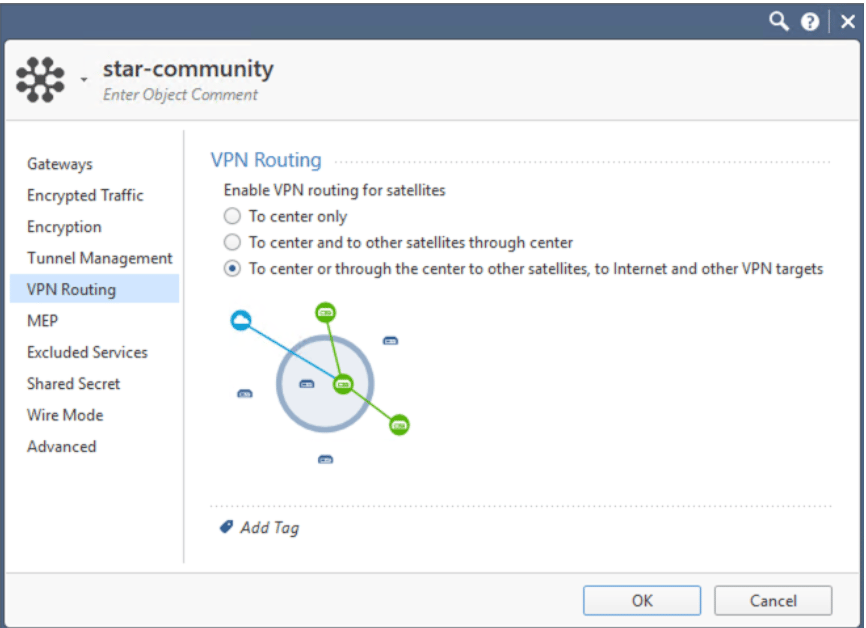
12. Double-click on created VPN community > VPN routing > select as shown in the
image below.
4. Click **OK**.
5. Double-click on the created VPN community and then select Encryption in the
left menu.
6. Select the options according to the Site2Cloud configuration downloaded
previously (see
[Creating an External Connection](#creating-an-external-connection) above).
7. Click **OK**.
8. Double-click on the created VPN community and then select Tunnel management
in the left menu.
9. Select **Set Permanent Tunnels** / **On all tunnels in the community**.
10. Select the **One VPN tunnel per Gateway pair** radio button.
11. Click **OK**.
12. Double-click on created VPN community > VPN routing > select as shown in the
image below.
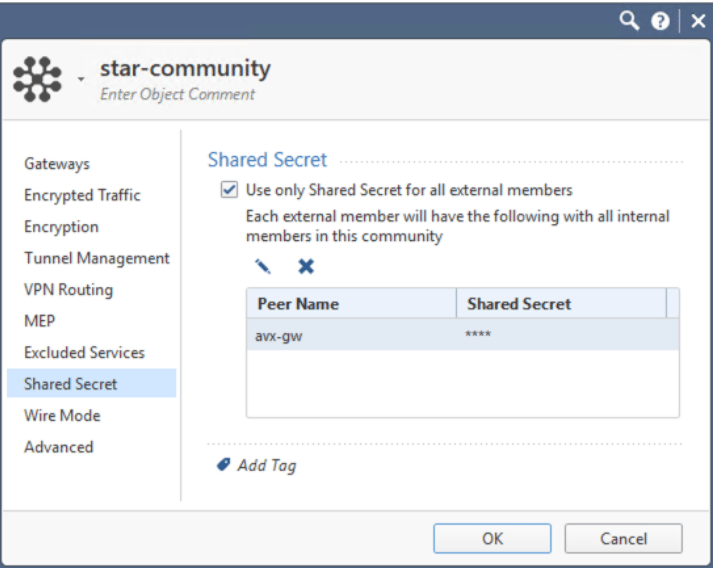
 13. Double-click on the created VPN community. In the left menu select Shared
Secret.
14. Enter the Shared Secret by copying the Pre-Shared Key from the Site2Cloud
configuration downloaded previously (see
[Creating an External Connection](#creating-an-external-connection) above).
13. Double-click on the created VPN community. In the left menu select Shared
Secret.
14. Enter the Shared Secret by copying the Pre-Shared Key from the Site2Cloud
configuration downloaded previously (see
[Creating an External Connection](#creating-an-external-connection) above).
 15. Click **OK**.
16. Double-click on the created VPN community.
17. In the left menu select Advanced.
18. Enter the Phase1 and Phase2 parameters according to the Site2Cloud
configuration downloaded previously (see
[Creating an External Connection](#creating-an-external-connection) above).
19. Click **OK**.
### Creating Firewall Rule for VPN Traffic
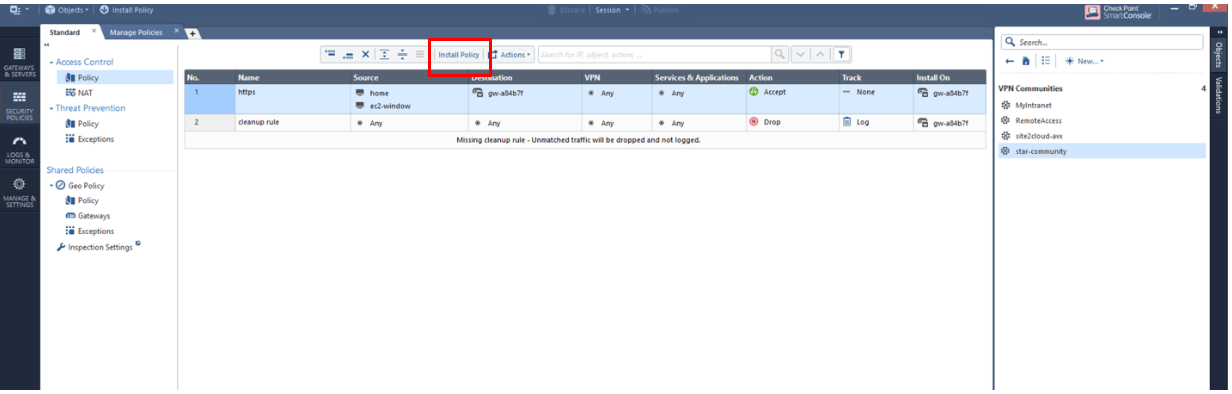
1. Go to security and policies. Add a policy and click **Install Policy**.
15. Click **OK**.
16. Double-click on the created VPN community.
17. In the left menu select Advanced.
18. Enter the Phase1 and Phase2 parameters according to the Site2Cloud
configuration downloaded previously (see
[Creating an External Connection](#creating-an-external-connection) above).
19. Click **OK**.
### Creating Firewall Rule for VPN Traffic
1. Go to security and policies. Add a policy and click **Install Policy**.
 ### Troubleshooting and Verifying at Check Point Security Gateway
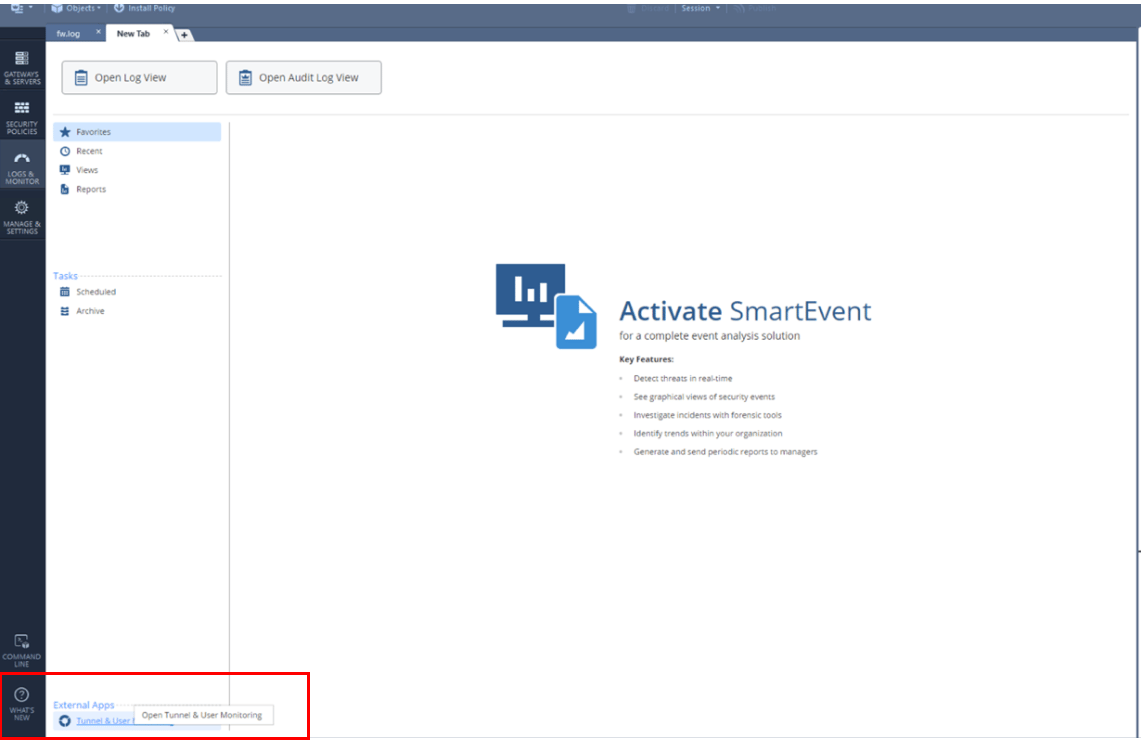
1. Go to **Logs and monitor** and dd a new tab.
2. Click **Open Tunnel & User Monitoring**.
### Troubleshooting and Verifying at Check Point Security Gateway
1. Go to **Logs and monitor** and dd a new tab.
2. Click **Open Tunnel & User Monitoring**.
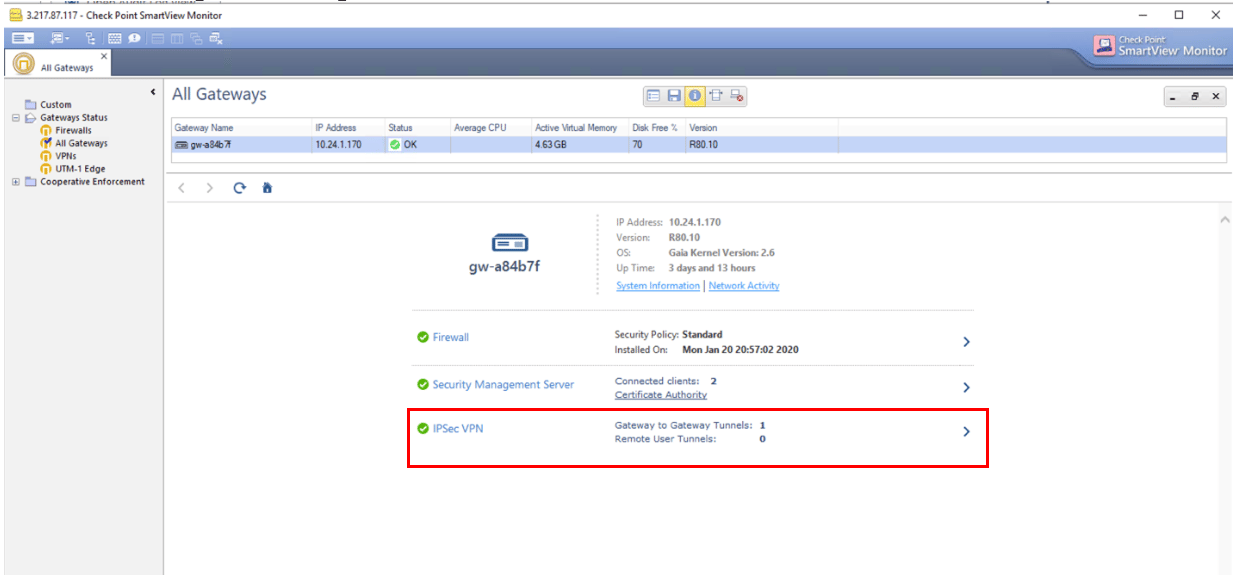
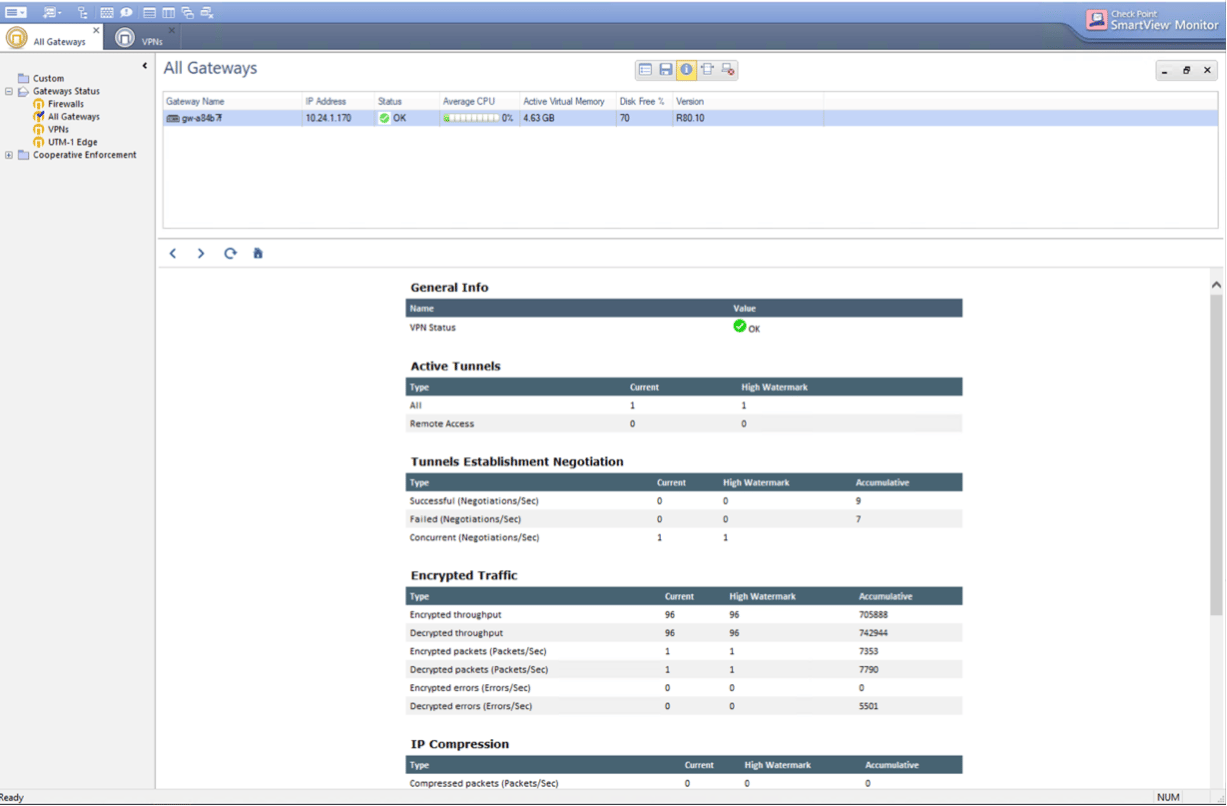
 3. Click **IPsec VPN** to see the tunnel status.
 ### Verifying the Connection Status
In CoPilot, go to the Diagnostics > Cloud Routes > External Connections tab to
confirm the Status and Tunnel Status of the external connection.
### Troubleshooting
You can use the Diagnostic Tools (under Diagnostics in the left navigation menu)
to troubleshoot any connection issues.
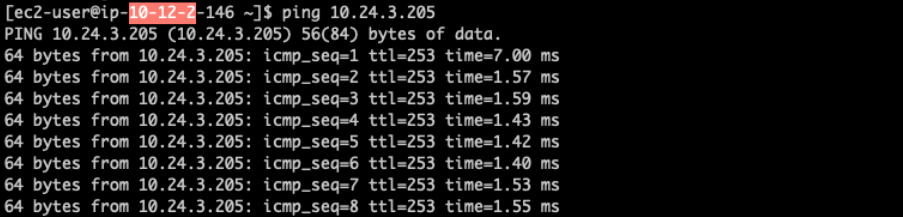
Below is the sample output for ping from an instance in the Aviatrix private
subnet to an instance in the Check Point private subnet.
### Verifying the Connection Status
In CoPilot, go to the Diagnostics > Cloud Routes > External Connections tab to
confirm the Status and Tunnel Status of the external connection.
### Troubleshooting
You can use the Diagnostic Tools (under Diagnostics in the left navigation menu)
to troubleshoot any connection issues.
Below is the sample output for ping from an instance in the Aviatrix private
subnet to an instance in the Check Point private subnet.
 ## Related Topics
* About External Connection Settings
* Aviatrix Gateway to Check Point(R77.30)
* Aviatrix Gateway to Cisco ASA
## Related Topics
* About External Connection Settings
* Aviatrix Gateway to Check Point(R77.30)
* Aviatrix Gateway to Cisco ASA