> ## Documentation Index
> Fetch the complete documentation index at: https://docs.aviatrix.com/llms.txt
> Use this file to discover all available pages before exploring further.
# Aviatrix Gateway to AWS Virtual Private Gateway (VGW)
> This section describes how to configure an IPsec tunnel between an Aviatrix Gateway and an AWS VGW.
This section describes how to configure an IPsec tunnel between an Aviatrix
Gateway and an AWS VGW.
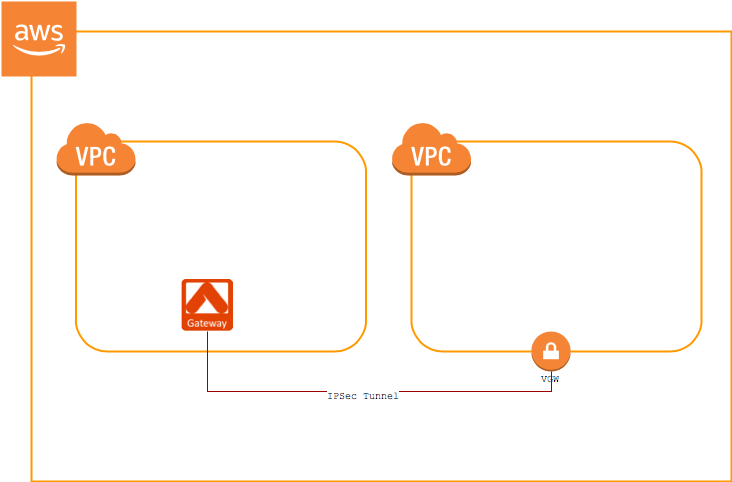 For this use case, you will first configure the AWS VGW VPN connection, and then
download the configuration from AWS and import it into Aviatrix.
## Create the Customer Gateway
**Prerequisites**
1. You have a VGW created and attached to a VPC.
2. You have an Aviatrix Gateway provisioned in a different VPC. You will need
this gateway's public IP address for the steps below.
You have the option of adding a High Availability (HA) instance when you create
your Aviatrix Gateway.
1. Log in to your [VPC Dashboard](https://console.aws.amazon.com/vpc/home) in
the region where your VGW is located.
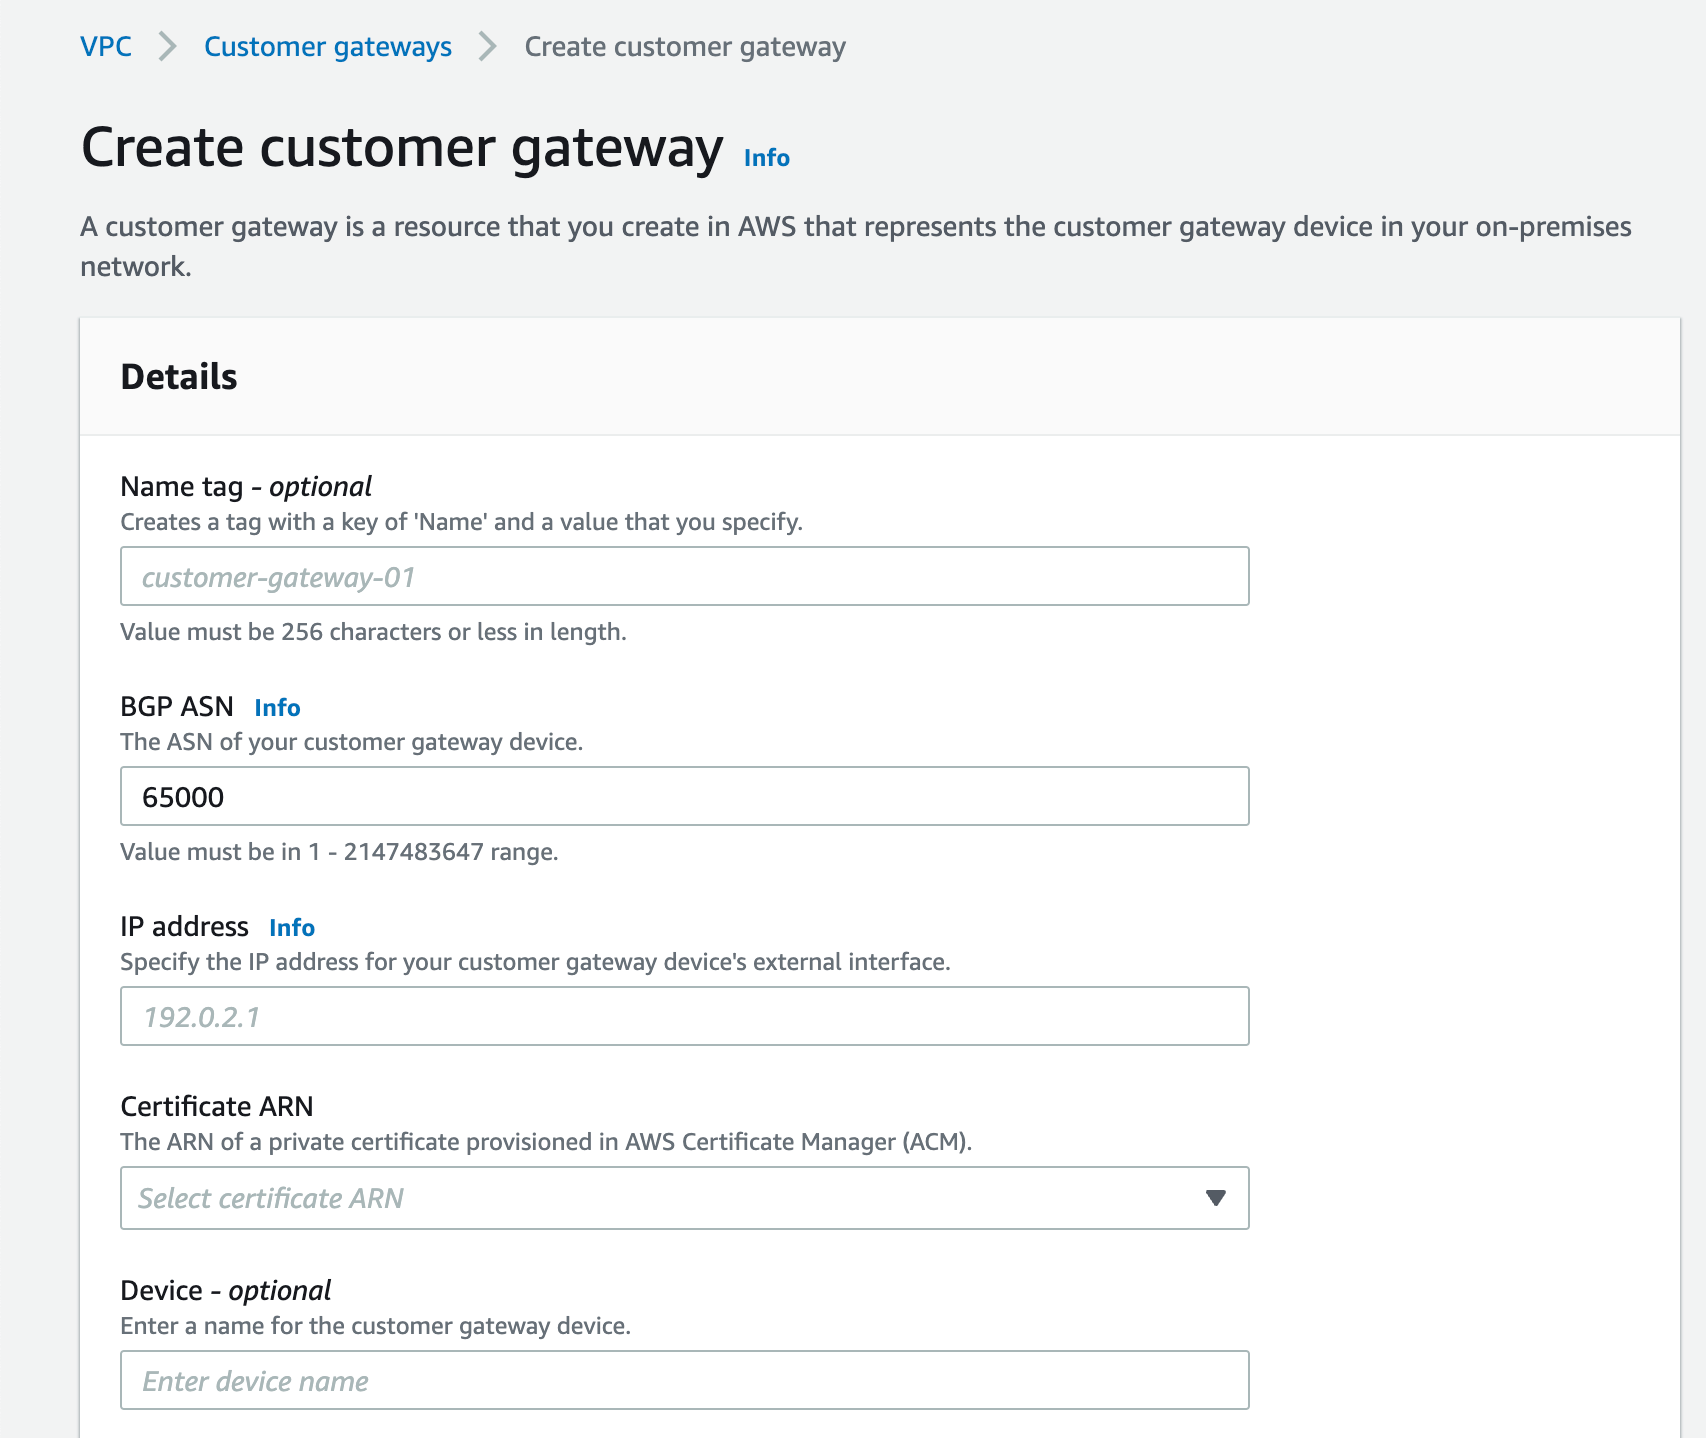
2. Create a new
[Customer Gateway](https://console.aws.amazon.com/vpc/home#CreateCustomerGateway).
In the IP address field, enter the public IP address of the Aviatrix Gateway.
For this use case, you will first configure the AWS VGW VPN connection, and then
download the configuration from AWS and import it into Aviatrix.
## Create the Customer Gateway
**Prerequisites**
1. You have a VGW created and attached to a VPC.
2. You have an Aviatrix Gateway provisioned in a different VPC. You will need
this gateway's public IP address for the steps below.
You have the option of adding a High Availability (HA) instance when you create
your Aviatrix Gateway.
1. Log in to your [VPC Dashboard](https://console.aws.amazon.com/vpc/home) in
the region where your VGW is located.
2. Create a new
[Customer Gateway](https://console.aws.amazon.com/vpc/home#CreateCustomerGateway).
In the IP address field, enter the public IP address of the Aviatrix Gateway.
 ## Create a VPN Connection
1. Create a
[VPN Connection](https://console.aws.amazon.com/vpc/home#CreateVpnConnection:).
## Create a VPN Connection
1. Create a
[VPN Connection](https://console.aws.amazon.com/vpc/home#CreateVpnConnection:).
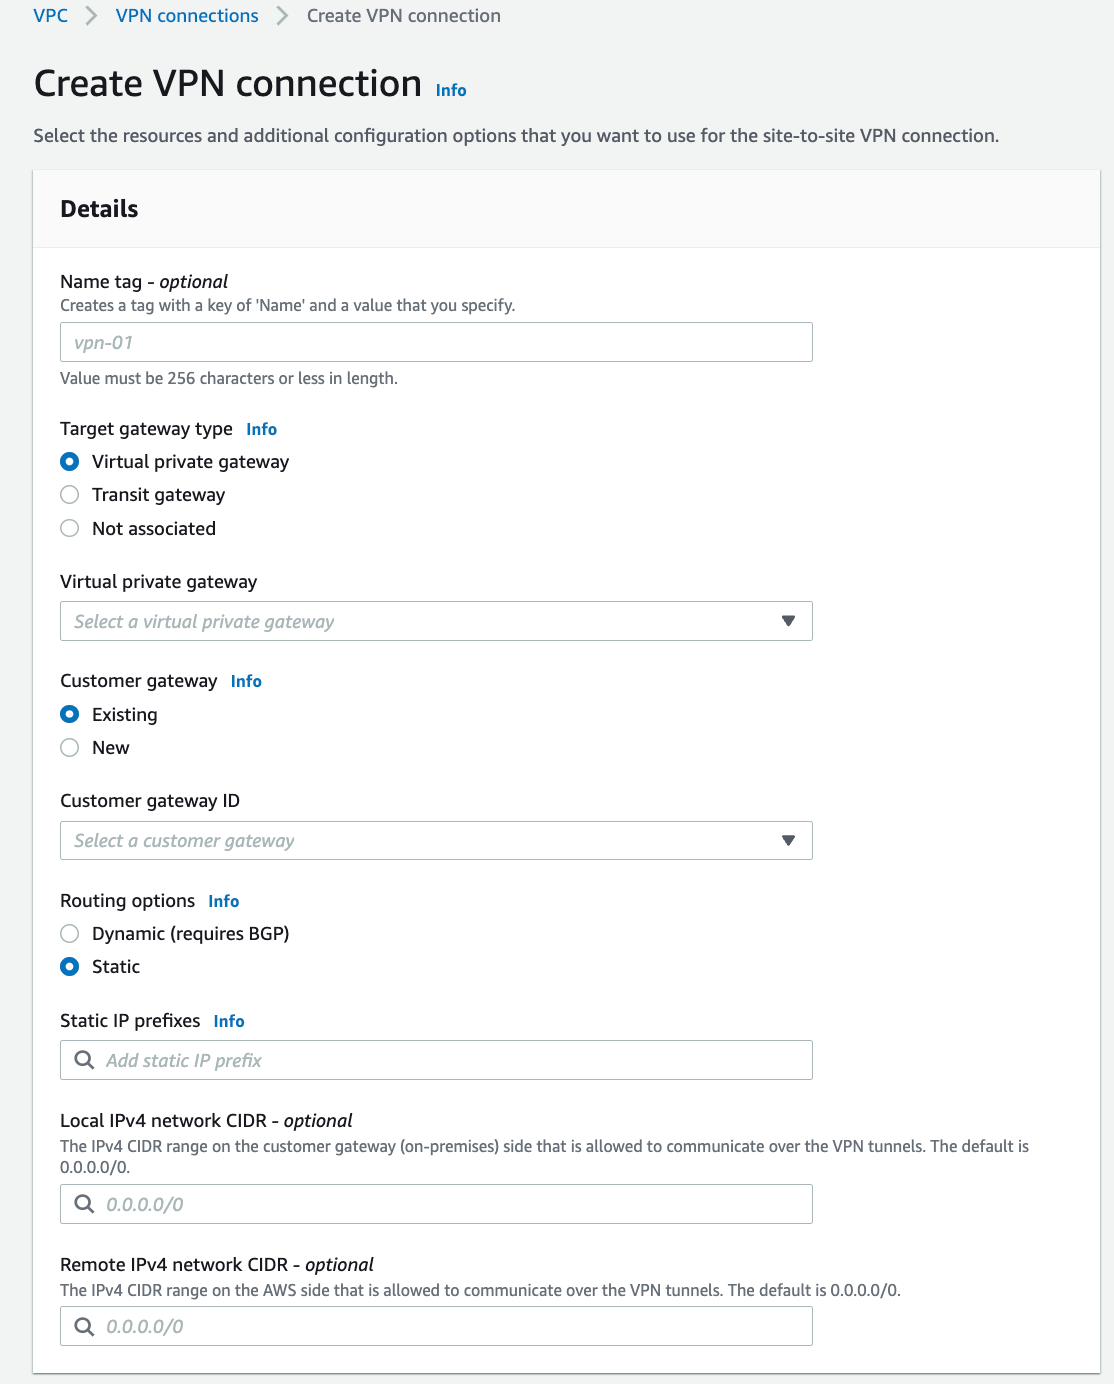 | Field | Description |
| ------------------- | -------------------------------------------------------------------------------------- |
| Name | Enter any name here |
| Target gateway type | Select Virtual private gateway |
| Customer Gateway | Select **Existing** and then select the gateway you created in the previous procedure. |
| Routing Options | Select **Static** |
| Static IP Prefixes | Enter the CIDR(s) of the VPC where the Aviatrix Gateway resides. |
2. You can leave the Tunnel 1 and 2 options as their defaults. Click **Create
VPN connection**.
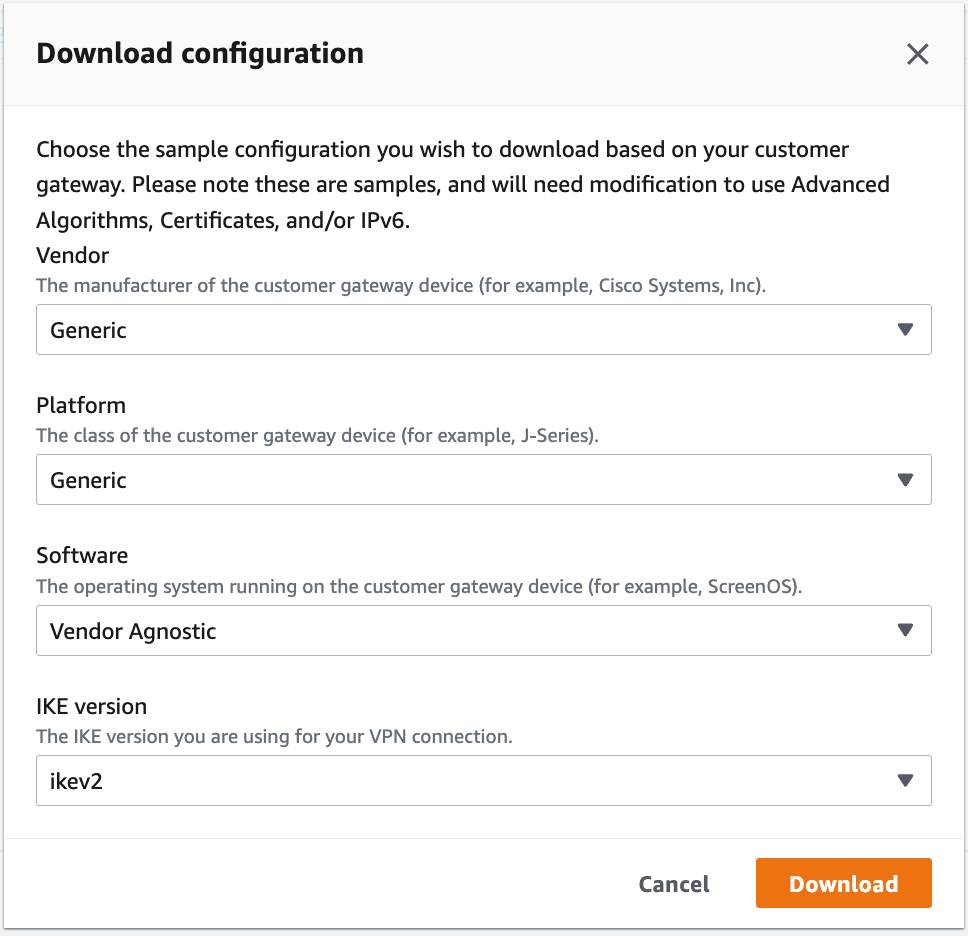
3. Select the VPN you just created and click **Download Configuration**.
| Field | Description |
| ------------------- | -------------------------------------------------------------------------------------- |
| Name | Enter any name here |
| Target gateway type | Select Virtual private gateway |
| Customer Gateway | Select **Existing** and then select the gateway you created in the previous procedure. |
| Routing Options | Select **Static** |
| Static IP Prefixes | Enter the CIDR(s) of the VPC where the Aviatrix Gateway resides. |
2. You can leave the Tunnel 1 and 2 options as their defaults. Click **Create
VPN connection**.
3. Select the VPN you just created and click **Download Configuration**.
 4. At the dialog, select **Generic** for the Vendor, **Generic** for the
Platform and **Vendor Agnostic** for the Software.
5. Click **Download**. You will use this file to create the other side of the
tunnel.
4. At the dialog, select **Generic** for the Vendor, **Generic** for the
Platform and **Vendor Agnostic** for the Software.
5. Click **Download**. You will use this file to create the other side of the
tunnel.
 ## Configure the External Connection
1. Log in to CoPilot and go to Networking > Connectivity > External Connection.
2. Click **+External Connection**.
3. Follow the steps in one of these documents to create an Unmapped connection
to an AWS TGW Remote Gateway:
* [Static Route-Based](https://legacy.docs.aviatrix.com/documentation/latest/network/external-connection-create-static-route-based-unmapped.html)
* [Static Policy-Based](https://legacy.docs.aviatrix.com/documentation/latest/network/external-connection-create-static-policy-based-unmapped.html)
When creating this external connection, do the following:
* Ensure that the Algorithms checkbox is selected.
* Select the **Generic** Remote Device Type. Any other Remote Devices listed
here are only valid with Controller version 6.7 or lower.
4. Enter the following values when configuring the external connection (make
sure you have the downloaded configuration file from the previous section
available):
* Remote Subnet CIDR(s): This is usually the the Spoke VPC that on-prem wants to
reach (in this example, 10.20.0.0/20)
* Pre-Shared Key: Enter the value that matches the value from #1: Internet Key
Exchange Configuration > Pre-Shared Key from the downloaded configuration file
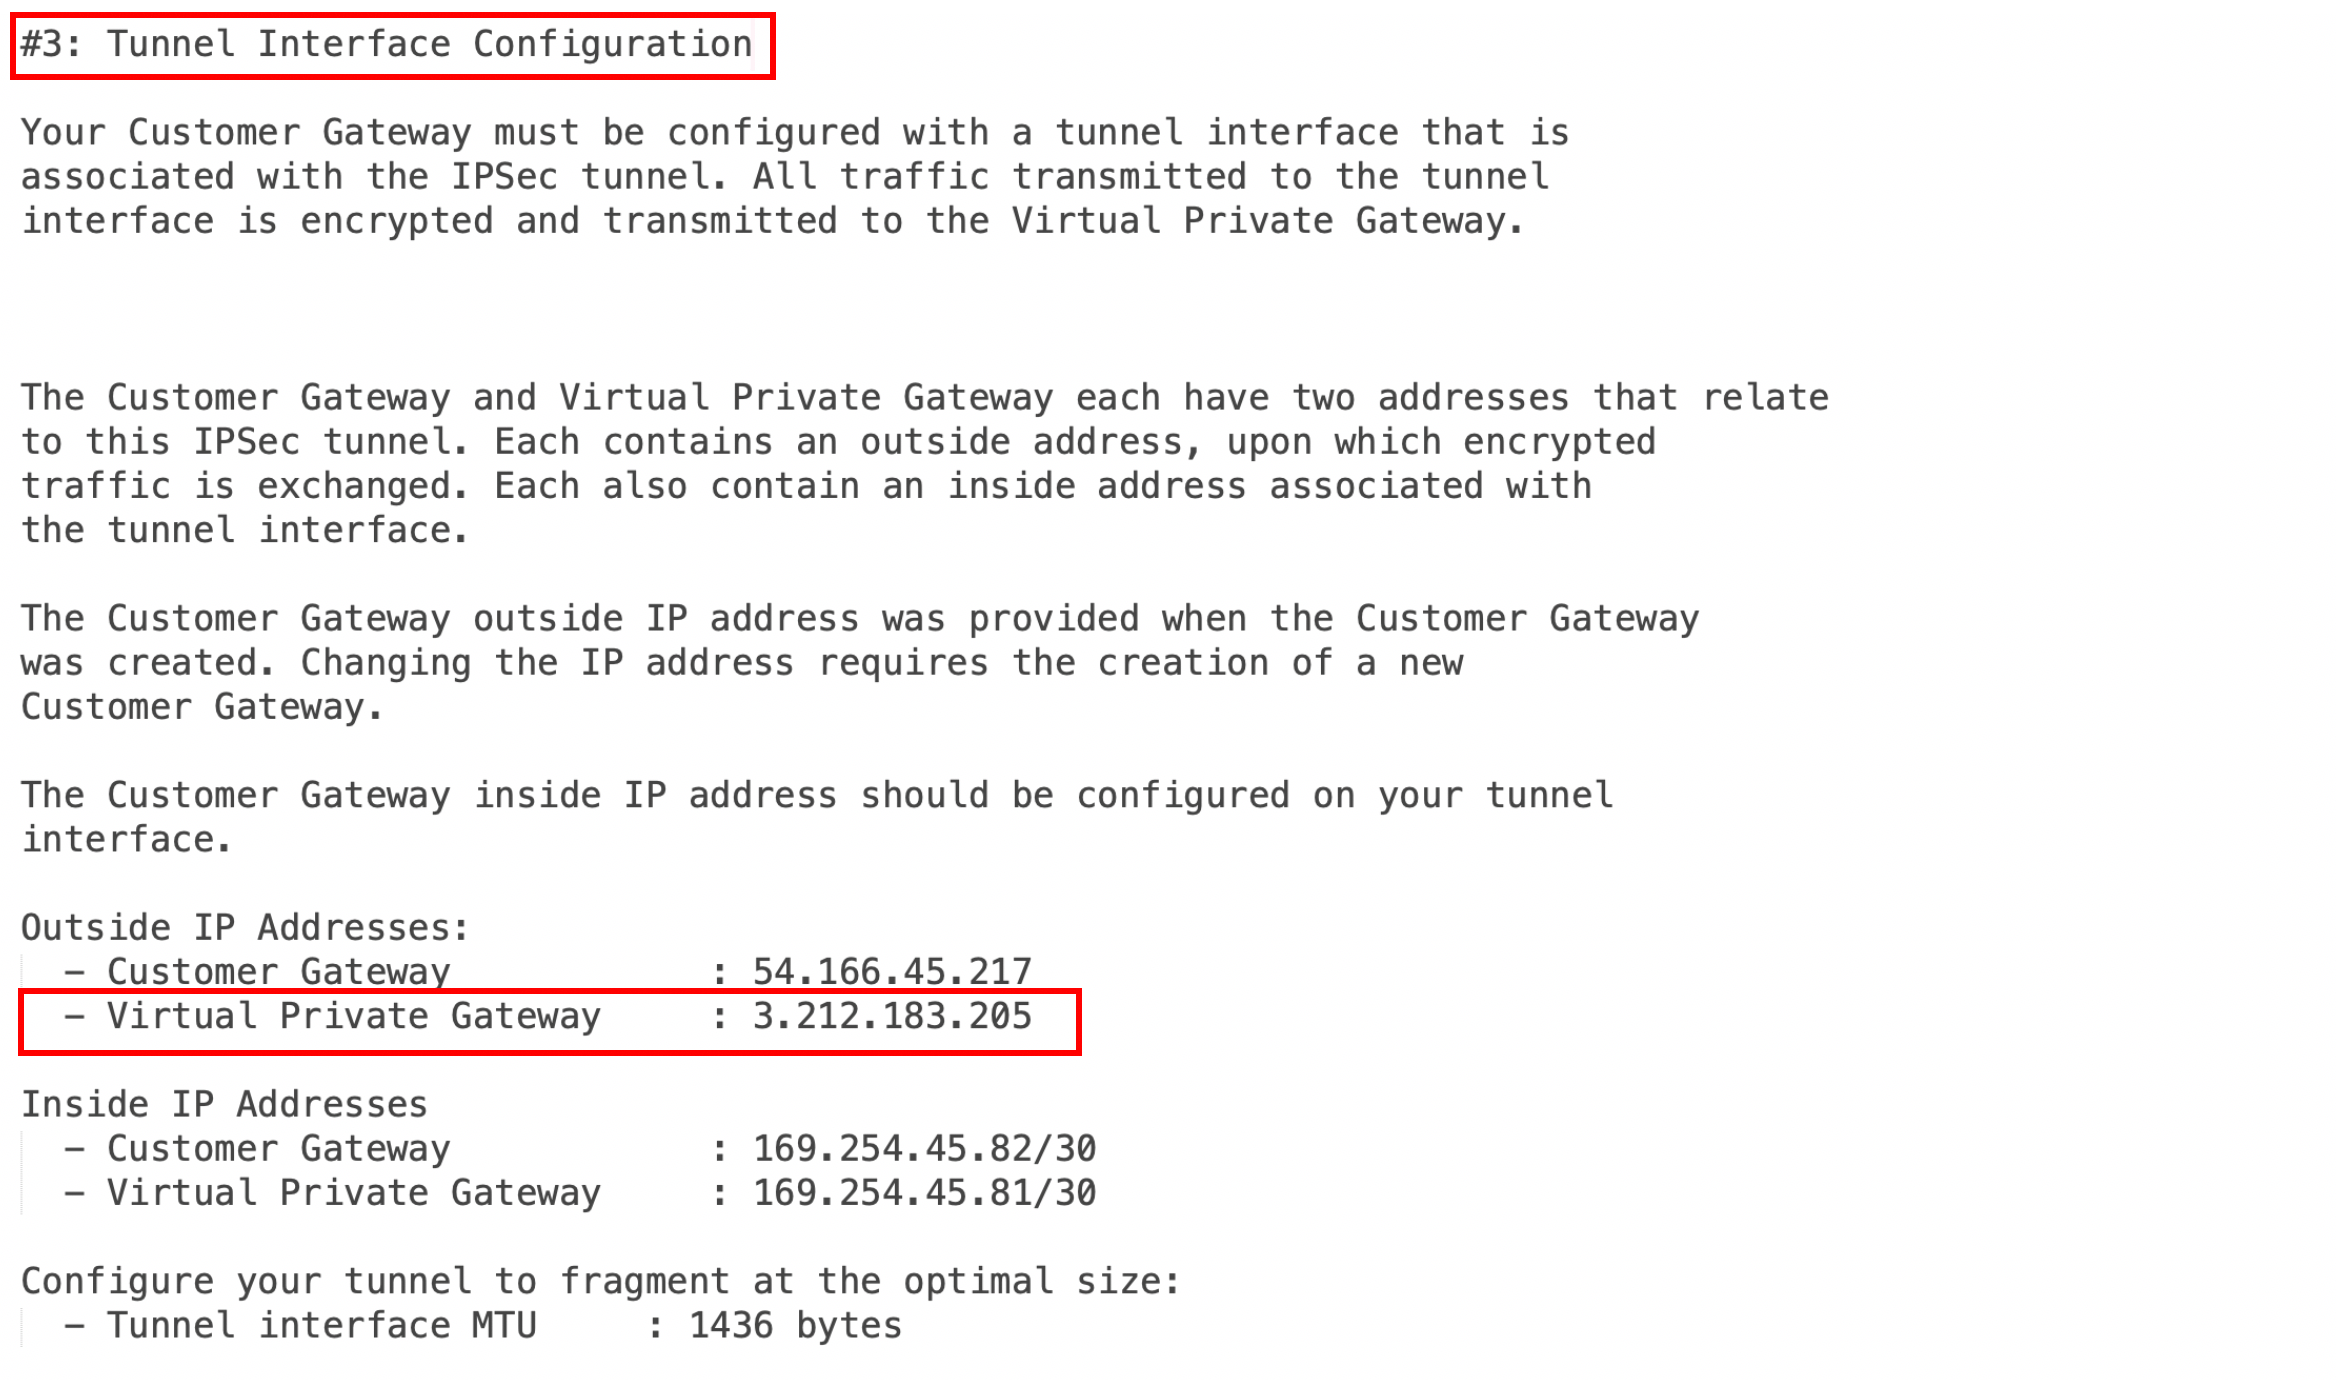
* Remote Device IP: Enter the value that matches #3: Tunnel Interface
Configuration > Outside IP Addresses > Virtual Private Gateway from the
downloaded file (in this example, 3.212.183.205)
## Configure the External Connection
1. Log in to CoPilot and go to Networking > Connectivity > External Connection.
2. Click **+External Connection**.
3. Follow the steps in one of these documents to create an Unmapped connection
to an AWS TGW Remote Gateway:
* [Static Route-Based](https://legacy.docs.aviatrix.com/documentation/latest/network/external-connection-create-static-route-based-unmapped.html)
* [Static Policy-Based](https://legacy.docs.aviatrix.com/documentation/latest/network/external-connection-create-static-policy-based-unmapped.html)
When creating this external connection, do the following:
* Ensure that the Algorithms checkbox is selected.
* Select the **Generic** Remote Device Type. Any other Remote Devices listed
here are only valid with Controller version 6.7 or lower.
4. Enter the following values when configuring the external connection (make
sure you have the downloaded configuration file from the previous section
available):
* Remote Subnet CIDR(s): This is usually the the Spoke VPC that on-prem wants to
reach (in this example, 10.20.0.0/20)
* Pre-Shared Key: Enter the value that matches the value from #1: Internet Key
Exchange Configuration > Pre-Shared Key from the downloaded configuration file
* Remote Device IP: Enter the value that matches #3: Tunnel Interface
Configuration > Outside IP Addresses > Virtual Private Gateway from the
downloaded file (in this example, 3.212.183.205)
 ## Testing the Connection
Once complete, you can check the tunnel status at Diagnostics > Cloud Routes >
External Connections.
## Troubleshooting
If the tunnel does not come up within the expected time frame, you can check the
IP addresses to confirm that they are accurate.
Additional troubleshooting is available under Diagnostics > Diagnostic Tools.
## Appendix: Enable HA
You can enable HA for Aviatrix Site2Cloud connection to AWS VGW. Please add the
following extra steps to the configuration.
### Creating an Aviatrix HA Gateway
Before creating a Site2Cloud connection, make sure that you
add an HA instance when creating your Aviatrix Gateway
.
### Creating a VPN Connection Between VGW and the Aviatrix HA Gateway
Follow the steps from
[Create the Customer Gateway](#create-the-customer-gateway) above.
The only differences are:
* When you create the Customer Gateway, enter the Aviatrix HA gateway public IP
* When you create the VPN connection:
* Select the same VGW used for the primary VPN connection
* Select the customer gateway you just created for HA
* Enter the CIDR(s) of the VPC where the HA Aviatrix Gateway resides under
Static IP Prefixes
Download the configuration for this new VPN connection just like you did earlier
for the primary VPN connection.
### Create Aviatrix Site2Cloud Connection with HA
In CoPilot, go to Networking > Connectivity > External Connections (S2C) and add
a new external connection. Add an instance for HA.
Additional fields are displayed when checked.
You need the information from the downloaded VPN configuration file to
configure the external connection between the AWS VPN and the Aviatrix HA
Gateway. Follow the same steps you did for the primary connection.
| Field | Description |
| --------------------------------- | ------------------------------------------------------------------------------------------------------------------------------- |
| Backup Gateway | Select the Aviatrix HA Gateway you just created |
| Remote Device IP Address (Backup) | Enter the value that matches the value from #3: Tunnel Interface Configuration > Outside IP Addresses > Virtual Private Gateway |
| Pre-shared Key (Backup) | Enter the value that matches the value #1: Internet Key Exchange Configuration > Pre-Shared Key |
Other fields should be filled as instructed in above section
[Configure the External Connection](#configure-the-external-connection).
## Related Topics
* [External Device Settings](https://legacy.docs.aviatrix.com/documentation/latest/network/externaldevice-settings.html)
## Testing the Connection
Once complete, you can check the tunnel status at Diagnostics > Cloud Routes >
External Connections.
## Troubleshooting
If the tunnel does not come up within the expected time frame, you can check the
IP addresses to confirm that they are accurate.
Additional troubleshooting is available under Diagnostics > Diagnostic Tools.
## Appendix: Enable HA
You can enable HA for Aviatrix Site2Cloud connection to AWS VGW. Please add the
following extra steps to the configuration.
### Creating an Aviatrix HA Gateway
Before creating a Site2Cloud connection, make sure that you
add an HA instance when creating your Aviatrix Gateway
.
### Creating a VPN Connection Between VGW and the Aviatrix HA Gateway
Follow the steps from
[Create the Customer Gateway](#create-the-customer-gateway) above.
The only differences are:
* When you create the Customer Gateway, enter the Aviatrix HA gateway public IP
* When you create the VPN connection:
* Select the same VGW used for the primary VPN connection
* Select the customer gateway you just created for HA
* Enter the CIDR(s) of the VPC where the HA Aviatrix Gateway resides under
Static IP Prefixes
Download the configuration for this new VPN connection just like you did earlier
for the primary VPN connection.
### Create Aviatrix Site2Cloud Connection with HA
In CoPilot, go to Networking > Connectivity > External Connections (S2C) and add
a new external connection. Add an instance for HA.
Additional fields are displayed when checked.
You need the information from the downloaded VPN configuration file to
configure the external connection between the AWS VPN and the Aviatrix HA
Gateway. Follow the same steps you did for the primary connection.
| Field | Description |
| --------------------------------- | ------------------------------------------------------------------------------------------------------------------------------- |
| Backup Gateway | Select the Aviatrix HA Gateway you just created |
| Remote Device IP Address (Backup) | Enter the value that matches the value from #3: Tunnel Interface Configuration > Outside IP Addresses > Virtual Private Gateway |
| Pre-shared Key (Backup) | Enter the value that matches the value #1: Internet Key Exchange Configuration > Pre-Shared Key |
Other fields should be filled as instructed in above section
[Configure the External Connection](#configure-the-external-connection).
## Related Topics
* [External Device Settings](https://legacy.docs.aviatrix.com/documentation/latest/network/externaldevice-settings.html)