> ## Documentation Index
> Fetch the complete documentation index at: https://docs.aviatrix.com/llms.txt
> Use this file to discover all available pages before exploring further.
# Accessing a Virtual IP Address Instance via Aviatrix Transit Network
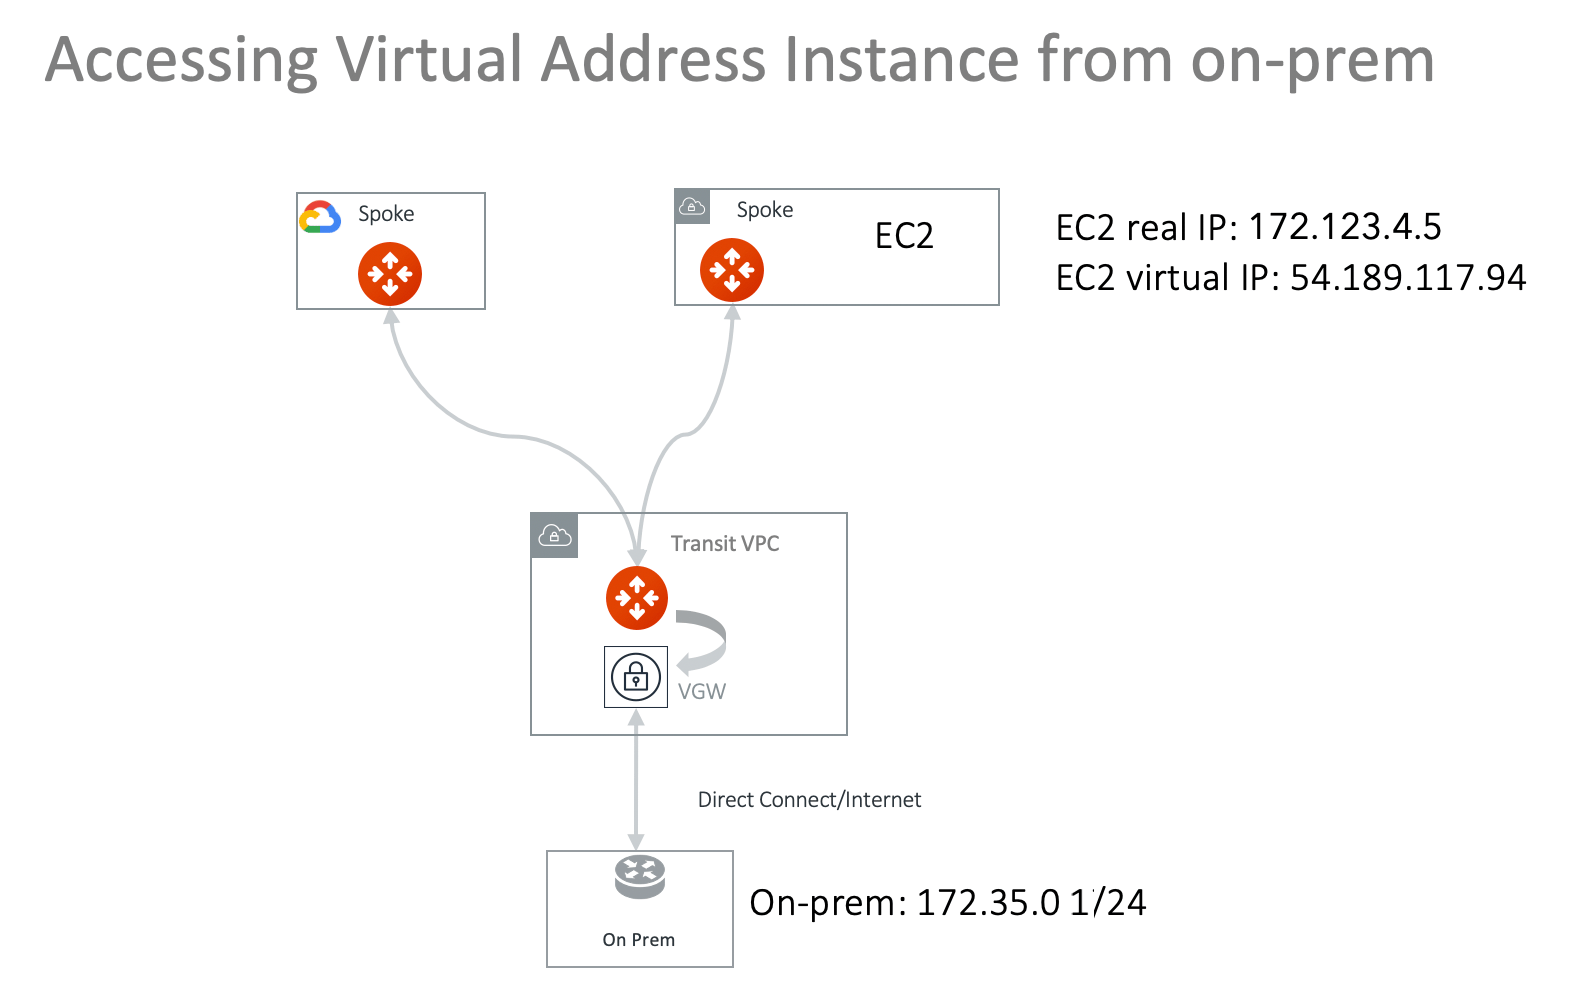
> This document addresses the scenario where a customer on-prem firewall device needs to route encrypted traffic to a partner network in the cloud (AWS/Azure/GCP), but due to concerns for overlapping CIDR blocks to the customer network, the customer side enforces a policy that the destination IP...
This document addresses the scenario where a customer on-prem firewall device
needs to route encrypted traffic to a partner network in the cloud
(AWS/Azure/GCP), but due to concerns for overlapping CIDR blocks to the customer
network, the customer side enforces a policy that the destination IP address
must be a public or a virtual IP address regardless of whether the partner
network is in the RFC 1918 range.
For example, the VPC instance IP address that the on-prem machine should send
data to is 172.123.4.5, but the on-prem machine must instead send data to a
virtual IP address 54.189.117.94 (or even 100.100.100.100).
Normally this problem can be solved by combining the
Site2Cloud
feature and
[DNAT](https://legacy.docs.aviatrix.com/documentation/latest/network/snat-dnat-settings.html)
feature.
There are situations where there are multiple applications in different VPCs,
and it is desirable to access different virtual addresses without building
multiple IPSEC tunnels to the cloud networks. This can be accomplished by
building an Aviatrix Transit Network where Spoke VPCs host these different
applications, as shown in the diagram below.
 ## Determine the Virtual IP address
As this virtual IP address is what the on-prem host sees, it should not change.
There are a couple of options for a virtual IP address:
* You can allocate an EIP in the VPC for this virtual IP address. Do not
associate this EIP to any instance.
* Alternatively, if the EC2 instance that on-prem hosts need to send data to has
an EIP, you can use that EIP.
You can also try a reserved public IP address range (for example, 100.100.x.x
range).
## Launch a Spoke Gateway
Create a
Spoke Gateway
in VPC 172.32.0.0/16.
## Customize Spoke Gateway Advertised Routes
1. After creating the Spoke Gateway, click the name of the Gateway and then
click the Settings tab.
2. Expand the Routing area.
3. In the Customize Spoke Advertised VPC/VNet CIDRs area, enter
54.189.117.94/32. With this customization, the Spoke gateway advertises
54.189.117.94/32 to the Transit Gateway and subsequently to on-prem.
## Attach the Spoke Gateway
You can attach the Spoke Gateway to Transit by clicking the edit
## Determine the Virtual IP address
As this virtual IP address is what the on-prem host sees, it should not change.
There are a couple of options for a virtual IP address:
* You can allocate an EIP in the VPC for this virtual IP address. Do not
associate this EIP to any instance.
* Alternatively, if the EC2 instance that on-prem hosts need to send data to has
an EIP, you can use that EIP.
You can also try a reserved public IP address range (for example, 100.100.x.x
range).
## Launch a Spoke Gateway
Create a
Spoke Gateway
in VPC 172.32.0.0/16.
## Customize Spoke Gateway Advertised Routes
1. After creating the Spoke Gateway, click the name of the Gateway and then
click the Settings tab.
2. Expand the Routing area.
3. In the Customize Spoke Advertised VPC/VNet CIDRs area, enter
54.189.117.94/32. With this customization, the Spoke gateway advertises
54.189.117.94/32 to the Transit Gateway and subsequently to on-prem.
## Attach the Spoke Gateway
You can attach the Spoke Gateway to Transit by clicking the edit
 icon next to the Spoke Gateway and selecting the Transit VPC (based on the
example diagram at the beginning of this document) from the Attach to Transit
Gateway dropdown.
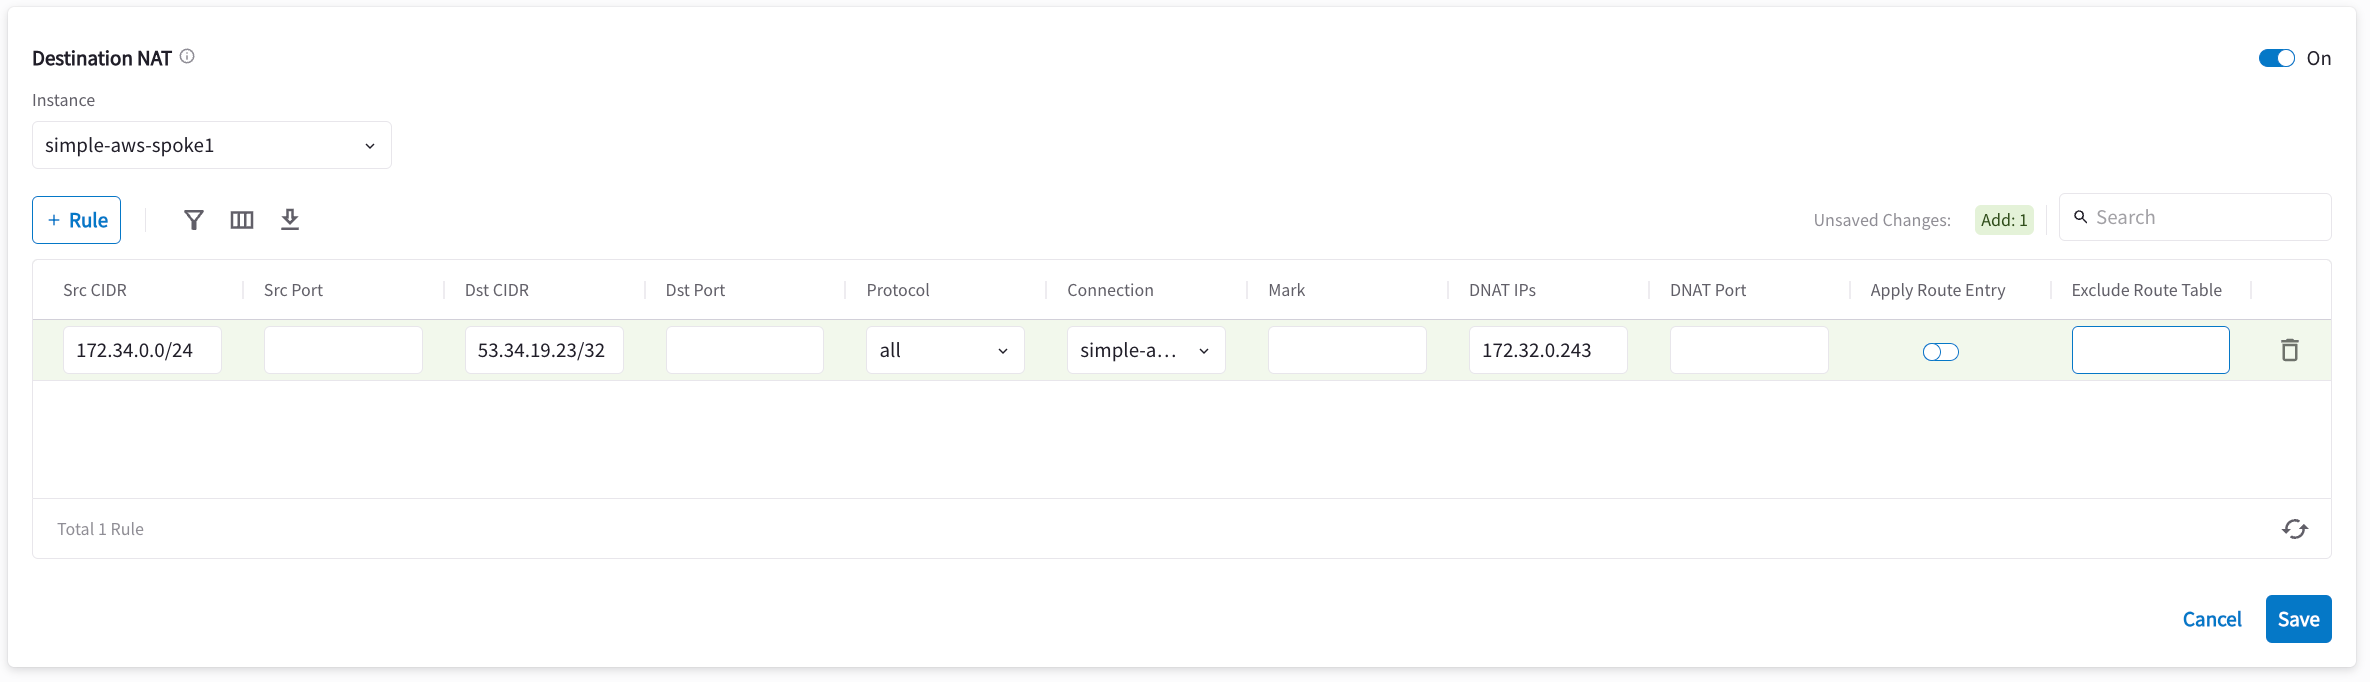
## Configure DNAT on the Spoke Gateway
This step is to configure the Spoke gateway to translate the destination virtual
IP address 54.189.117.94 to the real private IP address 172.123.4.5.
1. On the Gateway page, highlight the Spoke gateway and click **Edit**.
2. Scroll down to Destination NAT. Follow the instructions in
[Destination NAT](https://legacy.docs.aviatrix.com/documentation/latest/network/snat-dnat-settings.html)
to configure, as shown below. Use the "Connection" field to specify the
Site2Cloud connection name configured in Step 3.
icon next to the Spoke Gateway and selecting the Transit VPC (based on the
example diagram at the beginning of this document) from the Attach to Transit
Gateway dropdown.
## Configure DNAT on the Spoke Gateway
This step is to configure the Spoke gateway to translate the destination virtual
IP address 54.189.117.94 to the real private IP address 172.123.4.5.
1. On the Gateway page, highlight the Spoke gateway and click **Edit**.
2. Scroll down to Destination NAT. Follow the instructions in
[Destination NAT](https://legacy.docs.aviatrix.com/documentation/latest/network/snat-dnat-settings.html)
to configure, as shown below. Use the "Connection" field to specify the
Site2Cloud connection name configured in Step 3.
 ## Test
Test connectivity from the on-prem host to the EC2 instance. For example, ping
the virtual IP address 54.189.117.94 from an on-prem host machine. The ping
should reach 172.123.4.5.
## Test
Test connectivity from the on-prem host to the EC2 instance. For example, ping
the virtual IP address 54.189.117.94 from an on-prem host machine. The ping
should reach 172.123.4.5.