> ## Documentation Index
> Fetch the complete documentation index at: https://docs.aviatrix.com/llms.txt
> Use this file to discover all available pages before exploring further.

# Single-Region Multicloud Transit Network Workflow

> This document provides instructions to build a hub-and-spoke network model across multiple clouds in a single-region with Aviatrix Spoke and Transit Gateways.

This document provides instructions to build a hub-and-spoke network model
across multiple clouds in a single-region with Aviatrix Spoke and Transit
Gateways.

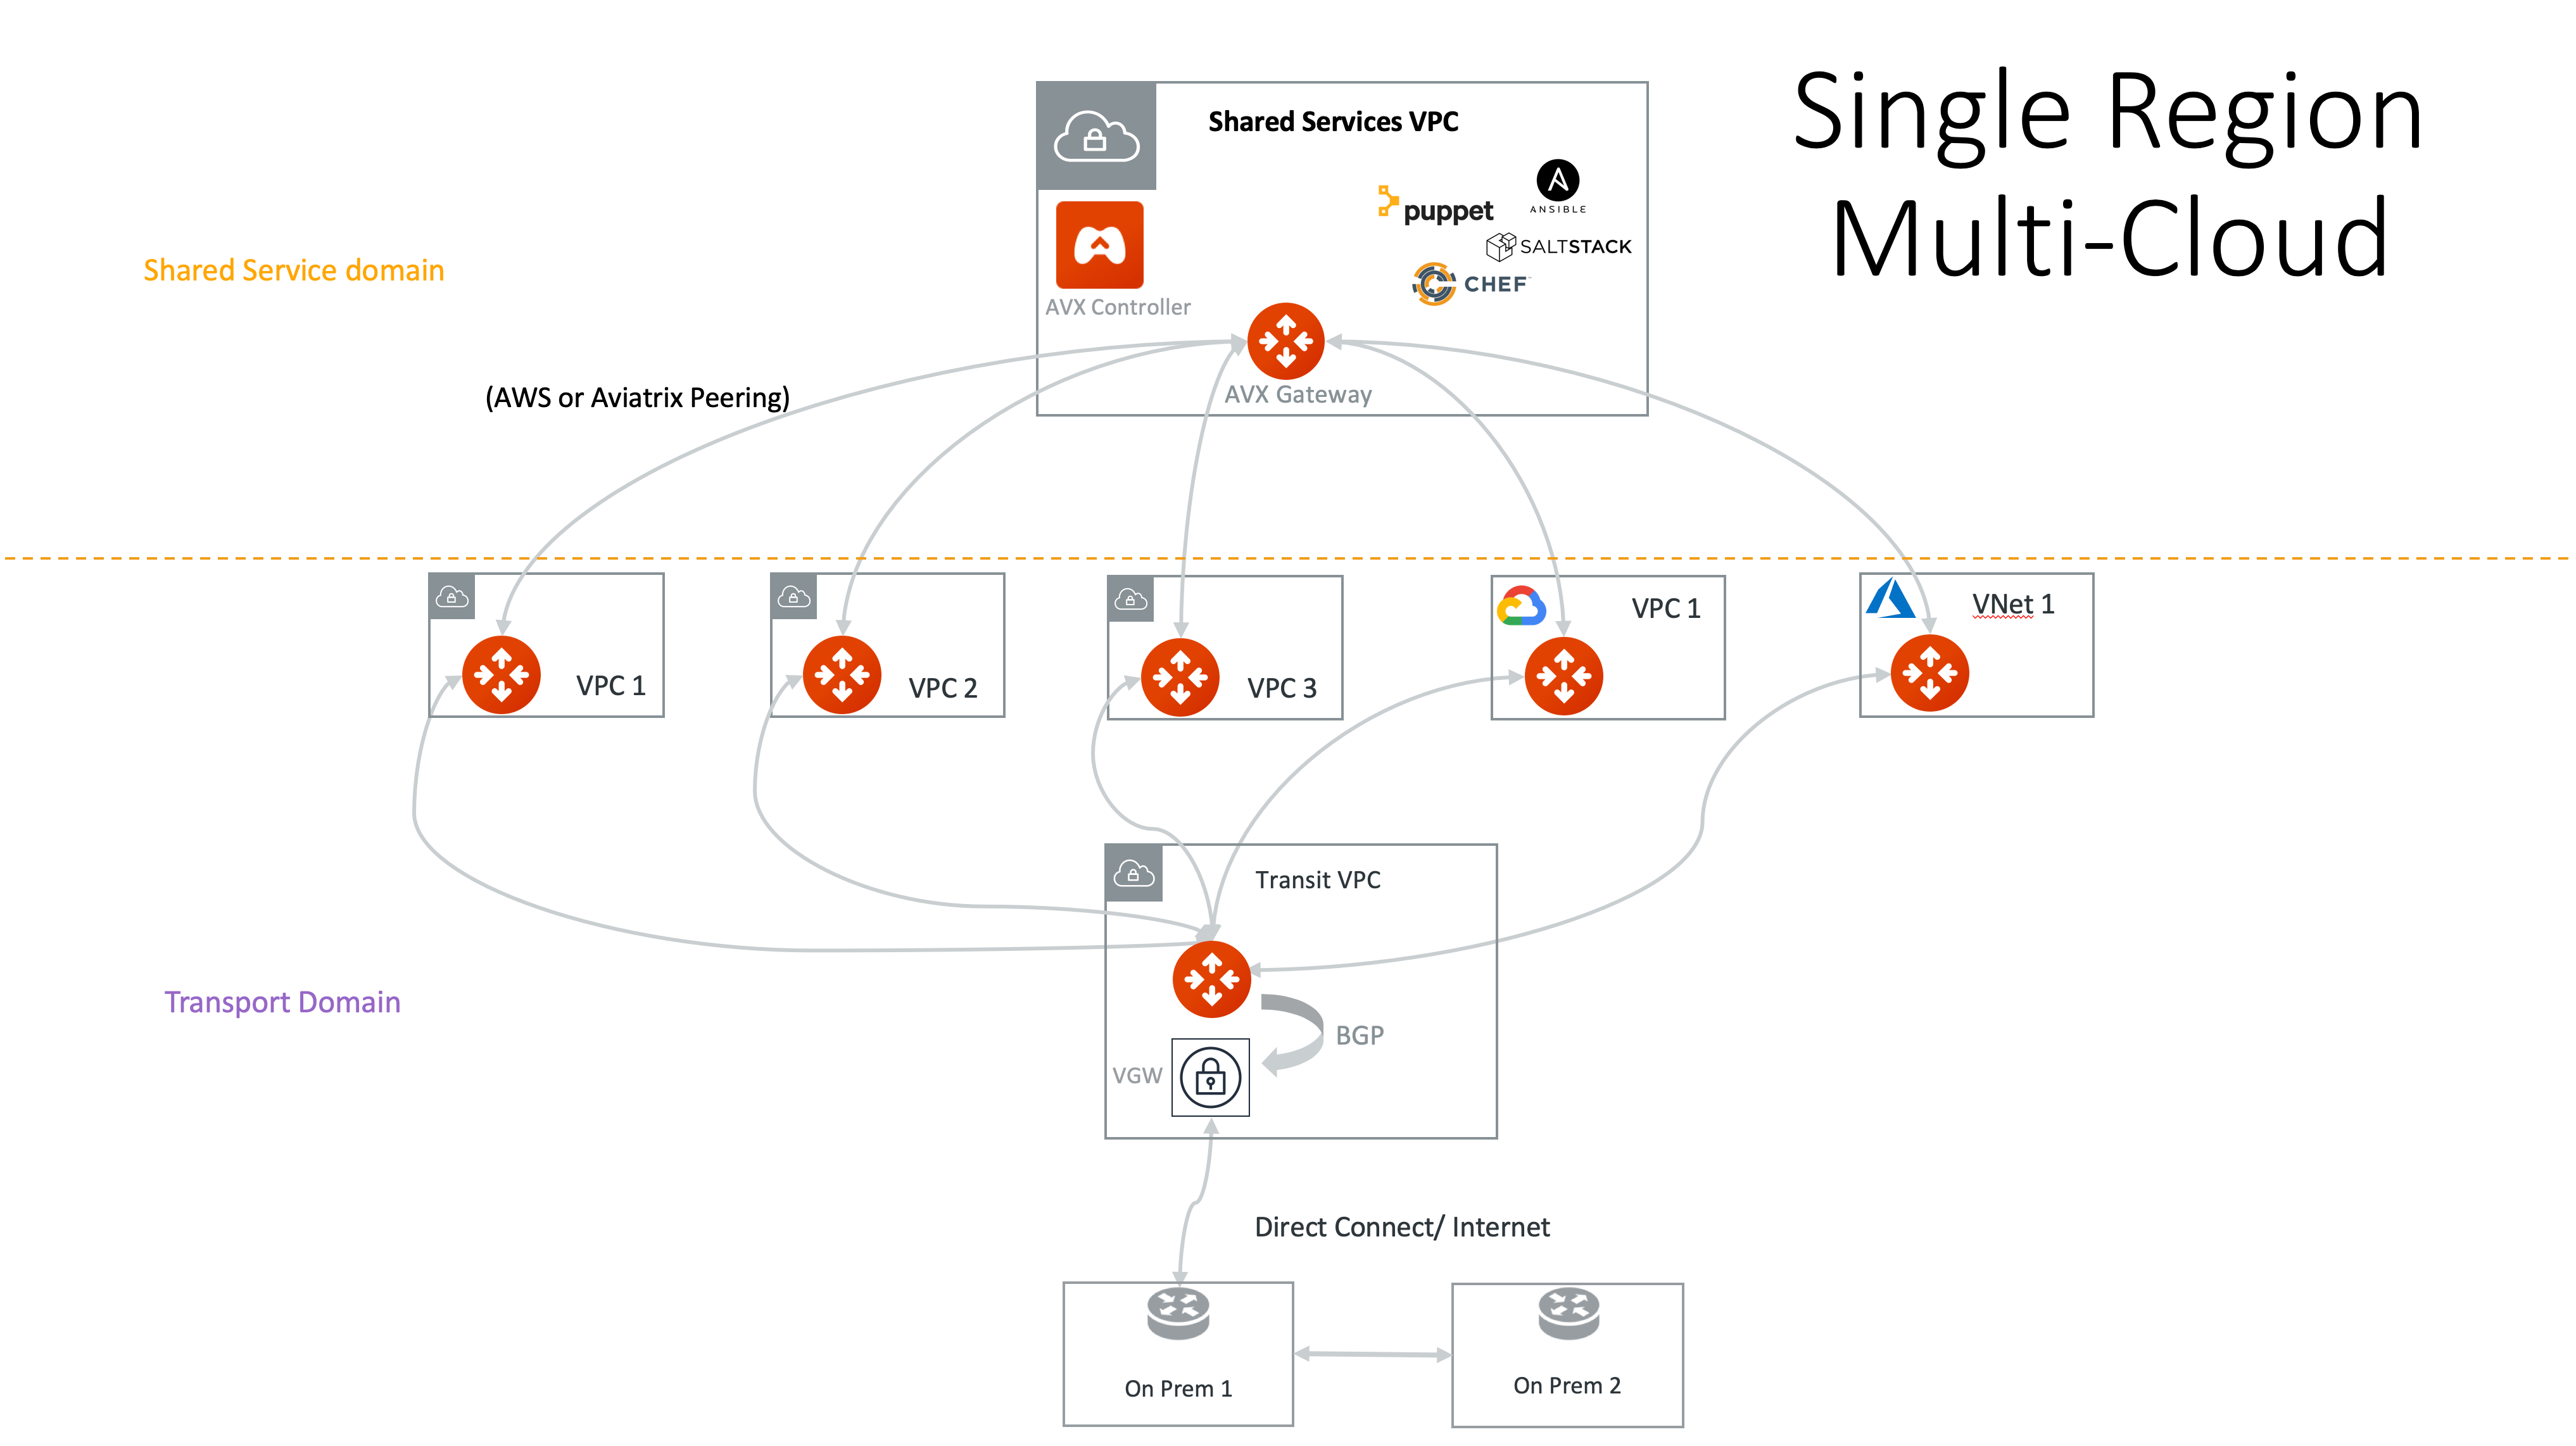
The hub-and-spoke model consists of an Aviatrix Transit Gateway and a set of
Spoke Gateways, as shown in the diagram below. The network traffic flows between
the Spoke VPCs through the Transit VPC.

<img src="https://mintcdn.com/aviatrix-14b37c43/1zOMu4WXCFpEtXhJ/images/guides/connectivity/transit/srmc.png?fit=max&auto=format&n=1zOMu4WXCFpEtXhJ&q=85&s=725502206096cd7ce5c41609ed3e2b08" alt="Single-Region Multicloud Transit Network" width="4068" height="2284" data-path="images/guides/connectivity/transit/srmc.png" />

## Prerequisites

1. If you have not launched an Aviatrix Controller, refer to the following
   Guides for your Cloud Service Provider:

* <a href={"/docs/enterprise/" + "10.1" + "/guides/controlplane/getting-started-guide-aws"}>AWS Getting Started Guide</a>
* <a href={"/docs/enterprise/" + "10.1" + "/guides/controlplane/getting-started-guide-azure"}>Azure Getting Started Guide</a>

<Note>
  If this is your first time using Aviatrix, make sure to go through the
  Controller onboarding process and create an Aviatrix account that corresponds
  to an IAM role.
</Note>

2. Identify a VPC or VNet in a region where you want to launch the Transit
   Gateway, and name it *Transit VPC* or VNet.

<Tip>
  Aviatrix recommends using the <a href={"/docs/enterprise/" + "10.1" + "/reference/ui/cloud-resources/cloud-networks#create-vpc-vnet"}>*Create a VPC*</a> tool with the option *Transit + FireNet* to create a Transit VPC/VNet that has all the necessary subnets and route tables fully populated.
</Tip>

For a Transit network in AWS, see
[Prerequisites for a Transit Network in AWS](https://legacy.docs.aviatrix.com/documentation/latest/network/transit-spoke-aws-requirements.html).

3. Create a VGW or reuse an existing VGW.

The VGW should not be attached to the Transit VPC or VNet if you plan to launch
Transit Gateway in the same VPC or VNet. This VGW can be attached to a different
VPC or VNet if this VPC or VNet CIDR is different from the Transit VPC or VNet
where the Transit Gateway is launched or in a different region and account. This
VGW should be connected to on-premises either over Direct Connect or over the
Internet.

## Configuration Workflow

While the instructions below reference AWS, the workflow applies to any public
cloud in which Aviatrix Transit Network is supported.

<Tabs>
  <Tab title="CoPilot UI" icon="mouse-pointer">
    Follow these steps to build a single-region multicloud Transit Network:

    1. [Create a Primary and Highly Available (HA) Transit Gateway](#creating-a-transit-gateway).
    2. [Create a Primary and Highly Available (HA) Spoke Gateway](#creating-a-spoke-gateway).
    3. [Attach the Spoke Gateway to the Transit Gateway](#creating-a-spoke-to-transit-attachment).

    <a id="launch-transit-gateway" />

    <a id="creating-a-transit-gateway" />

    ### 1. Creating a Transit Gateway

    To create primary and Highly Available (HA) Transit Gateway instances, provide
    the Transit Gateway general details, then assign the subnet and IP addresses for
    the gateway instances.

    <Steps>
      <Step title="Navigate to the Transit Gateways">
        In Aviatrix CoPilot, go to **Cloud Fabric** > **Gateways** > **Transit Gateways**.

        For quick access, at the top of the navigation panel, type *Transit Gateways* in the search bar.
      </Step>

      <Step title="Create a Transit Gateway">
        Click **+ Transit Gateway** and provide the following general information.

        <Expandable title="General Information">
          | Parameter                   | Description                                                                                                                                                                                                                                                                                                                                                                                                                                                                                                   |
          | --------------------------- | ------------------------------------------------------------------------------------------------------------------------------------------------------------------------------------------------------------------------------------------------------------------------------------------------------------------------------------------------------------------------------------------------------------------------------------------------------------------------------------------------------------- |
          | Name                        | A name for the Transit gateway.<br /><br />The name must begin with a letter, may include only letters, numbers, underscores, and dashes (excluding special characters or spaces), and must not exceed 50 characters in length.                                                                                                                                                                                                                                                                               |
          | Cloud                       | The Cloud Service Provider (CSP) where to create the Transit Gateway.<br /><br />When you select AWS and Azure, you can use the dropdown menu to select Standard or Global, China, or GovCloud.                                                                                                                                                                                                                                                                                                               |
          | Account                     | The cloud access account for creating the Transit Gateway.                                                                                                                                                                                                                                                                                                                                                                                                                                                    |
          | Region                      | The cloud region in which to create the Transit Gateway.                                                                                                                                                                                                                                                                                                                                                                                                                                                      |
          | VPC/VNet                    | The VPC or VNet in the selected region in which to create the Transit Gateway.<br /><br />If the selected Transit gateway will be used in a Transit FireNet workflow, selecting a VPC/VNet that has the *Transit + FireNet* function enabled means that a particular set of /28 subnets has been created across two availability zones. This function is enabled when the VPC/VNet is created.                                                                                                                |
          | Instance Size               | The gateway instance size.<br /><br />When selecting Transit Gateway instance size, choose a t2 series for Proof of Concept (POC) or prototyping only. Transit Gateway of t2 series instance type has a random packet drop of 3% for packet size less than 150 bytes when interoperating with VGW. This packet drop does not apply to Spoke Gateway.<br /><br />When selecting the gateway size, note that the size you select affects your IPsec performance. You can change the Transit Gateway size later. |
          | High Performance Encryption | To enable High Performance Encryption (HPE) for the Transit Gateway, set this toggle to *On*.<br /><br />HPE enables 10Gbps and higher IPsec performance between two single Aviatrix Gateway instances or between a single Aviatrix Gateway instance and an on-premises Aviatrix appliance.<br /><br />You cannot set High Performance Encryption to *On* or *Off* after the Transit Gateway is created.                                                                                                      |
          | Support for IPv6            | To enable IPv6 addressing and routing for the Transit Gateway, set this toggle to *On*.<br /><br />Fill the Account, Region, and VPC/VNet fields before enabling IPv6 support.                                                                                                                                                                                                                                                                                                                                |
          | Attach to Transit Gateways  | The Transit Gateway(s) to peer with this Transit Gateway.                                                                                                                                                                                                                                                                                                                                                                                                                                                     |
        </Expandable>
      </Step>

      <Step title="Advanced Settings">
        In the **Advanced Settings** section, set the advanced gateway settings that may apply.

        <Expandable title="Advanced Settings">
          | Parameter                                                     | Description                                                                                                                                                                                                                                                                                                                                                                                                                                                                                            |
          | ------------------------------------------------------------- | ------------------------------------------------------------------------------------------------------------------------------------------------------------------------------------------------------------------------------------------------------------------------------------------------------------------------------------------------------------------------------------------------------------------------------------------------------------------------------------------------------ |
          | Transit Egress Capability (all clouds except OCI and Alibaba) | To add Transit Egress Capability to this Transit Gateway, set this toggle to *On*.<br /><br />Transit Gateways that have Transit Egress Capability enabled can have attachments added in the Transit FireNet workflow, or be selectable in the Transit Egress workflow.<br /><br />For Azure and GCP, selecting *Transit Egress Capability* must occur when the gateway is created. Otherwise, it will not display as an available Transit Gateway in the Transit FireNet or Transit Egress workflows. |
          | Gateway Load Balancer (AWS only)                              | For AWS, if you enable Transit Egress Capability you can also enable the Gateway Load Balancer option, which creates a load balancer within the selected VPC.<br /><br />If this option is enabled here it will show as On and disabled if you add Transit FireNet to this gateway as part of the Transit FireNet workflow.                                                                                                                                                                            |
          | Subnet (GCP only)                                             | For GCP, if you enable Transit Egress Capability you must also select a subnet.                                                                                                                                                                                                                                                                                                                                                                                                                        |
          | BGP over LAN (Azure)                                          | To enable BGP over LAN connections for this Transit Gateway, set this toggle to *On*.<br /><br />For Azure, also enter the number of BGP over LAN interfaces you need (maximum is eight).                                                                                                                                                                                                                                                                                                              |
          | BGP over LAN (GCP)                                            | To enable BGP over LAN connections for this Transit Gateway, set this toggle to *On*.<br /><br />For GCP, select the subnet on which to apply the BGP over LAN connection.<br /><br />For GCP, you cannot set BGP over LAN to *On* after the Transit Gateway is created.                                                                                                                                                                                                                               |
        </Expandable>
      </Step>

      <Step title="High Availability Instances">
        In the **Instances** section, assign the subnets and IP addresses for the Transit Gateway instances.

        <Expandable title="High Availability Instances Settings">
          | Parameter        | Description                                                                                                                                                                |
          | ---------------- | -------------------------------------------------------------------------------------------------------------------------------------------------------------------------- |
          | Attach to Subnet | The subnet in which to create the gateway instance. For best practice, select a different subnet in a different availability zone from the other Transit gateway instance. |
          | Public IP        | The public IP address of the gateway instance. (AWS only) To allocate a new EIP, leave Public IP as *Allocate New Static Public IP*.                                       |
        </Expandable>

        To create a highly available (HA) gateway instance, click **+ Instance** and assign the subnet and IP address.

        A Transit gateway supports up to 15 HA gateway instances.

        The gateway instances are created in active-active mode.
      </Step>

      <Step title="Resource Tags">
        In the **Resource Tags** section, you can add custom resource tags for the Transit Gateway.

        1. Click **+ Resource Tag**.
        2. Enter a key to identify the resource and a value for the Key. The Key must be unique.
        3. Click the checkmark icon to add the key:value pair to the resource tags.
        4. Click the Tick button to save it.
      </Step>

      <Step title="Save the Transit Gateway">
        Click **Save**.
      </Step>
    </Steps>

    You can monitor the progress of the gateway creation by going to **CoPilot** > **Monitor** > **Notifications** > **Tasks** tab. Click the expand arrow next to the gateway name to see the progress.

    <a id="creating-a-spoke-gateway" />

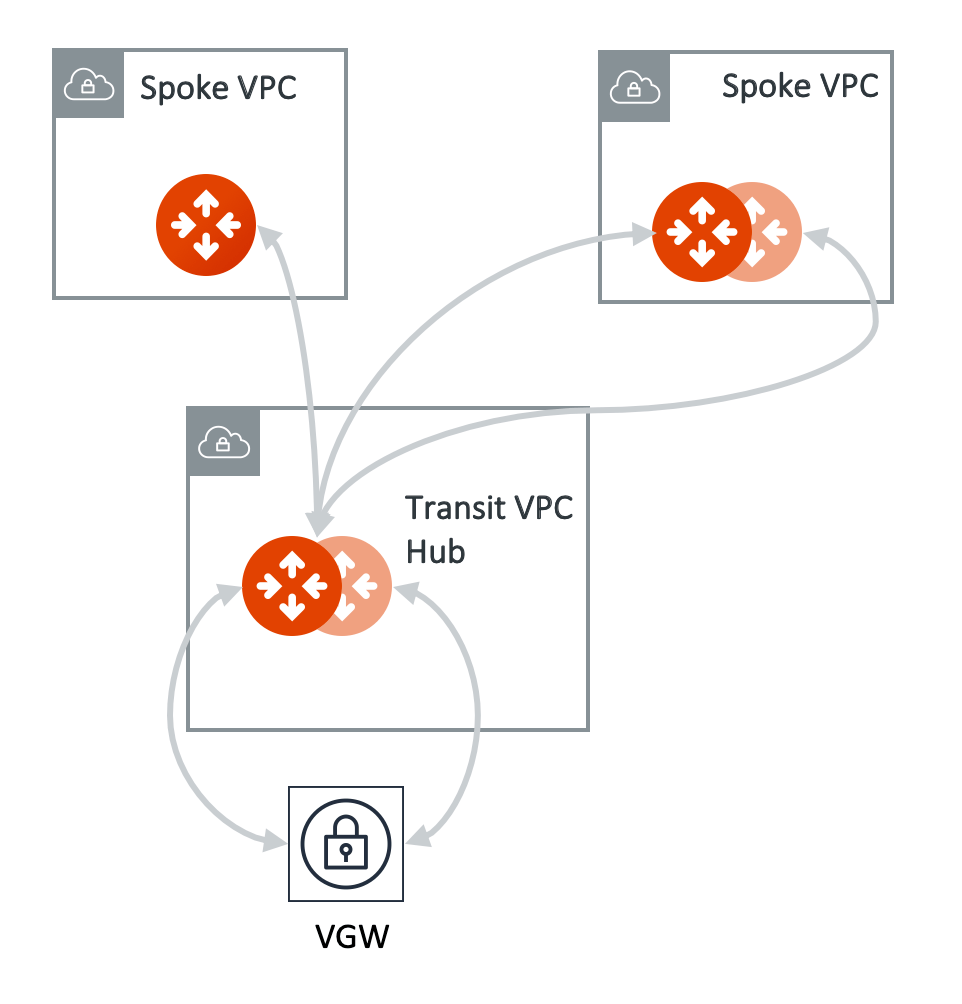
    ### 2. Creating a Spoke Gateway

    To create primary and Highly Available (HA) Spoke Gateway instances, provide
    the Spoke Gateway general details, then assign the subnet and IP addresses for
    the gateway instances.

    <img src="https://mintcdn.com/aviatrix-14b37c43/1zOMu4WXCFpEtXhJ/images/guides/connectivity/transit/spoke-vpc.png?fit=max&auto=format&n=1zOMu4WXCFpEtXhJ&q=85&s=95ba7453b9e78c423f2498a3f6659ce8" alt="spoke vpc" width="962" height="1004" data-path="images/guides/connectivity/transit/spoke-vpc.png" />

    <Steps>
      <Step title="Navigate to the Spoke Gateways">
        In Aviatrix CoPilot, go to **Cloud Fabric** > **Gateways** > **Spoke Gateways**.

        For quick access, at the top of the navigation panel, type *Spoke Gateways* in the search bar.
      </Step>

      <Step title="Create a Spoke Gateway">
        Click **+ Spoke Gateway** and provide the following general information.

        <Expandable title="General Information">
          | Parameter                        | Description                                                                                                                                                                                                                                                                                                                                                                                        |
          | -------------------------------- | -------------------------------------------------------------------------------------------------------------------------------------------------------------------------------------------------------------------------------------------------------------------------------------------------------------------------------------------------------------------------------------------------- |
          | Name                             | A name for the Spoke Gateway.<br /><br />The name must begin with a letter, may include only letters, numbers, underscores, and dashes (excluding special characters or spaces), and must not exceed 50 characters in length.                                                                                                                                                                      |
          | Cloud                            | The Cloud Service Provider (CSP) where to create the Spoke Gateway.<br /><br />For AWS and Azure, you can use the dropdown menu to select Standard or Global, China, or GovCloud.                                                                                                                                                                                                                  |
          | Account                          | The cloud access account for creating the Spoke Gateway.                                                                                                                                                                                                                                                                                                                                           |
          | Region                           | The cloud region in which to create the Spoke Gateway.                                                                                                                                                                                                                                                                                                                                             |
          | VPC/VNet                         | The VPC or VNet in the selected region in which to create the Spoke Gateway.                                                                                                                                                                                                                                                                                                                       |
          | Instance Size                    | The gateway instance size.<br /><br />When selecting the gateway size, note that the size you select affects your IPsec performance.                                                                                                                                                                                                                                                               |
          | High Performance Encryption      | To enable High Performance Encryption (HPE) for the Spoke Gateway, set this toggle to *On*.<br /><br />HPE enables 10Gbps and higher IPsec performance between two single Aviatrix Gateway instances or between a single Aviatrix Gateway instance and an on-premises Aviatrix appliance.<br /><br />You cannot turn High Performance Encryption *On* or *Off* after the Spoke Gateway is created. |
          | Support for IPv6                 | To enable IPv6 addressing and routing for the Transit Gateway, set this toggle to *On*.<br /><br />Fill the Account, Region, and VPC/VNet fields before enabling IPv6 support.                                                                                                                                                                                                                     |
          | Attach to Transit Gateway        | Select the Transit Gateway to attach to the Spoke Gateway.                                                                                                                                                                                                                                                                                                                                         |
          | Attach to Egress Transit FireNet | Select the Egress Transit FireNet to attach to the Spoke Gateway.<br /><br />This option is only available if an Egress Transit FireNet has been created.                                                                                                                                                                                                                                          |
        </Expandable>
      </Step>

      <Step title="Advanced Settings">
        In the **Advanced Settings** section, set the advanced gateway settings that may apply.

        <Expandable title="Advanced Settings">
          | Parameter            | Description                                                                                                                                                                                                                                                                                                                                 |
          | -------------------- | ------------------------------------------------------------------------------------------------------------------------------------------------------------------------------------------------------------------------------------------------------------------------------------------------------------------------------------------- |
          | BGP (all clouds)     | To enable the Spoke Gateway to run BGP connection to external routers and dynamically exchange routes, set this toggle to *On*.                                                                                                                                                                                                             |
          | BGP over LAN (Azure) | To enable BGP connection over LAN: Set this toggle to *On*. You must set both *BGP* and *BGP over LAN* settings to *On* to enable BGP over LAN connection on the Spoke Gateway. Enter the number of LAN interfaces you need (maximum is eight) for the BGP connection. You cannot delete an interface after the Transit Gateway is created. |
          | Global VPC (GCP)     | To connect the Spoke Gateway to a global VPC, set this toggle to *On*.                                                                                                                                                                                                                                                                      |
        </Expandable>
      </Step>

      <Step title="High Availability Instances">
        In the **Instances** section, assign the subnet and IP address for the Spoke Gateway instances.

        <Expandable title="High Availability Instances Settings">
          | Parameter        | Description                                                                                                                                                                     |
          | ---------------- | ------------------------------------------------------------------------------------------------------------------------------------------------------------------------------- |
          | Attach to Subnet | The subnet in which to create the Spoke gateway instance. For best practice, select a different subnet in a different availability zone from the other Spoke gateway instances. |
          | Public IP        | The public IP address of the gateway instance. (AWS only) To allocate a new EIP, leave Public IP as *Allocate New Static Public IP*.                                            |
        </Expandable>

        To create a highly available (HA) gateway instance, click **+ Instance** and
        designate the subnet and IP address of the gateway instance.

        A Spoke Gateway can have up to 15 HA gateway instances.

        All gateway instances are created in active-active mode.

        A BGP-enabled Spoke Gateway can have only two HA gateway instances.

        A Spoke Gateway with Site2Cloud or customized SNAT and DNAT enabled can have
        only two HA gateway instances.
      </Step>

      <Step title="Resource Tags">
        In the **Resource Tags** section, you can add custom resource tags for the Spoke Gateway.

        1. Click **+ Resource Tag**.
        2. Enter a *key* to identify the resource and a *value* for the Key. The Key must be unique.
        3. Click the checkmark icon to add the *key:value* pair to the resource tags.
        4. Click **Save**.
      </Step>

      <Step title="Save the Spoke Gateway">
        Click **Save**.
      </Step>
    </Steps>

    You can monitor the progress of the gateway creation by going to **CoPilot** > **Monitor** > **Notifications** > **Tasks** tab. Click the expand arrow next to the gateway name to see the progress.

    <a id="launch-spoke-gateway" />

    <a id="attach-spoke-to-transit" />

    <a id="creating-a-spoke-to-transit-attachment" />

    ### 3. Creating a Spoke to Transit Attachment

    To attach a Spoke Gateway to a Transit Gateway:

    <Steps>
      <Step title="Navigate to the Spoke Gateways">
        In Aviatrix CoPilot, go to **Cloud Fabric** > **Gateways** > **Spoke Gateways**.
      </Step>

      <Step title="Manage Gateway Attachment Dialog">
        In the table, locate the Spoke Gateway you want to attach and click the **Manage Gateway Attachment** icon on the right side of its row.
      </Step>

      <Step title="Create a Spoke to Transit Attachment">
        In the Manage Gateway Attachment dialog, click the **Transit Gateway** tab and
        then click **+ Attachment** and provide the following information.

        <Expandable title="Spoke to Transit Attachment Settings">
          | Parameter       | Description                                         |
          | --------------- | --------------------------------------------------- |
          | Transit Gateway | The Transit Gateway to attach to the Spoke Gateway. |

          In the *Advanced* section, set the advanced settings that may apply.

          | Parameter                        | Description                                                                                                                                                                                                                                                                                                                                                                                                                                                                                                                                                                                                                                                                                                                                                                 |
          | -------------------------------- | --------------------------------------------------------------------------------------------------------------------------------------------------------------------------------------------------------------------------------------------------------------------------------------------------------------------------------------------------------------------------------------------------------------------------------------------------------------------------------------------------------------------------------------------------------------------------------------------------------------------------------------------------------------------------------------------------------------------------------------------------------------------------- |
          | Customize Route Table Attachment | Enables custom route tables when set to *On*. From the *Select Route Tables* dropdown menu, select the custom route table(s) to attach to this Spoke Gateway.                                                                                                                                                                                                                                                                                                                                                                                                                                                                                                                                                                                                               |
          | Max Performance                  | Creates the maximum number of High Performance Encryption (HPE) tunnels for the Transit-to-Spoke attachment when set to *On*. The number of tunnels that are created depends on the gateway instance sizes. Max Performance option is valid only when both the Spoke and Transit Gateways are launched with HPE enabled and are in the same cloud type. When the Spoke and Transit Gateways are launched in different cloud types, only one tunnel is created (even when HPE is enabled for both the Spoke and Transit Gateway). If Max Performance is *Off*, only one tunnel is created (even when HPE is enabled for both the Spoke and Transit Gateway). To switch between multiple tunnels or one tunnel, detach and reattach the Spoke Gateway to the Transit Gateway. |

          {true && (
                    <Note>
                      <p>
                        Controller 10.1.0 adds an <strong>Early Access</strong> capability to
                        edit a spoke attachment's managed route tables in place, without
                        detaching and reattaching the gateway. From CoPilot, open the spoke
                        gateway's <strong>Managed Route Tables</strong> card to add, remove, or
                        change the attached route tables. This is a new alternative to setting
                        route tables through the{" "}
                        <strong>Customize Route Table Attachment</strong> option above.
                      </p>
                      <p>
                        This capability is <strong>Early Access</strong> in Controller 10.1.0,
                        available on AWS and Azure. To request Early Access, contact your
                        Aviatrix account team.
                      </p>
                      {/* TODO: confirm with the feature SME whether the Customize Route Table Attachment option above remains available for initial attachment once the Managed Route Tables card ships, or whether it is fully replaced. */}
                    </Note>
                    )}
        </Expandable>

        To attach this Spoke Gateway to another Transit Gateway, click **+ Attachment**
        again and provide the attachment details.
      </Step>

      <Step title="Save the Spoke to Transit Attachment">
        Click **Save**.
      </Step>
    </Steps>

    A notification appears indicating that the Spoke Gateway is attached to the Transit Gateway.
  </Tab>

  <Tab title="Terraform" icon="file-code">
    Use the [Aviatrix Terraform provider](https://registry.terraform.io/providers/AviatrixSystems/aviatrix/latest) to build a single-region hub-and-spoke Transit Network.

    <Note>
      Module examples pin `terraform-aviatrix-modules/mc-transit` and `mc-spoke` to
      version `{"10.0.1"}`. Check the
      [Terraform Registry](https://registry.terraform.io/namespaces/terraform-aviatrix-modules)
      for newer patch releases before you pin a specific version in your
      configuration.
    </Note>

    Complete the [Prerequisites](#prerequisites) before you begin.

    The steps to create a single-region hub-and-spoke network are as follows:

    <Steps>
      <Step title="Get the Existing VPC Information">
        Retrieve the details of the existing Transit and Spoke VPCs with the `aviatrix_vpc` data source block.

        ```hcl theme={null}
        data "aviatrix_vpc" "transit_vpc_aws" {
          name = "transit-vpc-aws" # your Transit VPC name for AWS
        }


        data "aviatrix_vpc" "spoke_vpc_aws" {
          name = "spoke-vpc-aws" # your Spoke VPC name for AWS
        }

        data "aviatrix_vpc" "spoke_vpc_azure" {
          name = "spoke-vpc-azure" # your Spoke VPC name for Azure
        }

        data "aviatrix_vpc" "spoke_vpc_gcp" {
          name = "spoke-vpc-gcp" # your Spoke VPC name for GCP
        }

        ```
      </Step>

      <Step title="Create the Transit Gateway">
        Create primary and Highly Available (HA) Transit Gateway instances with the `mc-transit` module. Use the VPC data source block retrieved in the previous step to set the `region`, `cidr`, `name`, `vpc_id`, `gw_subnet`, and `hagw_subnet` fields.

        The following code snippet is for AWS (`cloud = "AWS"`). For Azure, GCP, and OCI, set the arguments as per the [Aviatrix Terraform provider documentation](https://registry.terraform.io/providers/AviatrixSystems/aviatrix/latest/docs).

        ```hcl theme={null}
        module "mc-transit" {

          source  = "terraform-aviatrix-modules/mc-transit/aviatrix"
          version = "10.0.1"

          cloud   = "AWS"
          region  = data.aviatrix_vpc.transit_vpc_aws.region
          cidr    = data.aviatrix_vpc.transit_vpc_aws.cidr
          account = "aws-account"

          name    = data.aviatrix_vpc.transit_vpc_aws.name
          gw_name = "transit-gw-aws"

          use_existing_vpc = true

          vpc_id = data.aviatrix_vpc.transit_vpc_aws.vpc_id

          gw_subnet   = data.aviatrix_vpc.transit_vpc_aws.public_subnets[0].cidr
          hagw_subnet = data.aviatrix_vpc.transit_vpc_aws.public_subnets[1].cidr
        }
        ```
      </Step>

      <Step title="Create Spoke Gateway and Attach to Transit Gateway">
        Create primary and HA AWS Spoke Gateway instances with the `mc-spoke` module. Use the VPC data source block retrieved in the previous step to set the `cloud`, `name`, `region`, `account`, `transit_gw`, `use_existing_vpc`, `vpc_id`, `gw_subnet`, and `hagw_subnet` fields.

        Attach the Spoke Gateway to the Transit Gateway with the `transit_gw` argument.

        ```hcl theme={null}
        module "spoke_aws_1" {

          source  = "terraform-aviatrix-modules/mc-spoke/aviatrix"
          version = "10.0.1"

          cloud            = "AWS"
          name             = data.aviatrix_vpc.spoke_vpc_aws.name
          region           = data.aviatrix_vpc.spoke_vpc_aws.region
          account          = "aws-account"

          transit_gw       = module.mc-transit.transit_gateway.gw_name

          use_existing_vpc = true

          vpc_id           = data.aviatrix_vpc.spoke_vpc_aws.vpc_id

          gw_subnet        = data.aviatrix_vpc.spoke_vpc_aws.public_subnets[0].cidr
          hagw_subnet      = data.aviatrix_vpc.spoke_vpc_aws.public_subnets[1].cidr 
        }
        ```
      </Step>

      <Step title="Reuse the Code Snippet for Other Clouds">
        To create Spoke Gateways and attach them to the Transit Gateway for other clouds, reuse the same code snippet by replacing the AWS specific fields with the other clouds specific fields.

        For example, for Azure:

        ```hcl theme={null}
        module "spoke_azure_1" {
          
          source  = "terraform-aviatrix-modules/mc-spoke/aviatrix"
          version = "10.0.1"

          cloud            = "Azure"
          name             = data.aviatrix_vpc.spoke_vpc_azure.name
          region           = data.aviatrix_vpc.spoke_vpc_azure.region
          account          = "azure-account"

          transit_gw       = module.mc-transit.transit_gateway.gw_name
          
          use_existing_vpc = true

          vpc_id           = data.aviatrix_vpc.spoke_vpc_azure.vpc_id

          gw_subnet        = data.aviatrix_vpc.spoke_vpc_azure.subnets[0].cidr
          hagw_subnet      = data.aviatrix_vpc.spoke_vpc_azure.subnets[1].cidr 
        }
        ```

        For GCP:

        ```hcl theme={null}
        module "spoke_gcp_1" {

          source  = "terraform-aviatrix-modules/mc-spoke/aviatrix"
          version = "10.0.1"

          cloud            = "GCP"
          name             = data.aviatrix_vpc.spoke_vpc_gcp.name
          region           = data.aviatrix_vpc.spoke_vpc_gcp.region
          account          = "gcp-account"

          transit_gw       = module.mc-transit.transit_gateway.gw_name

          use_existing_vpc = true

          vpc_id           = data.aviatrix_vpc.spoke_vpc_gcp.vpc_id

          gw_subnet        = data.aviatrix_vpc.spoke_vpc_gcp.subnets[0].cidr
          hagw_subnet      = data.aviatrix_vpc.spoke_vpc_gcp.subnets[0].cidr 
        }
        ```
      </Step>

      <Step title="Verify and Apply the Configuration">
        Run `terraform plan`, review the planned changes, and run `terraform apply`.
      </Step>
    </Steps>

    ### Examples

    The following are a few examples of creating a single-region multicloud Transit Network using Terraform.

    The following examples are for Azure, AWS, and GCP. For OCI and Alibaba, reuse the same code snippet by replacing the Azure, AWS, and GCP specific fields with the OCI and Alibaba specific fields.

    <AccordionGroup>
      <Accordion title="Multicloud Transit with Azure Hub and Workload-Aligned Spokes in AWS and GCP">
        This example reflects a common multicloud pattern: a European business runs its line-of-business app on Azure, keeps regulated customer data on AWS, and uses GCP for analytics. An Azure Transit Gateway in `West Europe` acts as the hub, and one HA Spoke per cloud carries the workload that best fits that cloud. Aviatrix peers the underlying CSPs transparently, so the three Spokes route to each other through the single Transit Gateway.

        The CIDRs are aligned on a `10.x.0.0/22` plan so each Spoke can be summarized cleanly toward the on-premises network later. Common tags are applied to every gateway for cost allocation, with a per-cloud tag layered on each Spoke.

        ```hcl theme={null}
        module "azure_transit" {
          
          source  = "terraform-aviatrix-modules/mc-transit/aviatrix"
          version = "10.0.1"

          cloud   = "Azure"
          name    = "transit-azure-weu"
          region  = "West Europe"
          account = "azure-prod"
          cidr    = "10.10.0.0/23"
          instance_size = "Standard_D3_v2"
          tags    = {
                      Owner       = "platform-networking"
                      CostCenter  = "2042"
                      Application = "customer-portal"
                    }
        }

        module "spoke_azure_app" {
          source  = "terraform-aviatrix-modules/mc-spoke/aviatrix"
          version = "10.0.1"

          cloud         = "Azure"
          name          = "spoke-azure-app"
          region        = "West Europe"
          account       = "azure-prod"
          cidr          = "10.20.0.0/22"
          transit_gw    = module.azure_transit.transit_gateway.gw_name
          instance_size = "Standard_D3_v2"
          tags       = {
                        Owner       = "platform-networking"
                        CostCenter  = "2042"
                        Application = "customer-portal"
                        Tier        = "app"
                      }
        }

        module "spoke_aws_data" {
          source  = "terraform-aviatrix-modules/mc-spoke/aviatrix"
          version = "10.0.1"

          cloud      = "AWS"
          name       = "spoke-aws-data"
          region     = "eu-west-1"
          account    = "aws-prod"
          cidr       = "10.30.0.0/22"
          transit_gw = module.azure_transit.transit_gateway.gw_name
          tags       = {
                        Owner       = "platform-networking"
                        CostCenter  = "2042"
                        Application = "customer-portal"
                        Tier        = "data"
                      }
        }

        module "spoke_gcp_analytics" {
          source  = "terraform-aviatrix-modules/mc-spoke/aviatrix"
          version = "10.0.1"

          cloud      = "GCP"
          name       = "spoke-gcp-analytics"
          region     = "europe-west1"
          account    = "gcp-prod"
          cidr       = "10.40.0.0/22"
          transit_gw = module.azure_transit.transit_gateway.gw_name
        }
        ```

        <Tip>
          For OCI or Alibaba, copy any Spoke block and replace the cloud-specific fields (`cloud`, `region`, `account`). All other arguments behave the same way across providers.
        </Tip>
      </Accordion>

      <Accordion title="Enterprise AWS Hub with Production, Non-Production, and Shared-Services Spokes">
        This example reflects a common enterprise starting point: a single Aviatrix Transit Gateway in AWS's N. Virginia region acts as the hub for a payments workload. Production and Non-Production environments live in separate Spoke VPCs so blast radius and change windows can be managed independently. A third Spoke holds shared services such as logging, identity, and CI/CD runners that must be reachable from both environments.

        All gateways are deployed in HA. High Performance Encryption (`insane_mode`) is enabled on the Transit Gateway and on the Production Spoke for line-rate encrypted east-west traffic. Common tags are applied to every gateway for cost allocation, and per-environment tags are layered on top of the Spokes.

        A `locals` block centralizes the account, region, and base tag set so the same values are not repeated in every module call.

        ```hcl theme={null}

        module "transit_aws" {
          source  = "terraform-aviatrix-modules/mc-transit/aviatrix"
          version = "10.0.1"

          cloud       = "AWS"
          name        = "transit-aws-use1"
          region      = "us-east-1"
          account     = "aws-prod"
          cidr        = "10.100.0.0/23"
          insane_mode = true
          tags        = {
                        Owner       = "platform-networking"
                        CostCenter  = "1001"
                        Application = "payments"
                      }
        }

        module "spoke_prod_payments" {
          source  = "terraform-aviatrix-modules/mc-spoke/aviatrix"
          version = "10.0.1"

          cloud       = "AWS"
          name        = "spoke-prod-payments"
          region      = "us-east-1"
          account     = "aws-prod"
          cidr        = "10.110.0.0/22"
          transit_gw  = module.transit_aws.transit_gateway.gw_name
          insane_mode = true
          tags        = {
                        Owner       = "platform-networking"
                        CostCenter  = "1001"
                        Application = "payments"
                        Environment = "prod"
                      }
        }

        module "spoke_nonprod_payments" {
          source  = "terraform-aviatrix-modules/mc-spoke/aviatrix"
          version = "10.0.1"

          cloud      = "AWS"
          name       = "spoke-nonprod-payments"
          region     = "us-east-1"
          account    = "aws-prod"
          cidr       = "10.120.0.0/22"
          transit_gw = module.transit_aws.transit_gateway.gw_name
          tags       = {
                        Owner       = "platform-networking"
                        CostCenter  = "1001"
                        Application = "payments"
                        Environment = "nonprod"
                      }
        }

        module "spoke_shared_services" {
          source  = "terraform-aviatrix-modules/mc-spoke/aviatrix"
          version = "10.0.1"

          cloud      = "AWS"
          name       = "spoke-shared-services"
          region     = "us-east-1"
          account    = "aws-prod"
          cidr       = "10.130.0.0/22"
          transit_gw = module.transit_aws.transit_gateway.gw_name
          tags       = {
                        Owner       = "platform-networking"
                        CostCenter  = "1001"
                        Application = "payments"
                        Environment = "shared"
                      }
        }
        ```

        <Tip>
          To enforce traffic isolation between Production, Non-Production, and Shared-Services Spokes at the Transit, set `enable_segmentation = true` on the `mc-transit` module and place each Spoke in its own Network Domain. See <a href={"/docs/enterprise/" + "10.1" + "/guides/security/network-segmentation-secured"}>Network Segmentation Secured</a>.
        </Tip>
      </Accordion>
    </AccordionGroup>
  </Tab>
</Tabs>

***

## View the Network Topology

You can view the network topology in CoPilot by going to **Cloud Fabric** >
**Topology**. For more information about using the topology map, see
<a href={"/docs/enterprise/" + "10.1" + "/guides/monitoring/topology-visibility"}>Gaining Visibility into Your Network Topology</a>.

## View the Gateway's Connections and Route Tables

You can view the Spoke and Transit Gateway connections and route table
information.

<Steps>
  <Step title="Navigate to the Gateways">
    In Aviatrix CoPilot, go to **Cloud Fabric** > **Gateways**, and select the Spoke or Transit Gateway to open the gateway's page.
  </Step>

  <Step title="View the Connections of the Gateway">
    Click the **Attachments** tab to view the gateway's connections.
  </Step>

  <Step title="View the Route Tables of the Gateway">
    Click the **VPC/VNet Route Tables** tab, then from the **Route Table** dropdown menu, select a route table to view the routes.
  </Step>
</Steps>

## Related Topics

* You can peer Transit Gateways to expand your Aviatrix Transit Network across
  multiple regions and clouds. See <a href={"/docs/enterprise/" + "10.1" + "/guides/connectivity/peering/transit-gateway-peering-workflow"}>Multi-Region Multicloud Transit Gateway Peering Workflow</a>.

* You can segment your Aviatrix Transit Network to create network isolation and
  enhance security. To learn more, see
  <a href={"/docs/enterprise/" + "10.1" + "/guides/security/network-segmentation-secured"}>Network Segmentation Secured</a>.

* You can connect the Transit Gateway to external devices such as on-premises
  firewalls and routers to connect to your datacenter. See
  [Connecting the Transit Network to On-Premises](https://legacy.docs.aviatrix.com/documentation/latest/network/transit-to-externaldevice.html).

* You can connect the Transit Gateway to an Edge Gateway to extend your Aviatrix
  Transit Network to the network edge. See
  [Hybrid Cloud Connectivity](https://legacy.docs.aviatrix.com/documentation/latest/network/edge-connectivity.html).

* You can automate your multicloud Transit Network configuration by using Terraform. To learn more, see [Aviatrix Terraform Namespace](https://registry.terraform.io/namespaces/terraform-aviatrix-modules).

* You can add your cloud accounts to your CoPilot. To learn more, see <a href={"/docs/enterprise/" + "10.1" + "/reference/ui/cloud-resources/cloud-account#add-cloud-account"}>Cloud Account</a>.
