> ## Documentation Index
> Fetch the complete documentation index at: https://docs.aviatrix.com/llms.txt
> Use this file to discover all available pages before exploring further.
# Transit Gateway Multi-Peer BGP Over LAN in GCP Workflow
> Transit BGP to LAN allows Aviatrix Transit Gateways to communicate with multiple instances in the same VPC in GCP without running any tunneling protocol such as IPsec or GRE (traffic needs to be sent to the subnet gateway for forwarding).
## Introduction
Transit BGP to LAN allows Aviatrix Transit Gateways to communicate with multiple
instances in the same VPC in GCP without running any tunneling protocol such as
IPsec or GRE (traffic needs to be sent to the subnet gateway for forwarding).
One use case is to interoperate with third-party virtual appliances such as
SD-WAN cloud instances that do not have the capability to support BGP over any
tunneling protocols.
For example, integrating with SD-WAN gateways can be deployed as below, where
Aviatrix Multicloud Transit Gateways connect to third-party cloud instances in
the same VPC in GCP:
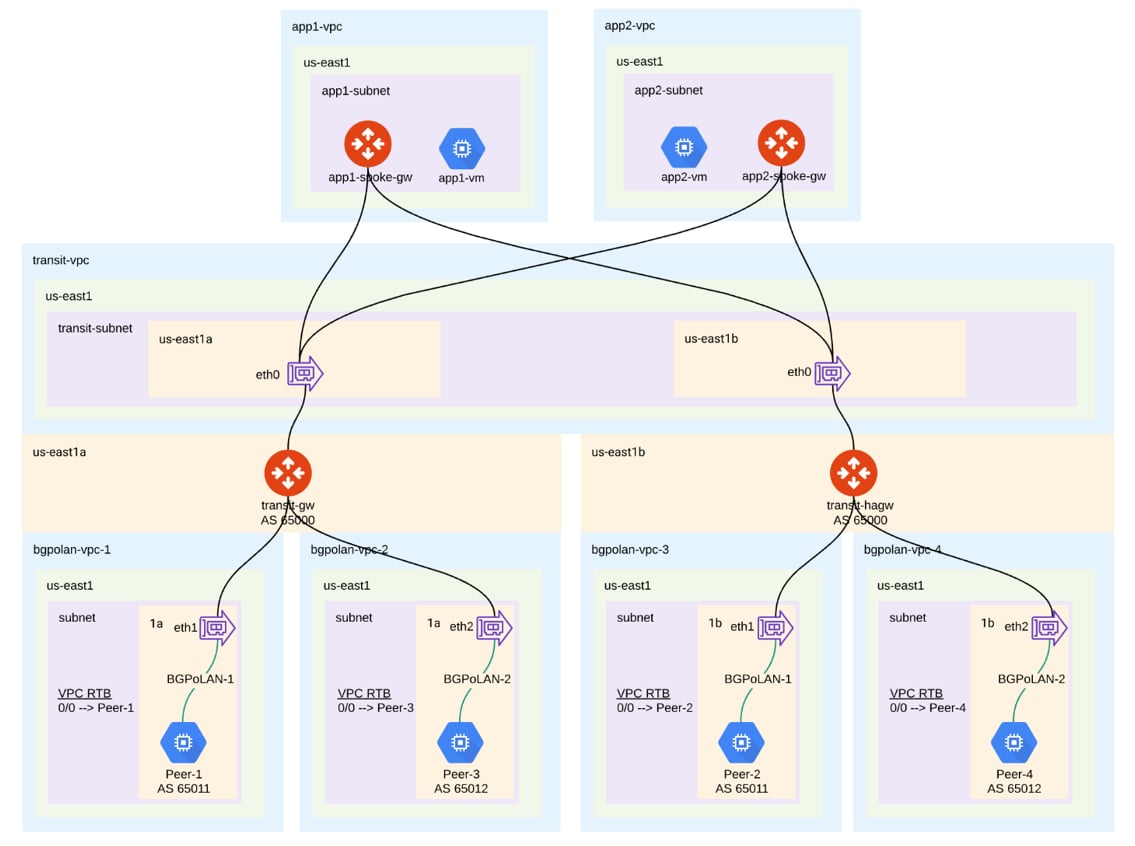 This document describes a step-by-step instruction on how to build Aviatrix
Transit Gateway to External Device using BGP over LAN. In this Tech Note, you
will learn the following:
1. [Deploy Aviatrix Transit Solution](#deploying-aviatrix-multicloud-transit-solution)
2. [Launch third-party cloud instances](#launching-third-party-cloud-instances)
3. [Build BGP over LAN](#building-bgp-over-lan)
For other BGP over LAN workflows, see:
* Multicloud Transit BGP over LAN in AWS Workflow
* Transit Gateway BGP over LAN in Azure Workflow
For more information about Multicloud Transit Network and External Device, see:
* Multi Cloud Global Transit FAQ
* Global Transit Network Workflow Instructions (AWS/Azure/GCP/OCI)
* Aviatrix Transit Gateway to External Devices
* Transit Network Design Patterns
- ActiveMesh 2.0 is required. To migrate to ActiveMesh 2.0, see [Migrating
from Classic Aviatrix Encrypted Transit Network to Aviatrix ActiveMesh Transit
Network](https://legacy.docs.aviatrix.com/documentation/latest/network/activemesh-migration.html).
- This solution is available in Azure when connecting to a single BGP peer.
Multi-peer BGP is supported in GCP and AWS. The workflow with GCP here is just
an example. Please adjust the topology depending on your requirements. \* GCP
does not allow interfaces to be added to an instance after deployment. Verify
the design before creating the instances to make sure they have all the
required interfaces.
### The key ideas for this solution are:
* A BGP session establishes between third-party cloud instances and Aviatrix
Transit Gateways via each LAN interface in the same VPC.
* Dataplane traffic also runs between third-party cloud instances and Aviatrix
Transit Gateways via each LAN interface without a tunnel protocol such as
IPsec or GRE.
### Prerequisites
* Upgrade
Aviatrix Controller to at least version 6.6.
* Third-party cloud instance supports high throughput.
### Deploying Aviatrix Multicloud Transit Solution
Refer to
Global Transit Network Workflow Instructions
for the below steps. Please adjust the topology depending on your requirements.
1. Deploy
[Aviatrix Multicloud Transit Gateway and HA](https://legacy.docs.aviatrix.com/documentation/latest/network/transit-gateway-about.html?expand=true)
with High Performance Encryption Mode encryption enabled in Transit VPC.
Ensure that you create the required number of BGP over LAN connections.
2. Deploy
[Spoke Gateway and HA](https://legacy.docs.aviatrix.com/documentation/latest/network/spoke-gateway-about.html?expand=true)
with High Performance Encryption Mode encryption enabled in Spoke VPC(s).
3. [Attach Spoke Gateways to Transit Network](https://legacy.docs.aviatrix.com/documentation/latest/network/spoke-gateway-attachments.html?expand=true).
### Launching Third-Party Cloud Instances
Deploy third-party cloud instances with an interface in the same VPC as the
Aviatrix Transit Gateway.
1. Create a third-party cloud instance and put the MGMT interface in public
gateway subnet.
2. Create a new WAN subnet and dedicated routing table for the WAN interface if
needed.
3. Create a new LAN subnet and a dedicated routing table for the LAN interface.
4. Make sure the IP forwarding function is enabled on the third-party cloud
instances.
GCP allows a maximum of eight interfaces per instance, and the maximum limit
depends on the number of vCPUs. Due to this limitation, the solution supports
seven BGP peers without FireNet enabled and six BGP peers with FireNet
enabled.
### Building BGP over LAN
1. In CoPilot, navigate to Networking > Connectivity > External Connections
(S2C).
2. Click *+External Connection*.
3. In the Add External Connection dialog, select *Connect Public Cloud to
External Device*.
4. Select *BGP over LAN* from the drop-down.
5. Enter the following information in the fields provided.
| Setting | Value |
| --------------------- | --------------------------------------------------------------------------------------------------------------------------------------------------------------------------------------------------- |
| Name | Unique name to identify the external device connection. |
| Local Gateway | Select the Transit VPC ID where the Transit gateway was launched (BGP over LAN must have been enabled for this Transit gateway). |
| Local ASN | The local BGP AS number (for on-site equipment) the Spoke gateway will use to exchange routes with the external device. |
| Remote ASN | Enter the BGP AS number of the cloud location the external device will use to exchange routes with the Transit Gateway. |
| BGP ActiveMesh | Enable full mesh BGP connections to the external devices. |
| Learned CIDR Approval | Set to On by default if selected for the Local Gateway. Otherwise, it is set to Off. |
| Remote LAN IP | The private IP of the LAN interface of the third-party cloud primary instance. |
| Local LAN IP | Aviatrix detects the Local LAN IP automatically and assigns an IP in the same subnet as the Remote LAN IP. Optionally, you can configure a specific IP within the same subnet as the Remote LAN IP. |
6. Click *Connect* to generate the BGP sessions.
7. Create an external connection for each BGP peer.
#### (Optional) Downloading the BGP over LAN configuration sample from Aviatrix Controller
1. On the External Connections (S2C) tab, click the vertical ellipsis and then
select *Download Configuration*.
2. In the Download Configuration dialog, select the following:
* Vendor: select the device you are using (any device that is capable of running
IPsec and BGP).
* Platform: select the applicable platform for the chosen device.
* Software: automatically selected based on the Vendor/Platform you select.
3. Click *Download*.
#### Configuring BGP over LAN on the Third-Party Cloud Instance(s)
1. (Optional) Open the downloaded BGP over LAN configuration file.
2. Configure the relevant BGP over LAN information on the third-party cloud
instance(s).
#### Verifying the Connection Status
Navigate to Diagnostics > Cloud Routes > Gateway Routes to check the gateway and
tunnel status.
#### Verifying the BGP session status on Aviatrix Controller
Navigate to Diagnostics > Cloud Routes > BGP Info and expand a Gateway Name to
check the Neighbor Status. The Status should be Established. If some external
connections for the selected Transit Gateway are Not Established, the overall
BGP Status for the Transit Gateway is Partially Established.
### Ready to Go
At this point, run connectivity and performance tests to ensure everything is
working correctly. You can use the Diagnostic Tools for
this.
This document describes a step-by-step instruction on how to build Aviatrix
Transit Gateway to External Device using BGP over LAN. In this Tech Note, you
will learn the following:
1. [Deploy Aviatrix Transit Solution](#deploying-aviatrix-multicloud-transit-solution)
2. [Launch third-party cloud instances](#launching-third-party-cloud-instances)
3. [Build BGP over LAN](#building-bgp-over-lan)
For other BGP over LAN workflows, see:
* Multicloud Transit BGP over LAN in AWS Workflow
* Transit Gateway BGP over LAN in Azure Workflow
For more information about Multicloud Transit Network and External Device, see:
* Multi Cloud Global Transit FAQ
* Global Transit Network Workflow Instructions (AWS/Azure/GCP/OCI)
* Aviatrix Transit Gateway to External Devices
* Transit Network Design Patterns
- ActiveMesh 2.0 is required. To migrate to ActiveMesh 2.0, see [Migrating
from Classic Aviatrix Encrypted Transit Network to Aviatrix ActiveMesh Transit
Network](https://legacy.docs.aviatrix.com/documentation/latest/network/activemesh-migration.html).
- This solution is available in Azure when connecting to a single BGP peer.
Multi-peer BGP is supported in GCP and AWS. The workflow with GCP here is just
an example. Please adjust the topology depending on your requirements. \* GCP
does not allow interfaces to be added to an instance after deployment. Verify
the design before creating the instances to make sure they have all the
required interfaces.
### The key ideas for this solution are:
* A BGP session establishes between third-party cloud instances and Aviatrix
Transit Gateways via each LAN interface in the same VPC.
* Dataplane traffic also runs between third-party cloud instances and Aviatrix
Transit Gateways via each LAN interface without a tunnel protocol such as
IPsec or GRE.
### Prerequisites
* Upgrade
Aviatrix Controller to at least version 6.6.
* Third-party cloud instance supports high throughput.
### Deploying Aviatrix Multicloud Transit Solution
Refer to
Global Transit Network Workflow Instructions
for the below steps. Please adjust the topology depending on your requirements.
1. Deploy
[Aviatrix Multicloud Transit Gateway and HA](https://legacy.docs.aviatrix.com/documentation/latest/network/transit-gateway-about.html?expand=true)
with High Performance Encryption Mode encryption enabled in Transit VPC.
Ensure that you create the required number of BGP over LAN connections.
2. Deploy
[Spoke Gateway and HA](https://legacy.docs.aviatrix.com/documentation/latest/network/spoke-gateway-about.html?expand=true)
with High Performance Encryption Mode encryption enabled in Spoke VPC(s).
3. [Attach Spoke Gateways to Transit Network](https://legacy.docs.aviatrix.com/documentation/latest/network/spoke-gateway-attachments.html?expand=true).
### Launching Third-Party Cloud Instances
Deploy third-party cloud instances with an interface in the same VPC as the
Aviatrix Transit Gateway.
1. Create a third-party cloud instance and put the MGMT interface in public
gateway subnet.
2. Create a new WAN subnet and dedicated routing table for the WAN interface if
needed.
3. Create a new LAN subnet and a dedicated routing table for the LAN interface.
4. Make sure the IP forwarding function is enabled on the third-party cloud
instances.
GCP allows a maximum of eight interfaces per instance, and the maximum limit
depends on the number of vCPUs. Due to this limitation, the solution supports
seven BGP peers without FireNet enabled and six BGP peers with FireNet
enabled.
### Building BGP over LAN
1. In CoPilot, navigate to Networking > Connectivity > External Connections
(S2C).
2. Click *+External Connection*.
3. In the Add External Connection dialog, select *Connect Public Cloud to
External Device*.
4. Select *BGP over LAN* from the drop-down.
5. Enter the following information in the fields provided.
| Setting | Value |
| --------------------- | --------------------------------------------------------------------------------------------------------------------------------------------------------------------------------------------------- |
| Name | Unique name to identify the external device connection. |
| Local Gateway | Select the Transit VPC ID where the Transit gateway was launched (BGP over LAN must have been enabled for this Transit gateway). |
| Local ASN | The local BGP AS number (for on-site equipment) the Spoke gateway will use to exchange routes with the external device. |
| Remote ASN | Enter the BGP AS number of the cloud location the external device will use to exchange routes with the Transit Gateway. |
| BGP ActiveMesh | Enable full mesh BGP connections to the external devices. |
| Learned CIDR Approval | Set to On by default if selected for the Local Gateway. Otherwise, it is set to Off. |
| Remote LAN IP | The private IP of the LAN interface of the third-party cloud primary instance. |
| Local LAN IP | Aviatrix detects the Local LAN IP automatically and assigns an IP in the same subnet as the Remote LAN IP. Optionally, you can configure a specific IP within the same subnet as the Remote LAN IP. |
6. Click *Connect* to generate the BGP sessions.
7. Create an external connection for each BGP peer.
#### (Optional) Downloading the BGP over LAN configuration sample from Aviatrix Controller
1. On the External Connections (S2C) tab, click the vertical ellipsis and then
select *Download Configuration*.
2. In the Download Configuration dialog, select the following:
* Vendor: select the device you are using (any device that is capable of running
IPsec and BGP).
* Platform: select the applicable platform for the chosen device.
* Software: automatically selected based on the Vendor/Platform you select.
3. Click *Download*.
#### Configuring BGP over LAN on the Third-Party Cloud Instance(s)
1. (Optional) Open the downloaded BGP over LAN configuration file.
2. Configure the relevant BGP over LAN information on the third-party cloud
instance(s).
#### Verifying the Connection Status
Navigate to Diagnostics > Cloud Routes > Gateway Routes to check the gateway and
tunnel status.
#### Verifying the BGP session status on Aviatrix Controller
Navigate to Diagnostics > Cloud Routes > BGP Info and expand a Gateway Name to
check the Neighbor Status. The Status should be Established. If some external
connections for the selected Transit Gateway are Not Established, the overall
BGP Status for the Transit Gateway is Partially Established.
### Ready to Go
At this point, run connectivity and performance tests to ensure everything is
working correctly. You can use the Diagnostic Tools for
this.