> ## Documentation Index
> Fetch the complete documentation index at: https://docs.aviatrix.com/llms.txt
> Use this file to discover all available pages before exploring further.
# Edge Spoke Gateway Deployment Workflow on Self-Managed VMware ESXi and KVM
> This document provides instructions for deploying a primary and secondary highly available (HA) Edge Spoke Gateways on self-managed VMware ESXi or an open-source Kernal-based Virtual Machine (KVM).
This document provides instructions for deploying a primary and secondary highly
available (HA) Edge Spoke Gateways on self-managed VMware ESXi or an open-source
Kernel-based Virtual Machine (KVM).
For an overview of Aviatrix Edge, see
About Aviatrix Hybrid Cloud Edge
.
The deployment workflow on this page applies to all currently supported
Aviatrix Edge VM image generations, including **g3**, **g4**, and later.
Specific image generations may have different VM sizing, disk, and host
requirements; always confirm the requirements for the image generation you are
deploying before you provision the VM. See{" "}
About Aviatrix Edge Gateway Requirements
for the current per-image-generation specifications.
## Topology
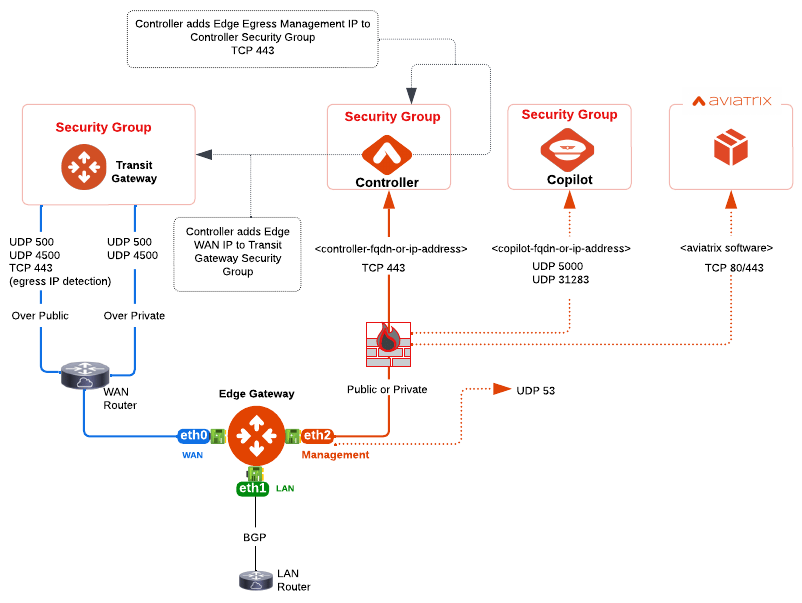
The following diagram shows an example of network connectivity for Aviatrix Edge
Gateway to Transit Gateway in AWS.
 ## Prerequisites
Before you deploy an Aviatrix Edge Gateway on VMware ESXi or KVM, ensure the
prerequisite requirements are complete, see
Prerequisites for Edge Spoke Deployment on VMware ESXi and KVM
.
## Aviatrix Edge Spoke Gateway Deployment Workflow
To deploy Aviatrix Edge Spoke Gateway, first you need to procure and onboard
your edge device on the platform of your choice (see
Prerequisites for Edge Spoke Deployment on VMware ESXi and KVM
). Next, you deploy the Aviatrix Edge Gateway on the edge device and attach the
Edge Gateway to the Aviatrix Transit Gateway for cloud connectivity. Then,
configure the Edge Gateway for LAN-side connectivity.
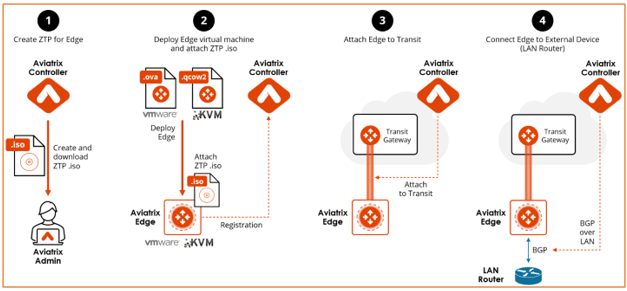
The diagram below provides a high-level view of the four-step process for
deploying Aviatrix Edge Spoke Gateway in Aviatrix CoPilot. You have the option
to use either VMware ESXi or an open-source Kernel-based Virtual Machine (KVM)
to deploy the Edge Spoke Gateway VM and attach the ISO file. The ISO file is the
equivalent of the Zero-Touch Provisioning (ZTP) token. ZTP allows to remotely
deploy and provision network devices at remote locations.
## Prerequisites
Before you deploy an Aviatrix Edge Gateway on VMware ESXi or KVM, ensure the
prerequisite requirements are complete, see
Prerequisites for Edge Spoke Deployment on VMware ESXi and KVM
.
## Aviatrix Edge Spoke Gateway Deployment Workflow
To deploy Aviatrix Edge Spoke Gateway, first you need to procure and onboard
your edge device on the platform of your choice (see
Prerequisites for Edge Spoke Deployment on VMware ESXi and KVM
). Next, you deploy the Aviatrix Edge Gateway on the edge device and attach the
Edge Gateway to the Aviatrix Transit Gateway for cloud connectivity. Then,
configure the Edge Gateway for LAN-side connectivity.
The diagram below provides a high-level view of the four-step process for
deploying Aviatrix Edge Spoke Gateway in Aviatrix CoPilot. You have the option
to use either VMware ESXi or an open-source Kernel-based Virtual Machine (KVM)
to deploy the Edge Spoke Gateway VM and attach the ISO file. The ISO file is the
equivalent of the Zero-Touch Provisioning (ZTP) token. ZTP allows to remotely
deploy and provision network devices at remote locations.
 This workflow provides the steps to create a primary and secondary (HA) Edge
Gateway in VMware ESXi and KVM. It also provides the steps to attach the Edge
Gateways to a Transit Gateway and connect the Edge Gateways to an external
device, such as a LAN BGP router.
1. [Create the ZTP ISO for the primary Edge Gateway](#creating-the-ztp-iso-for-the-edge-gateway-self-managed-platform).
2. [Deploy the primary Edge Gateway Virtual Machine and Attach ZTP ISO](#deploying-the-edge-gateway-virtual-machine-instance-and-attaching-the-ztp-iso).
3. [Create the ZTP ISO for the secondary Edge Gateway](#creating-a-highly-available-edge-gateway-self-managed-platform).
4. [Deploy the secondary Edge Gateway Virtual Machine and Attach ZTP ISO](#deploying-the-edge-gateway-virtual-machine-instance-and-attaching-the-ztp-iso).
5. [Attach the primary Edge Gateway to a Transit Gateway](#attach-an-edge-spoke-gateway-to-a-transit-gateway).
6. [Connect the Edge Gateway to an external device](#connecting-edge-spoke-gateway-to-an-external-device-bgp-over-lan).
## Creating the ZTP ISO for the Edge Gateway (Self-Managed Platform)
You must have port 443 open to the IP address of the Aviatrix Controller. For
the required port access for Edge Gateway deployment, refer to
Aviatrix Edge Gateway Ports and Protocols
.
In Aviatrix CoPilot:
1. Go to **Cloud Fabric > Hybrid Cloud > Edge Gateways** tab.
2. Click **+ Spoke Gateways**, then provide the following information.
Provide the following information.
| Parameter | Description |
| ----------------- | ------------------------------------------------------------------------------------------------------------------------------------------------------------ |
| Name | Name for the Edge Gateway. |
| Platform | Select **edge\_admin**. |
| Site | Select an existing name or enter a new name to identify the edge location. Site names cannot contain spaces. |
| ZTP File Type | Select the ZTP file type. For VMware ESXi, select **iso**. For KVM, select **iso** or **cloud-init**. |
| High Availability | High Availability is set to **Off** for the primary Edge Gateway. For the secondary (HA) Edge Gateways, select **Active-Active** or **Active-Standby** mode. |
Deploying multiple Edge Gateways for the same site is supported. A maximum of
8 Edge Gateways are supported.
3. [Configure the WAN, LAN, and Management interfaces](#configuring-the-edge-gateway-interfaces).
### Configuring the Edge Gateway Interfaces
By default, an Aviatrix Edge Gateway has three interfaces: one WAN interface on
eth0, one LAN interface on eth1, and one Management interface on eth2. You will
need these configuration information to configure the interfaces.
In the **Interface Configuration** section, configure the **WAN**, **LAN**, and
**Management** interfaces for the Edge Gateway.
#### Configuring the WAN Interface
Click **WAN**, then provide the following information.
For IP and DNS settings, enter using the applicable format. For example, if the
Edge Gateway's WAN IP is 10.1.1.151, enter 10.1.1.151/24 or what your netmask
is.
| Parameter | Description |
| ------------------ | ---------------------------------------------------------------------------------------------------------------- |
| IP Assignment | The default is **Static** for static IP assignment. **DHCP** for dynamic IP address assignment is not supported. |
| Interface Labels | (optional) A name to identify the WAN interface. |
| Interface CIDR | The CIDR for the WAN interface. |
| Default Gateway IP | The Default Gateway IP address for the WAN interface. |
| Public IP | (optional) The Public IP address of the WAN interface. |
To change or update the Edge Gateway WAN connectivity to Transit Gateway, you
will need to first detach the Edge-to-Transit gateway attachment, if there is
an attachment.
#### Configuring the LAN Interface
Click **LAN**, then provide the following information.
| Parameter | Description |
| ------------------ | -------------------------------------------------------------------------------------------------------------------------- |
| IP Assignment | The default is **Static** for static IP assignment. **DHCP** for dynamic IP address assignment is not supported. |
| VRRP | If you have Virtual Router Redundancy Protocol (VRRP) configured for the LAN router redundancy, set this switch to **On**. |
| Interface CIDR | The CIDR for the LAN interface. |
| VRRP Gateway IP | The Virtual IP (VIP) address, when VRRP is enabled. |
| Default Gateway IP | (optional) The Default Gateway IP for the LAN interface. |
| Interface Labels | (optional) A name to identify the LAN interface. |
**VLAN Interface**
If your LAN is segmented into virtual LANs (VLANs), click **+ VLAN Interface**
to add one or more VLAN sub-interfaces, then provide the following information
for each VLAN sub-interface.
You cannot edit the VLAN ID after the Edge Gateway is created. To edit the
VLAN sub-interface attributes, it is highly recommended to delete and recreate
the VLAN sub-interface configuration.
| Parameter | Description |
| ----------------------- | ------------------------------------------------------------------------------------------------ |
| Interface CIDR | The native VLAN interface IP address. This is the interface where the untagged packets are sent. |
| VRRP Gateway IP | The Virtual IP for the VRRP Gateway, when VRRP is enabled. |
| Default Gateway IP | The Default Gateway IP address for the native VLAN interface. |
| Interface Labels | (optional) A name to identify this native VLAN interface. |
| **VLAN Sub-Interfaces** | |
| VLAN ID | The VLAN ID. VLAN ID must be a number between 2 and 4092. |
| VLAN Interface CIDR | The VLAN sub-interface IP address. |
| VRRP Gateway IP | The Virtual IP for the VRRP Gateway, when VRRP is enabled. |
| Default Gateway IP | The Default Gateway IP address for this VLAN sub-interface. |
| Sub-Interface Tag | (optional) A name to identify this VLAN sub-interface. |
#### Configuring the MGMT Interface
Click **MGMT**, then provide the following information.
| Parameter | Description |
| --------------- | ---------------------------------------------------------------------------------------------------------------------------------------------------------------------------------------------------- |
| IP Assignment | Select **DHCP** or **Static**, depending on your environment. This setting cannot be changed after the gateway is created. |
| Private Network | If the Management interface connection to the Aviatrix Controller is over a private network, set this switch to **On**. Leave the setting to **Off**, if the connection is over the public internet. |
| Parameter | Description |
| ---------------------- | ---------------------------------------------------------------- |
| Egress CIDR (Optional) | The CIDR range for the egress flow for the Management interface. |
CoPilot creates the ISO file and downloads the file to your downloads folder.
Next, log in to your VMware ESXi or KVM host and upload the ISO or cloud-init
file to a datastore or storage device. Then, deploy the Edge Gateway VM instance
and attach the ISO or cloud-init image file to complete the Edge Gateway
creation and authentication with the Aviatrix Controller.
The ISO file expires after 24 hours. You cannot download it again and will
have to repeat the above steps. You must mount the ISO file to an Edge VM to
complete the Edge Gateway registration within 24 hours. See [Deploying the
Edge Gateway Virtual Machine
Instance](#deploying-the-edge-gateway-virtual-machine-instance-and-attaching-the-ztp-iso).
## Creating a Highly Available Edge Gateway (Self-Managed Platform)
Before you can create the highly available Edge Gateway, the primary Edge
Gateway must be deployed and its status must be **Up**.
You must have port 443 open to the IP address of the Aviatrix Controller. For
the required port access for Edge Gateway deployment, refer to
Aviatrix Edge Gateway Ports and Protocols
.
To create a secondary (HA) Edge Gateway, follow these steps.
1. In Aviatrix CoPilot, go to **Cloud Fabric** > **Edge** > **Gateways** tab.
2. In the table, locate the primary Edge Gateway for which you want to create
the HA gateway and click its Edit icon.
3. In the **Edit Edge Gateway** dialog box, from the **High Availability**
dropdown menu, select **Active-Active** or **Active-Standby** mode.
4. In the Interfaces section, configure the WAN, LAN, and Management interfaces
for the secondary (HA) Edge Gateway.
**WAN Interface**
Click **WAN**, then provide the following information.
For IP and DNS settings, enter using the applicable format. For example, if the
Edge Gateway's WAN IP is 10.1.1.151, enter 10.1.1.151/24 or what your netmask
is.
| Parameter | Description |
| ------------------ | ---------------------------------------------------------------------------------------------------------------- |
| IP Assignment | The default is **Static** for static IP assignment. **DHCP** for dynamic IP address assignment is not supported. |
| Interface Labels | (optional) A name to identify the WAN interface. |
| Interface CIDR | The CIDR for the WAN interface. |
| Default Gateway IP | The Default Gateway IP address for the WAN interface. |
| Public IP | (optional) The Public IP address of the WAN interface. |
**LAN Interface**
Click **LAN**, then provide the following information.
| Parameter | Description |
| ------------------ | -------------------------------------------------------------------------------------------------------------------------- |
| IP Assignment | The default is **Static** for static IP assignment. **DHCP** for dynamic IP address assignment is not supported. |
| VRRP | If you have Virtual Router Redundancy Protocol (VRRP) configured for the LAN router redundancy, set this switch to **On**. |
| Interface CIDR | The CIDR for the LAN interface. |
| VRRP Gateway IP | The Virtual IP (VIP) address, when VRRP is enabled. |
| Default Gateway IP | (optional) The Default Gateway IP for the LAN interface. |
| Interface Labels | (optional) A name to identify the LAN interface. |
**VLAN Interface**
Provide the following information for each VLAN sub-interface.
| Parameter | Description |
| ----------------------- | ------------------------------------------------------------------------------------------------ |
| Interface CIDR | The native VLAN interface IP address. This is the interface where the untagged packets are sent. |
| Default Gateway IP | The Default Gateway IP address for the native VLAN interface. |
| Interface Labels | (optional) A name to identify this native VLAN interface. |
| **VLAN Sub-Interfaces** | |
| VLAN Interface CIDR | The VLAN sub-interface IP address. |
| Default Gateway IP | The Default Gateway IP address for this VLAN sub-interface. |
VLAN configurations are added to the primary Edge Gateway. On the secondary
Edge Gateway, some fields are disabled and non-editable, the field value
appears when it is selected.
CoPilot creates the ISO file and downloads the file to your downloads folder.
Next, log in to your VMware ESXi or KVM host and upload the ISO or cloud-init
file to a datastore or storage device. Then, deploy the Edge Gateway VM instance
and attach the ISO or cloud-init image file to complete the Edge Gateway
creation and authentication with the Aviatrix Controller.
The ISO file expires after 24 hours. You cannot download it again and will
have to repeat the above steps. You must mount the ISO file to an Edge VM to
complete the Edge Gateway registration within the 24-hour timeframe.
See
[Deploying the Edge Gateway Virtual Machine Instance](#deploying-the-edge-gateway-virtual-machine-instance-and-attaching-the-ztp-iso).
## Deploying the Edge Gateway Virtual Machine Instance and Attaching the ZTP ISO
See:
* [Deploying the Edge Gateway Virtual Machine in VMware ESXi](#deploying-the-edge-gateway-virtual-machine-in-vmware-esxi)
* [Deploying the Edge Gateway Virtual Machine in KVM](#deploying-the-edge-gateway-virtual-machine-in-kvm)
### Deploying the Edge Gateway Virtual Machine in VMware ESXi
To deploy the Edge Gateway virtual machine, follow these steps.
1. If you have not downloaded the ESXi OVA file, download the file by using the
link provided to you by Aviatrix Support. See
Download the Aviatrix Secure Edge Image File
.
2. Log in to VMware vSphere Web client to access the ESXi host.
You can use vSphere Web client to manage ESXi host, launch a VM, mount ISO
files, and start and stop the Aviatrix Edge Gateway.
3. Load the OVA file into the ESXi using vSphere, go to **ESXi** > **Virtual
Machines** > **Create/Register VM**.
4. Select **Deploy a virtual machine from an OVF or OVA file** and click
**Next**.
5. Enter a name for the Aviatrix Secure Edge VM and drag the OVA file into the
blue pane, then click **Next**.
6. In the Select storage page, select the storage device where to create the VM
instance (the OVA is installed in this instance) and click **Next**.
7. In the Deployment options window, enter the **Network mappings** for WAN,
LAN, and MGMT network interfaces and select the **Deployment type**. (Refer
to the pull-down menu or see
Virtual Machine CPU and Memory Configurations
.)
If necessary, you can change the network interface mappings after deployment.
8. Click **Next**.
9. In the Ready to complete page, click **Finish**.
Next,
[attach the ISO file](#attaching-the-iso-file-to-the-edge-gateway-virtual-machine-in-vmware-esxi)
to Edge Gateway VM, which will auto-mount the media with the configuration file
to be provision the Edge Gateway.
#### Attaching the ISO File to the Edge Gateway Virtual Machine in VMware ESXi
The ZTP ISO file can only be used for a single Aviatrix Secure Edge VM
instance, and only one time for that instance.
The ZTP token expires after 24 hours. If you wait too long to boot up the VM
with the attached ISO image, it will not work. In that case, delete the Edge
Gateway in the Aviatrix CoPilot and create a new Edge Gateway to receive a new
ISO file.
1. Upload the ISO file downloaded from Aviatrix CoPilot to your VMware
datastore.
2. In vSphere, select the Aviatrix Secure Edge VM you created and click **Edit
settings**.
3. Select the **Virtual Hardware** tab.
4. Next to CD/DVD Drive 1, click the dropdown menu and select **Datastore ISO
file**.
5. Next to CD/DVD Drive 1, ensure the **Connect** box is checked and click
**Save**.
**Connect at power on** is required when you attach the ISO image to the VM
for the first time. If the VM is powered on at the time you attach the ISO
image, select the ISO file and save the configuration to make the ISO
available to ZTP.
6. Next to the CD/DVD Media, click **Browse**, locate the datastore and select
the ISO file you uploaded.
7. Click **Save**. ZTP auto-mounts the ISO file and deploys the Edge Gateway on
the VM.
Verify the Edge Gateway is Up (see
[Verifying the Edge Gateway Creation](https://legacy.docs.aviatrix.com/documentation/latest/network/edge-create-verify.html)).
Next,
[attach the Edge Gateway to the Transit Gateway](#attach-an-edge-spoke-gateway-to-a-transit-gateway).
### Deploying the Edge Gateway Virtual Machine in KVM
Aviatrix Edge Gateway can be deployed on KVM on Linux. There are numerous
user-space front-ends to KVM. The Edge Gateway VM does not depend on any
specific user-space tools, but you must understand how to configure your choice
of KVM tools. Refer to your management tool's documentation for details. If
these requirements are unclear, consider adopting
Aviatrix Edge Platform
instead, which manages this for you.
**Requirements for Edge Gateway on KVM:**
* The network must use `virtio` drivers. Emulated physical drivers do not
provide adequate performance.
* Multi-queue networking should be enabled, with the number of queues equal to
the number of CPUs.
* Storage must use `virtio` or `nvme`. Emulated physical drivers do not provide
adequate performance.
* At least 64 GB of disk space is required for production use cases. The images
support smaller deployments, but this is only appropriate for lab scenarios.
* The LAN, WAN, and MGMT network bridges must be associated with the physical
Ethernet interfaces on the KVM host. Refer to your KVM product documentation.
Even with `virtio` networking, self-managed Edge Gateway deployments on KVM
may run into CPU saturation under heavy load. For higher performance, consider
Aviatrix Edge Platform
, which uses interface passthrough to deliver bare-metal network speeds.
After you have configured your KVM environment to meet the requirements above,
deploy the Edge Gateway VM using your chosen KVM management tool:
1. Download the KVM QCOW2 image file using the link provided by Aviatrix
Support. See
Download the Aviatrix Secure Edge Image File
for the current per-image-generation disk, vCPU, and memory specifications
(these vary across image generations such as g3 and g4).
2. Create the Edge Gateway VM from the QCOW2 image, attaching the WAN, LAN, and
MGMT virtual bridge interfaces using the `virtio` device model.
3. Attach the ZTP ISO file you downloaded from Aviatrix CoPilot to the VM.
4. Start the VM. ZTP auto-mounts the ISO file and provisions the Edge Gateway.
Verify the Edge Gateway is Up (see
[Verifying the Edge Gateway Creation](https://legacy.docs.aviatrix.com/documentation/latest/network/edge-create-verify.html)).
Next,
[attach the Edge Gateway to the Transit Gateway](#attach-an-edge-spoke-gateway-to-a-transit-gateway).
## Attach an Edge Spoke Gateway to a Transit Gateway
To attach an Edge Spoke Gateway to a Transit Gateway, perform the prerequisites
then create the attachment.
### Prerequisites
Before you create the attachment:
* Ensure **Local ASN Number** is configured on Edge and Transit Gateway.
* If the Edge to Transit Gateway attachment is over public network, you need to
update the WAN Public IP on the Edge Gateway.
1. Go to **Cloud Fabric** > **Hybrid Cloud** > **Edge Gateways** tab.
2. Click **Spoke Gateways**.
3. Locate the Edge Gateway, and click its Edit icon on the right.
4. In **Edit Edge Gateway**, go to **Interface Configuration** and click
**WAN**.
5. In **Public IP**, click **Discover**.
6. Verify the WAN Public IP and click **Save**.
### Attach Edge Spoke Gateway to Transit Gateway
To create a High Performance Encryption attachment peering, make sure the
Transit Gateway is created with High Performance Encryption enabled.
If you want Jumbo Frame enabled for the attachment peering, make sure to
enable Jumbo Frame on the Edge Gateway before you attach it to the Transit
Gateway.
To create the attachment:
1. In Aviatrix CoPilot, go to **Cloud Fabric** > **Hybrid Cloud** > **Edge
Gateways** tab.
2. Click **Spoke Gateways**.
3. Locate the Edge Spoke Gateway, and click **Manage Gateway Attachments** icon
on the right side of the row.
4. In **Manage Gateway Attachments > Transit Gateway** tab, click
**+Attachment** and provide the following information.
| Field | Description |
| ---------------------------- | --------------------------------------------------------------------------------------------------------------------------------------------------------------------------------------------------------------------------------------------------------------------------------------------------------------------------------------------------------------------------------------------------- |
| Transit Gateway | The Transit Gateway in cloud to attach. |
| Local Edge Gateway Interface | The WAN interface of the local Edge Spoke Gateway to use for the attachment. |
| Attach Over | The connection between the Edge gateways. It can be over a **Private Network** or the **Public Network**. |
| ActiveMesh | ActiveMesh enables full mesh peering between the local and remote Edge gateways. For full mesh peering, set **ActiveMesh** toggle **On**. |
| Jumbo Frame | Jumbo Frame improves performance for the connection between the Edge gateways. Jumbo Frame is applicable when the attachment is over a Private network. To use Jumbo Frames for the connection , set **Jumbo Frame** toggle to **On**. |
| Number of HPE Tunnels | The number of High Performance Encryption (HPE) tunnels to create for the attachment peering. **Single** creates a single tunnel. **Maximum** creates the maximum tunnels based on the gateway sizes and the number of interface IPs on the peering gateway. This option is available only for connection over a Private network. **Custom** allows you to specify the number of tunnels to create. |
To attach the Edge Spoke Gateway to another Transit Gateway, click **+
Attachment** again and provide the required information.
You can attach an Edge Spoke Gateway to multiple Transit Gateways. Each
attachment can be configured with different parameters, such as connecting
interfaces, connection over private or public network, high-performance
encryption, and Jumbo Frame.
5. Click **Save**.
### Manage Gateway Attachments
You can attach an Edge Spoke Gateway to multiple Transit Gateways. Each
attachment can be configured with different parameters, such as connecting
interfaces, connection over private or public network, high-performance
encryption, and Jumbo Frame.
Click **+ Attachment** and provide the required information.
| Field | Description |
| ---------------------------- | ---------------------------------------------------------------------------- |
| Transit Gateway | The Transit Gateway in cloud to attach. |
| Local Edge Gateway Interface | The WAN interface of the local Edge Spoke Gateway to use for the attachment. |
**Advanced**
| Field | Description |
| --------------------- | --------------------------------------------------------------------------------------------------------------------------------------------------------------------------------------------------------------------------------------------------------------------------------------------------------------------------------------------------------------------------------------------------- |
| Attach Over | The connection between the Edge gateways. It can be over a **Private Network** or the **Public Network**. |
| ActiveMesh | ActiveMesh enables full mesh peering between the local and remote Edge gateways. For full mesh peering, set **ActiveMesh** toggle **On**. |
| Jumbo Frame | Jumbo Frame improves performance for the connection between the Edge gateways. Jumbo Frame is applicable when the attachment is over a Private network. To use Jumbo Frames for the connection , set **Jumbo Frame** toggle to **On**. |
| Number of HPE Tunnels | The number of High Performance Encryption (HPE) tunnels to create for the attachment peering. **Single** creates a single tunnel. **Maximum** creates the maximum tunnels based on the gateway sizes and the number of interface IPs on the peering gateway. This option is available only for connection over a Private network. **Custom** allows you to specify the number of tunnels to create. |
Next,
[connect the Edge Gateway to the external device](#connecting-edge-spoke-gateway-to-an-external-device-bgp-over-lan).
## Connecting Edge Spoke Gateway to an External Device (BGP over LAN)
For LAN-side connectivity, you can connect the Edge Spoke Gateway to an external
device, such as a LAN BGP router.
To connect the Edge Gateway to the LAN BGP router, follow these steps.
1. In CoPilot, navigate to **Networking > Connectivity** > **External
Connections (S2C)** tab.
2. From **+ External Connection To** dropdown menu, select **External Device**,
then provide the following information.
| Field | Description |
| ------------- | -------------------------------------------------------------------------------------------------------------------------------------------------------------------------- |
| Name | Name to identify the connection to the LAN router. |
| Connect Using | Select **BGP**. |
| Type | Select **LAN**. |
| Local Gateway | The Edge Gateway that you want to connect to the LAN router. |
| Local ASN | The Local AS number that the Edge Gateway will use to exchange routes with the LAN router. This is automatically populated if the Edge Gateway is assigned an ASN already. |
3. In **LAN Configuration**, provide the following information.
| Field | Description |
| ------------- | --------------------------------------------------------------------------------- |
| Remote ASN | The BGP AS number that is configured on the LAN router. |
| Remote LAN IP | The IP address of the LAN router. |
| Local LAN IP | This is automatically populated with the Edge Gateway's LAN interface IP address. |
4. Click **Save**.
This workflow provides the steps to create a primary and secondary (HA) Edge
Gateway in VMware ESXi and KVM. It also provides the steps to attach the Edge
Gateways to a Transit Gateway and connect the Edge Gateways to an external
device, such as a LAN BGP router.
1. [Create the ZTP ISO for the primary Edge Gateway](#creating-the-ztp-iso-for-the-edge-gateway-self-managed-platform).
2. [Deploy the primary Edge Gateway Virtual Machine and Attach ZTP ISO](#deploying-the-edge-gateway-virtual-machine-instance-and-attaching-the-ztp-iso).
3. [Create the ZTP ISO for the secondary Edge Gateway](#creating-a-highly-available-edge-gateway-self-managed-platform).
4. [Deploy the secondary Edge Gateway Virtual Machine and Attach ZTP ISO](#deploying-the-edge-gateway-virtual-machine-instance-and-attaching-the-ztp-iso).
5. [Attach the primary Edge Gateway to a Transit Gateway](#attach-an-edge-spoke-gateway-to-a-transit-gateway).
6. [Connect the Edge Gateway to an external device](#connecting-edge-spoke-gateway-to-an-external-device-bgp-over-lan).
## Creating the ZTP ISO for the Edge Gateway (Self-Managed Platform)
You must have port 443 open to the IP address of the Aviatrix Controller. For
the required port access for Edge Gateway deployment, refer to
Aviatrix Edge Gateway Ports and Protocols
.
In Aviatrix CoPilot:
1. Go to **Cloud Fabric > Hybrid Cloud > Edge Gateways** tab.
2. Click **+ Spoke Gateways**, then provide the following information.
Provide the following information.
| Parameter | Description |
| ----------------- | ------------------------------------------------------------------------------------------------------------------------------------------------------------ |
| Name | Name for the Edge Gateway. |
| Platform | Select **edge\_admin**. |
| Site | Select an existing name or enter a new name to identify the edge location. Site names cannot contain spaces. |
| ZTP File Type | Select the ZTP file type. For VMware ESXi, select **iso**. For KVM, select **iso** or **cloud-init**. |
| High Availability | High Availability is set to **Off** for the primary Edge Gateway. For the secondary (HA) Edge Gateways, select **Active-Active** or **Active-Standby** mode. |
Deploying multiple Edge Gateways for the same site is supported. A maximum of
8 Edge Gateways are supported.
3. [Configure the WAN, LAN, and Management interfaces](#configuring-the-edge-gateway-interfaces).
### Configuring the Edge Gateway Interfaces
By default, an Aviatrix Edge Gateway has three interfaces: one WAN interface on
eth0, one LAN interface on eth1, and one Management interface on eth2. You will
need these configuration information to configure the interfaces.
In the **Interface Configuration** section, configure the **WAN**, **LAN**, and
**Management** interfaces for the Edge Gateway.
#### Configuring the WAN Interface
Click **WAN**, then provide the following information.
For IP and DNS settings, enter using the applicable format. For example, if the
Edge Gateway's WAN IP is 10.1.1.151, enter 10.1.1.151/24 or what your netmask
is.
| Parameter | Description |
| ------------------ | ---------------------------------------------------------------------------------------------------------------- |
| IP Assignment | The default is **Static** for static IP assignment. **DHCP** for dynamic IP address assignment is not supported. |
| Interface Labels | (optional) A name to identify the WAN interface. |
| Interface CIDR | The CIDR for the WAN interface. |
| Default Gateway IP | The Default Gateway IP address for the WAN interface. |
| Public IP | (optional) The Public IP address of the WAN interface. |
To change or update the Edge Gateway WAN connectivity to Transit Gateway, you
will need to first detach the Edge-to-Transit gateway attachment, if there is
an attachment.
#### Configuring the LAN Interface
Click **LAN**, then provide the following information.
| Parameter | Description |
| ------------------ | -------------------------------------------------------------------------------------------------------------------------- |
| IP Assignment | The default is **Static** for static IP assignment. **DHCP** for dynamic IP address assignment is not supported. |
| VRRP | If you have Virtual Router Redundancy Protocol (VRRP) configured for the LAN router redundancy, set this switch to **On**. |
| Interface CIDR | The CIDR for the LAN interface. |
| VRRP Gateway IP | The Virtual IP (VIP) address, when VRRP is enabled. |
| Default Gateway IP | (optional) The Default Gateway IP for the LAN interface. |
| Interface Labels | (optional) A name to identify the LAN interface. |
**VLAN Interface**
If your LAN is segmented into virtual LANs (VLANs), click **+ VLAN Interface**
to add one or more VLAN sub-interfaces, then provide the following information
for each VLAN sub-interface.
You cannot edit the VLAN ID after the Edge Gateway is created. To edit the
VLAN sub-interface attributes, it is highly recommended to delete and recreate
the VLAN sub-interface configuration.
| Parameter | Description |
| ----------------------- | ------------------------------------------------------------------------------------------------ |
| Interface CIDR | The native VLAN interface IP address. This is the interface where the untagged packets are sent. |
| VRRP Gateway IP | The Virtual IP for the VRRP Gateway, when VRRP is enabled. |
| Default Gateway IP | The Default Gateway IP address for the native VLAN interface. |
| Interface Labels | (optional) A name to identify this native VLAN interface. |
| **VLAN Sub-Interfaces** | |
| VLAN ID | The VLAN ID. VLAN ID must be a number between 2 and 4092. |
| VLAN Interface CIDR | The VLAN sub-interface IP address. |
| VRRP Gateway IP | The Virtual IP for the VRRP Gateway, when VRRP is enabled. |
| Default Gateway IP | The Default Gateway IP address for this VLAN sub-interface. |
| Sub-Interface Tag | (optional) A name to identify this VLAN sub-interface. |
#### Configuring the MGMT Interface
Click **MGMT**, then provide the following information.
| Parameter | Description |
| --------------- | ---------------------------------------------------------------------------------------------------------------------------------------------------------------------------------------------------- |
| IP Assignment | Select **DHCP** or **Static**, depending on your environment. This setting cannot be changed after the gateway is created. |
| Private Network | If the Management interface connection to the Aviatrix Controller is over a private network, set this switch to **On**. Leave the setting to **Off**, if the connection is over the public internet. |
| Parameter | Description |
| ---------------------- | ---------------------------------------------------------------- |
| Egress CIDR (Optional) | The CIDR range for the egress flow for the Management interface. |
CoPilot creates the ISO file and downloads the file to your downloads folder.
Next, log in to your VMware ESXi or KVM host and upload the ISO or cloud-init
file to a datastore or storage device. Then, deploy the Edge Gateway VM instance
and attach the ISO or cloud-init image file to complete the Edge Gateway
creation and authentication with the Aviatrix Controller.
The ISO file expires after 24 hours. You cannot download it again and will
have to repeat the above steps. You must mount the ISO file to an Edge VM to
complete the Edge Gateway registration within 24 hours. See [Deploying the
Edge Gateway Virtual Machine
Instance](#deploying-the-edge-gateway-virtual-machine-instance-and-attaching-the-ztp-iso).
## Creating a Highly Available Edge Gateway (Self-Managed Platform)
Before you can create the highly available Edge Gateway, the primary Edge
Gateway must be deployed and its status must be **Up**.
You must have port 443 open to the IP address of the Aviatrix Controller. For
the required port access for Edge Gateway deployment, refer to
Aviatrix Edge Gateway Ports and Protocols
.
To create a secondary (HA) Edge Gateway, follow these steps.
1. In Aviatrix CoPilot, go to **Cloud Fabric** > **Edge** > **Gateways** tab.
2. In the table, locate the primary Edge Gateway for which you want to create
the HA gateway and click its Edit icon.
3. In the **Edit Edge Gateway** dialog box, from the **High Availability**
dropdown menu, select **Active-Active** or **Active-Standby** mode.
4. In the Interfaces section, configure the WAN, LAN, and Management interfaces
for the secondary (HA) Edge Gateway.
**WAN Interface**
Click **WAN**, then provide the following information.
For IP and DNS settings, enter using the applicable format. For example, if the
Edge Gateway's WAN IP is 10.1.1.151, enter 10.1.1.151/24 or what your netmask
is.
| Parameter | Description |
| ------------------ | ---------------------------------------------------------------------------------------------------------------- |
| IP Assignment | The default is **Static** for static IP assignment. **DHCP** for dynamic IP address assignment is not supported. |
| Interface Labels | (optional) A name to identify the WAN interface. |
| Interface CIDR | The CIDR for the WAN interface. |
| Default Gateway IP | The Default Gateway IP address for the WAN interface. |
| Public IP | (optional) The Public IP address of the WAN interface. |
**LAN Interface**
Click **LAN**, then provide the following information.
| Parameter | Description |
| ------------------ | -------------------------------------------------------------------------------------------------------------------------- |
| IP Assignment | The default is **Static** for static IP assignment. **DHCP** for dynamic IP address assignment is not supported. |
| VRRP | If you have Virtual Router Redundancy Protocol (VRRP) configured for the LAN router redundancy, set this switch to **On**. |
| Interface CIDR | The CIDR for the LAN interface. |
| VRRP Gateway IP | The Virtual IP (VIP) address, when VRRP is enabled. |
| Default Gateway IP | (optional) The Default Gateway IP for the LAN interface. |
| Interface Labels | (optional) A name to identify the LAN interface. |
**VLAN Interface**
Provide the following information for each VLAN sub-interface.
| Parameter | Description |
| ----------------------- | ------------------------------------------------------------------------------------------------ |
| Interface CIDR | The native VLAN interface IP address. This is the interface where the untagged packets are sent. |
| Default Gateway IP | The Default Gateway IP address for the native VLAN interface. |
| Interface Labels | (optional) A name to identify this native VLAN interface. |
| **VLAN Sub-Interfaces** | |
| VLAN Interface CIDR | The VLAN sub-interface IP address. |
| Default Gateway IP | The Default Gateway IP address for this VLAN sub-interface. |
VLAN configurations are added to the primary Edge Gateway. On the secondary
Edge Gateway, some fields are disabled and non-editable, the field value
appears when it is selected.
CoPilot creates the ISO file and downloads the file to your downloads folder.
Next, log in to your VMware ESXi or KVM host and upload the ISO or cloud-init
file to a datastore or storage device. Then, deploy the Edge Gateway VM instance
and attach the ISO or cloud-init image file to complete the Edge Gateway
creation and authentication with the Aviatrix Controller.
The ISO file expires after 24 hours. You cannot download it again and will
have to repeat the above steps. You must mount the ISO file to an Edge VM to
complete the Edge Gateway registration within the 24-hour timeframe.
See
[Deploying the Edge Gateway Virtual Machine Instance](#deploying-the-edge-gateway-virtual-machine-instance-and-attaching-the-ztp-iso).
## Deploying the Edge Gateway Virtual Machine Instance and Attaching the ZTP ISO
See:
* [Deploying the Edge Gateway Virtual Machine in VMware ESXi](#deploying-the-edge-gateway-virtual-machine-in-vmware-esxi)
* [Deploying the Edge Gateway Virtual Machine in KVM](#deploying-the-edge-gateway-virtual-machine-in-kvm)
### Deploying the Edge Gateway Virtual Machine in VMware ESXi
To deploy the Edge Gateway virtual machine, follow these steps.
1. If you have not downloaded the ESXi OVA file, download the file by using the
link provided to you by Aviatrix Support. See
Download the Aviatrix Secure Edge Image File
.
2. Log in to VMware vSphere Web client to access the ESXi host.
You can use vSphere Web client to manage ESXi host, launch a VM, mount ISO
files, and start and stop the Aviatrix Edge Gateway.
3. Load the OVA file into the ESXi using vSphere, go to **ESXi** > **Virtual
Machines** > **Create/Register VM**.
4. Select **Deploy a virtual machine from an OVF or OVA file** and click
**Next**.
5. Enter a name for the Aviatrix Secure Edge VM and drag the OVA file into the
blue pane, then click **Next**.
6. In the Select storage page, select the storage device where to create the VM
instance (the OVA is installed in this instance) and click **Next**.
7. In the Deployment options window, enter the **Network mappings** for WAN,
LAN, and MGMT network interfaces and select the **Deployment type**. (Refer
to the pull-down menu or see
Virtual Machine CPU and Memory Configurations
.)
If necessary, you can change the network interface mappings after deployment.
8. Click **Next**.
9. In the Ready to complete page, click **Finish**.
Next,
[attach the ISO file](#attaching-the-iso-file-to-the-edge-gateway-virtual-machine-in-vmware-esxi)
to Edge Gateway VM, which will auto-mount the media with the configuration file
to be provision the Edge Gateway.
#### Attaching the ISO File to the Edge Gateway Virtual Machine in VMware ESXi
The ZTP ISO file can only be used for a single Aviatrix Secure Edge VM
instance, and only one time for that instance.
The ZTP token expires after 24 hours. If you wait too long to boot up the VM
with the attached ISO image, it will not work. In that case, delete the Edge
Gateway in the Aviatrix CoPilot and create a new Edge Gateway to receive a new
ISO file.
1. Upload the ISO file downloaded from Aviatrix CoPilot to your VMware
datastore.
2. In vSphere, select the Aviatrix Secure Edge VM you created and click **Edit
settings**.
3. Select the **Virtual Hardware** tab.
4. Next to CD/DVD Drive 1, click the dropdown menu and select **Datastore ISO
file**.
5. Next to CD/DVD Drive 1, ensure the **Connect** box is checked and click
**Save**.
**Connect at power on** is required when you attach the ISO image to the VM
for the first time. If the VM is powered on at the time you attach the ISO
image, select the ISO file and save the configuration to make the ISO
available to ZTP.
6. Next to the CD/DVD Media, click **Browse**, locate the datastore and select
the ISO file you uploaded.
7. Click **Save**. ZTP auto-mounts the ISO file and deploys the Edge Gateway on
the VM.
Verify the Edge Gateway is Up (see
[Verifying the Edge Gateway Creation](https://legacy.docs.aviatrix.com/documentation/latest/network/edge-create-verify.html)).
Next,
[attach the Edge Gateway to the Transit Gateway](#attach-an-edge-spoke-gateway-to-a-transit-gateway).
### Deploying the Edge Gateway Virtual Machine in KVM
Aviatrix Edge Gateway can be deployed on KVM on Linux. There are numerous
user-space front-ends to KVM. The Edge Gateway VM does not depend on any
specific user-space tools, but you must understand how to configure your choice
of KVM tools. Refer to your management tool's documentation for details. If
these requirements are unclear, consider adopting
Aviatrix Edge Platform
instead, which manages this for you.
**Requirements for Edge Gateway on KVM:**
* The network must use `virtio` drivers. Emulated physical drivers do not
provide adequate performance.
* Multi-queue networking should be enabled, with the number of queues equal to
the number of CPUs.
* Storage must use `virtio` or `nvme`. Emulated physical drivers do not provide
adequate performance.
* At least 64 GB of disk space is required for production use cases. The images
support smaller deployments, but this is only appropriate for lab scenarios.
* The LAN, WAN, and MGMT network bridges must be associated with the physical
Ethernet interfaces on the KVM host. Refer to your KVM product documentation.
Even with `virtio` networking, self-managed Edge Gateway deployments on KVM
may run into CPU saturation under heavy load. For higher performance, consider
Aviatrix Edge Platform
, which uses interface passthrough to deliver bare-metal network speeds.
After you have configured your KVM environment to meet the requirements above,
deploy the Edge Gateway VM using your chosen KVM management tool:
1. Download the KVM QCOW2 image file using the link provided by Aviatrix
Support. See
Download the Aviatrix Secure Edge Image File
for the current per-image-generation disk, vCPU, and memory specifications
(these vary across image generations such as g3 and g4).
2. Create the Edge Gateway VM from the QCOW2 image, attaching the WAN, LAN, and
MGMT virtual bridge interfaces using the `virtio` device model.
3. Attach the ZTP ISO file you downloaded from Aviatrix CoPilot to the VM.
4. Start the VM. ZTP auto-mounts the ISO file and provisions the Edge Gateway.
Verify the Edge Gateway is Up (see
[Verifying the Edge Gateway Creation](https://legacy.docs.aviatrix.com/documentation/latest/network/edge-create-verify.html)).
Next,
[attach the Edge Gateway to the Transit Gateway](#attach-an-edge-spoke-gateway-to-a-transit-gateway).
## Attach an Edge Spoke Gateway to a Transit Gateway
To attach an Edge Spoke Gateway to a Transit Gateway, perform the prerequisites
then create the attachment.
### Prerequisites
Before you create the attachment:
* Ensure **Local ASN Number** is configured on Edge and Transit Gateway.
* If the Edge to Transit Gateway attachment is over public network, you need to
update the WAN Public IP on the Edge Gateway.
1. Go to **Cloud Fabric** > **Hybrid Cloud** > **Edge Gateways** tab.
2. Click **Spoke Gateways**.
3. Locate the Edge Gateway, and click its Edit icon on the right.
4. In **Edit Edge Gateway**, go to **Interface Configuration** and click
**WAN**.
5. In **Public IP**, click **Discover**.
6. Verify the WAN Public IP and click **Save**.
### Attach Edge Spoke Gateway to Transit Gateway
To create a High Performance Encryption attachment peering, make sure the
Transit Gateway is created with High Performance Encryption enabled.
If you want Jumbo Frame enabled for the attachment peering, make sure to
enable Jumbo Frame on the Edge Gateway before you attach it to the Transit
Gateway.
To create the attachment:
1. In Aviatrix CoPilot, go to **Cloud Fabric** > **Hybrid Cloud** > **Edge
Gateways** tab.
2. Click **Spoke Gateways**.
3. Locate the Edge Spoke Gateway, and click **Manage Gateway Attachments** icon
on the right side of the row.
4. In **Manage Gateway Attachments > Transit Gateway** tab, click
**+Attachment** and provide the following information.
| Field | Description |
| ---------------------------- | --------------------------------------------------------------------------------------------------------------------------------------------------------------------------------------------------------------------------------------------------------------------------------------------------------------------------------------------------------------------------------------------------- |
| Transit Gateway | The Transit Gateway in cloud to attach. |
| Local Edge Gateway Interface | The WAN interface of the local Edge Spoke Gateway to use for the attachment. |
| Attach Over | The connection between the Edge gateways. It can be over a **Private Network** or the **Public Network**. |
| ActiveMesh | ActiveMesh enables full mesh peering between the local and remote Edge gateways. For full mesh peering, set **ActiveMesh** toggle **On**. |
| Jumbo Frame | Jumbo Frame improves performance for the connection between the Edge gateways. Jumbo Frame is applicable when the attachment is over a Private network. To use Jumbo Frames for the connection , set **Jumbo Frame** toggle to **On**. |
| Number of HPE Tunnels | The number of High Performance Encryption (HPE) tunnels to create for the attachment peering. **Single** creates a single tunnel. **Maximum** creates the maximum tunnels based on the gateway sizes and the number of interface IPs on the peering gateway. This option is available only for connection over a Private network. **Custom** allows you to specify the number of tunnels to create. |
To attach the Edge Spoke Gateway to another Transit Gateway, click **+
Attachment** again and provide the required information.
You can attach an Edge Spoke Gateway to multiple Transit Gateways. Each
attachment can be configured with different parameters, such as connecting
interfaces, connection over private or public network, high-performance
encryption, and Jumbo Frame.
5. Click **Save**.
### Manage Gateway Attachments
You can attach an Edge Spoke Gateway to multiple Transit Gateways. Each
attachment can be configured with different parameters, such as connecting
interfaces, connection over private or public network, high-performance
encryption, and Jumbo Frame.
Click **+ Attachment** and provide the required information.
| Field | Description |
| ---------------------------- | ---------------------------------------------------------------------------- |
| Transit Gateway | The Transit Gateway in cloud to attach. |
| Local Edge Gateway Interface | The WAN interface of the local Edge Spoke Gateway to use for the attachment. |
**Advanced**
| Field | Description |
| --------------------- | --------------------------------------------------------------------------------------------------------------------------------------------------------------------------------------------------------------------------------------------------------------------------------------------------------------------------------------------------------------------------------------------------- |
| Attach Over | The connection between the Edge gateways. It can be over a **Private Network** or the **Public Network**. |
| ActiveMesh | ActiveMesh enables full mesh peering between the local and remote Edge gateways. For full mesh peering, set **ActiveMesh** toggle **On**. |
| Jumbo Frame | Jumbo Frame improves performance for the connection between the Edge gateways. Jumbo Frame is applicable when the attachment is over a Private network. To use Jumbo Frames for the connection , set **Jumbo Frame** toggle to **On**. |
| Number of HPE Tunnels | The number of High Performance Encryption (HPE) tunnels to create for the attachment peering. **Single** creates a single tunnel. **Maximum** creates the maximum tunnels based on the gateway sizes and the number of interface IPs on the peering gateway. This option is available only for connection over a Private network. **Custom** allows you to specify the number of tunnels to create. |
Next,
[connect the Edge Gateway to the external device](#connecting-edge-spoke-gateway-to-an-external-device-bgp-over-lan).
## Connecting Edge Spoke Gateway to an External Device (BGP over LAN)
For LAN-side connectivity, you can connect the Edge Spoke Gateway to an external
device, such as a LAN BGP router.
To connect the Edge Gateway to the LAN BGP router, follow these steps.
1. In CoPilot, navigate to **Networking > Connectivity** > **External
Connections (S2C)** tab.
2. From **+ External Connection To** dropdown menu, select **External Device**,
then provide the following information.
| Field | Description |
| ------------- | -------------------------------------------------------------------------------------------------------------------------------------------------------------------------- |
| Name | Name to identify the connection to the LAN router. |
| Connect Using | Select **BGP**. |
| Type | Select **LAN**. |
| Local Gateway | The Edge Gateway that you want to connect to the LAN router. |
| Local ASN | The Local AS number that the Edge Gateway will use to exchange routes with the LAN router. This is automatically populated if the Edge Gateway is assigned an ASN already. |
3. In **LAN Configuration**, provide the following information.
| Field | Description |
| ------------- | --------------------------------------------------------------------------------- |
| Remote ASN | The BGP AS number that is configured on the LAN router. |
| Remote LAN IP | The IP address of the LAN router. |
| Local LAN IP | This is automatically populated with the Edge Gateway's LAN interface IP address. |
4. Click **Save**.